Note: You can get all the codes below in this gists
If you are creating API, maybe you will want to increase the security or limit the access on who can invoke your API. One of the way is to use Amazon Cognito user pool as authoriser for the REST API.
By default, each serverless project will generates a new API gateway, however, we can share same API gateway between multiple project by referencing its REST API ID and Root Resource ID in serverless.yml!
In this example, we will define every services that we will create in difference configuration. This is because, as your application grows, you will likely need to break it out into multiple, smaller services.
Serverless project A
- API gateway
Serverless project B
- Amazon cognito user pool
- API Gateway Authoriser
Serverless project C
- Lambda function
You can also define service in serverless project A and B in one project. Up to you!. But like I've mention above, we want to share the same API gateway between multiple project by referencing its REST API ID and Root Resource ID in serverless.yml! I just utilise the intrinsic function in cloudformation so that we can learn more.
Let's get into it!
Serverless project A
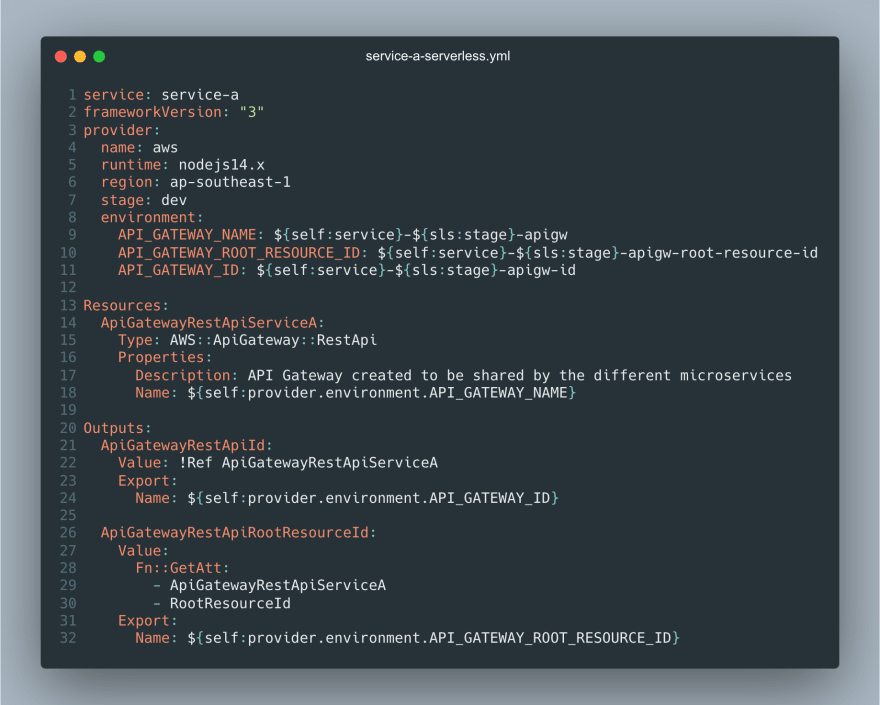
We define the service that we will create that is API gateway(line 14-18). We will also exports the root resource ID(line 26-32), and the ID of the API gateway(line 21-24) to be used later service B
Serverless project B
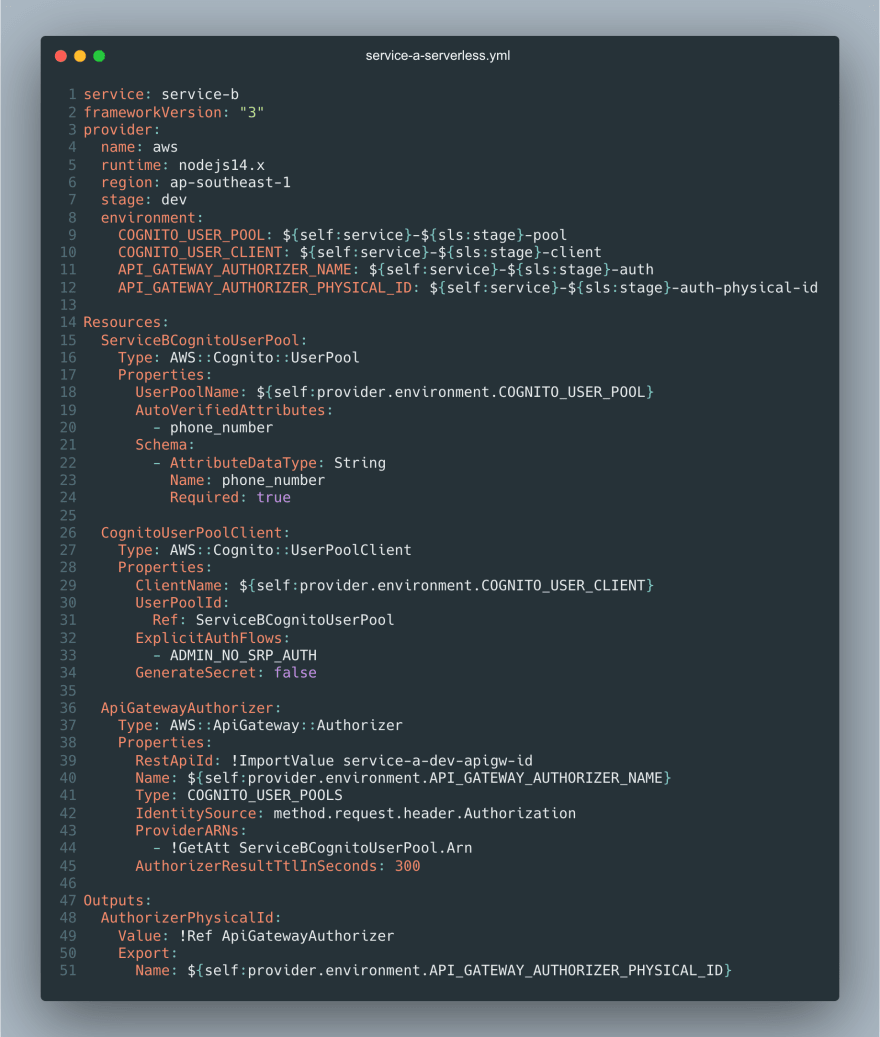
Now, in project B, you can see that we define the authoriser for API gateway in here (line 36-45). We use the properties for RestApiId: !ImportValue service-a-dev-apigw-id (line 39) that we export in service A. We also define the user pool (line 15-24) in this service.
The authoriser will used the user pool as the authentication when invoking the REST API. So, it's fine if you want to define your authoriser in service A instead. But don't forget to make sure to export the outputs of the physical ID. This physical ID later will be used by the lambda in service C.
Serverless project C
In this service, we will define our lambda function (line 14-36), use the API gateway endpoint that we have create in service A under provider apiGateway (line 8-10) and also use the authoriser (line 33-36) that we have define in service B to be used when invoking the endpoint.
You can see that we use !ImportValue restApiRootResourceId and restApiId (line 9-10) to import the value from service A outputs variable and also we define our environment AUTHORIZER_PHYSICAL_ID (line 12) that we export from outputs variable in service B
With this pattern, if you have other microservices and you want to use the same format of endpoint for example https://fqhbso3qa4.execute-api.ap-southeast-1.amazonaws.com/dev/hello, you can just define it like in service C like how I did it under provider apiGateway (line 8-10n) and it will use the same format https://fqhbso3qa4.execute-api.ap-southeast-1.amazonaws.com/dev/etc
Hope all of this make sense to you!
I just want to show you, how you can use the API gateway that is being define from another service and the authoriser also from another service to be used in different service!
As you know, serverless have a limit of 500 resource limit services that we can define and deploy in a project. So I hope, this solution can help you overcome that by splitting your applications into microservices.
Do ask and let me know in the comment below if you have any question! 😁
Note: You can get all the codes above in this gists
Thank you for reading :D
Psstt pstt :p
Do consider to love this article ❤️ and follow me! Why not right? It's FREE~
I would really appreciate it 👨🏻💻
Will be posting more on things related to AWS, Javascript, Python, Serverless and more!


Top comments (0)