
You have a project. But, its a monorepo. Along the way, you start to have many people onboard in the project. But, you want people to follow a certain standard when committing a message for the changes that they have make. You are thinking about the future. The clarity of what have been done. The maintenance effort and so on.
How to implement a standard commit message across your team? Well, one of the ways is by using git hooks, and Husky 🐶 can help you with that!
To read more about why and what’s the benefit of standardizing commit message? You can read it here.
Today, I’ll give you step by step, on how to setup husky on monorepo to standardize the commit message across your teams.
Let’s just say you have your folder structure like below, where you’re building for your Frontend project.

There's a multiple folder that you create for your admin website and public website. Or maybe you have project for mobile and another one is for desktop. Anything. As long as you have multiple projects in a repository.
Let's get started!

It's recommended to add husky in root package.json. But in this tutorial, we’ll just install husky in one of the folder in your repo and just use our existing package.json. It’s totally okay and fine.
Meaning, you will not have package.json and package-lock.json at your root folder.
- Go to any of your folder that you want Husky to be in. In this case, let’s take user-public folder as an example.
-
Install husky by running below command.
npm install husky
3. Update your `package.json` manually. You can update the `prepare` scripts in `package.json` according to your preferences. In this case, we change directory to the root folder (as husky install must be run in the same directory as `.git`) and put husky config inside the `user-public` folder. Or you can just let husky install in your root folder. Just your husky modules will be inside user-public folder.

     ```


     {
       "name": "user-public",
       "version": "1.0.0",
       "description": "Bla bla bla...",
       "main": "index.js",
       "keywords": [],
       "author": "Harith Zainudin",
       "scripts": {
         "prepare": "cd .. && husky install user-public/.husky"
       }
       "license": "ISC",
       "dependencies": {
            ...<all-your-dependencies-here>,
       }
     }
-
In our case, our
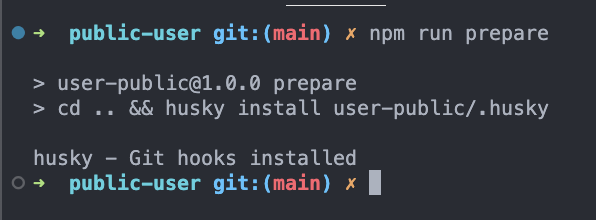
.gitis the same level with ouruser-publicandadmin-internal. Hence we will need to do some manual configuring on ourpackage.jsonby ourself before running the command. That is what we do in step 3, where we amend ourpackage.jsona bit to cater with our folder structure and point out to husky that we are using current folder to install husky. Incase you wondering and don’t understand where is your.gitfolder is and what it is, click here for explanation. Then, what you need to do, is just run the command below.npm run prepare
5. This is what you will get, once you have run the above command and you can see the `.husky` config folder under your `user-public` folder.
6. Before we add our Git Hooks, we need to add the “Scripts” that will check for your commit message. In this case, you can just get the template that I have make [here](https://gist.github.com/harithzainudin/a99b25c04d099e4f6c08c21927ef9319). It is in Javascript (Please don’t judge me hahah). You can make your own in bash or any language you like, but for me, I prefer and comfortable with Javascript, hence I use Javascript. The template might be not really complete or perfect, but hey, it get the jobs done for me! :p
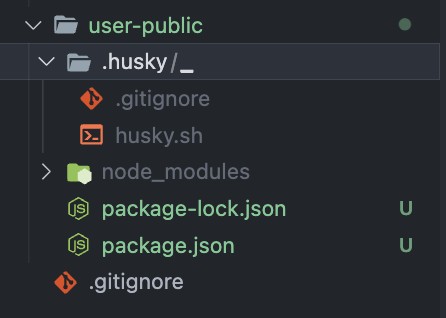
7. Once you have download/copy the template or make your own checking, put the template inside `.husky` config folder, and your folder will look something like this now.
8. Now we are ready to start adding our git hooks! Husky supports [all Git hooks](https://git-scm.com/docs/githooks). For us, because we want to standardize the commit message only, let’s use commit-msg hooks. Run below command to add the hooks. [Click here](#step-8-explanation) for explanation on command below.
```
# You can change to the git hooks that you prefer. But we will use commit-msg hooks as for now.
npx husky add .husky/commit-msg "cat user-public/.husky/commit-msg-linter.js | node --input-type=commonjs"
# Make sure you stage the changes for husky config, then your hooks will take effect.
git add .husky
-
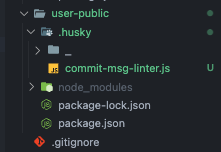
Once you run the above command, you will get the result below. Now, your
.huskyconfig folder will containcommit-msgfile. This file is automatically create by husky once you run the above command.

-
Once you start to commit your changes with your message, and if the commit is not according to your checking and validation, it will show something like this. Husky will prevent you from committing your commit.

You’re good to go now! That’s all you need :)
Of course, if you don’t like how’s the message looks like or you want different kind of checking, feel free to update or change the content inside commit-msg-linter.js. Like I was saying in step number 6, you can use whatever language that you comfortable with!
Hope you able to improve and standardize the commit message across your team! Goodluck and have fun with the commit message.
Stay hungry, stay foolish, and keep learning!
Thank you for reading :D
Psstt pstt :p
Do consider to love this article ❤️ and follow me! Why not right? It's FREE~
I would really appreciate it 👨🏻💻
Will be posting more on things related to AWS, JavaScript, Serverless and more!
EXTRA INFORMATION
Explanation for Command on step 8
-
npx husky add .husky/commit-msg: This part of the command tells Husky to add acommit-msghook to the.huskydirectory. Thecommit-msghook is used to enforce commit message conventions. -
cat commit-msg-linter.js | node --input-type=commonjs: This is the script that will be executed by thecommit-msghook. Let's break it down further:-
cat commit-msg-linter.js: This part uses thecatcommand to read the contents of thecommit-msg-linter.jsfile. It's assuming thatcommit-msg-linter.jscontains a script for linting or validating commit messages. -
|: This is a pipe symbol, which is used to redirect the output of the command on the left side of the pipe to the command on the right side. -
node --input-type=commonjs: This part of the command runs the Node.js interpreter with thecommit-msg-linter.jsscript as input. It specifies the--input-type=commonjsflag to indicate that the input script should be treated as CommonJS module syntax.
-
What is .git, how to know and where is it located?
The .git folder is a hidden folder that is created when you initialize a Git repository or clone a project from somewhere else. It contains all the necessary information for your project in version control, including the history of commits, remote repository address, and more. It will be in your root folder in your project.
Here is some key information about the .git folder:
- Purpose: The .git folder serves as the repository for your project, maintaining a history of the changes made to your codebase. It stores metadata and the object database for the project.
- Contents: Inside the .git folder, you will find various files and directories that are essential for Git to handle your code. These include the commit history log, object database, configuration files, hooks, and more.
- Visibility: The .git folder is hidden by default to prevent accidental deletion or modification. You can view it using the command
ls -ain the Git Bash terminal. To show hidden folder for VS Code, see here. - Importance: The .git folder is crucial for performing Git operations on your project. Without it, your project is considered a local project and not a Git project. Deleting the .git folder would remove all version control information and make it difficult to track changes and collaborate with others.
It's important to note that the .git folder should not be modified or deleted manually unless you have a good understanding of Git and its implications.

Top comments (2)
This's a great information for my team, thks!!! :)
Nicee! Glad that it able to help your team :D