TL;DR
What to expect from this two part tutorial?
- Realtime GraphQL APIs from Hasura
- Authentication with JWT and role based permissions
- React frontend; 100% functional components with hooks
- Typescript definitions auto-generated using GraphQL Code Generator
This is a two part tutorial. The first part will be about building the backend using Hasura GraphQL Engine. The second one will be about building the frontend using React Hooks and Typescript. This is about the backend. The frontend tutorial is coming soon. But the app's source code is available here.
Let's start building the backend by deploying Hasura.
Hasura is an open-source engine that gives you realtime GraphQL APIs on new or existing Postgres databases, with built-in support for stitching custom GraphQL APIs and triggering webhooks on database changes.
Deploy Hasura on Heroku
- Deploy Postgres and GraphQL Engine on Heroku
- Get the Heroku app URL (say
my-app.herokuapp.com) and open it to view the Hasura Console
Database Modelling
Let's take a look at the requirements for the basic version of WhatsApp where a user can initiate a chat with another user / group.
The core of whatsapp revolves around users. So lets create a table for users
Typically the users table will have an id (unique identifier), username and password for logging in and metadata like name, picture and created_at for whatsapp's use-case.
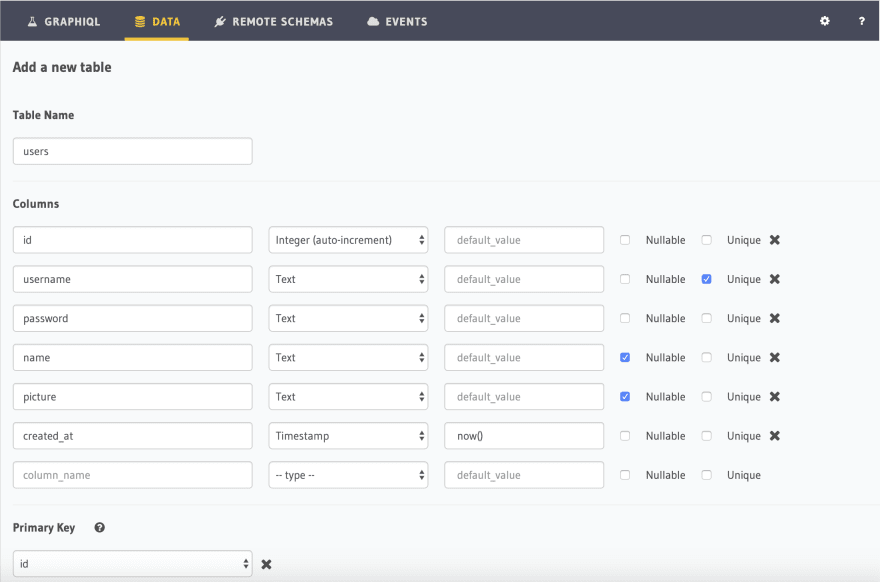
Head to the Hasura Console -> Data -> Create table and input the values for users table as follows:
Here we are ensuring that username is a unique column and we make use of postgres default for the timestamp column created_at. The primary key is id , an auto-incrementing integer. (you can also UUID).
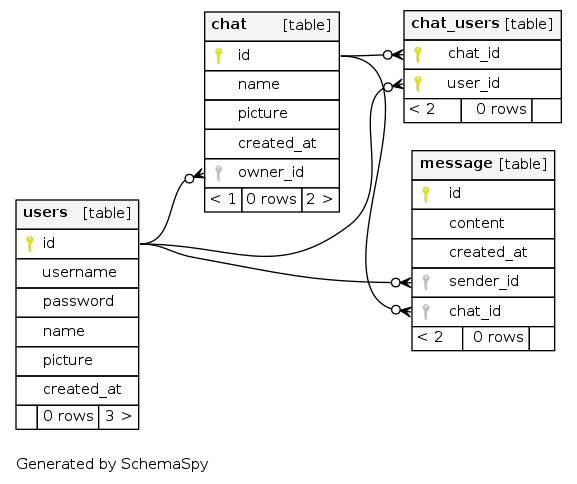
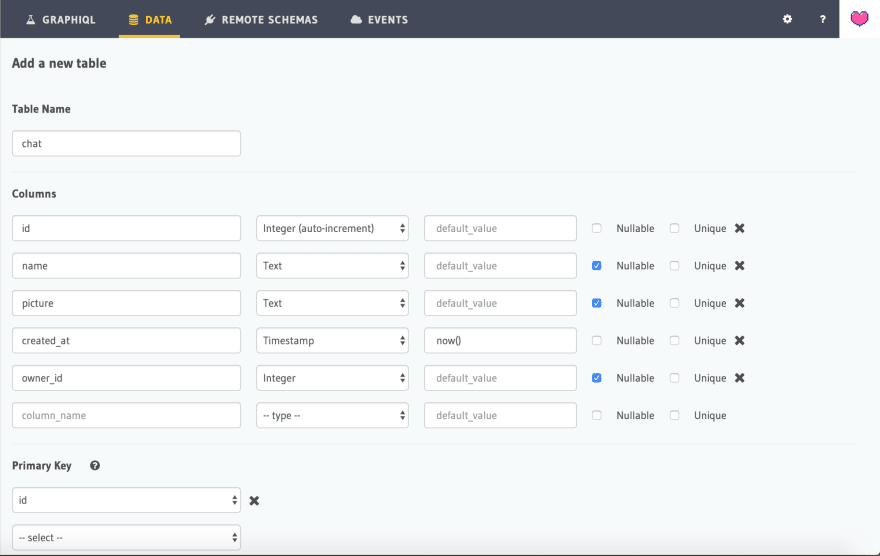
Now, the next important model for whatsapp is the chat table. Any conversation between 2 users or a group will be considered as a chat and this will be the parent table. The model for chat table will have the following columns id (unique identifier) , created_at and properties of a group chat name , picture and owner_id. Since the chat will not always be a group chat, the columns name, picture and owner_id are nullable.
The owner_id is a column which decides whether the chat is a private chat or a group chat.
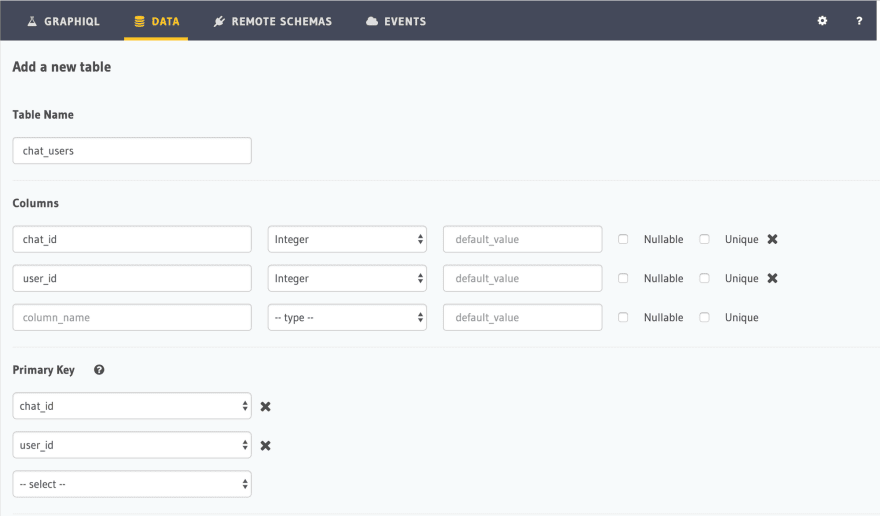
But irrespective of whether the chat is private or group, we need to map the users involved in each chat. Let's go ahead and create a new table chat_users which will have chat_id and user_id as the columns and both would form a composite primary key.
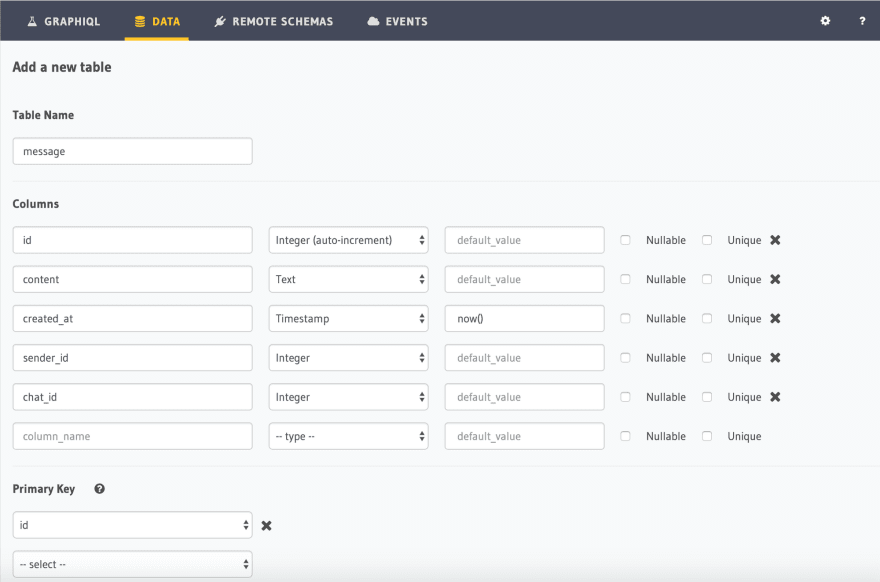
Now that we have users, chat and their mapping ready, let's finish the missing piece, message. The message table will have the following columns; id (unique identifier), content (message content), created_at, sender_id and chat_id.
The core database tables required for a simple WhatsApp clone is ready.
Relational modelling with constraints
We are using Postgres database underneath and hence we can leverage the relational features like constraints and relations.
Let's add foreign key constraints to all the relevant columns so that we can fetch related data in the same query.
Head to Data -> Chat -> Modify and create a foreign key constraint for the column owner_id which has to be a value of users->id
Now, lets create foreign key constraint for chat_users table for both columns chat_id and user_id
For example, chat_id column would have a constraint on chat table's id column. Similarly create a foreign key constraint for user_id column which will point to users table's id column.
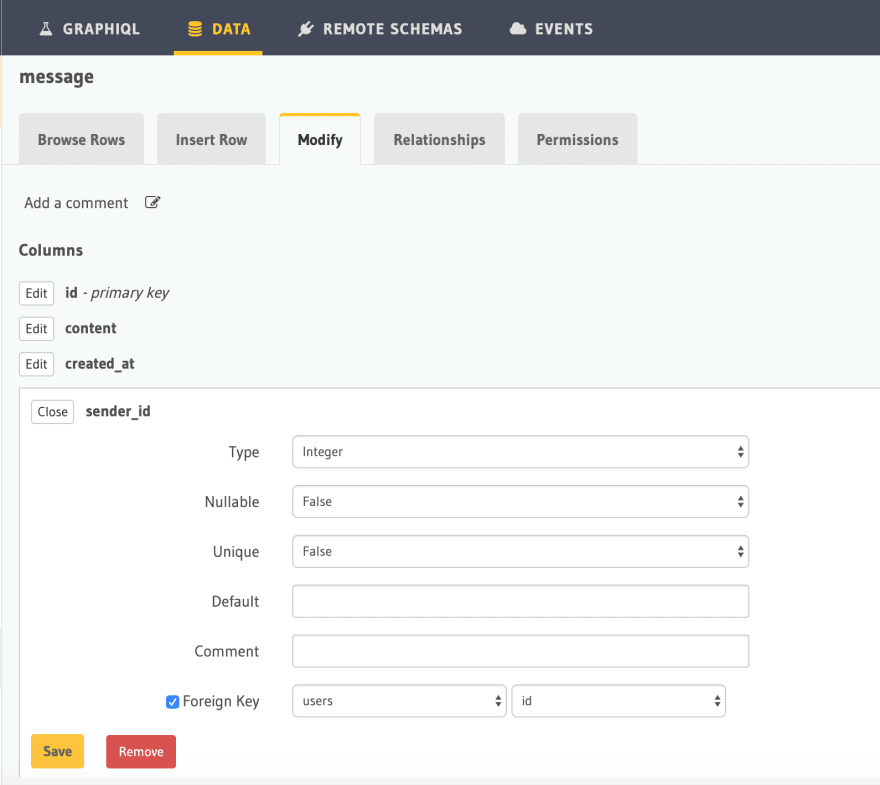
Let's move on to message table to create the last two foreign keys required.
sender_id :: users -> id
chat_id :: chat -> id
Great! Now we are done with creating the necessary constraints for all the tables.
Create relationships using console
We need to tell Hasura that relationships exist between two tables by explicitly creating them. Since we have foreign keys created, Hasura console will automatically suggest relationships available. For the foreign keys that we created just above, let's create corresponding relationships so that we can query related data via GraphQL.
We need to create relationships from chat to users as an object relationship. It is a one to one relationship.
Similarly we need to create array relationships from chat to chat_users and message tables. A chat can have multiple messages and can involve multiple users.
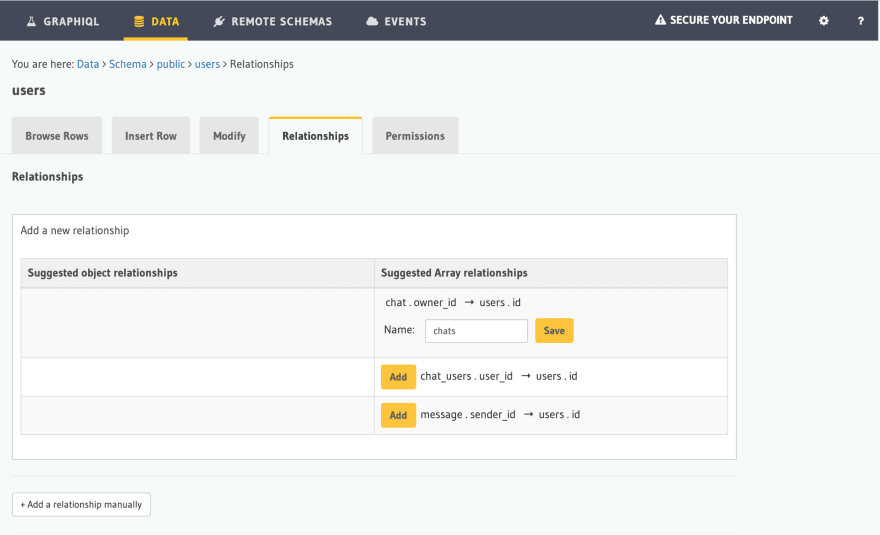
Using the suggested array relationships from the console, let's create the following chat_users.chat_id -> chat.id and message.chat_id -> chat.id
And in users table, we create the necessary array relationships for the following:
chat.owner_id -> users.id
chat_users.user_id -> users.id
message.sender_id -> users.id
Queries
Hasura gives instant GraphQL APIs over Postgres. For all the tables we created above, we have a ready to consume CRUD GraphQL API.
With the above data model, we should be able to query for all use cases to build a WhatsApp clone. Let's consider each of these use-cases and see what the GraphQL query looks like:
- List of all chats - In the landing page, we would like to see the list of chats along with the user information. The chat list should be sorted by the latest message received for each chat.
query ChatsListQuery($userId: Int!) {
    chat(order_by:[{messages_aggregate:{max:{created_at:desc}}}]) {
      id
      name
      picture
      owner_id
      users(where:{user_id:{_neq:$userId}}) {
        user {
          id
          username
          name
          picture
        }
      }

    }
}
We make use of relationship users to fetch relevant user information and filter by user who is already logged in and belongs to the same chat.
- List of all users/groups - We would like to also list down all the users or groups that the user belongs to, so that a conversation can be initiated.
query ExistingChatUsers($userId: Int){
    chat(where:{users:{user_id:{_eq:$userId}}, owner_id:{_is_null:true}}){
      id
      name
      owner_id
      users(order_by:[{user_id:desc}],where:{user_id:{_neq:$userId}}) {
        user_id
        user {
          ...user
        }
      }
    }
}
- List of messages in a chat - This query will give a list of messages for a given chat, along with sender information using a relationship.
query MessagesListQuery($chatId: Int!) {
    message(where:{chat_id: {_eq: $chatId}}) {
        id
        chat_id
        sender {
          id
          name
        }
        content
        created_at
    }
}
Mutations
Now that the queries are ready to fetch data, let's move on to Mutations to make modifications like insert, update or delete in the database.
-
Insert chat/group (nested mutation) - The first time a conversation occurs between two users, we need to make a mutation to create a record in
chatand create two records inchat_users. This can be done using Hasura GraphQL's nested mutations.
mutation NewChatScreenMutation($userId: Int!,$currentUserId: Int!) {
    insert_chat(objects: [{
      owner_id: null,
      users: {
        data: [
          {user_id: $userId},
          {user_id: $currentUserId}
        ]
      }
    }]) {
      affected_rows
    }
  }
-
Insert message - To insert a message, we can issue a simple mutation to
messagetable with the relevant variables.
mutation MessageBoxMutation($chatId: Int!, $content: String!, $sender_id: Int!) {
    insert_message(objects: [{chat_id: $chatId, content: $content, sender_id: $sender_id}]) {
      affected_rows
    }
}
-
Delete chat - To delete a chat, (either one-one or a group), we can issue a simple delete mutation. But to avoid dangling data, we would issue a delete to cascade all rows from
chat_usersandmessageas well apart fromchat.
mutation deleteChat($chatId: Int!) {
    delete_chat_users(where:{chat_id:{_eq: $chatId}}) {
      affected_rows
    }
    delete_message(where:{chat_id:{_eq: $chatId}}) {
      affected_rows
    }
    delete_chat(where:{id: {_eq: $chatId}}) {
      affected_rows
    }
}
Note: We could also create an on delete constraint in postgres which takes care of this automatically. But the above mutations are shown for demonstration.
- Update user profile - Finally, we need a mutation to update user's profile data like the name, profile picture etc.
mutation profileMutation($name: String, $picture: String, $userId: Int) {
    update_users(_set: {name: $name, picture: $picture}, where: {id: {_eq: $userId}}) {
      affected_rows
      returning {
        id
        name
        picture
        username
      }
    }
  }
Subscriptions
Now comes the exciting part! Realtime data. We need a way to notify the user when a new message has arrived. This can be done using GraphQL Subscriptions where the client watches for changes in data and the server pushes data to client whenever there is a change in data via websocket. We have two places where we need realtime data. One for new messages, and one for users who are registered.
- Subscribe to latest messages
subscription MessageAdded {
    message_user {
        id
        chat_id
        sender {
        id
        name
        }
        content
        created_at
    }
  }
- Subscribe to users
subscription UserUpdated {
    users(order_by:[{id:desc}]) {
      id
      username
      name
      picture
    }
}
Permissions and Auth
The Auth API for signup and login is provided by a simple JWT server. The source code for the server is available here.
Now coming to Authorization, Hasura allows you to define role based access control permissions model.
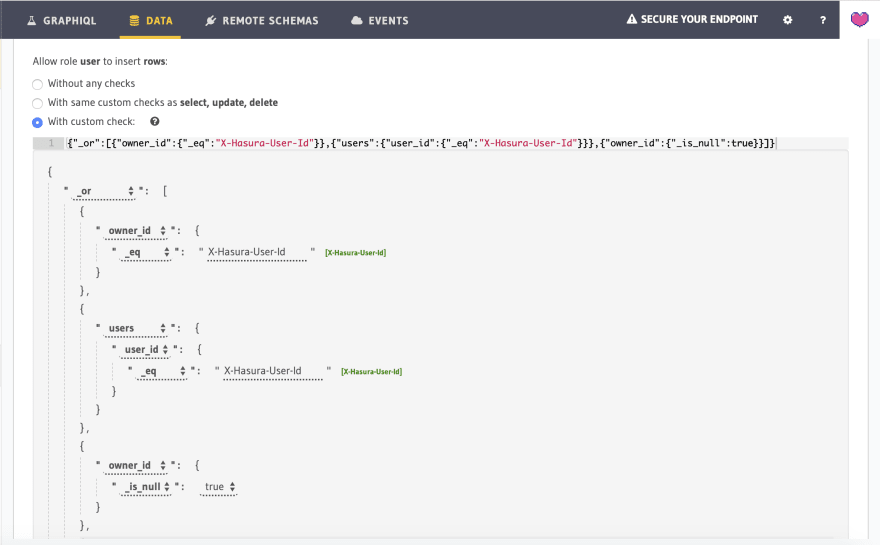
In our data model, there is one role for the app and its the user role. We need to define permissions for this role for the tables created above. To insert into chat, a user role needs to have the following permission - The user should be the owner of the chat or the user should belong to the chat that they are creating.
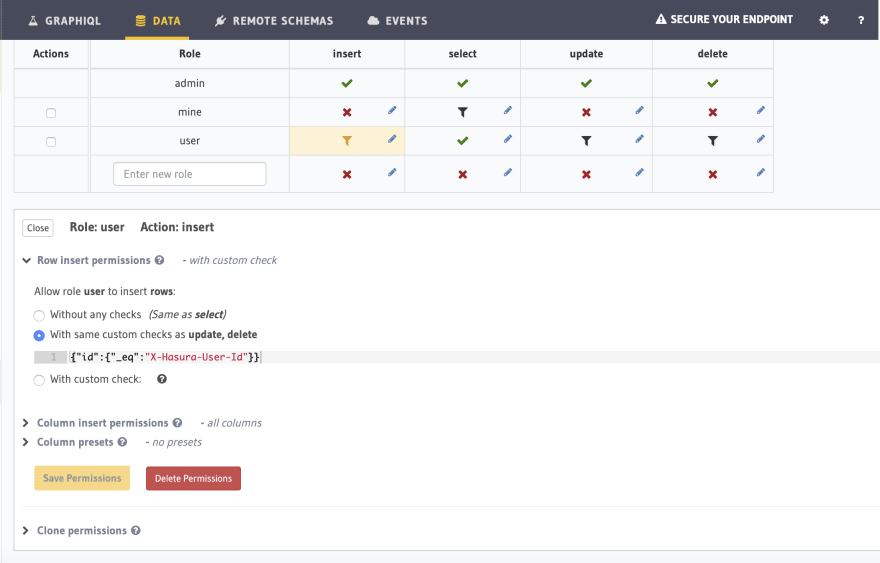
Similarly for users table, insert permission looks like the following:
We are substituting session variables to match the id of the user.
Similarly we can define permissions with the same condition for all operations.
Check out the metadata for the complete list of permissions.
What's Next?
The app data model currently doesn't have the following features: Typing indicator and read receipts. This can be introduced with minor updates to schema.
Now that the backend is ready, we can move forward with the integration of GraphQL APIs with the React Frontend with Hooks, Typescript and GraphQL Code Generator.
Watch out for this space for the second part of the tutorial involving the frontend!






Top comments (0)