
If you have been using social media or similar apps for any amount of time, you probably have noticed buttons in a lot of those like these by now:
Maybe you have used any sort of website that does analytics or posts things for you on those social media, either automatically or in some sort of special condition. You might also have seen that strange video with the exact amount of views in both the title and the view counter every single time you watch it. And all those things have something in common: they all use OAuth.
What's OAuth?
OAuth is usually referred to as an open standard for access delegation. That short definition could be described as a protocol, if you will, that allows a piece of software (such as an application or a console script) to access and/or modify a user's information or resources, thus acting on their behalf if needed, via an external API, usually from a social network, without requiring the user to input their password anywhere other than its official app or website. Besides, that website will usually make sure the user agrees with letting that accessing application use whatever it needs.
As described above, it's frequently used as an authentication method in websites that are external to those social media, so that the user doesn't have to fill in yet another form when applying for a job or getting started in a platform, as it simply asks the software that provides OAuth access to some user data to automate that process. Some of them, such as Medium, will go as far as to only provide that option for a user to either login or create an account, omitting the traditional login form completely.
However, that's only the tip of the iceberg, since OAuth is simply providing access to an API in the name of a user who explicitly allowed the app that consumes it to do so, and as long as it has the permission, it may not only access data but modify it at will. That may be used by an app to import files from your Drive, schedule posts externally, automatically create them from other sources, or even provide automatic services via a Facebook page or a Twitter account, much like bots in Telegram or Discord do, among other things.
How it works
If you're familiar with HTTP APIs, you'll be aware of the fact that as soon as you have the authorization, using any endpoints needed to do what you want is relatively easy: just prepare an HTTP request with the correct method and endpoint, making sure to place the access token where necessary (usually in the Authorization header), then execute it and analyze the response you get from it.
But, unlike traditional services, where you simply request an access token by providing a username or email along with a password, how do you get authorization to use an API via OAuth? Well, being a standard, any OAuth provider will make your app go through a specific flow to get the token, which can be resumed in:
Your app generates a unique link (at least, it should be) to the OAuth provider's login page
The user goes through it and they login in if they haven't already, then they're usually presented with the list of permissions your app needs.
If the user grants access (or has done it in the past, thus skipping the prompt), the provider redirects the user back to the app.
The app gets a single-use access code via that redirection if everything went well, which will be used by the app to ask the API for a proper access token, allowing it to act on the behalf of the user on that service.
The process in detail
The steps above describe how the flow works at a high level, but doesn't cover everything that's required to properly consume an OAuth provider. What's described here obviously applies to most OAuth providers you're going to find and the changes from one provider to the next will usually be very minor, often boiling down to certain parameters' length or whether some parameters are actually required or are just recommended.
The setup on the provider's side
Before you're able to use any part of an OAuth-authenticated API, you'll need to get a client ID and a secret from the provider. This usually means registering your application in the developer console or settings for your account, and once you generate those strings, the credentials section will look something like this:
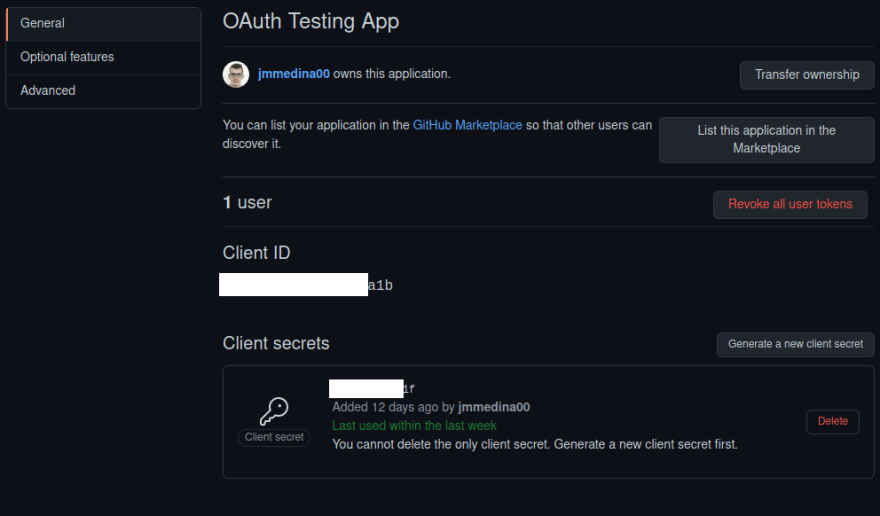
You may consider those as a username and password of sorts for applications that wish to act on the behalf of users. The client ID will always be used twice: to generate the URL and to request the access token once the temporary code is available reaches your application. The secret, as you may imagine, is used in that last step as a password or key to make sure that the token request is legitimate, and while the client ID may be leaked without much issue, the secret should be reset as soon as you're aware of its unauthorized use. That's the whole reason some developer consoles will force you to create a new one if you lose the previous one, although most of the time, you simply need to click a button if you want to see it again.
The way you do the registration process varies from one service to the next. Make sure to check out the documentation to learn how to properly do it.
Generating the link
Once you obtain the client ID and secret, you'll be able to generate a proper link to the authorization endpoint. It will carry the data it needs through the query parameters on the URL, and those parameters are:
client_id: the app's client ID obtained from the developer consoleredirect_uri: the app's URL the provider should redirect the user back to once the authentication and prompt, if any, are done. It will receive the single-use code necessary for obtaining the access token in most cases.response_type: if it's required, it should always be set tocode, since that's the flow that's been discussed above and thetokenflow, while apparently faster, is much more insecure, to the point it's going to be removed in OAuth 2.1.state: a string of your choice, normally used to mitigate CSRF attacks or, in other words, making it harder for attackers to tamper with your application via a user's interaction with another website. It'll be sent along with the temporary code back to the app, where it'll be verified. It's usually recommended, but some providers require a state to be present.scope: the list of scopes or permissions your app needs from the user to function, separated however the provider specifies it (some require spaces between scopes, others require colons). Make sure to only specify the scopes you need (for example, don't ask to modify repos if you only need to read user private information), not only because a user should distrust an app that asks a lot of permissions for basic stuff, but if an attacker gets the access token, they'll be able to cause much more damage than with a token with very limited write permissions.
These are the generic parameters you are guaranteed to need when going through an OAuth flow. There are others specific to a particular provider, so check their documentation if you intend to use them.
Requesting the token
Once the user has authorized the application back at the OAuth provider, they will be redirected to it on the specified redirect_uri. It will include the access code and the previously specified state if any. Once the state is verified, the next step is to ask for the access token.
This is done by sending a POST request to the API's endpoint responsible for this. Both the client ID and the secret are required to validate the request, usually as the body parameters client_id and client_secret, respectively, except for Reddit, which fetches the ID and secret as a username and password in the Authorization: Basic style, the same as the Apache server's password protection works.
The code is always passed as a body parameter and in most cases, two more parameters are required, which are grant_type (which is always set to "authorization_code") and redirect_uri, which should probably be set to the same value the authorization link had in its query.
The response to this request will contain the access_token among other information, which might be useful or not depending on the use case. Some providers also allow getting a refresh_token, either by setting a specific parameter or automatically, which may be used later to get a new access token, usually by doing the same process, only providing the refresh token rather than a temporary code.
Some sample code
Even though there are quite a lot of libraries that make this whole process easier, particularly when generating the links, I think it's a good practice to try to understand how things work at a lower level, then switch to higher-level libraries, much in the same way as learning a programming language, then learning a framework is recommended.
I decided to code a quick sample app in PHP and JavaScript, without using any frameworks, that showcases the most basic case use for OAuth with several providers: getting basic user data to identify them quickly. While it's not proper signup or login, it will hopefully make sense to anyone who takes a look at it.
 jmmedina00
/
sample-oauth-app
jmmedina00
/
sample-oauth-app
A demo app that can be logged into via other services. The purpose is to show the flow of OAuth in different web services.
Sample OAuth App
Web application developed by Juan Miguel Medina Prieto as a proof of concept of using OAuth for authentication purposes. Accesses the APIs of Google, GitHub, GitLab and Dropbox in order to get information from the user that grants permission to their respective OAuth app. Reddit is also showcased, though it can't really be used in the app's flow as it doesn't provide the user's email.
Running the application
-
Make sure you have Docker and Docker Compose installed.
-
Go to each service's development console and create an application or project (make sure to choose web app for Reddit and OAuth App for GitHub). Follow the required steps in order to get an OAuth client ID and secret, and only toggle the required scopes for each service:
-
Google:
https://www.googleapis.com/auth/userinfo.emailandhttps://www.googleapis.com/auth/userinfo.profile -
GitHub:
user:readanduser:email -
GitLab:
read_user -
Dropbox:
account_info.read -
Reddit:
identity
-
-
Clone this repository, either with
git cloneor…
Feel free to ask any questions or suggestions, I'll try my best to give a meaningful reply.

Top comments (0)