
Intro
If you read this blog before (or saw the YouTube videos) you're aware that it's heavy on the demos, so it's no surprise that I like to streamline as much as possible the process of setting things up.
Streamlining the setup of the development environment is in fact one of the main reasons I love to use Docker so much, as it allows me to create a Docker Compose file, describe the dependencies I want to use, be it a PostgreSQL database, some Redis for cache or maybe a RabbitMQ instance to play a bit with messaging.
Currently I'm preparing a presentation around the topic of event-driven systems, so to spice things up a bit, I thought about running things in Azure, instead of my usual local Docker approach. As I haven't really played much with Azure, it's an opportunity to learn a bit about it, while preparing the demos for the presentation.
When researching how to start preparing my demos, most of the content I came across uses the Azure portal to create and manage the resources. As you might be thinking, poking around a web UI doesn't really match my usual run a command and have things up approach.
This post, as well as an upcoming one, dive exactly into the subject of preparing things to have an easy way to setup a demo, using Azure Resource Manager (shortened to ARM) templates and GitHub actions.
To be clear, using ARM templates and infrastructure as code isn't really something new that I'm going to tell you about, it's just that it seems it's usually discussed in more dedicated contexts, not applied to preparing coding demos.
Disclaimer: before proceeding I feel it's important to clearly note that the samples don't necessarily follow the best cloud architecture practices, particularly in terms of security, as the focus of these posts is on setting up an environment for coding demos, not to be production ready.
What is the Azure Resource Manager and ARM templates?
Azure Resource Manager is the deployment and management service for Azure. It provides a management layer that enables us to create, update, and delete resources.
Azure Resource Manager templates, typically referred to as ARM templates, are JSON files in which we describe what services we want to use in Azure. We can think about it a bit like a Docker Compose file, but for Azure resources (and massively more verbose).
When we're poking around the Azure portal, checking a box here, clicking a dropdown there, even if we don't touch a single line of JSON, it's being used behind the scenes and stored by the Azure Resource Manager.
I won't go deep into all the advantages of using ARM templates (or an alternative infrastructure as code tool), as I think you'd be better served by reading the documentation, but in the context of preparing demos, I think you can start to imagine why I want to use something like this: I can create a file describing the Azure services I want to use, store it in source control next to the sample code and startup a demo environment with a couple of commands.
High-level structure
As mentioned before, an ARM template is a JSON file, but it follows a certain structure, so you can use it to guide you when trying to understand what's going on.
An empty template would look like this:
{
  "$schema": "https://schema.management.azure.com/schemas/2019-04-01/deploymentTemplate.json#",
  "contentVersion": "1.0.0.0",
  "parameters": {
  },
  "variables": {
  },
    "functions": {
    },
  "resources": [
  ],
  "outputs": {
  }
}
Note that not all of the shown template sections are mandatory, just put them in for us to see what's available.
Going through each of them:
-
parameters- where we declare parameters that can be provided when deploying the template to control it's behavior. A typical usage of parameters is to have a single template file, but then parameterize it with different values depending on the environment. -
variables- in here we can declare variables that we want to reuse in the template. The variables don't need to be constants, we can compose them from other variables, parameters or even values provided by functions. -
functions- when defining a template we can use predefined functions for a myriad of things (e.g. concatenate strings or get the resource group in which the template will be deployed). In thefunctionssection of the template we can also create our own functions that may help us simplify the template. -
resources- as the name suggests, in this section we declare and configure all the Azure resources we want to use. This is where all those parameters, variables and functions will prove useful, cause there's a lot going on here! -
outputs- as the deployment completes, there are values that we might want to get as an output, so we can use them elsewhere (e.g. a connection string from a created database). This is the section we can use to declare such values.
How to get started
So, how to start creating a template? I'll say one thing, you won't be typing it all manually! Well, you can, but it's a massive pain 😛. In fact, even without typing everything manually it's still a pain, but not as much 🙂.
Get the template from the portal
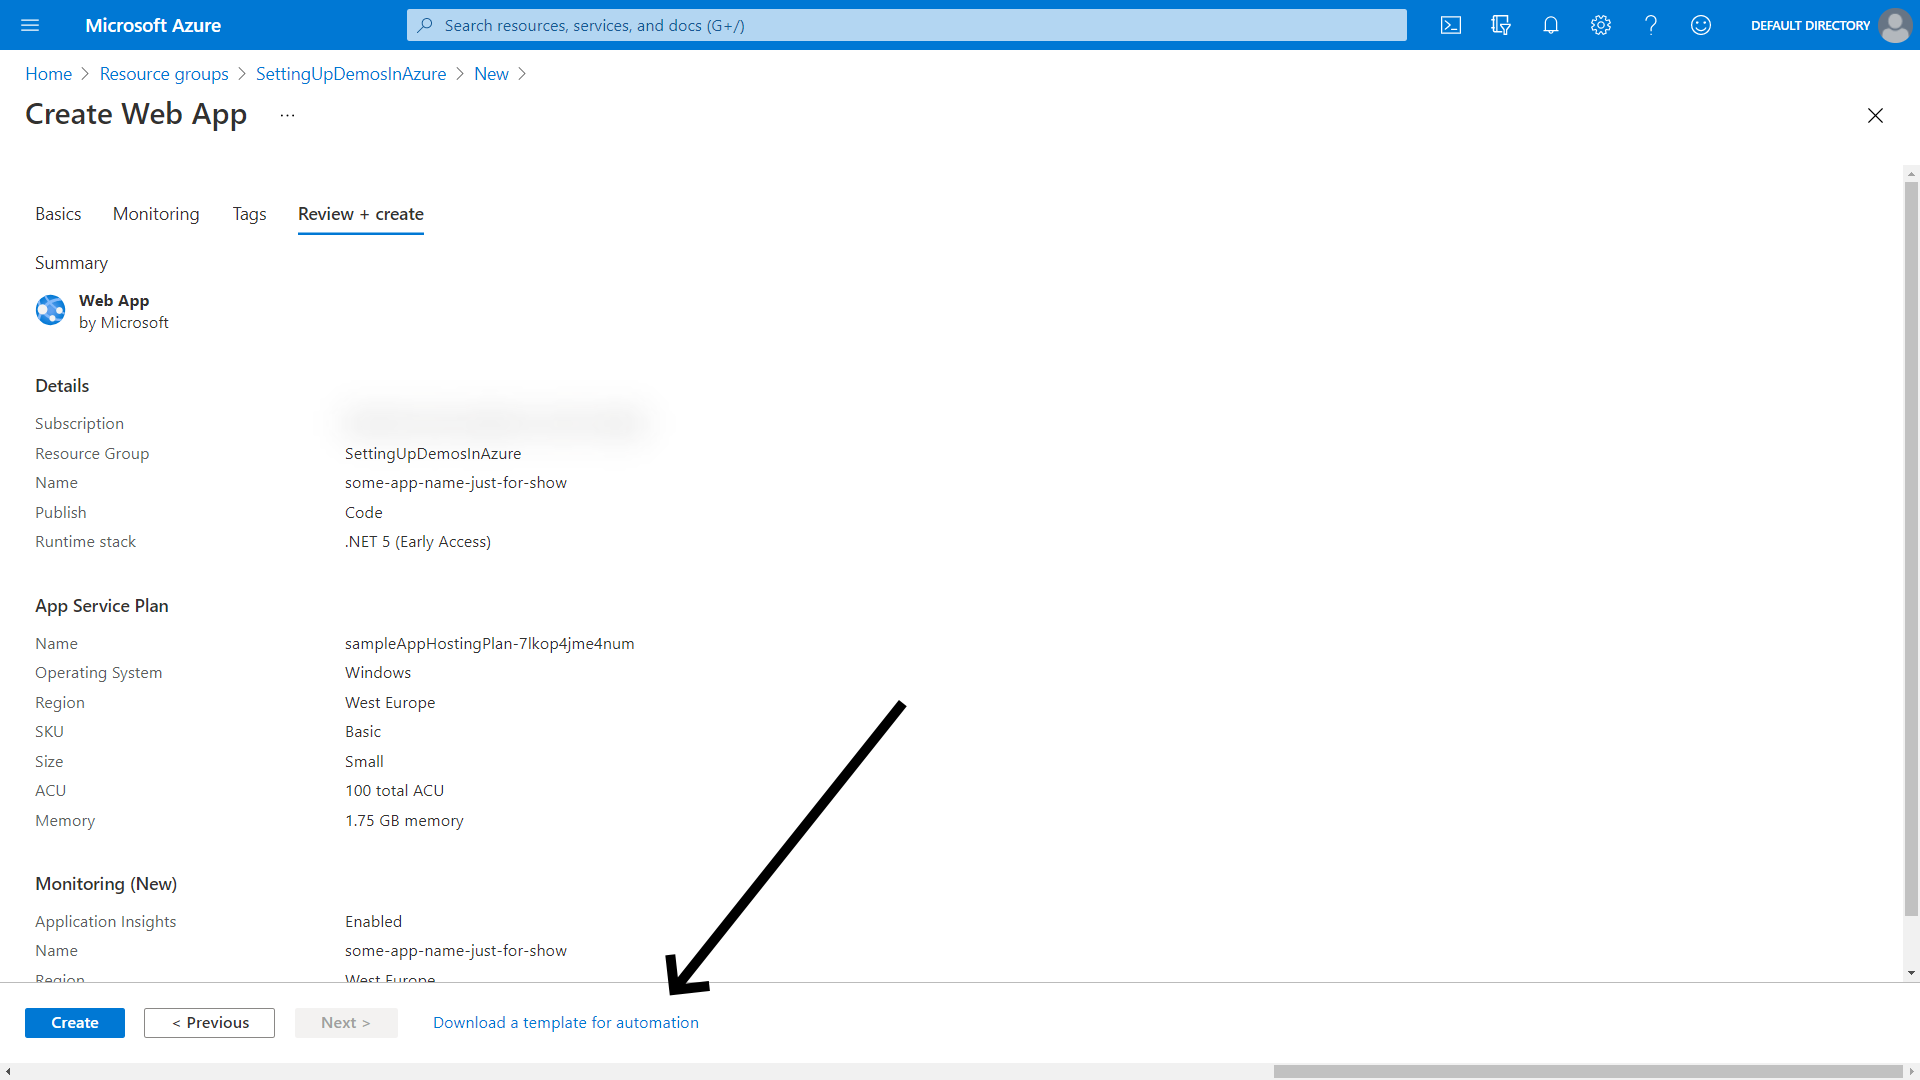
A possible way to do things is to use the portal, download the ARM template it provides while creating/managing the resources. You can get it just before creating a new resource, but even after it's created, there's a way to download the associated template.
In this screenshot, we're at the final step of creating a new web app through the portal. In this final page, at the bottom, we have the option to download the template.
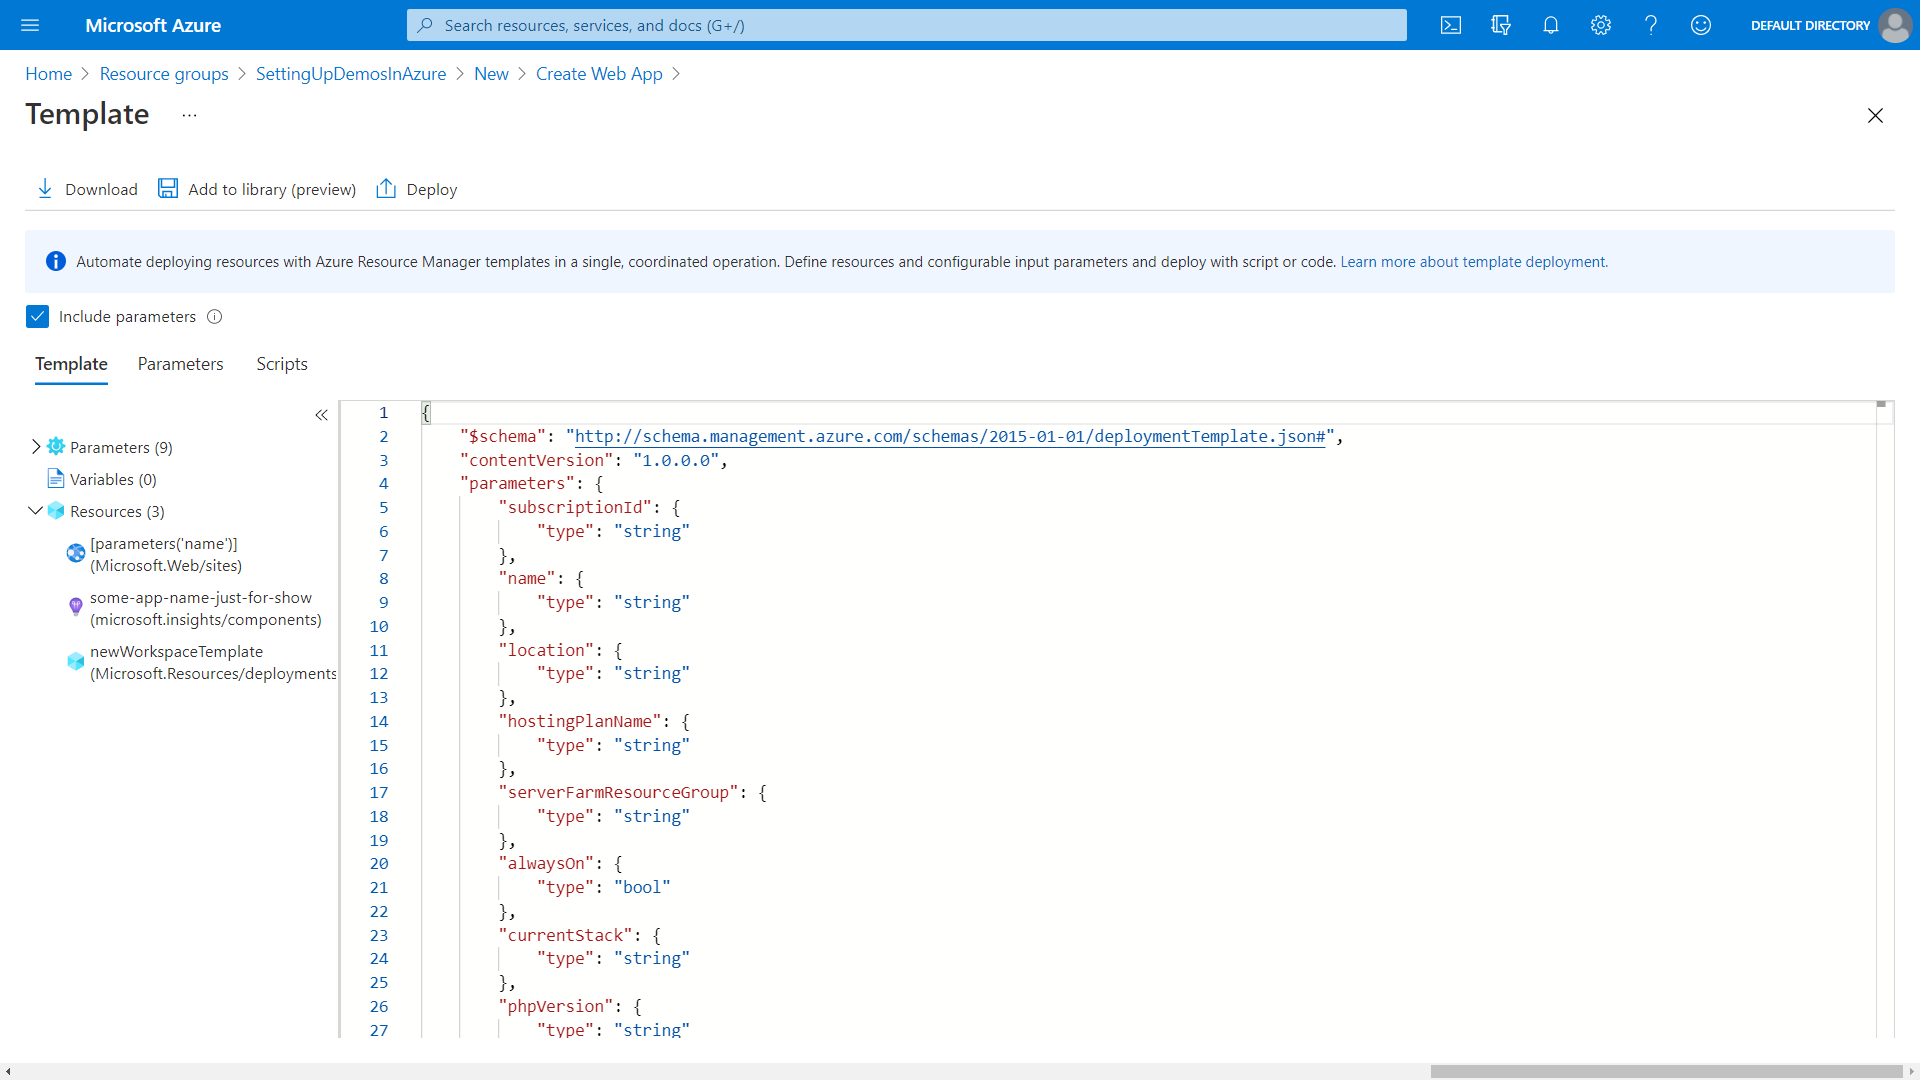
Clicking the download link takes us to this page where we can see the template and change some things before we download it.
If you have an existing resource, you can also find the option to download the associated template. Below is an example using an existing web app.

Find what you need in the Azure Quickstart Templates page
Another approach is to head to the Azure Quickstart Templates page (or associated GitHub repository) and try to find what you need in there.
It's not certain that it has what we need, but given the amount of templates in there, the odds are not too bad.
Mix and match
Coming as a surprise to probably no one, the approach I found that makes the most sense is... mix and match!
Depending on the needs, we might find a close enough template in the quickstarts repository, mix in a bit from another one, get something that's missing from the template generated by the portal, wrapping up by making some final tweaks manually.
For the unavoidable manual tweaks, if you use Visual Studio Code, the Azure Resource Manager (ARM) Tools extension is rather helpful, providing some syntax highlighting, warnings and errors, as well as some auto-completion capabilities.
What do I need for the presentation
The presentation I'm preparing is around the topic of event-driven systems, so I want to have some running services, databases for them to store stuff and event infrastructure for them to communicate.
For the services, I'm going with Azure App Service, as it's a simple way to host traditional ASP.NET Core applications. Azure Functions would also be a good option, particularly in the event-driven context, but I don't want to focus the presentation on that, so keeping it simple with good old ASP.NET Core apps.
For the database, I'm using Azure SQL, as SQL is very prevalent and how it fits in an event-driven system is pretty relevant. I'm still thinking if I should use Azure Cosmos DB as well. On one hand adding a NoSQL database into the mix is very interesting, but on the other, the presentation cannot last hours 😛.
For event infrastructure, we have a bunch of options, like Azure Service Bus, Azure Event Grid and Azure Event Hubs. Like the databases, they aren't mutually exclusive and I could use all, depending on the circumstance, but to keep things simple, I'll pick one and move on. Right now I'm more inclined towards Event Hubs, as it works similarly to Apache Kafka, which is a good fit for the presentation context.
Sample template
Right out of the gate, even if this section is called "sample template", I won't put it all here, as it's a big JSON file which won't be readable on the blog. I'll drop a couple of bits here, but to see the whole thing, better head to GitHub.
Parameters
In the parameters section, I'm putting some things I might want to tweak a bit.
"parameters": {
      "location": {
          "type": "string",
          "defaultValue": "[resourceGroup().location]",
          "metadata": {
              "description": "Location for all resources."
          }
      },
      "administratorLogin": {
          "type": "string",
          "defaultValue": "InsecureAdminLogin",
          "metadata": {
              "description": "The administrator username of the SQL logical server."
          }
      },
      "administratorLoginPassword": {
          "type": "securestring",
          "metadata": {
              "description": "The administrator password of the SQL logical server."
          }
      }
  },
First heads-up, related to users. When creating the Azure SQL server, I'm providing the administratorLogin and administratorLoginPassword, to be used as their name implies. In a well designed Azure deployment, we should probably use an AD account for this, but as I mentioned from the beginning, for demo purposes we can simplify.
Variables
In the variables section, I'm putting things that'll be used more than once in the template, but I'm not really interested in parameterizing.
"variables": {
    "appName": "[concat('sampleApp-', uniqueString(resourceGroup().id))]",
    "appCurrentStack": "dotnet",
    "sqlLogicalServerName": "[concat('sampleSqlLogicalServer-', uniqueString(resourceGroup().id))]",
    "sqlDBName": "SampleSqlDB",
    // ...
},
Probably the only added note that can be interesting here, is the usage of the uniqueString template function. Many of the resources we create need to have a unique name. An easy way to do that is using this function, which creates a deterministic hash string based on the given parameters (more info in the docs).
Resources
In the resources section comes, well, everything else. I'll drop here just a portion of the App Service configuration.
"resources":
[
    {
        "apiVersion": "2020-06-01",
        "name": "[variables('appName')]",
        "type": "Microsoft.Web/sites",
        "location": "[parameters('location')]",
        "dependsOn": [
            "[resourceId('Microsoft.Insights/components/', variables('appInsights'))]",
            "[resourceId('Microsoft.Web/serverfarms/', variables('appHostingPlanName'))]",
            "[resourceId('Microsoft.EventHub/namespaces/eventhubs/', variables('eventHubNamespaceName'), variables('eventHubName'))]",
            "[resourceId('Microsoft.DocumentDB/databaseAccounts', variables('cosmosDbAccountName'))]"
        ],
        "properties": {
            "siteConfig": {
                "connectionStrings": [
                    {
                        "name": "SqlConnectionString",
                        "type": "SQLAzure",
                        "connectionString": "[concat('Server=tcp:',
                        variables('sqlLogicalServerName'),
                        '.database.windows.net,1433;Initial Catalog=',
                        variables('sqlDBName'),
                        ';Persist Security Info=False;User ID=',
                        parameters('administratorLogin'),
                        ';Password=',
                        parameters('administratorLoginPassword'),
                        ';MultipleActiveResultSets=False;Encrypt=True;TrustServerCertificate=False;Connection Timeout=30;')]"
                    },
                    {
                        "name": "EventHubConnectionString",
                        "type": "Custom",
                        "connectionString": "[listKeys(variables('eventHubSendRuleId'), providers('Microsoft.EventHub', 'namespaces/eventHubs').apiVersions[0]).primaryConnectionString]"
                    },
                    {
                        "name": "CosmosDbConnectionString",
                        "type": "Custom",
                        "connectionString": "[listConnectionStrings(resourceId('Microsoft.DocumentDB/databaseAccounts', variables('cosmosDbAccountName')), providers('Microsoft.DocumentDB', 'databaseAccounts').apiVersions[0]).connectionStrings[0].connectionString]"
                    }
                ],
                "appSettings": [
                                        {
                          "name": "APPINSIGHTS_INSTRUMENTATIONKEY",
                          "value": "[reference(resourceId('microsoft.insights/components/', variables('appInsights')), '2018-05-01-preview').InstrumentationKey]"
                      },
                      // ...
                ],
                "metadata": [
                    {
                        "name": "CURRENT_STACK",
                        "value": "[variables('appCurrentStack')]"
                    }
                ],
                "netFrameworkVersion": "[variables('appNetFrameworkVersion')]",
                "alwaysOn": false
            },
            "serverFarmId": "[resourceId('Microsoft.Web/serverfarms', variables('appHostingPlanName'))]"
        }
    },
]
Let's go through some interesting bits.
For starters, you'll notice the usage of parameters and variables across the resource definition.
In the dependsOn property we indicate all the services in which the App Service depends. We should avoid as much as possible to have this, as it makes it impossible to parallelize resource creation, but if we really need to follow a certain sequence, this is the way. In this case, as we're depending on the creation of the databases and event hubs to get their connection string, we need to use it. It could probably be avoided by using an alternative way to authenticate, like AD users.
This brings us to another heads up topic, the connection strings I'm providing to the application. For instance, the SQL connection string is using the administrator credentials, which is far from ideal. Again, my excuse is, good enough for demos 🙃.
Another interesting thing to point out is the appSettings property. If you work with ASP.NET Core, you're probably aware of the way configurations work, being composable from multiple sources. In this case, what we pass here will end up as environment variables read by the application. Same applies to the connection strings we provide in the connectionStrings property.
Deploying the template with Azure CLI
Ok, so we have an ARM template, how do we deploy it?
There are multiple ways (Portal, CLI, PowerShell, ...) but for my tests I went with the Azure CLI.
After installing it, we can interact with it by typing az in the command line. First thing we need to do to start working with it is to login, using az login.
After we're logged in, we can start creating stuff!
To deploy the developed template, we need to create a resource group, where our resources will live. We can also create an ARM template for this, but a single line on the CLI easily does the trick:
az group create --name SettingUpDemosInAzure --location westeurope
Then, to create the resources, we provide the ARM template:
az deployment group create --resource-group SettingUpDemosInAzure --name SampleResources --template-file all-the-things.json --parameters administratorLoginPassword="SomePassword!"
Let's briefly go through the parameters we're passing to az deployment group create.
-
--resource-groupindicates the resource group where the resources should be created. -
--nameis the name of the deployment. It's important to identify the deployment, so if we apply the template (or iterations of it) multiple times, the resource manager knows it should apply to the same one, and not deploy something new. -
--template-fileis where we pass the ARM template file. -
--parameterslet's us specify values for the parameters we use inside the template file. In this example we're passing in the admin password for Azure SQL. We can also pass parameters using parameter files, which can be particularly useful if we want to have multiple parameter files, one per environment for example.
In the end, when we want to tear everything down, we can just delete the resource group:
az group delete --name SettingUpDemosInAzure
If we want to delete all resources but keep the group, we can use an empty ARM template and deploy it in complete mode, which unlike the default incremental mode, deletes resources that are not referenced in the template.
It would look something like this:
az deployment group create --mode Complete --resource-group SettingUpDemosInAzure --name SampleResources --template-file empty.json
Some alternatives to ARM templates
Before wrapping up, it's probably worth taking a quick look at possible alternatives to ARM templates.
Scripting
The first two options that come to mind are Azure CLI and Azure PowerShell. Both allow to create resources using commands, so we could write a shell or PowerShell script to automate things.
While it's possible to do everything with scripts, not really sure it's the best idea.
ARM templates and other alternatives follow a declarative approach, where we define what we want, but then it's up to the thing that uses them to check if things are in place, deploy what's needed, remove what's not, adjust as required, all automatically, based on the current configuration and the one being applied.
Using scripts falls more on the imperative side, where we tell which things to do. This means that to achieve the same iterative approach, we'd need to do it manually (e.g. does this thing exist? delete it, create this new thing, ...), which is much less appealing.
Declarative
Established that it's probably better to go with a declarative approach, what can we use besides ARM templates?
- Project Bicep
- Terraform
- Pulumi
- A bunch more, this isn't supposed to be an exhaustive list
Project Bicep is developed by Microsoft as a DSL (domain specific language) for deployment of Azure resources. Bicep code is transpiled to the standard JSON files we saw earlier. I thought about going with Bicep, but when I started looking at things it was still experimental, and as I just want to prepare some resources, drop them in a repo and move on, decided against it.
Terraform is pretty well known in the infrastructure as code space, supporting not only multiple cloud providers, but also Kubernetes. It uses a specialized programming language called Hashicorp Configuration Language (HCL).
Finally there's Pulumi, which is also cloud provider agnostic (and also supports Kubernetes). Unlike Terraform, Pulumi provides SDKs for multiple programming languages, so we can use C# to define our infrastructure, just like we used it to define the build using Nuke. Next time I need to setup something like this, I'll probably try Pulumi out.
Outro
There's much more to ARM templates than what I described in this post, but I hope is a good enough intro to the topic and motivates you to look further into infrastructure as code.
In summary, we looked at:
- Why use ARM templates or other infrastructure as code tools
- Overview of ARM templates
- How to get started using them
- Some alternative infrastructure as code tools
Along with the ARM stuff, you'll also find a simple example application in the GitHub repository, making use of all the resources created with the developed template.
Final reminder that the samples don't necessarily follow the best cloud architecture practices, particularly regarding security, as the focus of these posts is on setting up an environment for coding demos, not to be production ready.
Links in the post:
- What are ARM templates?
- ARM template documentation
- Infrastructure as code - Wikipedia
- Azure Quickstart Templates
- Azure Quickstart Templates - GitHub repository
- Azure Resource Manager (ARM) Tools extension for Visual Studio Code
- Azure App Service
- Azure Functions
- Azure SQL Database
- Azure Cosmos DB
- Azure Service Bus
- Azure Event Grid
- Azure Event Hubs
- Apache Kafka
- String functions for ARM templates
- Create Resource Manager parameter file
- Azure CLI
- Azure PowerShell
- Project Bicep
- Terraform
- Pulumi
The source code for this post is in the SettingUpDemosInAzure repository.
Thanks for stopping by, cyaz!

Top comments (0)