This tutorial will explain how to build Gitlab service in Docker mode relying on Tencent Cloud Host (CVM).
0. Introduction to Gitlab
Gitlab (https://gitlab.com) is a complete set of DevOps tools, through which developers can easily manage projects, source code management, continuous integration/deployment, development document maintenance and even security monitoring, and these important tasks Covers the entire development cycle of the software.
Gitlab's code submission mode is fully compatible with Git, and the cooperation mode is similar to Github. Merge Request in Gitlab can be roughly analogous to Github's Pull Request. This makes it easy for developers to get started with almost no concept learning cost.
When do we need Gitlab (or a similar tool)? The answer is that the earlier the project, the better. The core functions of Gitlab are source code submission records and continuous integration, which are like "ledgers" and "rulers" for software projects, and their importance is self-evident. For developers, it is convenient to carry out distributed collaboration, such as branch feature development, etc., thereby improving efficiency, confidence, and sense of achievement; for project managers, it is easy to analyze and track problems, measure progress, and plan target features.
Git provides a complete set of software, which is essentially a Ruby on Rails WebApp (some background components are now implemented in Go). In the early days, its installation was relatively cumbersome, because it had many components, such as servers, databases, message queues, log management, etc. Although it was easy to use, it had a slight threshold. With the popularization of Docker technology, now we can easily install, configure and deploy through its official image. Next, we will build Gitlab service from scratch on Tencent Cloud Server CVM , let's get started~
1. Preparations
Before starting to install Gitlab, we need to prepare some initial environments, mainly including: cloud server + domain name + certificate + Nginx server installation.
Cloud server: Gitlab's official recommendation is not less than 4GB of memory, here we choose S4.MEDIUM4 of Tencent cloud server (standard S4, 2 cores 4GB).
Operating system: CentOS-7.5 is selected here, other systems such as Ubuntu are also no problem at all, and the operation is similar.
Domain name: It can be purchased from any domain name provider (such as Tencent Cloud Domain Name ). The following is an example of master-cvm.yangyang.cloud.
Then we have the web server and SSL certificate installed, which can be easily verified through the Nginx test page similar to the following.
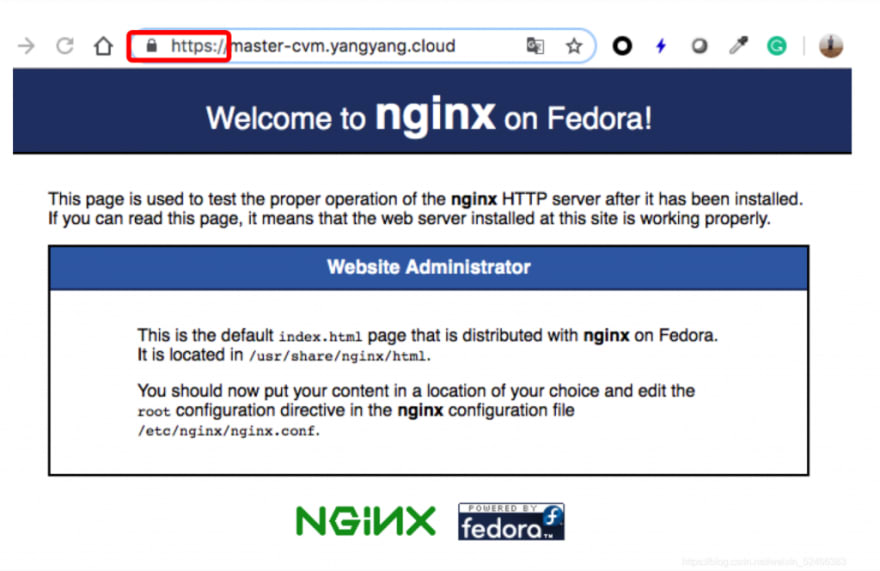
For SSL certificate application and advanced Nginx installation, please refer to the previous article: Play with CVM: Web Service Construction .
2. Docker installation
As a platform for container management, Docker has been widely used in service deployment and other fields. Container is a lightweight virtualization solution, relying on OS-level virtualization technologies such as overlayfs, namespace under Linux, and cgroups, and its performance is more prominent than VM-based virtualization. But more importantly, it is more convenient to install and configure software through Docker, so we need to simply install Docker first.
Here we take the example of installing the latest docker-ce version. If the ee version is installed, it is similar. Refer to the official documentation here: https://docs.docker.com/install/linux/docker-ce/centos/
Install dependencies and set up repository sources
yum install -y yum-utils device-mapper-persistent-data lvm2
yum-config-manager \
    --add-repo \
    https://download.docker.com/linux/centos/docker-ce.repo
Install docker-ce
In our environment, it takes about 1 minute, and Tencent Cloud's network generally feels pretty good.
# The latest stable version
yum install docker-ce docker-ce-cli containerd.io
# Or the specified version, such as:
# yum install docker-ce-18.09.6 docker-ce-cli-18.09.6 containerd.io
The version installed in this article is: docker-ce-18.09.6 (the latest).
start the docker service
systemctl start docker
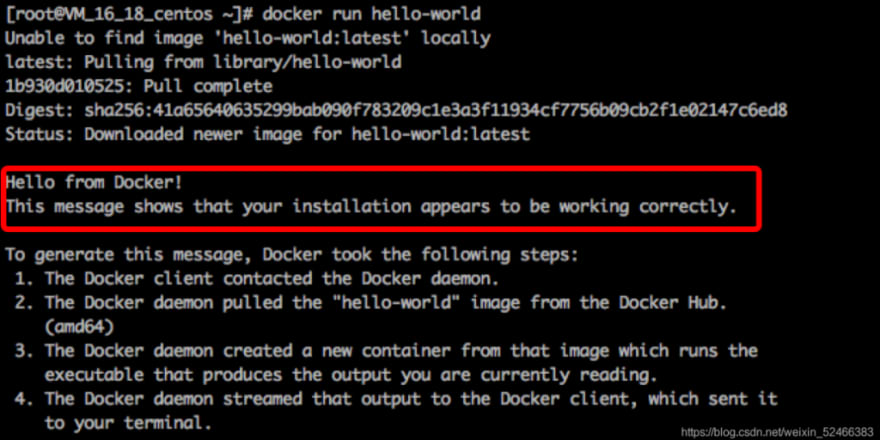
Docker service verification
Start the hello-world container for simple verification.
docker run hello-world docker run hello-world docker run hello-world docker run hello-world
Indeed, the installation of Docker is becoming more and more convenient.
3. Install Gitlab
Official documentation: https://docs.gitlab.com/omnibus/docker/
Download the docker image of gitlab to the local
It takes about 2.5 minutes on Tencent Cloud.
# The latest stable version
docker pull gitlab/gitlab-ce
# or the specified version, such as:
docker pull gitlab/gitlab-ce:11.11.2-ce.0
The version installed in this article is: gitlab-ce:11.11.2-ce.0 (the latest).
Start the gitlab container
docker run --detach \
  --hostname master-cvm.yangyang.cloud \
  --env GITLAB_OMNIBUS_CONFIG="external_url 'https://master-cvm.yangyang.cloud/gitlab'; gitlab_rails['gitlab_shell_ssh_port'] = 55522;" \
  --publish 127.0.0.1:55523:443 --publish 55522:22 \
  --name gitlab    \
  --restart always \
  --volume /data/gitlab/config:/etc/gitlab   \
  --volume /data/gitlab/logs:/var/log/gitlab \
  --volume /data/gitlab/data:/var/opt/gitlab \
  gitlab/gitlab-ce:latest
The meaning of each parameter:
- detach: let the container run in the background;
- always: always restart after failure;
- env: pass environment variables, pay special attention here, the external_url value passed should be consistent with the domain name and routing under Nginx;
- publish: port forwarding –pubish 55522:22 will forward port 22 of the container to port 55522 of the cloud server;
- volume: The volume mount directory of the custom container, Gitlab needs three: configuration config, log logs and data data;
After the container is started, we can docker ps view the container status through the command, as shown in the figure:
![]()
It can be seen that our gitlab container is running normally.
In addition, you can also use docker logs to view the startup log of the container to troubleshoot potential errors.
docker logs -f --tail 50 gitlab
Nginx settings
Note that the configuration of the path (location) and port number (proxy_pass) should match the docker run command above.
server {
    listen 80;
    server_name master-cvm.yangyang.cloud;

    return 301 https://$host$request_uri;
}

server {
    listen 443 http2 ssl;
    listen [::]:443 http2 ssl;

    server_name master-cvm.yangyang.cloud;

    ssl on;
    ssl_certificate /etc/letsencrypt/live/master-cvm.yangyang.cloud/fullchain.pem;
    ssl_certificate_key /etc/letsencrypt/live/master-cvm.yangyang.cloud/privkey.pem;
    ssl_session_timeout 5m;
    ssl_protocols TLSv1 TLSv1.1 TLSv1.2;
    ssl_ciphers ECDHE-RSA-AES128-GCM-SHA256:HIGH:!aNULL:!MD5:!RC4:!DHE;
    ssl_prefer_server_ciphers on;

    location /gitlab/ {
        proxy_set_header Upgrade $http_upgrade;
        proxy_set_header Connection "upgrade";
        proxy_set_header Host $host;
        proxy_set_header X-Real-IP $remote_addr;
        proxy_set_header X-Forwarded-For $proxy_add_x_forwarded_for;
        proxy_set_header X-Forwarded-Proto $scheme;
        proxy_http_version 1.1;
        proxy_pass https://127.0.0.1:55523;
    }

    location / {
        root    /usr/share/nginx/html;
    }
}
reboot
systemctl restart nginx.service
Try accessing it from a browser~ For example: https://master-cvm.yangyang.cloud/gitlab/
At this time, the interface to reset the root password will appear, and the installation is successful.
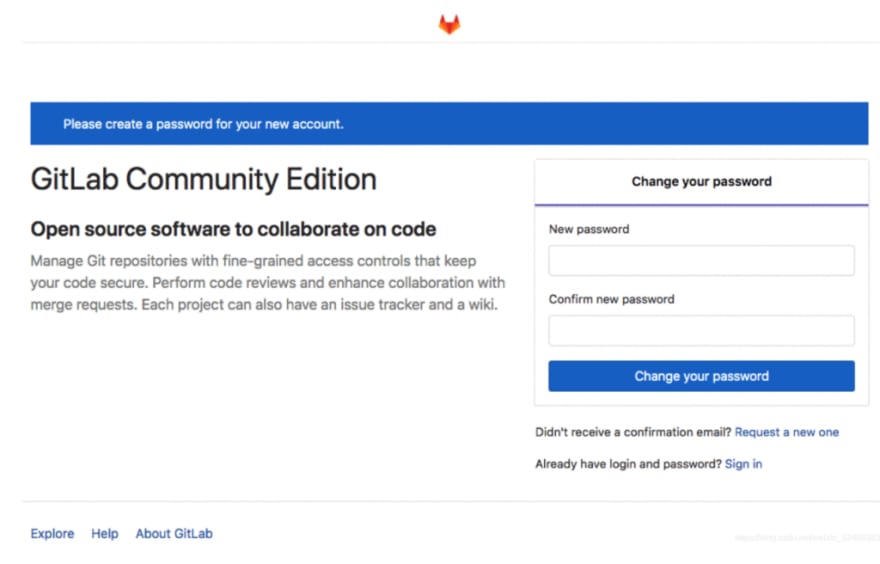
4. Initialization and installation verification
After Gitlab is installed, we can use it on the web side. The first is to set the root password. Note that only the root user can access the administrator panel and view many global configurations such as users and projects.
create user
After setting the root password, you will be redirected to the login page. Although you can use root + the password you just set to log in directly, it is more recommended to register the first user and use this user for daily operations.
Upload the key of the user's local development machine
set sshkey
Consistent with Github, users need to upload the user's ssh key to push code through the ssh protocol. Execute the following command on development and copy it:
ssh-keygen
cat ~/.ssh/id_rsa.pub
User avatar in the upper right corner -> "Settings" -> "SSH Keys" in the left column to manage and add keys.

5. Common operations
Create projects, create users and group management
Create a project group (optional)
In Gitlab, the namespace that manages each project (Project) is a group (Group) and its nested subgroup (Subgroup), which can be simply understood as different "directories" where the project is located.
Gitlab creates a default project group with the same name for each user, so projects can be created directly.
Create project

Here is the familiar Github-like interface:
Because the key has been uploaded before, we can clone the project locally through SSH
git clone ssh://git@master-cvm.yangyang.cloud:55522/example-group/my-webapp.git
Note that the url here will contain the ssh port set by my door
It is also supported to select the https protocol when cloning the code, but it is not as convenient to use ssh to enter the user name and password.
6. CI and CI-Runner installation
Gitlab's support for CI (Continuous Integration/Deployment) is very mature. Personally think it is easier to understand and use than jenkins. The so-called continuous integration is to do pre-set tasks (such as code compilation and packaging, automated testing, release, etc.) on a specific machine at a specific point in time (such as code Merge). The program that executes the task is called Gitlab Runner, which executes the component of the task, and it does not necessarily run on the host where gitlab is located, as long as it can communicate with the network.
For the installation process, refer to the official documentation here: https://docs.gitlab.com/runner/install/linux-repository.html
The installation of Gitlab's CI-Runner is very simple and straightforward, and subsequent use (such as configuration tasks) can be started in just three steps.
Update repository source
curl -L https://packages.gitlab.com/install/repositories/runner/gitlab-runner/script.rpm.sh | bash
Install
yum install gitlab-runner
register
Why register? In fact, it is to let gitlab know which machines are running runner. The url and token of gitlab are required.
You can find it in the project's "Settings" -> "CI/CD" -> "Runners" and copy it, as shown in the figure

We can register directly with the gitlab-runner register command.
The type of executor is selected according to the needs, and the shell is more commonly used.

Later, you can set specific CI tasks in .gitlab-ci.yml under the project, and view the execution results of the tasks on the Pipeline page of Gitlab-CI.
7. bonus: git/gitlab based development process
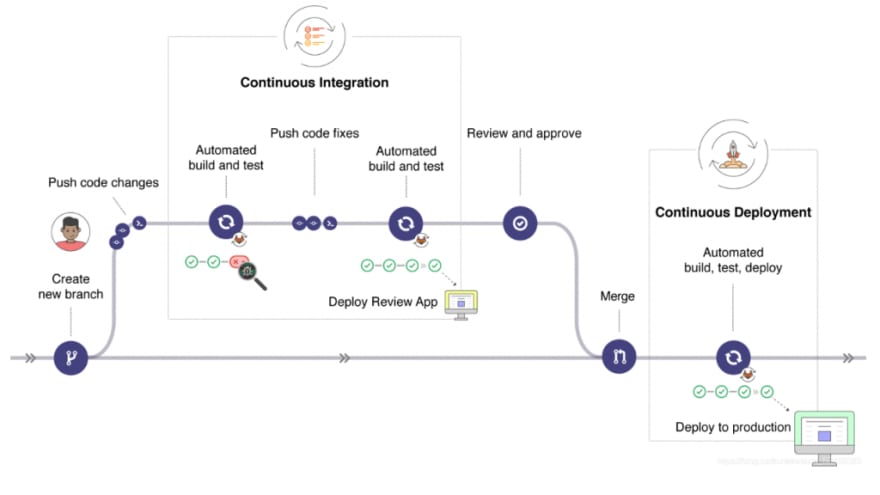
The pictures on Gitlab's official website are quoted here to illustrate the development workflow.
It can be seen that Gitlab classifies a series of work on the branch code before merging into the release trunk as a CI process, including automatic build testing, etc.; and the automated work after merging into the trunk is called a CD process, including deployment to the production environment, etc. .
The problems to be dealt with in actual automated deployment are usually much more complicated than this picture, and we can further experience this evolving process in the process of project development.
At this point, this tutorial has come to an end. I believe that following here, you can already build your own Gitlab service on CVM by yourself, and you are well prepared for the next journey.
Let's enjoy the fun of playing CVM together~
Enjoy Yourself~
This article is from Tencent Cloud Computing Community, please indicate the source for reprinting: https://computeinit.com/archives/2415

Top comments (0)