DEV Community

Khe Ai
Khe Ai Subscriber

Posted on

Blaze 3 Unofficial Simple Todos Tutorial with Meteor 3.4.1 + Rspack + PicoCSS

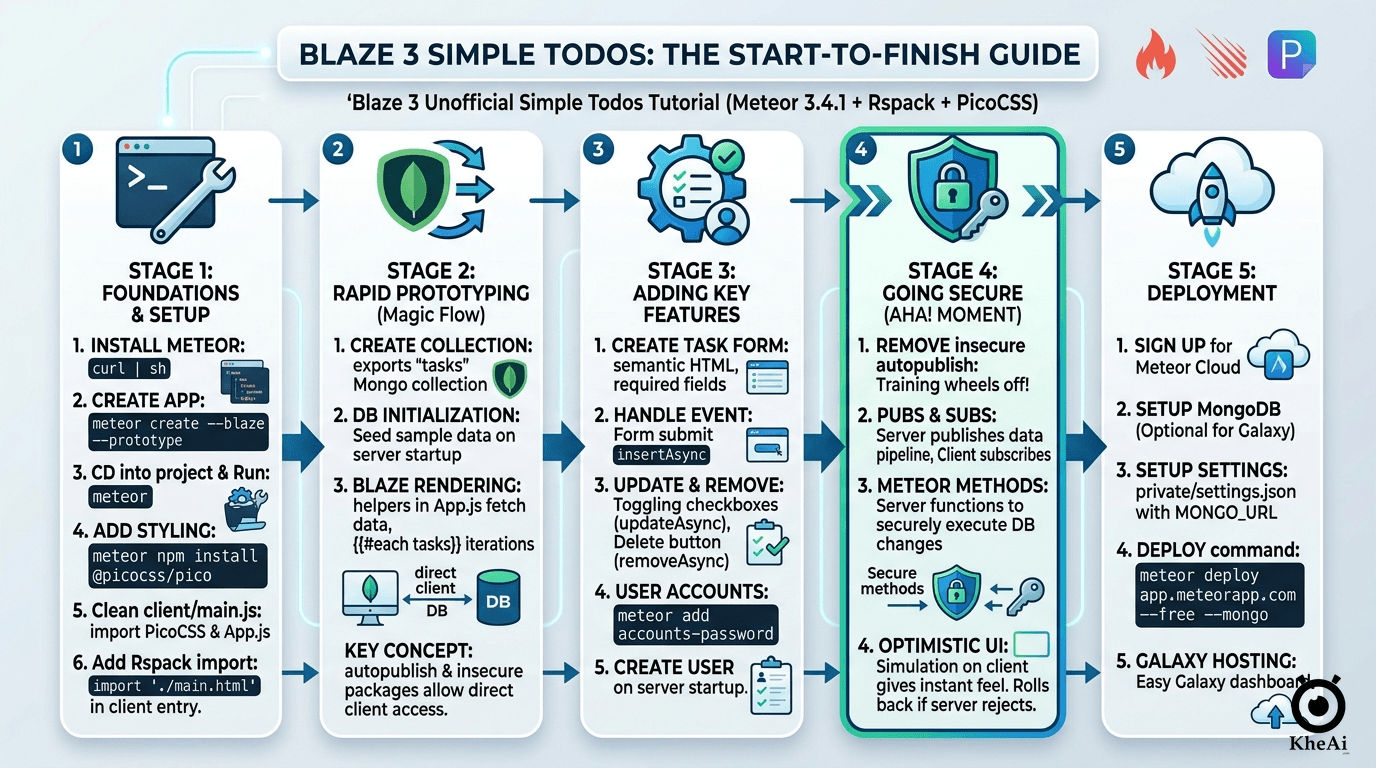
Welcome! In this tutorial, we will create a simple To-Do app using Blaze and Meteor 3.4.1.

Blaze is Meteor's original, deeply integrated UI framework. It uses an easy-to-learn, Handlebars-like template syntax. Compared to traditional tools, Blaze eliminates the need to manually update the DOM when your database changes. Instead, it integrates directly with Meteor's transparent reactivity. Change a document in your database, and the UI updates instantly.

With Meteor, a single developer can build a fully functional, real-time app in the time it takes a team of architects to decide on their communication protocols. Let's start building.

Blaze 3 Unofficial Simple Todos Tutorial with Meteor 3.4.1 + Rspack + PicoCSS

PS: Tutorial originally adapted from the official Meteor Blaze Guide.

Github Repo:

📝 Simple Todos (Meteor 3 + Blaze)

Meteor Version Frontend Bundler CSS Framework Deployed on Galaxy

A reactive, full-stack To-Do application built to demonstrate the power and speed of Meteor 3.4.1 using its native Blaze templating engine.

This project showcases modern Meteor features including Rspack for lightning-fast bundling, fully asynchronous database operations (Async/Await), user authentication, and Optimistic UI.

🚀 Live Demo

Play with the live app here! (Deployed via Meteor Galaxy)

✨ Features

  • Real-time Reactivity: Changes in the database are instantly reflected in the UI without manual DOM manipulation.
  • Optimistic UI: When a user checks or deletes a task, the UI updates instantly (zero latency) while the server processes the request securely in the background.
  • User Authentication: Built-in secure login system using accounts-password and bcrypt.
  • Data Security: Strict data-flow control using Meteor Publications/Subscriptions and secure Remote Procedure Calls (Meteor Methods).
  • State Management: Client-side state filtering (hiding completed tasks) managed via reactive-dict.
  • Semantic Styling: Zero-config, responsive…

Chapter 1: Creating the App & Styling

1.1 Install Meteor

First, install Meteor by opening your terminal and running this command (MacOS/Linux):

curl https://install.meteor.com/ | sh
Enter fullscreen mode Exit fullscreen mode

After installation, you should see a success message confirming Meteor 3.4 has been installed in your home directory.

1.2 Create the Project

We will create a project named todos-app. We are using the --blaze flag to set up our UI, and the --prototype flag. The --prototype flag is a powerful teaching tool: it temporarily bypasses server security so you can build your UI rapidly. (Don't worry, we'll secure it later).

cd dev
meteor create --blaze --prototype todos-app --release 3.4.1
cd todos-app
Enter fullscreen mode Exit fullscreen mode

log

kafechew@Kais-MacBook-Pro dev % cd todos-app
kafechew@Kais-MacBook-Pro todos-app % ls
client          package.json        tests
node_modules        rspack.config.js
package-lock.json   server
kafechew@Kais-MacBook-Pro todos-app % cd client
kafechew@Kais-MacBook-Pro client % ls
main.css    main.html   main.js
kafechew@Kais-MacBook-Pro client % cd ~/dev/todos-app/server
kafechew@Kais-MacBook-Pro server % ls
main.js
Enter fullscreen mode Exit fullscreen mode

The files located in the client directory are setting up your client side (web), you can see for example client/main.html where Meteor is rendering your App main component into the HTML.

Also, check the server directory where Meteor is setting up the server side (Node.js), you can see the server/main.js which would be a good place to initialize your MongoDB database with some data. You don't need to install MongoDB as Meteor provides an embedded version of it ready for you to use.

Meteor 3.4+ uses Rspack as its default bundler, which makes building incredibly fast. Let's start the app:

meteor
Enter fullscreen mode Exit fullscreen mode

Open http://localhost:3000 in your browser. You should see the default starter app. Keep this terminal running in the background.

kafechew@Kais-MacBook-Pro todos-app % meteor
[[[[[ ~/dev/todos-app ]]]]]          

=> Started proxy.                             
=> Started HMR server.                        
=> Started MongoDB.                           
[Rspack Server] [server-rspack]:package ...  |
  [server-rspack] compiled successfully in 92 ms

[Rspack Client] <i> [webpack-dev-server] Project is running at:

[Rspack Client] <i> [webpack-dev-server] Loopback: http://localhost:8080/, http://[::1]:8080/

[Rspack Client Error] <i> [webpack-dev-server] On Your Network (IPv4): http://192.168.0.192:8080/

[Rspack Client Error] <i> [webpack-dev-server] Content not from webpack is served from '/Users/kafechew/dev/todos-app/public' directory

[Rspack Client] [client-rspack]:package ...  -
  [client-rspack] compiled successfully in 236 ms

=> Started your app.                          

=> App running at: http://localhost:3000/
Enter fullscreen mode Exit fullscreen mode

Don't worry, Meteor will keep your app in sync with all your changes from now on.

If you see (node:2543) Warning: The util._extend API is deprecated. Please use Object.assign() instead. It simply means some underlying code is using an older Node.js method. This is something the Meteor maintainers will eventually update, but it does not affect your app's functionality and will not crash it. You don't need to fix anything. Simply open your web browser and navigate to http://localhost:3000/. Your Simple Todos app should be right there waiting for you.

1.3 Git & Version Control

Git is a "Version Control System"—think of it as a high-tech save button and a time machine for your code. It tracks every change you make, allowing you to experiment without fear because you can always revert to a previous version if something breaks.

PS: If you are working from a cloned repository (someone else's code), remember to run meteor npm install in your terminal first. This downloads all the necessary "ingredients" (dependencies) that aren't included in the Git download to save space.

Setting up GitHub Desktop

If you prefer a visual interface over typing commands in a terminal, GitHub Desktop is the easiest way to manage your project.

  1. Open GitHub Desktop.
  2. Add your project: Go to File > Add Local Repository.
  3. Choose the path: Browse to your project folder (e.g., ../dev/todos-app).
  4. Initialize: If the app says the folder is not a repository yet, click the link to "create a repository" inside that folder.
  5. Publish: Click the Publish Repository button at the top.
  6. Optional Settings: The organization is set to KheAi, keep the "Keep this code private" box unchecked (to make it Public), and click Publish Repository.

The .gitignore File

Not every file in your folder should be uploaded to the internet. For example, macOS users often have hidden .DS_Store files that clutter the project, and the node_modules folder is far too large to upload.

Create a file in your root directory named .gitignore and paste the following:

# Dependencies
node_modules/

# Meteor Modern-Tools build context directories
_build
*/build-assets
*/build-chunks
.rsdoctor

# System Files
.DS_Store
Enter fullscreen mode Exit fullscreen mode

Why do this? Adding .DS_Store to your ignore list prevents macOS system-specific metadata from being uploaded, which keeps your repository clean for other developers who might be using Windows or Linux.

1.4 Add PicoCSS for Zero-Config Styling

Nobody wants an ugly app, but we also don't want to waste time configuring complex CSS tools. Pico.css is a lightweight, semantic CSS framework. It automatically makes standard HTML tags look beautiful without needing dozens of classes.

Open a new terminal window, navigate to your project folder, and install Pico:

meteor npm install @picocss/pico
Enter fullscreen mode Exit fullscreen mode

(Note: Always use meteor npm instead of just npm to ensure versions match perfectly with Meteor's core).

1.5 Clean Up and Build the Layout

Open your project in a code editor like VS Code. We need to clear out the starter code and build our own shell.

File > Open... > dev/todos-app

Take a quick look at all the files created by Meteor, you don't need to understand them now but it's good to know where they are.

Your Blaze code will be located inside the imports/ui directory, and the App.html and App.js files will be the root component of your Blaze To-do app. We haven't made those yet but will soon.

1. Clean the Client Entry Point:

Replace everything in client/main.js with this:

import "@picocss/pico"; // The only styling import you need
import './main.html';
import '../imports/ui/App.js';
Enter fullscreen mode Exit fullscreen mode

In the traditional Meteor builder, any .html file in the client/ folder was automatically detected. With rspack, you often need to tell the entry point about the HTML.

2. Clean the HTML Entry Point:

Replace the contents of client/main.html:

<head>
  <title>Simple Todo</title>
  <meta charset="utf-8"/>
  <meta name="viewport" content="width=device-width, initial-scale=1"/>
</head>

<body>
    {{> mainContainer }}
</body>
Enter fullscreen mode Exit fullscreen mode

3. Create Your Main App Component:

Create a new folder path: imports/ui/. Inside it, create App.html. We will use Pico's semantic HTML tags like <main>, <article>, and <header>.

imports/ui/App.html

<template name="mainContainer">
  <main class="container">
    <article>
      <header>
        <hgroup>
          <h1>📝️ Todo List</h1>
        </hgroup>
      </header>

      <ul style="list-style: none; padding: 0;">
        {{#each tasks}} 
            {{> task}}
        {{/each}}
      </ul>
    </article>
  </main>
</template>

<template name="task">
    <li>{{text}}</li>
</template>
Enter fullscreen mode Exit fullscreen mode

We just created two templates, the mainContainer, which will be rendered in the body of our app, and it will show a header and a list of tasks that will render each item using the task template. Now, we need some data to present sample tasks on this page.

4. Create the Logic File:

Create App.js in the same imports/ui/ folder:

imports/ui/App.js

import { Template } from 'meteor/templating';
import './App.html';

Template.mainContainer.helpers({
  tasks: [
    { text: 'This is task 1' },
    { text: 'This is task 2' },
    { text: 'This is task 3' },
  ],
});
Enter fullscreen mode Exit fullscreen mode

Adding a helper to the mainContainer template, you are able to define the array of tasks. When the app starts, the client-side entry-point will import the App.js file, which will also import the App.html template we created in the previous step.

Check your browser. You should see a clean, centered card with three static tasks!

1.6 Rendering Data

img

Meteor parses HTML files and identifies three top-level tags: <head>, <body>, and <template>.

Everything inside any <head> tags is added to the head section of the HTML sent to the client, and everything inside <body> tags is added to the body section, just like in a regular HTML file.

Everything inside <template> tags is compiled into Meteor templates, which can be included inside HTML with {{> templateName}} or referenced in your JavaScript with Template.templateName.

Also, the body section can be referenced in your JavaScript with Template.body. Think of it as a special “parent” template, that can include the other child templates.

All of the code in your HTML files will be compiled with Meteor’s Spacebars compiler. Spacebars uses statements surrounded by double curly braces such as {{#each}} and {{#if}} to let you add logic and data to your views.

You can pass data into templates from your JavaScript code by defining helpers. In the code above, we defined a helper called tasks on Template.mainContainer that returns an array. Inside the template tag of the HTML, we can use {{#each tasks}} to iterate over the array and insert a task template for each value. Inside the #each block, we can display the text property of each array item using {{text}}.

1.7 Mobile Look

Let’s see how your app is looking on mobile. You can simulate a mobile environment by right clicking your app in the browser (we are assuming you are using Google Chrome, as it is the most popular browser) and then inspect, this will open a new window inside your browser called Dev Tools. In the Dev Tools you have a small icon showing a Mobile device and a Tablet:

img

Click on it and then select the phone that you want to simulate and in the top nav bar.

You can also check your app in your personal cellphone. To do so, connect to your App using your local IP in the navigation browser of your mobile browser.

This command should print your local IP for you on Unix systems ifconfig | grep "inet " | grep -Fv 127.0.0.1 | awk '{print $2}'

On Microsoft Windows try this in a command prompt ipconfig | findstr "IPv4 Address"

As you can see, everything is small, as we are not adjusting the view port for mobile devices. You can fix this and other similar issues by adding these lines to your client/main.html file, inside the head tag, after the title.

client/main.html

...
  <meta charset="utf-8"/>
  <meta http-equiv="x-ua-compatible" content="ie=edge"/>
  <meta
      name="viewport"
      content="width=device-width, height=device-height, viewport-fit=cover, initial-scale=1, maximum-scale=1, minimum-scale=1, user-scalable=no"
  />
  <meta name="mobile-web-app-capable" content="yes"/>
  <meta name="apple-mobile-web-app-capable" content="yes"/>
...
Enter fullscreen mode Exit fullscreen mode

1.8 Hot Module Replacement

By default, when using Blaze with Meteor, a package called hot-module-replacement is already added for you. This package updates the javascript modules in a running app that were modified during a rebuild. Reduces the feedback cycle while developing, so you can view and test changes quicker (it even updates the app before the build has finished). You are also not going to lose the state, your app code will be updated, and your state will be the same.

You can read more about packages here.

You should also add the package dev-error-overlay at this point, so you can see the errors in your web browser.

meteor add dev-error-overlay
Enter fullscreen mode Exit fullscreen mode

You can try to make some mistakes and then you are going to see the errors in the browser and not only in the console.

In the next step we are going to work with our MongoDB database to be able to store our tasks.

Chapter 2: Collections & Rapid UI

Static data is boring. Let's use a real database. Meteor provides an embedded version of MongoDB out of the box. In this step we will implement all the necessary code to have a basic collection for our tasks up and running.

You can read more about collections here.

2.1 Create the Collection

Create a new folder imports/api/ and a file inside named TasksCollection.js.

imports/api/TasksCollection.js

import { Mongo } from "meteor/mongo";

export const TasksCollection = new Mongo.Collection("tasks");
Enter fullscreen mode Exit fullscreen mode

Notice that we stored the file in the imports/api directory, which is a place to store API-related code, like publications and methods. You can name this folder as you want, this is just a choice.

You can read more about app structure and imports/exports here.

2.2 Initialize the Database

For our collection to work, you need to import it in the server so it sets some plumbing up.

You can either use import "/imports/api/TasksCollection" or import { TasksCollection } from "/imports/api/TasksCollection" if you are going to use on the same file, but make sure it is imported.

Now it is easy to check if there is data or not in our collection, otherwise, we can insert some sample data easily as well.

You don't need to keep the old content of server/main.js.

import { Meteor } from "meteor/meteor";
import { TasksCollection } from "/imports/api/TasksCollection"; // or "../api/TasksCollection"

const insertTask = (taskText) =>
  TasksCollection.insertAsync({ text: taskText });

Meteor.startup(async () => {
  // If the database is empty, add these tasks
  if ((await TasksCollection.find().countAsync()) === 0) {
    [
      "Learn Meteor 3",
      "Style with PicoCSS",
      "Conquer the World",
    ].forEach(insertTask);
  }
});
Enter fullscreen mode Exit fullscreen mode

So you are importing the TasksCollection and adding a few tasks to it iterating over an array of strings and for each string calling a function to insert this string as our text field in our task document.

2.3 Render the Database Data

Update your App.js to fetch data from MongoDB instead of our hardcoded array.

imports/ui/App.js

import { Template } from 'meteor/templating';
import { TasksCollection } from "/imports/api/TasksCollection"; 
import './App.html';

Template.mainContainer.helpers({
  tasks() {
    return TasksCollection.find({}, { sort: { createdAt: -1, _id: -1 } });
  },
});
Enter fullscreen mode Exit fullscreen mode

We can show the newest tasks first by sorting our Mongo query. If your computer is fast enough, it's possible that when it sets up the default tasks a few will have the same date. That will cause them to non-deterministically "jump around" in the UI as you toggle checkboxes and the UI reactively updates. To make it stable, you can add a secondary sort on the _id of the task.

Wait, why did this work? Usually, in web development, you have to write an API, fetch the data, parse the JSON, and manage state. Because we started with the --prototype flag, the autopublish package is active. It magically sends your entire database to the client so you can prototype at lightning speed.

2.4 Mongo

You can change your data on MongoDB in the server and your app will react and re-render for you.

You can connect to your MongoDB running meteor mongo in the terminal from your app folder (require mongosh mongodb://127.0.0.1:3001/meteor) or using a Mongo UI client, like NoSQLBooster. Your embedded MongoDB is running in port 3001.

See how to connect:

img

See your database:

img

You can double-click your collection to see the documents stored on it:

img

2.5 Meteor Dev Tools Extension

You can install an extension to visualize the data in your Mini Mongo.

Meteor DevTools Evolved will help you to debug your app as you can see what data is on Mini Mongo.

img

You can also see all the messages that Meteor is sending and receiving from the server, this is useful for you to learn more about how Meteor works.

img

Install it in your Google Chrome browser using this link.

In the next step, we are going to create tasks using a form.

Chapter 3: Forms and Events

Let's allow users to add tasks. All apps need to allow the user to perform some sort of interaction with the data that is stored. In our case, the first type of interaction is to insert new tasks. Without it, our To-Do app wouldn't be very helpful.

One of the main ways in which a user can insert or edit data on a website is through forms. In most cases, it is a good idea to use the <form> tag since it gives semantic meaning to the elements inside it.

3.1 Create the Form

Add a form template to imports/ui/App.html, just below mainContainer:

<template name="mainContainer">
  <main class="container">
    <article>
      <header>
        <hgroup>
          <h1>📝️ Todo List</h1>
        </hgroup>
      </header>
      {{> form }} 
      <ul style="list-style: none; padding: 0;">
        {{#each tasks}} 
            {{> task}}
        {{/each}}
      </ul>
    </article>
  </main>
</template>

<template name="task">
    <li>{{text}}</li>
</template>

<template name="form">
  <form class="task-form">
    <fieldset role="group">
      <input type="text" name="text" placeholder="Type to add new tasks" required />
      <input type="submit" value="Add" />
    </fieldset>
  </form>
</template>
Enter fullscreen mode Exit fullscreen mode

We are rendering the form template that we created in the previous step, and we are iterating over each of the tasks and rendering them using the task template.

3.2 Handle the Submit Event

Now, we listen for the form submission. Update App.js:

imports/ui/App.js

// ... previous imports ...

Template.form.events({
  async "submit .task-form"(event) {
    event.preventDefault(); // Prevent page reload

    const target = event.target;
    const text = target.text.value;

    // Insert directly into the database from the client!
    await TasksCollection.insertAsync({
      text,
      createdAt: new Date(),
    });      

    target.text.value = ''; // Clear form
  }
});
Enter fullscreen mode Exit fullscreen mode

Type a task and hit "Add". It appears instantly! Again, the --prototype flag includes a package called insecure, which allows the client UI to write directly to the database. We will fix this security hole later, but it feels great to move this fast right now, doesn't it?

3.3 Event

Event listeners are added to templates in much the same way as helpers are: by calling Template.templateName.events(...) with a dictionary. The keys describe the event to listen for, and the values are event handlers called when the event happens.

In our case above, we listen to the submit event on any element that matches the CSS selector .task-form. When this event is triggered by the user pressing enter inside the input field or the submit button, our event handler function is called.

The event handler gets an argument called event that has some information about the triggered event. In this case, event.target is our form element, and we can get the value of our input with event.target.text.value. You can see all the other properties of the event object by adding a console.log(event) and inspecting the object in your browser console.

We are adding a task to the tasks collection by calling Meteor.insertAsync(). It will first execute on the client optimistically using minimongo while simultaneously making the remote procedure call on the server. If the server call fails, minimongo will rollback the change on the client. This gives the speediest user experience.

Finally, in the last line of the event handler, we need to clear the input to prepare for another new task.

In the next step, we are going to update your tasks state and provide a way for users to remove tasks.

Chapter 4: Update and Remove

Up until now, you have only inserted documents into our collection. Let's make a dedicated component for individual tasks so we can check them off or delete them.

4.1 The Task Component

First, you need to add a checkbox element to your Task component. Then add the removal logic in the Task.js. It will just be a new event to the task template that is activated when the user clicks on a delete button (i.e. any button with the class delete)

Next, let’s create a new file for our task template in imports/ui/Task.html, so we can start to separate the logic in our app.

Create imports/ui/Task.html:

<template name="task">
  <li style="display: flex; align-items: center; justify-content: space-between; border-bottom: 1px solid var(--pico-muted-border-color); padding: 0.5rem 0;">
    <label style="margin-bottom: 0; cursor: pointer;">
      <input type="checkbox" checked="{{isChecked}}" class="toggle-checked" />
      <span style="{{#if isChecked}}text-decoration: line-through; color: var(--pico-muted-color);{{/if}}">
        {{text}}
      </span>
    </label>

    <button class="delete contrast outline" style="width: auto; padding: 2px 10px; border: none; font-size: 1.2rem;">
      &times;
    </button>
  </li>
</template>
Enter fullscreen mode Exit fullscreen mode

Don’t forget to remove the template named task in imports/ui/App.html.

You must also add the following import:

imports/ui/App.js

...
import './Task.html';
...
Enter fullscreen mode Exit fullscreen mode

4.2 Task Interactions

Now you can update your task document by toggling its isChecked field. First, create a new event called tasks.toggleChecked to update the isChecked property.

Create imports/ui/Task.js. In a collection, every inserted document has a unique _id field that can refer to that specific document. In event handlers, this refers to the specific database document the template is displaying. We can use this._id to tell MongoDB what to update.

imports/ui/Task.js

import { Template } from 'meteor/templating';
import { TasksCollection } from "/imports/api/TasksCollection";
import './Task.html';

Template.task.events({
  async 'click .toggle-checked'() {
    await TasksCollection.updateAsync(this._id, {
      $set: { isChecked: !this.isChecked },
    });
  },

  async 'click .delete'() {
    await TasksCollection.removeAsync(this._id);
  },
});
Enter fullscreen mode Exit fullscreen mode

Ensure your new file is loaded by adding this to the top of client/main.js:

import "../imports/ui/Task.js";
Enter fullscreen mode Exit fullscreen mode

Toggling checkboxes should now persist in the DB even if you refresh the web browser.

Chapter 5: Filtering & State

We want a button to hide completed tasks. To manage this temporary UI state (which shouldn't be saved in the database), we use a package called reactive-dict.

5.1 Install and Setup State

In your terminal, run:

meteor add reactive-dict
Enter fullscreen mode Exit fullscreen mode

Next, we need to set up a new ReactiveDict and attach it to the mainContainer template instance (as this is where we’ll store the button’s state) when it is first created. The best place to create our variables is inside the callback onCreated of the template that we want to persist our data. This callback is called as soon as the template renders on the screen.

Then, we need an event handler to update the ReactiveDict variable when the button is clicked. An event handler takes two arguments, the second of which is the same template instance in the onCreated callback. Also, create a new constant called HIDE_COMPLETED_STRING below the imports, that will be used throughout the code as the name of the variable we are persisting.

Finally, update the App component in order to show the number of pending tasks in the app bar. You should avoid adding zero to your app bar when there are no pending tasks.

Update App.js to create a dictionary when the component loads:

imports/ui/App.js

import { Template } from 'meteor/templating';
import { TasksCollection } from "/imports/api/TasksCollection"; 
import './App.html';
import './Task.html';

const HIDE_COMPLETED_STRING = "hideCompleted";

Template.mainContainer.onCreated(function () {
  this.state = new ReactiveDict();
});

Template.mainContainer.helpers({
  tasks() {
    return TasksCollection.find({}, { sort: { createdAt: -1, _id: -1 } });
  },
});

Template.form.events({
  async "submit .task-form"(event) {
    event.preventDefault(); // Prevent page reload

    const target = event.target;
    const text = target.text.value;

    // Insert directly into the database from the client!
    await TasksCollection.insertAsync({
      text,
      createdAt: new Date(),
    });      

    target.text.value = ''; // Clear form
  }
});

Template.mainContainer.events({
  "click #hide-completed-button"(event, instance) {
    const currentHideCompleted = instance.state.get(HIDE_COMPLETED_STRING);
    instance.state.set(HIDE_COMPLETED_STRING, !currentHideCompleted);
  }
});
Enter fullscreen mode Exit fullscreen mode

5.2 Filter the Query

Now, we need to update Template.mainContainer.helpers. The code below verifies if the variable hideCompleted is set to true and if yes, we filter our query to get non completed tasks. We also have a new helper called hideCompleted that will help us in the UI where we want to know if we’re filtering or not.

Update the helpers in App.js to check this state before asking MongoDB for data:

imports/ui/App.js

Template.mainContainer.helpers({
  tasks() {
    const instance = Template.instance();
    const hideCompleted = instance.state.get(HIDE_COMPLETED_STRING);

    const hideFilter = { isChecked: { $ne: true } };

    return TasksCollection.find(hideCompleted ? hideFilter : {}, {
      sort: { createdAt: -1, _id: -1 },
    });
  },
  hideCompleted() {
    return Template.instance().state.get(HIDE_COMPLETED_STRING);
  },
  incompleteCount() {
    const incompleteTasksCount = TasksCollection.find({ isChecked: { $ne: true } }).count();
    return incompleteTasksCount ? `(${incompleteTasksCount})` : '';
  },
});
Enter fullscreen mode Exit fullscreen mode

5.3 Add the UI Button

Update App.html to add the button and the counter:

imports/ui/App.html

        <hgroup>
          <h1>📝️ Todo List</h1>
          <p>{{incompleteCount}} tasks remaining</p>
        </hgroup>
      </header>

      <div style="text-align: right; margin-bottom: 1rem;">
         <button id="hide-completed-button" class="outline secondary" style="width: auto;">
           {{#if hideCompleted}} Show All {{else}} Hide Completed {{/if}}
         </button>
      </div>

      {{> form }}
Enter fullscreen mode Exit fullscreen mode

You may notice we’re using if (a conditional test) for the first time, and it’s pretty straightforward. You can learn more about the conditional test, if, here.

In the next step we are going to include user access in your app.

Chapter 6: Adding User Accounts

6.1 Install Accounts

Meteor already comes with a basic authentication and account management system out of the box, so you only need to add the accounts-password to enable username and password authentication:

meteor add accounts-password
meteor npm install --save bcrypt
Enter fullscreen mode Exit fullscreen mode

There are many more authentication methods supported. You can read more about the accounts system here.

We also recommend you to install bcrypt node module, otherwise, you are going to see a warning saying that you are using a pure-Javascript implementation of it.

You should always use meteor npm instead of only npm so you always use the npm version pinned by Meteor, this helps you to avoid problems due to different versions of npm installing different modules.

6.2 The Login Form

You need to provide a way for the users to input the credentials and authenticate, for that we need a form.

Our login form will be simple, with just two fields (username and password) and a button. You should use Meteor.loginWithPassword(username, password); to authenticate your user with the provided inputs.

Create imports/ui/Login.html:

<template name="login">
  <form class="login-form">
    <label>Username <input type="text" name="username" required /></label>
    <label>Password <input type="password" name="password" required /></label>
    <button type="submit">Log In</button>
  </form>
</template>
Enter fullscreen mode Exit fullscreen mode

Create imports/ui/Login.js:

import { Meteor } from 'meteor/meteor';
import { Template } from 'meteor/templating';
import './Login.html';

Template.login.events({
  'submit .login-form'(e) {
    e.preventDefault();
    const username = e.target.username.value;
    const password = e.target.password.value;

    Meteor.loginWithPassword(username, password);
  }
});
Enter fullscreen mode Exit fullscreen mode

Add import "../imports/ui/Login.js"; to your client/main.js.

6.3 Create a Default User

Since we don't have a registration form, we will automatically create an account when the server starts. Update server/main.js:

import { Meteor } from "meteor/meteor";
import { Accounts } from "meteor/accounts-base";
import { TasksCollection } from "/imports/api/TasksCollection";

const SEED_USERNAME = 'meteorite';
const SEED_PASSWORD = 'password';

const insertTask = (taskText) =>
  TasksCollection.insertAsync({ text: taskText });

Meteor.startup(async () => {
  // If the database is empty, add these tasks
  if ((await TasksCollection.find().countAsync()) === 0) {
    [
      "Learn Meteor 3",
      "Style with PicoCSS",
      "Conquer the World",
    ].forEach(insertTask);
  }

  if (!(await Accounts.findUserByUsername(SEED_USERNAME))) {
    await Accounts.createUser({
      username: SEED_USERNAME,
      password: SEED_PASSWORD,
    });
  }
});
Enter fullscreen mode Exit fullscreen mode

6.4 Secure the UI

Our app should only allow an authenticated user to access its task management features.

We can accomplish that by rendering the Login from the template when we don’t have an authenticated user. Otherwise, we return the form, filter, and list component.

Let's only show the tasks if the user is logged in.

In App.js, add this helper:

...  
isUserLoggedIn() {
  return !!Meteor.user();
},
getUser() {
  return Meteor.user();
},
...  
Enter fullscreen mode Exit fullscreen mode

In App.html, under, wrap the main content in an #if:

    {{#if isUserLoggedIn}}
      <div class="grid" style="align-items: center; margin-bottom: 1rem;">
        <mark>Logged in as: <strong>{{getUser.username}}</strong></mark>
        <button class="logout outline" style="width: auto;">Logout</button>
      </div>

      {{else}}
      {{> login }}
    {{/if}}
Enter fullscreen mode Exit fullscreen mode

As you can see, if the user is logged in, we render the whole app (isUserLoggedIn). Otherwise, we render the Login template.

To make logout work, add this to App.js inside Template.mainContainer.events:

  'click .logout'() {
    Meteor.logout();
  },
Enter fullscreen mode Exit fullscreen mode

Chapter 7: Security

Up to this point, our app has been incredibly easy to build, but it is totally insecure. If you opened your browser's developer console right now, you could type a command to delete every task in the database.

Why? Because back in Chapter 1, we used the --prototype flag. This automatically included two training-wheel packages:

  1. autopublish: Sends the entire database to every connected client.
  2. insecure: Allows the client to write, update, and delete data directly in the database without asking for permission.

It’s time to prepare our app for production. Open your terminal and run:

meteor remove insecure autopublish
Enter fullscreen mode Exit fullscreen mode

Look at your browser. Your tasks just disappeared! If you try to add a new task, it fails. The training wheels are off. Now we must explicitly declare what data the client is allowed to see (Publications) and what actions they can take (Methods).

7.1 Data Visibility (Publications & Subscriptions)

Without autopublish, the server is no longer sharing data. We need to create a Publication on the server (a specific pipeline of data) and a Subscription on the client (asking to listen to that pipeline).

Create a new file imports/api/TasksPublication.js:

import { Meteor } from "meteor/meteor";
import { TasksCollection } from "./TasksCollection";

Meteor.publish("tasks", function () {
  return TasksCollection.find();
});
Enter fullscreen mode Exit fullscreen mode

Import this into your server so Meteor knows it exists. Add this to server/main.js:

import "../imports/api/TasksPublication";
Enter fullscreen mode Exit fullscreen mode

Now, tell the client UI to subscribe to this channel. Update the onCreated block in imports/ui/App.js:

Template.mainContainer.onCreated(function () {
  this.state = new ReactiveDict();
  Meteor.subscribe('tasks'); // Ask the server for our data!
});
Enter fullscreen mode Exit fullscreen mode

7.2 Actions (Meteor Methods)

Without the insecure package, the client UI is no longer allowed to run TasksCollection.insertAsync() directly. Instead, the client must ask the server to do it. We do this using Meteor Methods, which are essentially secure Remote Procedure Calls (RPCs).

Create imports/api/TasksMethod.js:

import { Meteor } from "meteor/meteor";
import { TasksCollection } from "./TasksCollection";

Meteor.methods({
  async "tasks.insert"(text) {
    // 1. Check if the user is logged in
    if (!this.userId) throw new Meteor.Error('Not authorized.');

    // 2. Perform the secure action
    await TasksCollection.insertAsync({
      text,
      createdAt: new Date(),
      userId: this.userId, // Securely attach the user ID from the server
    });
  },

  async "tasks.remove"(taskId) {
    if (!this.userId) throw new Meteor.Error('Not authorized.');

    // Ensure the user only deletes THEIR OWN task
    await TasksCollection.removeAsync({ _id: taskId, userId: this.userId });
  },

  async "tasks.setChecked"(taskId, isChecked) {
    if (!this.userId) throw new Meteor.Error('Not authorized.');

    await TasksCollection.updateAsync(
      { _id: taskId, userId: this.userId },
      { $set: { isChecked } }
    );
  }
});
Enter fullscreen mode Exit fullscreen mode

Import this on the server by adding it to server/main.js:

import "../imports/api/TasksMethod";
Enter fullscreen mode Exit fullscreen mode

7.3 Update Client Actions & "Optimistic UI"

Finally, we need to update our client code. Instead of trying to modify the database directly, our buttons and forms must call the new Meteor.callAsync Methods we just wrote.

Update imports/ui/App.js (Form Submit):

At the very top of App.js, add this import:

import '/imports/api/TasksMethod.js'; 
Enter fullscreen mode Exit fullscreen mode

Then, update your form submit event to use the Method:

Template.form.events({
  async "submit .task-form"(event) {
    event.preventDefault();

    const target = event.target;
    const text = target.text.value;

    // Call the server Method instead of direct DB insert
    await Meteor.callAsync("tasks.insert", text);      

    target.text.value = '';
  }
});
Enter fullscreen mode Exit fullscreen mode

Update imports/ui/Task.js (Check and Delete):

At the very top of Task.js, add the same import:

import '/imports/api/TasksMethod.js';
Enter fullscreen mode Exit fullscreen mode

Then, update the click events:

Template.task.events({
  async 'click .toggle-checked'() {
    await Meteor.callAsync("tasks.setChecked", this._id, !this.isChecked);
  },

  async 'click .delete'() {
    await Meteor.callAsync("tasks.remove", this._id);
  },
});
Enter fullscreen mode Exit fullscreen mode

Update imports/api/TasksPublication.js:

import { Meteor } from "meteor/meteor";
import { TasksCollection } from "./TasksCollection";

Meteor.publish("tasks", function () {
  // Only publish tasks that belong to the currently logged-in user
  return TasksCollection.find({ userId: this.userId });
});
Enter fullscreen mode Exit fullscreen mode

đź’ˇ The Magic of Optimistic UI

You might be wondering: "Why did we import TasksMethods.js into our client files if Methods run on the server?"

This is the secret behind Meteor's incredible speed. It's a feature called Optimistic UI.

When you import a Method definition into the client, Meteor runs that Method twice:

  1. Instantly on the client: It simulates the result on your local MiniMongo database, updating the UI immediately without waiting for the network.
  2. Securely on the server: It sends the real request to the server in the background. If the server rejects it (e.g., you aren't logged in), the client instantly rolls back the UI to the correct state.

This gives your app the security of a traditional backend with the zero-latency feel of a local mobile app.

Your app is now completely secure and production-ready!

7.4 Secure the Seed Data

Because we added user accounts, we need to update our server startup script. We must make sure the default tasks we seed the database with are tied to our default meteorite user.

(Note: We use standard TasksCollection.insertAsync here instead of Methods because server-side code is already trusted).

Replace your server/main.js completely with this secure, final version:

import { Meteor } from "meteor/meteor";
import { Accounts } from "meteor/accounts-base";
import { TasksCollection } from "/imports/api/TasksCollection";
import "../imports/api/TasksPublication";
import "../imports/api/TasksMethod"; 

const SEED_USERNAME = 'meteorite';
const SEED_PASSWORD = 'password';

Meteor.startup(async () => {
  // 1. Create the seed user if they don't exist
  if (!(await Accounts.findUserByUsername(SEED_USERNAME))) {
    await Accounts.createUser({
      username: SEED_USERNAME,
      password: SEED_PASSWORD,
    });
  }

  // 2. Fetch the user we just created (or already existed)
  const user = await Accounts.findUserByUsername(SEED_USERNAME);

  // 3. Seed tasks securely using the user's ID
  if ((await TasksCollection.find().countAsync()) === 0) {
    const defaultTasks = [
      "Learn Meteor 3",
      "Style with PicoCSS",
      "Conquer the World",
    ];

    for (const taskName of defaultTasks) {
      await TasksCollection.insertAsync({ 
        text: taskName, 
        createdAt: new Date(),
        userId: user._id 
      });      
    }
  }
});
Enter fullscreen mode Exit fullscreen mode

(Tip: If you have old tasks stuck in your database from earlier chapters that don't have a userId, open a new terminal, type meteor reset OR meteor mongo, and run db.tasks.deleteMany({}) to wipe them out).

Chapter 8: Deploying

Deploying a Node.js app with websockets can be tricky, but Meteor provides Galaxy to make it trivial. Register a Galaxy account now.

8.1 Deploy

Now you are ready to deploy, run meteor npm install before deploying to make sure all your dependencies are installed.

Sign up for a free Meteor Cloud account. Then, run:

meteor whoami
meteor login
meteor deploy your-custom-name.meteorapp.com --free --mongo
Enter fullscreen mode Exit fullscreen mode

(The --mongo flag provisions a free database for testing on Galaxy. If you use your own database via settings.json, omit this flag). More CLI tips.

meteor deploy kheai-todo.meteorapp.com --free --mongo
Enter fullscreen mode Exit fullscreen mode

Log

kafechew@Kais-MacBook-Pro todos-app % meteor deploy kheai-todo.meteorapp.com --free --mongo
Talking to Galaxy servers at                  
https://us-east-1.galaxy-deploy.meteor.com
Preparing to build your app...                
Preparing to upload your app...               
Uploaded app bundle for new app at            
kheai-todo.sandbox.galaxycloud.app.

IMPORTANT: Your app domain has been updated to
kheai-todo.sandbox.galaxycloud.app. Please use
this domain going forward.

Your free MongoDB database has been
provisioned.
MONGO_URL:
mongodb://je653f009660:ao0CAdjqBmu9CImPRo_ivdR6@galaxyadmin_galaxyfreedb-01.mongodb.galaxy-cloud.io:30025,galaxyadmin_galaxyfreedb-02.mongodb.galaxy-cloud.io:30025,galaxyadmin_galaxyfreedb-03.mongodb.galaxy-cloud.io:30025/je653f009660?replicaSet=galaxyadmin_galaxyfreedb&ssl=true

View deployment progress at:
https://my.galaxycloud.app/moopt/us-east-1/apps/1b1451f4-b50b-42c1-ae7b-7e1adcd1a342/deployments/0797b21d-7879-436a-82e9-c32813948ff1
Enter fullscreen mode Exit fullscreen mode

8.2 Set up MongoDB (Optional)

As your app uses MongoDB the first step is to set up a MongoDB database, Galaxy offers MongoDB hosting on a free plan for testing purposes, and you can also request for a production ready database that allows you to scale.

In any MongoDB provider you will have a MongoDB URL which you must use. If you use the free option provided by Galaxy, the initial setup is done for you.

Galaxy MongoDB URL will be like this: mongodb://username:<password>@org-dbname-01.mongodb.galaxy-cloud.io .

You can read more about Galaxy MongoDB here.

8.3 Setup Settings

If you are not using the free option, then you need to create a settings file. It’s a JSON file that Meteor apps can read configurations from. Create this file in a new folder called private in the root of your project. It is important to notice that private is a special folder that is not going to be published to the client side of your app.

Make sure you replace Your MongoDB URL by your own MongoDB URL.

private/settings.json

{
  "galaxy.meteor.com": {
    "env": {
      "MONGO_URL": "Your MongoDB URL from a provider like MongoDB Atlas"
    }
  }
}
Enter fullscreen mode Exit fullscreen mode

Conclusion

You have just built a reactive, full-stack application with a real database, user authentication, and secure remote procedure calls. What you've learned here applies to applications of massive scale. Welcome to the Meteor ecosystem!

Top comments (0)