
Introduction
Over recent years, new frameworks, libraries and languages have found their way onto the tech scene and have struggled to gather mainstream adoption, but a recent piece of tech that has seen huge adoption by software engineering teams over a short period is GraphQL. Released by Facebook in 2015, it has been implemented in multiple programming languages and has led to the creation of several GraphQL related frameworks and libraries.
GraphQL is a strongly typed query language for APIs and a runtime for fulfilling queries with existing data. It allows clients to query for many resources in a single request by requesting required fields instead of making requests to multiple endpoints.
Apollo Server is an open-source GraphQL server that provides an easy way to build a GraphQL API that can use data from multiple sources, including several databases and even REST APIs.
MongoDB Atlas is a fully-managed application data platform that handles the creation, management and deployment of MongoDB in the cloud. It provides easy deployment of MongoDB databases to various cloud service providers with several tools for managing MongoDB databases in a production environment.
In this tutorial, we will learn how to build and deploy a GraphQL server connected to a MongoDB data source. At the end of this tutorial, you will have built a functional GraphQL API using Apollo Server and MongoDB Atlas and deployed it to production on Koyeb.
Requirements
To successfully follow this tutorial, you need the following:
- A development machine with Node.js installed. The demo app in this tutorial uses version 16.14.0 of Node.js
- A development machine with Git installed
- A MongoDB Atlas account
- A Koyeb account to deploy the application
Steps
The steps to creating a GraphQL API with Apollo DataSource and MongoDB Atlas and deploying it to production on Koyeb include:
- Create a MongoDB database using MongoDB Atlas
- Set up the project
- Create a GraphQL server using Apollo Server
- Connect the GraphQL server to the MongoDB database
- Use MongoDB as a GraphQL Data Source
- Deploy to Koyeb
Create a MongoDB Database using Mongo Atlas
MongoDB Atlas offers the ability to create MongoDB databases deployed to the Cloud with just a few clicks, and in this section, you will create a MongoDB database using MongoDB Atlas.
While logged into your MongoDB Atlas account, click the "Build a Database" button on the "Data Deployments" page and carry out the following steps:
- Click the "Create" button on your preferred deployment type.
- Select a preferred Cloud provider and region or use the preselected options.
- Enter a cluster name or use the default cluster name.
- Click the "Create Cluster" button.
- Select the "Username & Password" authentication option, enter a username and password and click the "Create User button". Store the username and password somewhere safe for later use.
- Enter "0.0.0.0/0" without the quotes into the IP Address field of the IP Access List section, and click the "Add Entry" button.
- Click the "Finish and Close" button and then the "Go to Databases" button. You will be redirected to the "Data Deployments" page, with your new MongoDB cluster now visible.
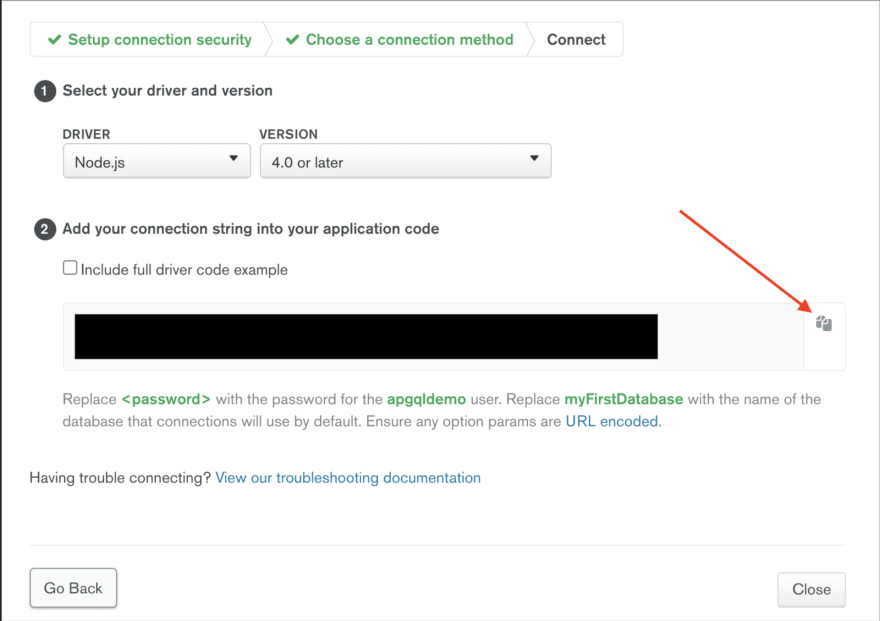
- Click the "Connect" button next to your MongoDB cluster name, select the "Connect your application" option and copy your database connection string to a safe place for later use.
Following the steps above, you have created a MongoDB database to read and store data for the GraphQL API. In the next section, you will set up the project and install the necessary libraries and dependencies.
Set Up the Project
In this section, you will set up an npm project and install the necessary dependencies for building the demo GraphQL server for this tutorial. The GraphQL server will expose a GraphQL API that reads and writes movie data from and to the MongoDB database created in the previous section. Start by creating a root directory for the project on your development machine. To do that, run the command below in your terminal window:
mkdir graphql_movies
The graphql_movies directory created by the command above is the root directory for the demo application. Next, change to the graphql_movies directory and initialize a Git repository in the directory by running the command below in your terminal window:
cd graphql_movies
git init
The first command above moves you into the graphql_movies directory in your terminal, while the second command initializes a Git repository to track changes in the graphql_movies directory. Next, create an npm project in the graphql_movies directory by running the command below in your terminal window:
npm init --yes
Running the npm init command initializes an empty npm project and creates a package.json file in the root directory. The --yes flag automatically answers "yes" to all the prompts raised by npm.
With an npm project now in place, go ahead and install the libraries and packages required to build the GraphQL API. In your terminal window, run the commands below:
npm install apollo-server graphql mongoose apollo-datasource-mongodb dotenv rimraf

npm install -D @babel/preset-env @babel/core @babel/node @babel/cli
The npm install command above installs 10 packages onto the project and adds them to the project's package.json file. The first command installs dependencies required to run the app, while the second one installs dependencies needed while developing the app. The dependencies installed include:
- apollo-server: An open-source library for building GraphQL servers.
- graphql: The JavaScript implementation of the GraphQL specification.
- mongoose: An Object Document Mapper for MongoDB.
- apollo-datasource-mongodb: An Apollo data source library for MongoDB.
- dotenv: A library for handling environment variables.
- rimraf: A library for running the UNIX
rm -rfcommand in Node.js.
The other libraries installed for development include a host of babel libraries for running and transpiling modern JavaScript code.
Next, create a .babelrc file in the project's root directory and add the following code to the file:
{
  "presets": [
    [
      "@babel/preset-env",
      {
        "useBuiltIns": "usage",
        "corejs": "3.0.0"
      }
    ]
  ]
}
The code above instructs Babel on how to transpile the latest JavaScript code present in the app using Babel's env configuration options.
Lastly, create an src folder in the project's root directory. This src folder will house all the project files. With these changes, the project structure is in place, and in the next section, you will create a GraphQL server using the Apollo Server library.
Create a GraphQL Server using Apollo Server
In this section, you will create a GraphQL server using Apollo Server. The Apollo Server library comes with an inbuilt Express server and can execute GraphQL queries and mutations. It also provides an in-browser sandbox for connecting to a GraphQL server, writing and executing GraphQL queries, viewing query results, and exploring the GraphQL schema of the server.
A GraphQL server consists of a GraphQL schema that defines the structure of its API and resolvers that implement the schema structure. A GraphQL schema consists of types, which describes the data that can be queried and returned by the GraphQL server. GraphQL provides a schema definition language (SDL) used to define a GraphQL schema. Using GraphQL's SDL, a movie type can be defined as follows:
type Movie {
  _id: ID!
  title: String!
  rating: Float!
  year: Int!
  }
The Movie type above defines the four fields that can be queried on a movie and their return type. GraphQL also has three root types; query, mutation and subscription. These three types serve as entry points to a GraphQL server and define the possible executable operations in a GraphQL server. The query type is for data fetching operations, the mutation type is for operations for creating or modifying data, and the subscription type is for real-time data fetching operations.
To create a schema for the GraphQL server, create a typeDefs.js file in the src folder and add the following code to the file:
import { gql } from 'apollo-server';

export const typeDefs = gql`
  type Movie {
    _id: ID!
    title: String!
    rating: Float!
    year: Int!
  }

  type Query {
    getMovies: [Movie!]!,
    getMovie(id: ID!): Movie!
  }

  type Mutation {
    createMovie(title: String!, rating: Float!, year: Int!): Movie!
  }
`;
The code above is a GraphQL schema type definition and defines three GraphQL types; Movie, Query and Mutation. The Query and Mutation types are the root types, while the Movie mutation defines the queryable fields for movie records.
The Query type in the schema definition above includes the following fields:
-
getMovies: This field returns an array of one or moreMovietype objects. -
getMovie: This field accepts anIDargument and returns a singleMovietype object.
In addition, the Mutation type includes a createMovie field that accepts a title, rating and a year argument and returns a Movie type object. These fields represent the queries and mutations accepted by the GraphQL server.
When the queries and mutations in the root types are executed, GraphQL expects their respective resolver functions to fetch and return data corresponding with the schema return type. To add resolver functions, create a resolvers.js file in the src directory and add the following code to the file:
const movies = [{
  _id: "12345",
  title: "Sinder Twindler",
  year: 2022,
  rating: 6.5,
}];

export const resolvers = {
  Query: {
    getMovies: (_root, _args, _context, _info) => {
      return movies;
    },
    getMovie: (_root, { id }, _context, _info) => {
      return movies.find(({ _id }) => _id === id);
    }
  },
  Mutation: {
    createMovie: (_root, args, _context, _info) => {
      const randomId = Math.random().toString().split('.')[1];
      const newMovie = { ...args, _id: randomId }
      movies.push(newMovie);
      return newMovie;
    }
  }
}
In the code above, we initialize an array of movies which serves as a temporary data source. In addition to that, we export a resolvers object with Query and Mutation properties that match the Query and Mutation types in the schema definition. The two resolver properties include functions that match the operations declared in the Query and Mutation types. These resolver functions perform specific actions on the data source and return the requested data.
A GraphQL resolver function accepts four arguments:
-
root: This argument contains the results of any previously run resolvers. -
args: This argument holds the parameters for a GraphQL query. -
context: This argument contains data/objects that can be accessed/shared across resolver functions. -
info: This argument holds information about the GraphQL query or mutation being executed.
The schema and resolvers created need to be connected to a server to become functional. In the src directory, create an index.js file and add the following piece of code to the file:
import { ApolloServer } from 'apollo-server';
import { typeDefs } from './typeDefs'
import { resolvers } from './resolvers'

const server = new ApolloServer({typeDefs, resolvers})

server.listen({ port: process.env.PORT || 4000 }).then(({ url }) => {
  console.log(`🚀 Server ready at ${url}`);
});
The code above imports and creates an instance of the Apollo Server. The schema (typeDefs) and resolvers are also imported into the file and passed to the Apollo Server instance. Finally, Apollo Server's listen method launches the webserver on the provided port or port 4000 if no port is provided.
To run the server, add the script below to the package.json file located at the root directory:
{
  ...
  "scripts": {
    …
    "start:dev": "babel-node src/index.js"
  },
...
}
The start:dev script above runs the code in the src/index.js file using the babel-node package. To run the script, run the command below in your terminal window:
npm run start:dev
The command above starts the webserver, which runs on port 4000. Running the command should return the response below:
🚀 Server ready at http://localhost:4000/
To see the Apollo Server landing page, visit http://localhost:4000/ in your browser. You should see a page like the one below:

On the landing page, click the "Query your server" button to be redirected to the in-browser sandbox. You should see a page like the one below, with a pre-filled GraphQL query:
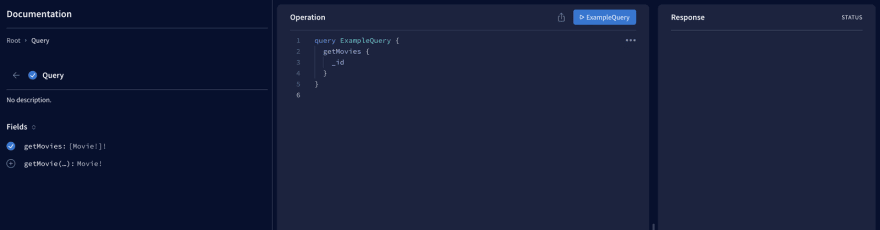
The sandbox consists of three panels; the left panel displays the schema of the GraphQL API with available queries and mutations, the middle panel is for writing and executing queries, and the right panel is for viewing query results. Replace the query in your sandbox with the code below:
query ExampleQuery {
  getMovies {
    _id
    title
    year
    rating
  }
}
The code above adds extra fields to the ExampleQuery query. To execute the query, click the "ExampleQuery" button to run the query. You should see the response in the right panel.

In this section, you created a GraphQL server with queries and mutation. In the next section, you will connect the GraphQL server to a MongoDB database.
Connect the GraphQL Server to the Mongo Database
The resolver functions in the GraphQL server currently fetches data from a hard-coded data source instead of the MongoDB database created in the first section. In this section, you will connect the GraphQL server to the MongoDB database and also create a mongoose model to represent a movie document on MongoDB.
First, create a .env file in the root directory of the project and add the following code to the file where <username> and <password> represent your MongoDB database user and its password:
MONGODB_URI="mongodb+srv://<username>:<password>@apollogql-demo.kk9qw.mongodb.net/apollogql-db?retryWrites=true&w=majority"
The code above makes your MongoDB database connection string available as an environment variable. The .env file should not be committed to git as it contains secret data.
Next, replace the code in the src/index.js file with the following:
import 'dotenv/config'
import mongoose from 'mongoose';
import { ApolloServer } from 'apollo-server';

import { typeDefs } from './typeDefs';
import { resolvers } from './resolvers';

const uri = process.env.MONGODB_URI
const main = async () => {
  await mongoose.connect(uri, { useNewUrlParser: true, useUnifiedTopology: true })
};

main()
  .then(console.log('🎉 connected to database successfully'))
  .catch(error => console.error(error));

const server = new ApolloServer({ typeDefs, resolvers })

server.listen({ port: process.env.PORT || 4000 }).then(({ url }) => {
  console.log(`🚀 Server ready at ${url}`);
});
The code above imports the dotenv config and mongoose package into the index.js file. Importing the dotenv config makes the environment variables in the .env file accessible via the process.env object. The value of the MONGODB_URI environment variable is accessed via the process.env and stored in a uri variable, and an async function main is declared to create a connection to the MongoDB database using the mongoose connect function and the uri connection string. The main() function is then called to open a connection to the MongoDB database.
🎉 connected to database successfully
🚀  Server ready at http://localhost:4000/
Lastly, create a models folder in the src folder and inside it, create a movie.js file. Add the code below to the file:
import mongoose from "mongoose";

export const Movie = mongoose.model("Movie", {
  title: String,
  rating: Number,
  year: Number,
});
The code above creates a Movie model, and it serves as the interface for creating and manipulating documents in the MongoDB database. This is the last step towards making the MongoDB database the data source for the GraphQL server. In the next section, you’ll switch the GraphQL server's data source from the hard-coded array to your MongoDB database.
Use MongoDB as a GraphQL Data Source
The current data source for the GraphQL server is a hard-coded array, and in this section, you will replace it with your MongoDB database. To do that, start by creating a dataSources folder in the src folder. In the dataSources folder, create a movies.js file and add the following code to the file:
import { MongoDataSource } from 'apollo-datasource-mongodb'

export default class Movies extends MongoDataSource {
  async getMovies() {
    return await this.model.find();
  }

  async getMovie(id) {
    return await this.findOneById(id);
  }

  async createMovie({ title, rating, year }) {
    return await this.model.create({ title, rating, year });
  }
}
The code above declares a Movies data source class that extends the MongoDataSource class provided by the apollo-datasource-mongodb package. The Movies data source contains three methods for each of the existing queries and mutation. The getMovies and createMovie methods use the movie model created in the previous section to read and insert data into the MongoDB database, and the getMovie method uses the findOneById method provided by the MongoDataSource class to fetch a document from the MongoDB collection that matches the provided id argument.
Next, replace the code in the src/index.js file with the code below:
import 'dotenv/config'
import mongoose from 'mongoose';
import { ApolloServer } from 'apollo-server';

import { typeDefs } from './typeDefs';
import { resolvers } from './resolvers';
import { Movie as MovieModel } from './models/movie';
import Movies from './dataSources/movies';

const uri = process.env.MONGODB_URI
const main = async () => {
  await mongoose.connect(uri, { useNewUrlParser: true, useUnifiedTopology: true })
};

main()
  .then(console.log('🎉 connected to database successfully'))
  .catch(error => console.error(error));

const dataSources = () => ({
  movies: new Movies(MovieModel),
});

const server = new ApolloServer({ typeDefs, resolvers, dataSources })

server.listen({ port: process.env.PORT || 4000 }).then(({ url }) => {
  console.log(`🚀 Server ready at ${url}`);
});
The updated code above imports the Movie model and the Movies data source class into the src/index.js file. After connecting to the MongoDB database, a dataSources function is created. This function returns an object containing an instance of the Movies data source that receives the Movie model as a parameter. The dataSources function is then passed to the Apollo Server instance, making the Movies data source instance available within every resolver function.
To replace the hard-coded data source with the Movie data source, replace the code in the src/resolvers.js file with the code below:
export const resolvers = {
  Query: {
    getMovies: async (_, _args, { dataSources: { movies } }) => {
      return movies.getMovies();
    },
    getMovie: async (_, { id }, { dataSources: { movies } }) => {
      return movies.getMovie(id);
    }
  },
  Mutation: {
    createMovie: async (_, args, { dataSources: { movies } }) => {
      return movies.createMovie(args)
    }
  }
}
In the updated code above, the Movies data source instance passed to Apollo Server in the src/index.js file is available in the resolver functions via the dataSources property of the shared context object. Each resolver function calls its respective method in the data source to carry out the specified operation on the MongoDB database.
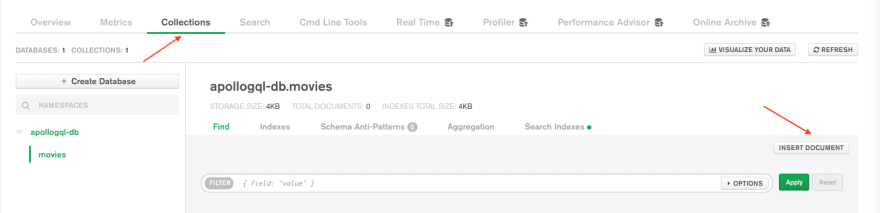
Any query made at this point will return an empty result as the MongoDB database is currently empty. Restart your server, then visit your Mongo Atlas account in your browser. On your MongoDB "Database Deployments" page, select your database cluster and click the "Collections" tab. On the "Collections" tab, click the "INSERT DOCUMENT" button and add as many movie documents as you want.
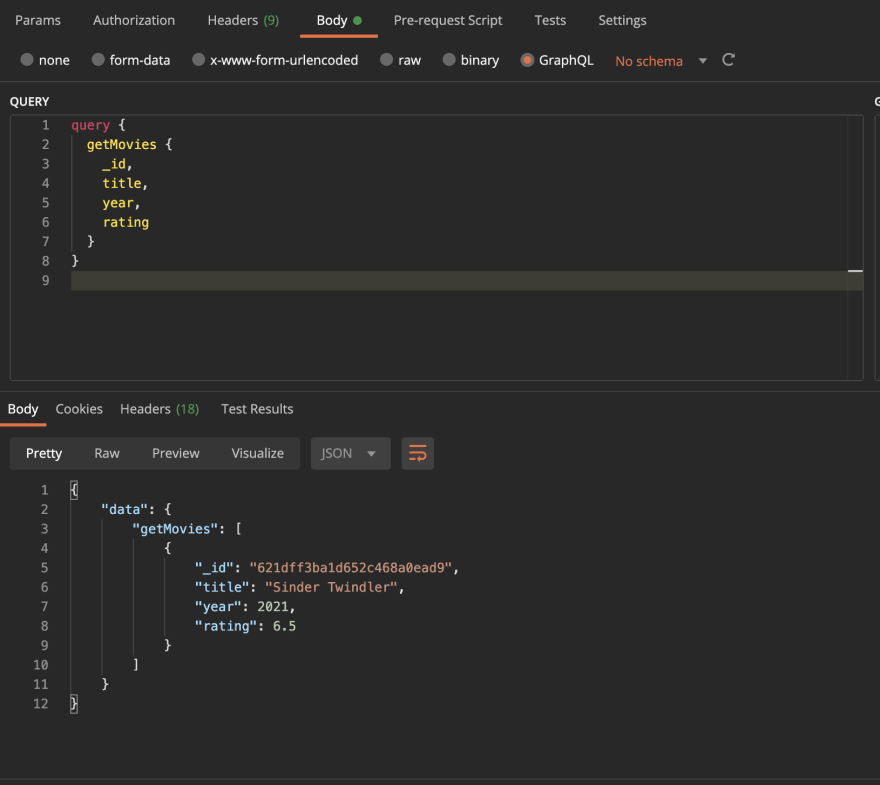
In your Apollo Server sandbox, run the ExampleQuery from the previous section. You should get a list of all the movie documents in your Mongo DB collection. In this section, you used your MongoDB database as a data source for your GraphQL server. In the next section, you will deploy your GraphQL server online on Koyeb.
Deploy to Koyeb
The first step towards deploying the GraphQL server on Koyeb is to add the npm scripts needed to build the code in production. Add the following scripts below to your package.json file:
"scripts": {
  ...
  "prebuild": "rimraf dist && mkdir dist",
  "build": "babel src -d dist",
  "start": "node ./dist/index.js"
  }
The three npm scripts added above include:
- A
prebuildscript to ensure there's an emptydistdirectory before thebuildscript executes. - A
buildscript that transpiles all the code in thesrcdirectory to JavaScript ES5 syntax into thedistdirectory with the help of thebabelpackage. - A
startscript that starts the server.
Next, create a GitHub repository for your GraphQL server, then run the commands below in your terminal window:
git add --all
git commit -m "Complete GraphQL server with MongoDB data source."
git remote add origin git@github.com<YOUR_GITHUB_USERNAME>/<YOUR_REPOSITORY_NAME>.git
git branch -M main
git push -u origin main
On your Koyeb control panel, go to the Secrets tab and create a new secret. Enter MONGODB_URI as the secret name and your MongoDB connection string as the value. Next, go to the Overview tab and click the `Create App" button to start the app creation process.
On the app creation page:
- Select GitHub as your deployment method.
- In the repositories dropdown, select the GitHub repository for your code.
- Select the branch you want to deploy. E.g.
main. - In the environment variables section, click the add environment variable button.
- Select the
Secrettype, enterMONGODB_URIas the key and select theMONGODB_URIsecret created previously as the value. - Add a plaintext environment variable with the key
PORTand value8080. - Give your app a name. E.g.
graphql-apollo-serverand click the "Create App" button.
While creating the app, the run and build command options were skipped as the Koyeb platform can detect the build and start scripts in the package.json file and execute them automatically. Clicking the "Create App" button redirects you to the deployment page, where you can monitor the app deployment process. Once the deployment is complete and all necessary health checks have passed, you can access your public URL.
Test your GraphQL API
Using your favorite API testing tool or this online GraphiQL playground, make a getMovies GraphQL query to your public URL. You should get a response of all movie documents on your MongoDB database.
Conclusion
That's it! You have successfully created and deployed a GraphQL server with Apollo Server and a MongoDB data source to Koyeb. Feel free to add more queries and mutations to your GraphQL server. Since we deployed to Koyeb using git-driven deployment, a new build will be automatically triggered and deployed on Koyeb whenever you push your changes to your GitHub repository.
Your changes will go live as soon as your deployment passes all necessary health checks. In case of a failure during deployment, Koyeb maintains the latest working deployment in production to ensure your application is always up and running.
By deploying on Koyeb, our application benefits from native global load balancing, autoscaling, autohealing, and auto HTTPS (SSL) encryption with zero configuration on our part.
If you would like to look at the code for the demo application, you can find it here.

Latest comments (0)