
I would recommend taking a look at some of the following links (if you're interested); wouldn't bash Metamask for no reason, but there are just certain facets of their wallet app that make it wholly insecure (in my opinion & in that of most security researchers 'in the wild', I would imagine):
https://twitter.com/librehash/status/1339040262753038343?s=20
https://twitter.com/librehash/status/1361214665519423488?s=20
There are many more reasons that can be listed, but I won't get into those here.
Let's just move forward toward ensuring that we can generate a secure Ethereum address.
Securing a Metamask Wallet
Despite all of the drawbacks and negatives listed above, there is a way to ensure that your Metamask wallet is a secure construction.
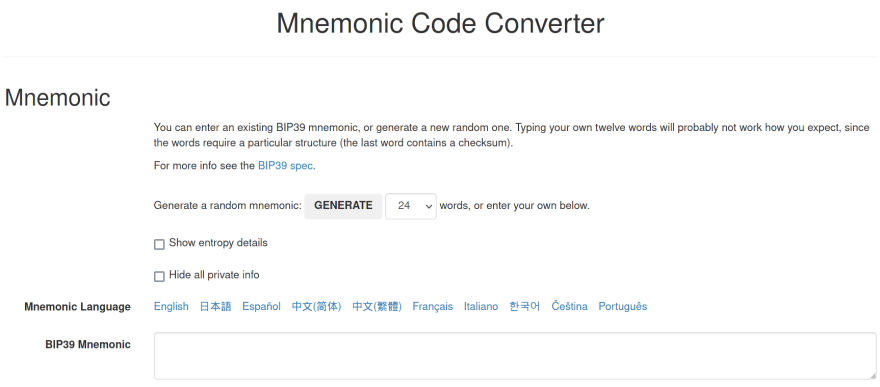
The first step to doing so would be downloading Ian Coleman's BIP39 site, located here: https://iancoleman.io/bip39/
Upon visiting the site, you should see something like the following:
In order to download this tool (safely) for use offline, we're going to visit the official GitHub repo for this page.
Specifically, we're going to visit: https://github.com/iancoleman/bip39
From there, we're going to check out the latest releases (https://github.com/iancoleman/bip39/releases/tag/0.5.3).
Ian Coleman Values Our Security
If we checkout the releases, we'll notice that there's an attached PGP signed message accompanying each release (SHA-512) published by Ian Coleman.
The PGP message specifically clear signs the sha256 checksum of the bip39-standalone.html page that gets produced after we download & unzip the relevant files.

We have the option of either downloading the standalone html file or the entire source code for the file (either or works; we're going to go with the source in this instance though).

Unpacking the Source and Running the Code
This can all be done in a couple simple commands.
If you're a terminal person, these next steps are for you:
curl -tlsv1.3 https://github.com/iancoleman/bip39/archive/refs/tags/0.5.3.tar.gz
Assuming that this doesn't work for whatever reason, that simply means that the latest version of 'curl' likely needs to be installed on one's computer (there's going to be a little bit of footwork mandated with this portion of things if you're truly interested, but its all encapsulated within one concise script for those that need it).
Installing Curl
this step is only for people that want to ensure that they have an insane level of security in their default setups; never a bad idea to do this though and ensure that you have the latest versions of all of the best libraries that are needed to build the requisite tools needed to stay on the cutting edge of security
The below script can be saved to a file (with any name) on the terminal, then subsequently activated via chmod +x (filename).(ending) in order to ensure that it can be ran at some point in the future.
sudo apt -y update
sudo apt-get -y upgrade # hopefully there are no funky problems on the machine that you're using ; could loop this through a command that first checks out the OS that someone is running first, then uses the appropriate packet manager based on the grepped & saved response (to a fd of some sort in the intermediate; random one preferably I suppose)
# assuming ubuntu / debian for the rest of the commands here
sudo apt -y install astyle cmake gcc ninja-build libssl-dev python3-pytest python3-pytest-xdist unzip xsltproc doxygen graphviz build-essential
wget https://curl.se/download/curl-7.77.0.tar.gz
tar -xvf curl-*.tar.gz
cd curl-*
./configure --with-openssl --with-libssh2 --with-zlib --with-brotli --with-zstd --with-gssapi --with-gsasl --enable-tls-srp --enable-threateded-resolver --enable-ipv6 --enable-unix-sockets --enable-manual --enable-sspi --enable-ldaps --enable-rtsp --enable-librtmp --with-libmetalink --with-libpsl --with-nghttp2 --disable-telnet --enable-libcurl-option --with-libmetalink --with-ngtcp2 --with-quiche --enable-mime --enable-netrc --enable-get-easy-options --enable-dnsshuffle --enable-hsts --enable-sspi
sudo make
sudo make test # sudo make check
sudo make install
After this, we need to look for where the 'curl' binary is at (more than likely, we didn't replace the previous longstanding curl binary with this command ; not a problem though)
We'll just have to run the following script:
#!/bin/sh

mkdir -p ~/Downloads/backups/
sudo cp ~/.bashrc ~/Downloads/backups/.bashrcbackup
cat <<EOF >>~/.bashrc
curl() {
    location/of/newlydownloaded/curl "$@"
}
EOF
# at this point the little curl command path we included above should be the path that's consulted first
exec bash # this should renew the bash terminal
which -a curl # this should tell us which curl will be used ultimately but if not then we can use the next cmd
echo $curl # the result of this command should mimic what we just appended ~/.bashrc with
# could add extra code that saves the output of either command above to assess whether they match what should be expected from a string we extract from the ~/.bashrc that gets grepped out but...too lazy, do it yourself if you are a reader
When this script is done executing, one just needs to type 'type curl' and the result should be
curl is a function
curl() {
    /path/to/new/curlsrc "$@"
}
If this is the case, then you're good to go. Now all you have to do is run the necessary code to extract the ian coleman repo from its place on GitHub.
That would be (make sure to double check the URLs on your end):
#!/bin/sh

mkdir -p ~/tmpdownload
cd ~/tmpdownload
curl -L -tlsv1.3 https://github.com/iancoleman/bip39/archive/refs/tags/0.5.3.tar.gz > iancole.tar.gz
tar -xvf *.tar.gz
cd bip39-*
# from here we're going to open up the webpage using firefox (assuming everyone has that downloaded)
firefox --new-instance --browser --private-window $(pwd)/src/index.html
All of the scripts above could be included in one bigger script, or there could just be a larger script created that calls each of these (or we can just create each one of the scripts above in one greater script). Doesn't really matter which choice we opt with.
Addressing any and All Concerns Associated with the Browser Use of the Script
The command that I used to open the 'index.html' in firefox:
firefox --new-instance --browser --private-window $(pwd)/src/index.html
This command:
a) calls firefox
b) ensures that a new instance is instantiated
c) ensures that the browser is called (vs. the headless version)
d) private window ensures that no cookies / history is saved at all
e) $(pwd)/src/index.html = location of the file we want to open up in the browser ; we want to make sure to only run this command from the root directory, otherwise we need to specify the explicit path that must be followed to enable these commands.
Dockerizing the Application
For those that may be even more paranoid than the most paranoid (assuming they are the ones that would have followed the above precautions), it would be recommended to dockerize or otherwise sandbox the application itself to ensure some level of isolation from the root / bare-metal / OS layer.
Regardless, there's a full guide that breaks this down for anybody that's curious as well (that will be included separately).
Assuming Everything Went Right and the Page is Offline
This is when we'll go ahead and generate a new 24-word mnemonic from the app itself.
We can do this one of two ways - we can either generate it using a random mnemonic (which it pulls from secure sources) or we can generate it from a hexadecimal source.
If you're not sure what either of those things means, then follow us on a brief journey below as we craft our own secure Ethereum wallet, starting with the Ian Coleman webpage that we downloaded initially.
Setting the Stage: Step One
Once you visit the Ian Coleman page, you should be greeted with a screen that looks like this one:

Once there, you're going to click on the dropdown menu where the number '15' is located and select '24' instead.
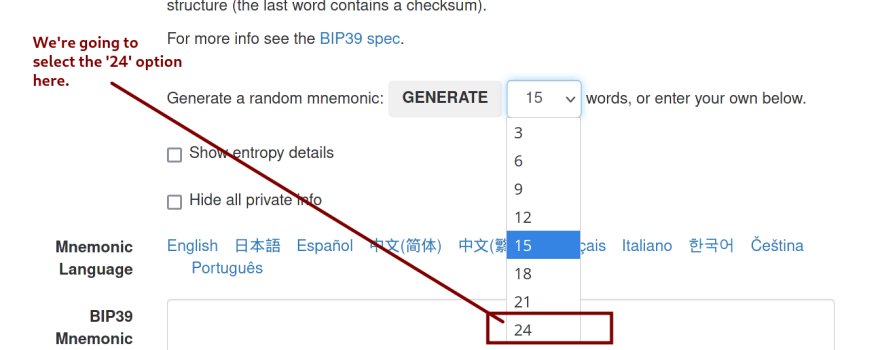
Once that's selected, we will then press the button that says, 'Generate'.

As you may have expected, 24 words will be generated (at random*) in the box below.
Check out the 24 words that were given to us:

report concert educate dirt door sorry season inject manual mixture logic item text indicate square wrap strike welcome permit frost sweet twelve round warrior
If we scroll a bit further, we can see that we're presented with other information, such as our wallet seed and our BIP32 root key.

If you notice, there's also a section where one can select the specific coin that they wish to use. This was left on 'Bitcoin' on purpose to allow this section to be a reminder that we need to adjust the coin to Ethereum if we're going to be producing a wallet for Metamask.

if you're curious why this is, the reason is that Ethereum uses a different hash operation in the creation of its addresses than Bitcoin does (pre-finalized version of the Keccak hash algorithm); Certain apps and blockchains use an entirely different word list than the BIP39 prevailing defalt 2048 word, word-list.
What was just demonstrated above was the "easy" way to create an Etheruem address.
This method is still secure, for the most part, but it does put the formation of your address up to some level of "chance" (i.e., contingent on the quality of the source of randomness used).
Quality of the Randomness Source
This si something that is critically important for anyone that's looking to generate a secure wallet (that won't be compromised at any point in the foreseeable future).
If you're thinking to yourself, 'What are the chances that someone could possibly guess my private key?', the answer is "Significant" if your source of randomness is not sufficiently random (i.e., someone is able to deduce the range / realm of results that the random number generator you're using tends to produce).
Prior Incidents
Back in 2013, there were a slew of Bitcoin users that ended up losing their funds. The one commonality among all of the thefts was the app that produced the compromised wallet addresses at the time.
Cybersecurity firm, 'Sophos' covered the incident at the time.
https://nakedsecurity.sophos.com/2013/08/12/android-random-number-flaw-implicated-in-bitcoin-thefts/
What's curious about this situation is that the wallets were not inherently compromised by the way that the formed, but rather by the signatures.
Since this is outside of the scope of what we're doing (since we're only creating a secure address vs. using it in a secure manner), this guide is going to go ahead and omit details about using it in a secure manner.

Top comments (0)