I recently applied to a company, for the position of front-end developer, and I was asked to complete an assignment before the technical interview. This post is about how I completed the assignment and the process that I followed.
First of all, the assignment was to animate the height of few boxes randomly and add functionality to start and stop the animation of each box.
Let's get started
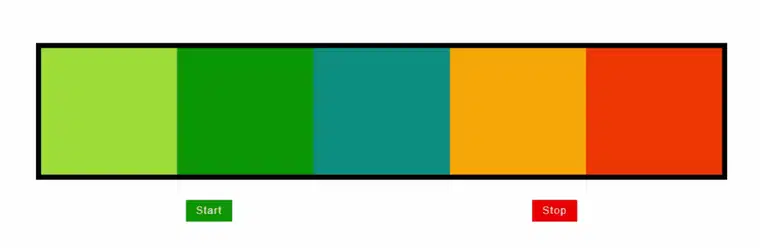
I started out with creating basic structure of the assignment. I created a div as container and added five more div's inside the container. After creating containers I centered them and added two buttons to start and stop the animation, pretty basic stuff. This is how HTML structure looked like:
      <div class="box-container">
        <div class="box" id="box-1"></div>
        <div class="box" id="box-2"></div>
        <div class="box" id="box-3"></div>
        <div class="box" id="box-4"></div>
        <div class="box" id="box-5"></div>
      </div>

      <div class="actions">
        <button class="action-btn" id="start-btn">Start</button>
        <button class="action-btn" id="stop-btn">Stop</button>
      </div>
Now it's time to add styles to the container and boxes. The container div is centered by adding flex property to the body.
body {
    display: flex;
    flex-direction: column;
    justify-content: center;
    align-items: center;
    gap: 2rem;

    width: 100vw;
    height: 100vh;
}
Box divs styles are pretty self-explanatory. There is one thing that is worth mentioning. Highlighted line on .box class's style.
.box-container {
    display: flex;
    width: 80%;
    height: 216px;
    background: black;
    border: 8px solid black;
}

.box {
    align-self: flex-end; /* this line */
    flex-grow: 1;
    height: 200px;
    min-width: 50px;
}
Without that line, the animation would look like this:

Let's move on to getting references of buttons and boxes, and adding EventListeners to boxes.
window.addEventListener("load", () => {
    console.log("Loaded");

    const boxes = [...document.querySelectorAll(".box")];

    const startBtn = document.getElementById("start-btn");
    const stopBtn = document.getElementById("stop-btn");

    startBtn.addEventListener("click", () => {

    });

    stopBtn.addEventListener("click", () => {

    });
}
Initially, I thought to create a .animation-active class like this:
/*animation: name duration timing-function delay iteration-count direction fill-mode play-state;*/
.animation-active {
    animation: toggle-height 700ms infinite;
}

@keyframes toggle-height {

  0% {
    height: 10%;
  }

  100% {
     height: 110px;
  }
}
I tried to add the animation-active class to boxes when the start button is clicked and remove it when the stop button is clicked. But, you can see that the assignment requires to toggle the height of the boxes randomly and the animation-active class has fixed values for changing the height from 10% to 110px.
So, I decided to use JavaScript animation API. With the quick search for the animation API js, the link for Web Animations API - MDN came up. While looking out for how to use the API, I came across this link Using the Web Animations API. Here you can see how to move the animations from CSS to JavaScript by using animate property available on an HTML element. To convert the animation described in the animation-active class we can do something like this:
function animateElement(element) {
    boxes.forEach(box => {

        box.animate(
            [
                { height: "10%" },
                { height: "110%" }
            ],{
                duration: 700,
                easing: "linear:
            }
        );
    });
}
Now, we can programmatically change the height variable's value using template literals so our animate function would look like this:
function animateElement(element) {
    boxes.forEach(box => {

        box.animate(
            [
                { height: "10%" },
                { height: `${Math.floor(Math.random() * 100) + 1}%` }
            ],{
                duration: 700,
                easing: "linear:
            }
        );
    });
}
Great, now we can call the animate function on each of our box elements, and a random height will be set on the box when the animation is complete. Let's tweak our animate function a little bit so it will accept an element and animation object by setting animation over it.
function animate(box) {

    const end = `${Math.floor(Math.random() * 100) + 1}%`;

    return box.animate(
        [
            {
                height: "10%"
            },
            {
                height: end
            }
        ], {
            duration: 700,
            easing: "ease-in"
        }
    );
}
Let's create an EventHandler function for starting the animation, we will call it handleStart. The requirement for the assignment is to animate the height of the boxes until the stop is clicked. With those requirements in mind, we need to set up four things:
-
handleStartfunction. - a flag to signal whether the animation is playing or stopped.
- a loop to continuously animate height which will use the above flag as a condition.
- an array to store all the animation that could be cleared after each iteration of the loop
// flag
let stopAnimation = true;

// function
function handleStart() {

    while (!stopAnimation) {

        // array to store animations on each box
        let animations = [];

        // do something
    }

}
With our handleStart function in place can now start adding animation to each box using forEach loop and animate function.
function handleStart() {

    while (!stopAnimation) {
        // array to store animations on each box
        let animations = [];

        boxes.forEach(box => {
            animations.push({
                animate: animate(box)
            });
        })
    }
}
Our overall script now looks like this:
window.addEventListener("load", () => {
    console.log("Loaded");

    const boxes = [...document.querySelectorAll(".box")];

    const startBtn = document.getElementById("start-btn");
    const stopBtn = document.getElementById("stop-btn");

    let stopAnimation = true;

    function handleStart() {

        while (!stopAnimation) {

            // array to store animations on each box
            let animations = [];

            boxes.forEach(box => {
                animations.push({
                    animate: animate(box)
                });
            })
        }
    }
}

function animate(box) {

    const end = `${Math.floor(Math.random() * 100) + 1}%`;

    return box.animate(
        [
            {
                height: "10%"
            },
            {
                height: end
            }
        ], {
            duration: 700,
            easing: "ease-in"
        }
    );
}
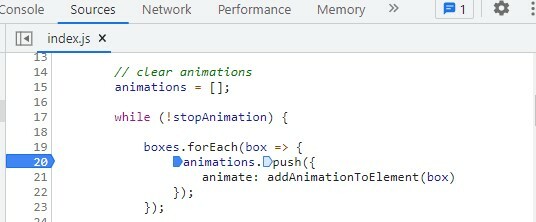
Hook up the style and script to the HTML page and open the page. I am using Live Server on VSCode as a local server. Click the start button to see if the handleStart function is working correctly. You can notice that nothing is happening after clicking the start button. Close the page it might not be responding and reopen it. Open up the debugger on our browser and put a breakpoint this line:
Click the start button and press step over next function call and look at the boxes you can see the animation on each box is running one by one. But when we click the start button nothing happens, and the page seems to be not responding. As it turns out animation in a loop crashes the page, maybe because we are not waiting for the animation to finish and starting another animation (as there is 700ms duration gap between each animation). Or at least, that's what I thought. So, I decided to add wait for each animation to finish before starting the next one. How do we add wait between each animation? Luckily, while experimenting with the animate interface on the single box, while logging out a couple of things, I discovered that there is a finished property on the returned value of the animate() method of the Element interface.
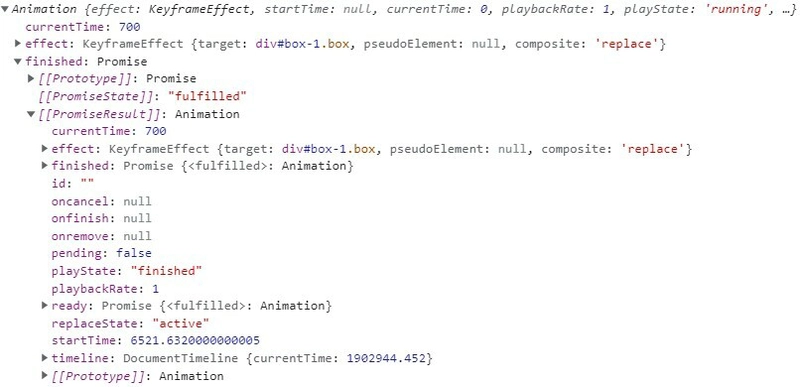
As you can see, in the above image that finished property is a Promise that resolves into Animation object. This object will come in handy later while setting the height of the box after the animation ends to persist the box height after the animation ends. For now, loop over the animations array. Now our handleStart function looks like this:
async function handleStart() {

    while (!stopAnimation) {

        // array to store animations on each box
        let animations = [];

        boxes.forEach(box => {
            animations.push({
                animate: animate(box)
            });
        })

        for(let i = 0; i < animations.length; i++) {
            const eachAnimation = animations[i];

            const animationObj = await eachAnimation.animate.finished;
        }
    }
}
Notice we aren't using forEach loop to iterate over the animations array, because Promise doesn't work in forEach loop.
Open the page again and click the start button. Animations are working. So what this line const animation by = await eachAnimation.animate.finished; is doing is that it is waiting for each animation to finish. After each animation finishes, the control goes to the outer while loop. The animation now looks like this:
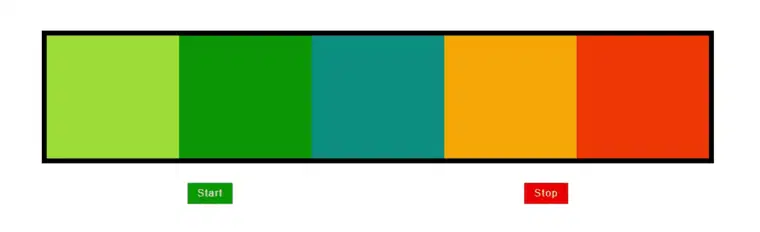
We have come a long way, animations are working, and the page is not crashing because of animations running wild in a while loop. All that is left is to set the height of the boxes to the height at which animations end. Time to put animationObj to use. Quickly console.log the animationObj, notice there is an effect property on it. The effect property has a KeyframeEffect object which has a target property pointing to the element on which the animation has finished playing. We are going to use the target property to get the element. Let's set up a function to extract the element's height at which the animation ended. Since the element returns to its original height after the animation end, we have to set height programmatically. We will name the function setElementHeightAfterAnimation.
function setElementHeightAfterAnimation(animation) {

    // get target element whose animation ended
    const srcElement = animation.effect.target;
}
newBoxHeight is the variable that will hold the height value at which animation ended. To get the height, let's look again at animationObj's effect property, animationObj has the getKeyframes() method on it. This method returns the keyframes assigned to the animation through the animate method. Since we just set two keyframes, the getKeyframes() method will return an array of two objects each for two keyframes.

You can guess what we are going to do next. That's right! We will extract the height at which animation ended through the getKeyframes() method.
function setElementHeightAfterAnimation(animation) {

    // get target element whose animation ended
    const srcElement = animation.effect.target;

    // get height at which the animation ended
    // keyframes returned contains the value at index 1 where
    // animation ended
    const newBoxHeight = animation.effect.getKeyframes()[1].height;

    // set the height of the element equal to newBoxHeight
    // so that the animation should start from new height
    srcElement.style.height = newBoxHeight;
}
After adding call to setElementHeightAfterAnimation from the for loop will now set the height of the box. All that is left now is to set the EventHandlers for start and stop buttons.
window.addEventListener("load", () => {
    .
    .
    .
    .
    // function
    async function handleStart() {

        while (!stopAnimation) {
            .
            .
            .
            .

            for(let i = 0; i < animations.length; i++) {
                const eachAnimation = animations[i];

                const animationObj = await eachAnimation.animate.finished;

                // add this line
                setElementHeightAfterAnimation(animationObj);
            }
        }
    }

    startBtn.addEventListener("click", () => {
        stopAnimation = false;

        handleStart();
    });

    stopBtn.addEventListener("click", () => {
        stopAnimation = true;
    });
}
That's it. Now our boxes will animate randomly while the start button is clicked and stop at the height at which the stop button gets clicked. Complete script will look this:
window.addEventListener("load", () => {
    console.log("Loaded");

    const boxes = [...document.querySelectorAll(".box")];

    const startBtn = document.getElementById("start-btn");
    const stopBtn = document.getElementById("stop-btn");

    let stopAnimation = true;

    // function
    async function handleStart() {

        while (!stopAnimation) {
            // array to store animations on each box
            // resets after each iteration
            let animations = [];

            boxes.forEach(box => {
                animations.push({
                    animate: animate(box)
                });
            })

            for(let i = 0; i < animations.length; i++) {
                const eachAnimation = animations[i];

                const animationObj = await eachAnimation.animate.finished;

                setElementHeightAfterAnimation(animationObj);
            }
        }
    }

    startBtn.addEventListener("click", () => {
        stopAnimation = false;

        handleStart();
    });

    stopBtn.addEventListener("click", () => {
        stopAnimation = true;
    });
});

function animate(box) {

    // since the height of each box is 200px
    // dividing the offsetHeight by 2(200/2) to
    // convert the box's height to percentage
    const start = `${box.offsetHeight/2}%`;

    const end = `${Math.floor(Math.random() * 100) + 1}%`;

    return box.animate(
        [
            {
                height: start
            },
            {
                height: end
            }
        ], {
            duration: 700,
            easing: "ease-in"
        }
    );
}

function setElementHeightAfterAnimation(animation) {

    // get target element whose animation ended
    const srcElement = animation.effect.target;

    // get height at which the animation ended
    // keyframes returned contains the value at index 1 where
    // animation ended
    const newBoxHeight = animation.effect.getKeyframes()[1].height;

    // set the height of the element equal to newBoxHeight
    // so that the animation should start from new height
    srcElement.style.height = newBoxHeight;
}
It is my first post, so please be kind. There might be some things that can be done more easily. Or maybe this whole thing could have been done differently. Please let me know about your suggestions and thought on this post.

Top comments (0)