Install Linux Mint
Linux Mint is one of the most popular distributions of the Linux operating system. Currently, this distribution along with Windows and Mac is one of the most popular operating systems in the world. In this article, we are going to teach you how to install Linux Mint step by step with a photo. So join us.
Undoubtedly, Linux Mint is one of the best Linux distributions for beginners. It is easy to use, does not consume much system resources and has a lot of software available.
Different ways to install Linux Mint
There are three different ways we can install Linux Mint. Linux Mint installation methods are:
Install Linux Mint in VirtualBox on Windows like a regular desktop application.
Install Linux Mint in Dual Boot mode with Windows, which holds both Windows and Linux Mint on one computer.
Replace all other operating systems and install Linux Mint as the only operating system on your computer.
In this tutorial, we will show you how to install Linux Mint and remove other operating systems from your computer. In fact, we have Mint as our main operating system.
How to install Linux Mint
We are using the Linux Mint 20 Cinnamon edition. However, the steps work for installing other versions of Mint and desktop types such as Xfce and MATE. The screenshot taken from the Linux Mint installation steps may look a little different, but the steps are the same.
Requirements for installing Linux Mint:
A USB with a capacity of at least 4 GB. You can also use a DVD.
Active internet connection to download Linux Mint ISO
Tool for making bootable USB drives.
You do not need internet to install Linux Mint.
Note: If you have important data on the system where you want to install Linux Mint, you must copy the files to an external disk.
Minimum system requirements for Linux Mint 20 Cinnamon default version:
At least 1 GB of RAM (2 GB recommended for easy use).
At least 15 GB of disk space (20 GB recommended). Minimum resolution 1024 × 768
Note: This method of installing Linux Mint will format your entire disk. This means that any data in the system will be lost. For this reason, please save your data to an external USB drive so that you can copy it after installing Mint.
Step 1: Download Linux Mint ISO to install Linux Mint
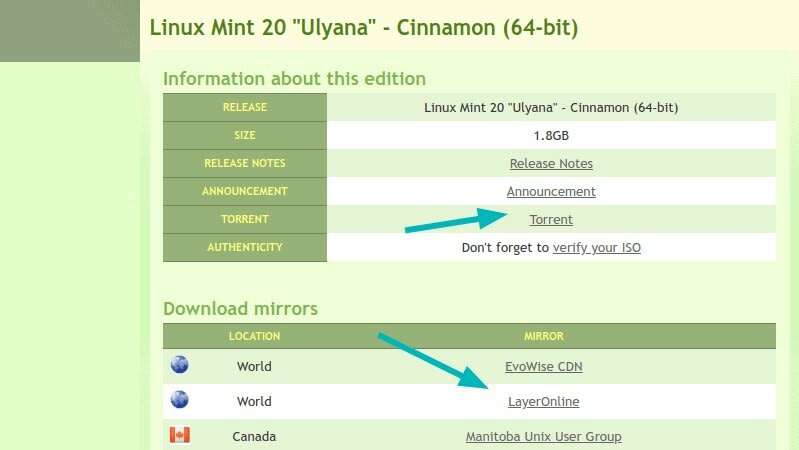
Go to the Linux Mint website and download the Linux Mint in ISO format. This file is used to create an installation USB.
Download Linux Mint
You will find three types:
Cinnamon
MATE
Xfce
If you do not know enough about them, go with the default version of Cinnamon. When you click on it, you will find various websites and related links to download the ISO file.
After downloading the file, we must prepare it for the next steps of installing Linux Mint.
Download Linux Mint
Step 2: Create a bootable USB drive from Linux Mint
Now that you have downloaded the ISO, it is time to create a live USB from Linux Mint. You need proprietary software to create a live USB. Several of these tools are available for free. You can use Etcher available on Windows, Linux and macOS.
If you use Windows, you can also use Rufus. In this example we have used Rufus.
Download Rufus and run the exe file and you will see a page like the one above.
Create a bootable USB drive from Linux Mint
How to create Linux Mint Live Usb
You select the ISO. You may confuse this with partitioning. Almost all computers have been using the GPT partitioning scheme for the past 7 years or more. Older computers and systems may use MBR partitioning. You should check which partitioning scheme your system uses to make sure you choose that option.
If you choose the wrong partitioning scheme, you may not be able to install Linux Mint successfully. In this case, go back to this step and re-create the USB by selecting another partitioning scheme.
Step 3: Boot from USB containing Linux Mint
Once you have successfully created USB Linux Mint, it's time to use it to install great Linux Mint.
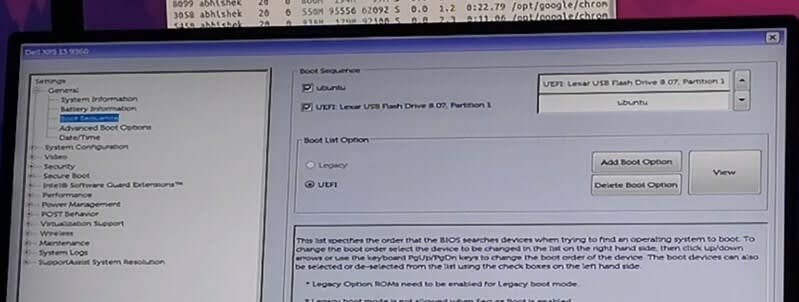
Connect the Linux Mint Live USB and restart your system. On the boot screen, when you see the manufacturer logo of your laptop or computer, press F2 or F10 or F12 to enter the BIOS settings.
At this point, you need to make sure you select the boot for USB or DVD. In this tutorial, we choose the first one. Select USB at the top of the boot command.
This screen may look different for different manufacturers. You have to find these settings yourself or search the internet. Make changes, save and exit.
Boot from USB containing Linux Mint
Step 4: Install Linux Mint
a) Change the boot to USB
You must now boot into the Linux Mint live environment. You will see a page like this that gives you several options. Proceed with the first option.
Linux Mint installation tutorial
You'll be in the Linux Mint live environment in seconds. If you have USB 2 it may take longer.
b) Select the Install Linux Mint icon
You will see the "Install Linux Mint" icon on your desktop. Click on it to start the installation process.
Install Linux Mint
c) Language selection
In this step you will be asked to select some basic settings such as language and keyboard layout. Choose the most suitable for your system. Select the Linux Mint keyboard layout as follows.
Install Linux Mint
Note: Do not connect to the Internet during installation. We strongly recommend that you do not connect to the Internet when installing Linux Mint. This way the installation is faster because it does not try to download updates during installation.
d) Select the partition to install Linux Mint
The next page is the most important part of installing Linux Mint. You want to format the entire hard drive and install Linux Mint. Linux Mint will be your only operating system. Again, this means that you will lose all data on the disk. Please copy important files to an external disk.
In this way, installing Linux Mint manages everything alone. This creates an ESP partition to manage the EFI boot with a size of about 500 MB and the rest of the disk is allocated to the root partition. The root contains a swap file for swap use and your main directory. This is the easiest way to get started with Linux Mint.
Install Linux Mint
In this step you will erase the disk and install Mint. You will be warned that the disk will be formatted. Click continue.
e) Select the time zone
In the next section, you must select the time zone. You can do it later.
Linux Mint installation tutorial
f) Specify username and password
After that, you will be presented with a page that asks you to set your username and password. Use an easy password to remember because you should always use it.
Linux Mint installation tutorial
From now on, everything is quite simple.
g) Complete the installation
You need to wait about 5-10 minutes for the Linux Mint installation to complete. After the installation is complete, it will ask you to restart the system. Restart it.
Linux Mint installation tutorial
h) Remove the USB drive
Linux Mint installation is complete. When the system shuts down, it will ask you to delete Live USB as well.
Linux Mint installation tutorial
Well, we've finished installing Linux Mint. You are now booting into Linux Mint. Enter the password you just created and log in to Linux Mint to see a welcome page like this:
Well, we were able to install Linux Mint on our computer easily
and with the least hassle. Now it's time to enjoy using Mint's popular operating system.


Top comments (0)