
Pankaj Parker | ng-conf | Mar 2019
A detailed guide to the core part of Angular Framework
Angular is one of the most extraordinary javascript frameworks available, because it all the features required for the web development out of the box. The change detection system is at heart of framework, it essentially helps to update bindings on a page. In this article, we will learn about change detection in detail, in a simple and easy to understand way.
Before we begin, let me highlight what principles frameworks or libraries to build applications these days.

General Application Architecture
Basically what we have is the state of our application, that we are trying to replicate on the UI, this is why we need data bindings on the template. Afterward we wire up “state + template” and replicate data on view. Also in the future, any changes that happen in the state get reflected on view.
This process of syncing HTML with the state can be termed as “Change detection”, each framework has its own way of doing it. React uses virtual DOM with reconciliation algorithm, Angular uses change detection, etc. This article will cover how change detection works in Angular.
What is Change Detection?
In simple word:- a process to synchronize the model/state changes to the view.
Let’s take a simple example. Suppose we have a simple component with its own HTML like shown below.
a simple binding example
<span>
  {{title}}
</span>
<button (click)="title='Changed'">
  Change Title
</button>
app.component.html hosted by GitHub
import { Component } from '@angular/core';
@Component({
  selector: 'my-app',
  templateUrl: './app.component.html',
  styleUrls: [ './app.component.css' ]
})
export class AppComponent  {
  title  = 'Angular'
}
app.component.ts hosted by GitHub
app.component.html has a simple span which is displaying the title property of a component and there is a button on click which will modify the title property value of changed.

demo
When the page gets happens, it shows "Angular“ on the page. Later when we click on Change Title button it changes the binding value to ”Changed“. This is super awesome, the Angular framework manages this functionality for us. What it essentially does is, track the value changes which are automagically reflected on the UI. Awesome! Check this stackblitz of the above example.

magic
Wondering 🤔 How angular updates the binding? That’s okay! Nothing really happens with magic, a framework must be running some code behind the scenes to do it. This process of updating binding is called as change detection. But the question is when angular running a change detection and how? To find out answers to these question, let’s dig a bit further.
When should change detection happen?
The simple answer to this question would be “as soon as an application’s state changes”. But when does the application’s state can change? 🤔
- Event Callback
- Network Call (XHR)
- Timers (setTimeout, setInterval)
Do you see any similarity in the examples above? Yes! they are all asynchronous. That means we can simply say any asynchronous call can cause a change in application state and that’s the instance where we should update our state on UI. So far so good!
Suppose we’re building our own change detection system, we would be firing change detection after the above 3 situations.
Let’s try to implement our own change detection system.
We’re just making sure to call detectChanges method from each method which includes XHR call, Timer, and Event. Just assume that the detectChanges method is responsible for the actual change detection. The vague implementation of change detection would look like the example below
//network Call
getDataFromServer().then(()=> {
   //state has changed
   detectChanges();
})

//timeout function
setTimeout(()=> {
   //Call change detection
   detectChanges();
}, 5000)

element.addEventListner('click', (event) =>{
   //state could have change
   detectChanges();
});
change-detection.js hosted by GitHub
And the implementation of detectionChanges method would look like the example below
let detectChanges => () => {
  if(currentState != prevState) {
    updateView(currentState);
  }
}
detectChanges.jshosted by GitHub
Ah! but doing this thing inside our real-world application will mess up everything. Generally in a real-world application you could have this in hundreds of thousands of places. So what can be a better implementation of this? Basically, we can also say that we are supposed to fire change detection when VM turn is over.
ZoneJS to the rescue
ZoneJS is an API which has been mostly ported out from the dart language. Behind the scenes, ZoneJS monkey patches the function. Basically, it helps to keep an eye on all async tasks, and provide an ability to call code before or after a task has been completed. The Zone API has different hooks to place your code onBeforeTask, onAfterTask, onZoneCreated, onError.
ZoneJS simple example
var myZoneSpec = {
  beforeTask: function () {
    console.log('Before task');
  },
  afterTask: function () {
    console.log('After task');
  }
};

var myZone = zone.fork(myZoneSpec);
myZone.run(function() {
   console.log('My task successfully got executed.')
});

// Output:
// Before task
// My task successfully got executed.
// After task
zonejs.js
So Angular uses the power of Zones to fire change detection. What happens is, if any asynchronous call happens, ZoneJS API emits data to the onMicrotaskEmpty observable, and angular calls the detectChanges method based on the same.
What happens when Application Bootstrap?
When an angular application bootstraps, it creates a platform for a bootstrapped angular module. It creates an ApplicationRef for a whole module. Basically, ApplicationRef has a reference to allcomponents, componentTypes and isStable (zone flag), also it has methods like detatchView, attachView, tick etc. You can look at this line from the source code.
Let’s have a quick look at application_ref.ts from the angular source code. You will see that after creating an ApplicationRef, it places a subscription on the onMicrotaskEmpty observable, so as soon as the VM tick over it emits a value into onMicrotaskEmpty observable, that will be listened to by a subscription, eventually that will call the tick method inside the current Zone of application.
this._zone.onMicrotaskEmpty.subscribe({
  next: () => {
    this._zone.run(() => {
      this.tick();
    });
  }}
);
zone_tick.js hosted by GitHub
Let’s look into how the tick method works.
tick(): void {
    try {
      this._views.forEach((view) => view.detectChanges());
      if (this._enforceNoNewChanges) {
        this._views.forEach((view) => view.checkNoChanges());
      }
    } catch (e) {
      ...
    } finally {
      ...
    }
  }
tick_implementation.js hosted by GitHub
Implementation of the tick method looks pretty simple. It basically loops over each view (components are internally referred to as view) and calls their detectChanges method which is responsible for updating UI bindings. The interesting thing is on the 4th line, it runs only in dev mode because in the application_ref.ts constructor it sets to_enforceNoNewChanges property.
this._enforceNoNewChanges = isDevMode()
Above is a gist about how change detection works, let's dig deeper how we can use this while crafting Angular application.
Change Detection Strategy
In total angular has two flavours of change detection.
- Default
- OnPush
Let's look at each change detection strategy.
Default
When you don’t specify the change detection strategy on the Component decorator, by default angular applies the Default strategy.
Any Angular application consists of components, the component where we bootstraped a root component. and we can draw out a diagram of an application with regards to a component. So if change detection fires in any component it will cause the tick method to be fired in the ApplicationRef. Ultimately firing detectChanges method from root component to its descendants as shown in the diagram below.

change detection strategy — Default
The problem with the default strategy is, changes that have been detected in on any component lead to firing change detection on all the components (if all component are set to Default strategy. But most of the time we don’t need such behavior, it would eventually affect the performance of an application by running multiple unnecessary change detection cycle.
Can we solve this problem efficiently? Luckily there is a solution, you can easily switch the change detection strategy to OnPush.
OnPush
onPush strategy makes component change detection bit smarter. It runs a change detection for a component only when Input bindings value of a component is changed. Actually, it compares the reference between oldValue and newValue of a Input binding. That means if a parent components properties of an object do not change it would not trigger change detection for that component.
change detection strategy — OnPush
As you can see in the above diagram, we’ve set a level 1 component to OnPush strategy. Both the component have the input of name. The root component is passing the input name to both the component with name1 and name2 respectively. On initial page load change detection fires on all the components. And later the right-hand side component emits an event, which tends to change the root component state.
So, again change detection started firing from the root component. Then change detection runs for the 1st level (OnPush) component. Before firing change detection on those components, it checks for the input binding name newValue and oldValue and if there are changes then only fire change detection for that component and it’s descendants. Changes have been detected for the right-hand side component. So change detection gets triggered only for right-hand side branch of components. By setting OnPush change detection strategy we can significantly improve application performance.
Make sure you enforce immutability on the
Inputbinding value while using componentOnPushstrategy.
Before proceeding we can have a look at a real application that is built using both change detection strategies. This application is deployed on https://pankajparkar.github.io/demystifying-change-detection.
This is a pretty simple application, it has posts displayed on the page and each post can have comments. The way that the application architected, it’s component hierarchy shown below.
root => post-list (all posts)=> post (single post)=> comment-list
The black border around the component indicates the boundary of that particular component.
Since we want to keep eye on when change detection fires, we highlight the components to yellow as soon change detection fires. We have used ngAfterViewChecked which tells us that the change detector has visited the current component.
highlight component on change detection fired
ngAfterViewChecked(): void {
  this.zone.runOutsideAngular(() => {
    this.el.nativeElement.classList.add('highlight')
    setTimeout(() => {
      this.el.nativeElement.classList.remove('highlight')
    }, 1500)
  })
}
highlight.ts hosted by GitHub

all component on default strategy
So you can see in the above diagram, on initial page load gets highlighted and they applied with highlight class. Thereafter while adding a comment in a comment field, you can see that on each keyup event it fires change detection and all component get highlighted.
Now, look at the uses of the OnPush change detection strategy, how it makes a difference in the change detection run cycle.
Right now all the components are set to OnPush strategy. So on page load change detection runs for all components, that’s perfectly fine. Thereafter when I tried to add a text in the comment section, it fires change detection for the comments section of the current component, not others. That’s great! But you can see that the other components post components are getting highlighted.
Ah! What is going on? PostComponent is already set to OnPush, there is no Input binding on that component but it seems to be changed. Is this a bug, is the ngAfterViewChecked lifecycle hook being called without reason? Perhaps.
Let’s not get confused. We can look into further.
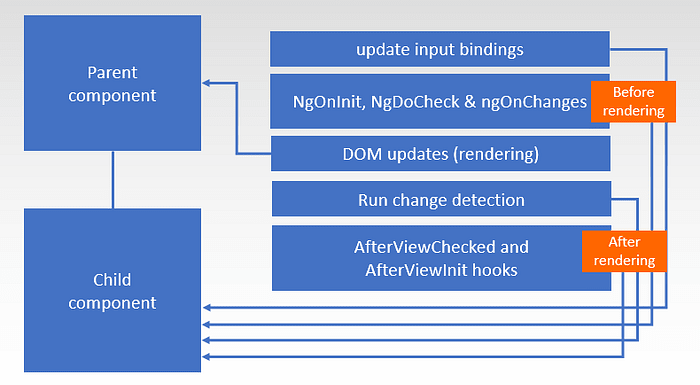
Taken from Max Koretskyi article from @angularInDepth
Refer to the above diagram — When change detection is running for a parent component, it follows a certain process. Initially, it updates the binding of child components, then calls the ngOnInit, ngDoCheck, ngOnChanges lifecycle hook of the child component. We can also state that this process happens before rendering the parent component. Then it updates the DOM on the current component. Later it runs change detection for a child component(depending on the strategy), followed by calling hooks ngAfterViewChecked, ngAfterViewInit.
That means while running change detection of a parent component, it runs ngDoCheck, ngContentChecked, ngAfterViewChecked lifecycle hooks of child component irrespective of a component change detection strategy.
Check this Github issue link logged by Pascal Precht ʕ•̫͡•ʔ
You might have missed, There is a catch. If you look at the change detection strategy of PostListComponent, it has been set to OnPush strategy, but there is no Input binding passed to it. So when PostListComponent component retrieves a data form the ngOnInit hook, it doesn’t run change detection from the root component (AppComponent). But it prevents to running change detection on PostListComponent since no Input have been changed. So we had to call either the detectChanges method or the markForCheck method of ChangeDetectorRef dependency. This will force change detection to run throughout. Such cases can easily happen in a real-world application. You can tackle such situations by calling markForCheck or detectChanges.
TL;DR
The difference between calling markForCheck, detectionChanges and tick would be
markForCheck — Once you call markForCheck method on component change detector, it will traverse a component tree till root, and mark those components to run change detection only for the next iteration. It will run change detection on marked component even though they are using the OnPush strategy.
detectChanges — When you call this method on changeDetectorRef provider, it will run change detection from the current component and all it’s descendants. While running change detection it keeps the change detection strategy in mind.
tick — The tick method applicable on ApplicationRef API. It will run change detection from the root component to all its descendants. It respects the change detection strategy of a component.
There are two more methods that exist in the ChangeDetectorRef provider
detach — By calling this method you can pluck out a component from the tree of the current component to its descendants. Whenever there is a need for running change detection on the component you could call detectChanges or markForCheck method depends on your need.
reattach — A Plucked a component from the tree can be easily brought back to its original place by calling reattach method. This can be used for fine tune application performance.
I hope this article has helped you to understand the mystery of what’s under the hood of change detection. Eventually, this will also make you comfortable with predicting when change detection runs in your application. By applying various flavors you can easily gain performance benefits in your application.
I gave a talk about this topic recently in #ngIndia
If you like this article press 👏 clap button 50 times or as many times you want. Feel free to ask a question if you have any. Thanks a lot for reading!
Thanks Tayamba Mwanza for grammatical review 😊
ng-conf: Join us for the Reliable Web Summit
Ready to build the most reliable web applications possible? Join us for the Reliable Web Summit this August 26th-27th, 2021 to learn how! A summit conference on building reliable web applications, including the following three pillars:
- Scalable infrastructure and architecture
- Maintainable Code
- Automated Testing

Top comments (0)