
Amazon Simple Storage Service (S3)?
Amazon Simple Storage Service (S3) is one of the numerous services offered by Amazon Web Services(AWS), an on-demand cloud computing platform. Amazon S3 provides scalable object storage through a web service interface that is used to store and retrieve any amount of data, at any time, from anywhere on the web.
Github Actions?
GitHub Actions makes it easy to automate your workflows like build, test, and deploy when using Github, a platform that provides hosting for software development version control using Git.
In this post, we will go through:
- How to create an Amazon S3 bucket.
- How to set up an S3 bucket for Web Hosting.
- How to configure our Github actions to automatically deploy changes to the S3 bucket. In the end, deploy a React App to live.
Before we get started, you need to have:
- A Github account.
- An AWS Account
This exercise can be accommodated within the AWS Free Tier
Create Amazon S3 Bucket
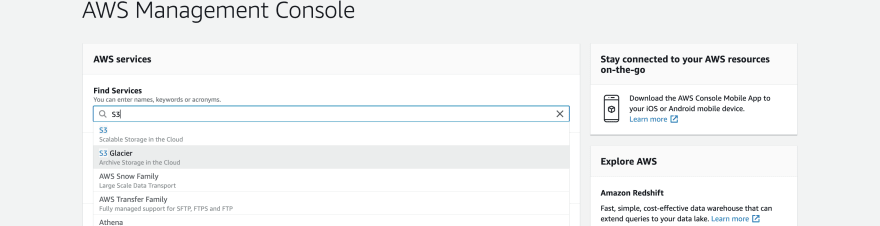
First, log in to your AWS account. On the AWS Management Console, click S3 from the list of services under the Storage section or use the search bar.
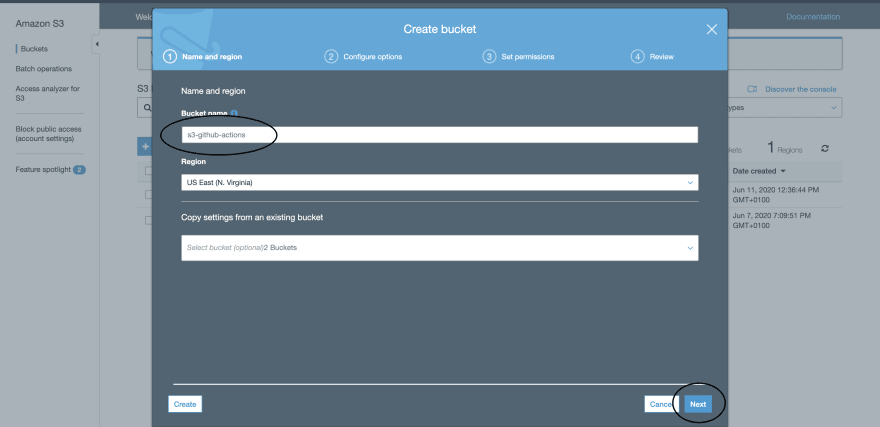
On the Amazon S3 page, click on Create Bucket

To create a bucket, provide a Bucket Name. An S3 bucket name must be unique amid all buckets universally in Amazon S3. Also, take note of the Region you are creating the bucket in. For this post, we are using US East (N. Virginia) which is us-east-1.
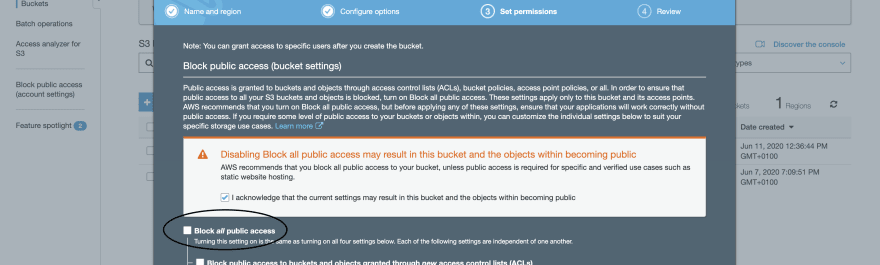
Uncheck the checkbox for Block all public access. After, click on Next and Review bucket configurations. Then click Create bucket.
Add Bucket Policy
This makes the contents of your bucket publicly available. This action is not recommended when working with S3 buckets, but for this our purpose this is fine.
Under Buckets, choose the name of your bucket(s3-github-actions) > Choose Permissions > Choose Bucket Policy.
Copy the following bucket policy, and paste it in the editor.
{
    "Version": "2012-10-17",
    "Statement": [
        {
            "Sid": "PublicReadGetObject",
            "Effect": "Allow",
            "Principal": "*",
            "Action": [
                "s3:GetObject"
            ],
            "Resource": [
                "arn:aws:s3:::<bucket-name>/*"
            ]
        }
    ]
}
Update the snippet to include your bucket name. In the bucket policy, <bucket-name> you must update this name to match your bucket name.
Then, click on Save.
Enable Static Website Hosting
Click Use this bucket to host a website.

Type index.html in the Index document field and Save.

Note: Take note of the Endpoint URL, our website will be accessible in the browser using this URL.
Create and Push React App to GitHub
Now we have our S3 bucket, it's time to create and push our React App to GitHub.
- First, create a
New Repositoryon GitHub.
After creating a repository, You could:
- Create a React application using Create React App or Parcel-Bundler and ensure that there is a build script in the
package.jsonfile will output to adistfolder.
  $ git init # initialize git locally
  $ git add . # add changes to git
  $ git commit -m "React App" # commit changes
  $ git remote add origin <your-github-repo-url.git> # add remote origin
  $ git push -u origin master # push to remote master branch
OR
- Clone the sample React App repository
S3-Github Actions React Appthat we will be using for this post and add your repository'sremoteURL. GitHub Repo - S3-Github Actions React App
To add new remote (this will add a new remote called actions):
  $ git remote add actions <your-github-repo-url.git> # add remote actions
  $ git push -u actions master # push to remote master branch
To set up our workflow, we need to provide the AWS_ACCESS_KEY_ID and AWS_SECRET_ACCESS_KEY and AWS_REGION of the S3 bucket in other to connect successfully to Amazon S3.
Get AWS Authorization
On the AWS Console:
- Click on
IAMunder theSecurity, Identity, & Compliancesection. - Click on
Usersand select your preferred user. - Under
Security Credentials, click onCreate Access Key. This will create anAWS_ACCESS_KEY_IDandAWS_SECRET_ACCESS_KEY, copy these values. You can also manage key access by either deleting or making it inactive.
Even with a confidante, you do not ever what to share your access keys. Your confidante might have a confidante. Who knows! 🤷🏻♂️.
So that's why we will be passing some very important values as Secrets on GitHub then later access them in the workflow file using the expression syntax. ${{ <expression> }}
Back to Github
Click on the Settings tab, Select Secret on the left menu, then click on New Secret to add a secret providing the Name and Value.
| Name | Value |
|---|---|
| AWS_ACCESS_KEY_ID | your-aws-access-key-id |
| AWS_SECRET_ACCESS_KEY | your-aws-secret-access-key |
| AWS_REGION |
us-east-1 or your-aws-s3-region |

Setup Github Actions
Now, we have the S3 bucket set up and a React app to deploy.
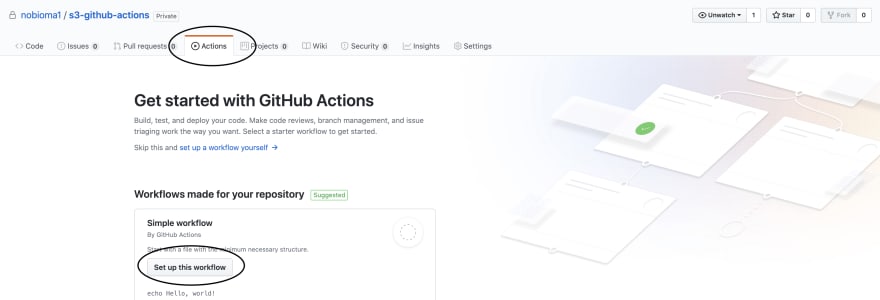
On the GitHub repository, click on the Actions tab to open the Github actions page. On the Actions page, click on the Set up this workflow or set up a workflow yourself -> button, this will redirect to a new page with a web editor containing some boilerplate code but we will get rid of that.
First, let's name the workflow file. Change blank.yml to s3-depl. You can leave the filename as blank.yml, but it is best to give it a descriptive name.

Copy and paste the code snippet into the editor. Copy and Paste, a developer's superpower 🦸🏻♂️🦸🏻♀️.
name: s3-depl

on:
  push:
    branches:
      - master

jobs:
  build:
    runs-on: ubuntu-latest
    steps:
      - uses: actions/checkout@v2
      - name: Configure AWS Credentials
        uses: aws-actions/configure-aws-credentials@v1
        with:
          aws-access-key-id: ${{ secrets.AWS_ACCESS_KEY_ID }}
          aws-secret-access-key: ${{ secrets.AWS_SECRET_ACCESS_KEY }}
          aws-region: ${{ secrets.AWS_REGION }}
      - name: Build React App
        run: npm install && npm run build
      - name: Deploy app build to S3 bucket
        run: aws s3 sync ./dist/ s3://<bucket-name> --delete
Mehhnnn! So many lines!!🥶
Now, let's breakdown the code snippet above.
name: We define the name of this action. This will be used to identify the action amid may others you may have.on: We define trigger withon:pushalso the branch. This workflow will run anytime youpushcode to themasterbranch.-
jobs: Workflow run is made up of one or more jobs and they run in parallel by default.-
steps: A job contains a sequence of tasks called steps. Steps can run commands, run setup tasks, or run action in your repository and each step starts either with auses:or aname:. - actions/checkout@v2: This action checks-out your repository, so your workflow can access it.
- aws-actions/configure-aws-credentials@v1: This configures AWS credentials and region environment variables for use in other GitHub Actions.
-
Build React App: This step block installs the node packages and runs the
buildin thepackage.jsonfile, which creates adistfolder in the root directory. -
Deploy app build to S3 bucket: This deploys the newly created build to
S3bucket<bucket-name>(replace<bucket-name>with the name of yourS3bucket. Mine iss3-github-actions).
-
To save, click on the Start Commit then Commit New File. This will,
- save the action, creating a
.githubdirectory with aworkflowsdirectory in it that contains the new files3-depl(the file name you used earlier) - Trigger the action.
To check the progress, click on the Actions tab.

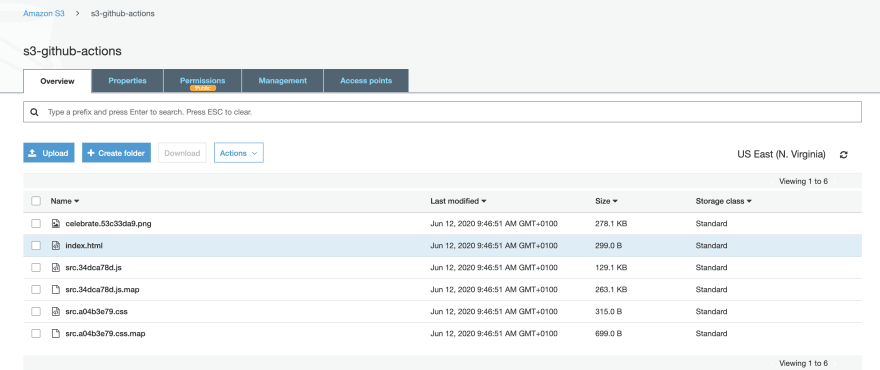
Voila!! The action ran successfully. Yay! Party After Party!! 🎊
You can now check your S3 bucket, you would see that the build files have been uploaded to it.
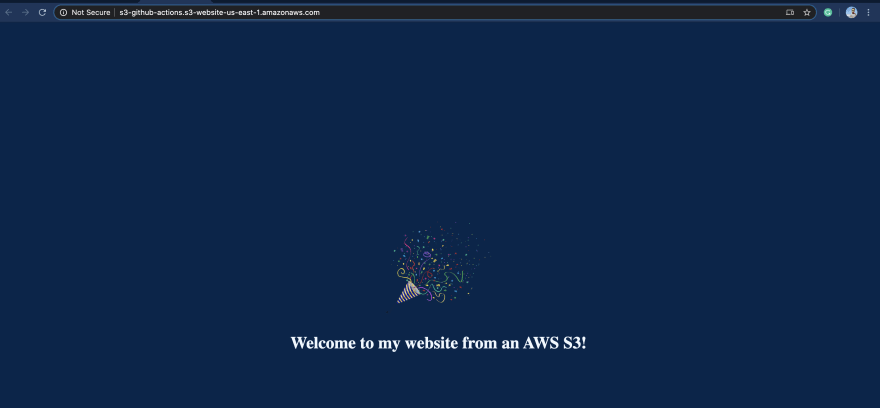
Our site is now live!!! On the browser, go to the Endpoint URL (http://<s3-bucket>.s3-website-<s3-region>.amazonaws.com) that we came across when enabling Static Website Hosting. Now, any change you make to your react app will build and upload to your S3 bucket which will update live.
You can go on to work with Github Actions by triggering an action on Pull Request that might run some CI tests and perform several steps before deploying to your S3.
Thank you. 🎊

Top comments (10)
Once you push this live, Does it route anything through github actions when a user visits?
No, it will not route anything through GitHub Actions when a user visits your site. After a successful deploy to your
S3bucket, the GitHub action terminates and will only be triggered when you make a new push to themasterbranch.Great, Thanks for clarifying! How will the website performance be if there are 100 users on the website at a time vs. 10,000 users at a time?
Thank you for your question 🙂. For Amazon S3, it is inherently scalable and scales seamlessly to serve thousands of HTTP or HTTPS requests per second without any changes to the architecture. But we can improve our current architecture by configuring the site to be served from the
S3bucket throughAWS Cloudfront, which will give some benefits and more like:Great post, can I check do you upload everything in the build folder to the bucket or the build folder itself?
The simplest way is to upload the content of the
buildfolder so that theindex.htmlis at the root of the S3 bucket.If you upload the
buildfolder you may have to tweak some S3 settings to get it working.Awesome
No caching? Need to cache the dependencies to reduce the build time.
Yea, you can check this out dev.to/github/caching-dependencies...
What about node installation.. Will it be available in the actions container. ?