For this tutorial I am going to be using a third-party library called react-native-bootsplash
- Install the library:
yarn add react-native-bootsplash
1.1. for iOS installation go to ios/ directory and run pod install
2.You can use the following command to generate the splash screen with the specified options:
npx react-native generate-bootsplash app/assets/my_app_logo.png \
  --background=#FFFFFF \
  --logo-width=150 \
  --assets-output=app/assets \
  --platforms=android,ios,web \
  --flavor=main
In this command:
app/assets/my_app_logo.png is the path to your logo file.
--background=#FFFFFF sets the background color to white (#FFFFFF).
--logo-width=150 specifies the logo width as 150 pixels.
--assets-output=app/assets specifies the output directory for generated assets.
--platforms=android,ios,web generates assets for Android, iOS, and web.
--flavor=main is the Android flavor build variant (where your resource directory is).
After running this command, the "react-native-bootsplash" tool will generate the necessary assets and configurations for your splash screen. Make sure to verify that the generated assets are placed in the appropriate folders within your project, especially in the Android and iOS directories.
- iOS further installation:
iOS Integration for React Native Splash Screen
3.1 Open the AppDelegate.mm file in your iOS project located in the ios/YourProjectName directory.
3.2 Import the "RNBootSplash" header at the top of the AppDelegate.mm file:
#import "RNBootSplash.h"
3.3 Add the following code before the @end of the AppDelegate.mm file:
- (UIView *)createRootViewWithBridge:(RCTBridge *)bridge
                          moduleName:(NSString *)moduleName
                           initProps:(NSDictionary *)initProps {
  UIView *rootView = [super createRootViewWithBridge:bridge
                                          moduleName:moduleName
                                           initProps:initProps];

  [RNBootSplash initWithStoryboard:@"BootSplash" rootView:rootView]; // Initialize the splash screen

  return rootView;
}
now after that there will be a file generated called: Bootsplash.storyboard find it in your finder and drag and drop it in your xcode projects right where the AppDelegate.mm file
Create folder references:
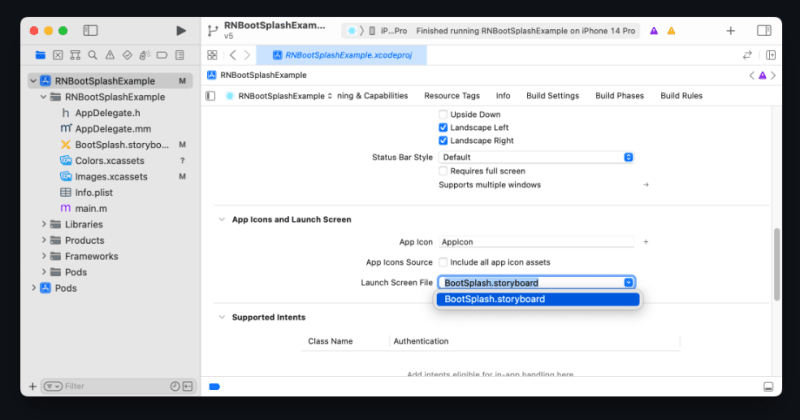
Set BootSplash.storyboard as Launch Screen File:

- Android: follow these instructions: Android installation guide
Once it is done, you can import BootSplash from react-native-bootsplash and use it like bolow if you are using React Navigation:
<NavigationContainer
      onReady={() => {
        BootSplash.hide();
      }}>
      <AuthNavigator />
    </NavigationContainer>
I hope it was useful!


Top comments (0)