This last week I spent some time with my daughter working on a drawing program. I was showing her how computational thinking works by first thinking in terms of breaking down the problem (Problem Decomposition). This makes up one of the four pillars of computational thinking.
- Problem Decomposition
- Pattern Recognition
- Data Representation / Abstractions
- Algorithms
Things quickly broke out from there about the kind of fun drawings, emojis, and learning to identify broken behaviors and when to fix them. It's a fun learning exercise if you have any kids, to think of a problem at hand and simply explore it iteratively. You can come up with new ideas on the fly so it makes it quite a playful experience for the little ones.
In any case, I wanted to build on this idea and add in a component for drawing collaboratively using WebRTC. We will be using simplepeer to handle the WebRTC layer as it simplifies the implementation quite a bit. Let's get started!
Setup
First, like all projects, we need to setup to make sure we have a place to draw on the screen as well as have tools to work with. Eventually, we will want the ability to have a tools in a toolbar to select, and be able to select and change properties in a popover. For now, let's setup the boilerplate for the layout.
<!DOCTYPE html>
<html>
<head>
    <meta charset="utf-8">
    <title>Map</title>
    <link rel="stylesheet" href="https://cdn.jsdelivr.net/npm/remixicon@2.5.0/fonts/remixicon.css">
    <link rel="stylesheet" href="index.css">
</head>
<body>
    <div class="flush vstack">
        <div class="menubar hstack">
            <a class="icon-link center">
                <i class="ri-lg ri-landscape-line"></i>
            </a>
            <div class="spacer"></div>
        </div>
        <div class="spacer app">
            <canvas></canvas>
        </div>
    </div>
    <script type="text/javascript" src="draw.js"></script>
</body>
</html>
/** index.css */
:root {
    --root-font-size: 16px;
    --standard-padding: 16px;

    --bg: #fafafa;
    --fg: #666;
    --menubar-bg: #fdfdfd;

    --menubar-shadow: 0 8px 6px -6px #f4f4f4;
}

/** Reset */
html, body, nav, ul, h1, h2, h3, h4, a, canvas {
    margin: 0px;
    padding: 0px;
    color: var(--text-color);
}
html, body {
    font-family: Roboto, -apple-system, BlinkMacSystemFont, 'Segoe UI', Oxygen, Ubuntu, Cantarell, 'Open Sans', 'Helvetica Neue', sans-serif;
    font-size: var(--root-font-size);
    background: var(--bg);
    height: 100%;
    width: 100%;
    overflow: hidden;
}
*, body, button, input, select, textarea, canvas {
    text-rendering: optimizeLegibility;
    -webkit-font-smoothing: antialiased;
    -moz-osx-font-smoothing: grayscale;
    outline: 0;
}

/** Utilities */
.hstack {
    display: flex;
    flex-direction: row;
}
.vstack {
    display: flex;
    flex-direction: column;
}
.center {
    display: flex;
    align-items: center;
}
.spacer {
    flex: 1;
}
.flush {
    height: 100%;
}
.icon-link {
    margin: 0px var(--standard-padding);
    font-size: 1rem;
}

/** Sections */
.menubar {
    padding: var(--standard-padding);
    box-shadow: var(--menubar-shadow);
    background: var(--menubar-bg);
}
.app {
    width: calc(100% - var(--sidebar-width));
}
Note that the above utilities I've added are basic flexbox properties. I just want to be able to lay things out in rows and columns with a simple spacer. I named these hstack, vstack, spacer, and a flush for maximizing height.
Icon Sets with RemixIcon
Additionally, I'm making use of remix icons. It's free / open-source / for commercial and personal use. You can reference it via CDN and the icons themselves are very minimalist while providing some customization on sizing. Very handy!
Drawing Setup
If you took a look at my Drawing interactive graphs with Canvas article, then this code will be very similar to that.
const canvas = document.querySelector('canvas');
const context = canvas.getContext('2d');

var nodes = [];

function resize() {
    canvas.width = window.innerWidth;
    canvas.height = window.innerHeight;
    draw();
}

function draw() {
    context.clearRect(0, 0, canvas.width, canvas.height);
}

window.onresize = resize;
resize();
Great! Our app doesn't do much of anything yet. Let's add some tools that can switch the context around.
Drawing with Shapes
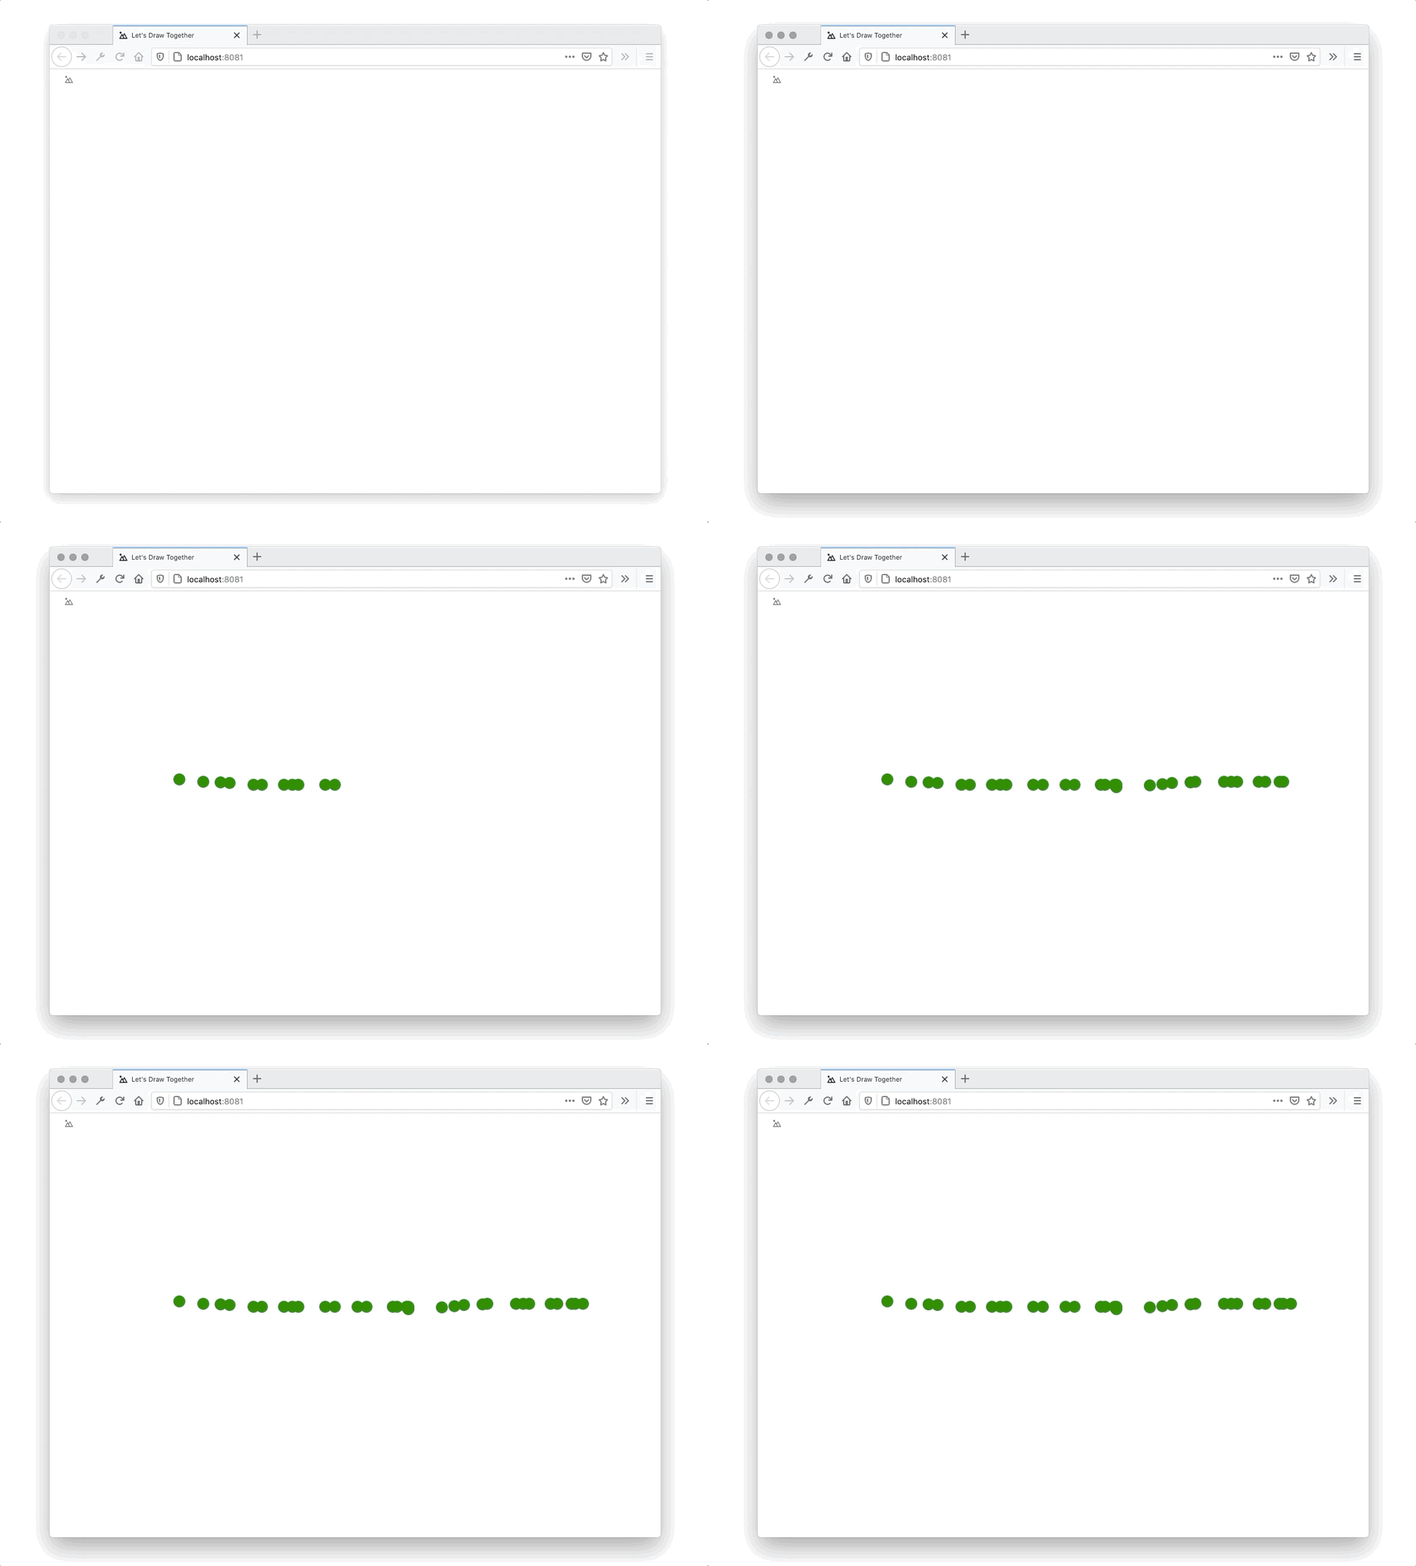
If we're going to draw anything on the screen, we're going to need some kind of brush to do it with. Since we don't have actual paint or pencil particles then we have to make our own "particles" by repeatedly drawing a shape. Let's see what that approach does with the following:
function move(e) {
    if (e.buttons) {
        context.fillStyle = 'green';
        context.beginPath();
        context.arc(e.x, e.y,
    }
}
window.onmousemove = move;
Here we are creating a new path each time we call beginPath - this will empty the list of subpaths and start a new path in the render context. When we use offsetX and offsetY rather than e.x and e.y due to the fact that our canvas is within an offset element node in the document.
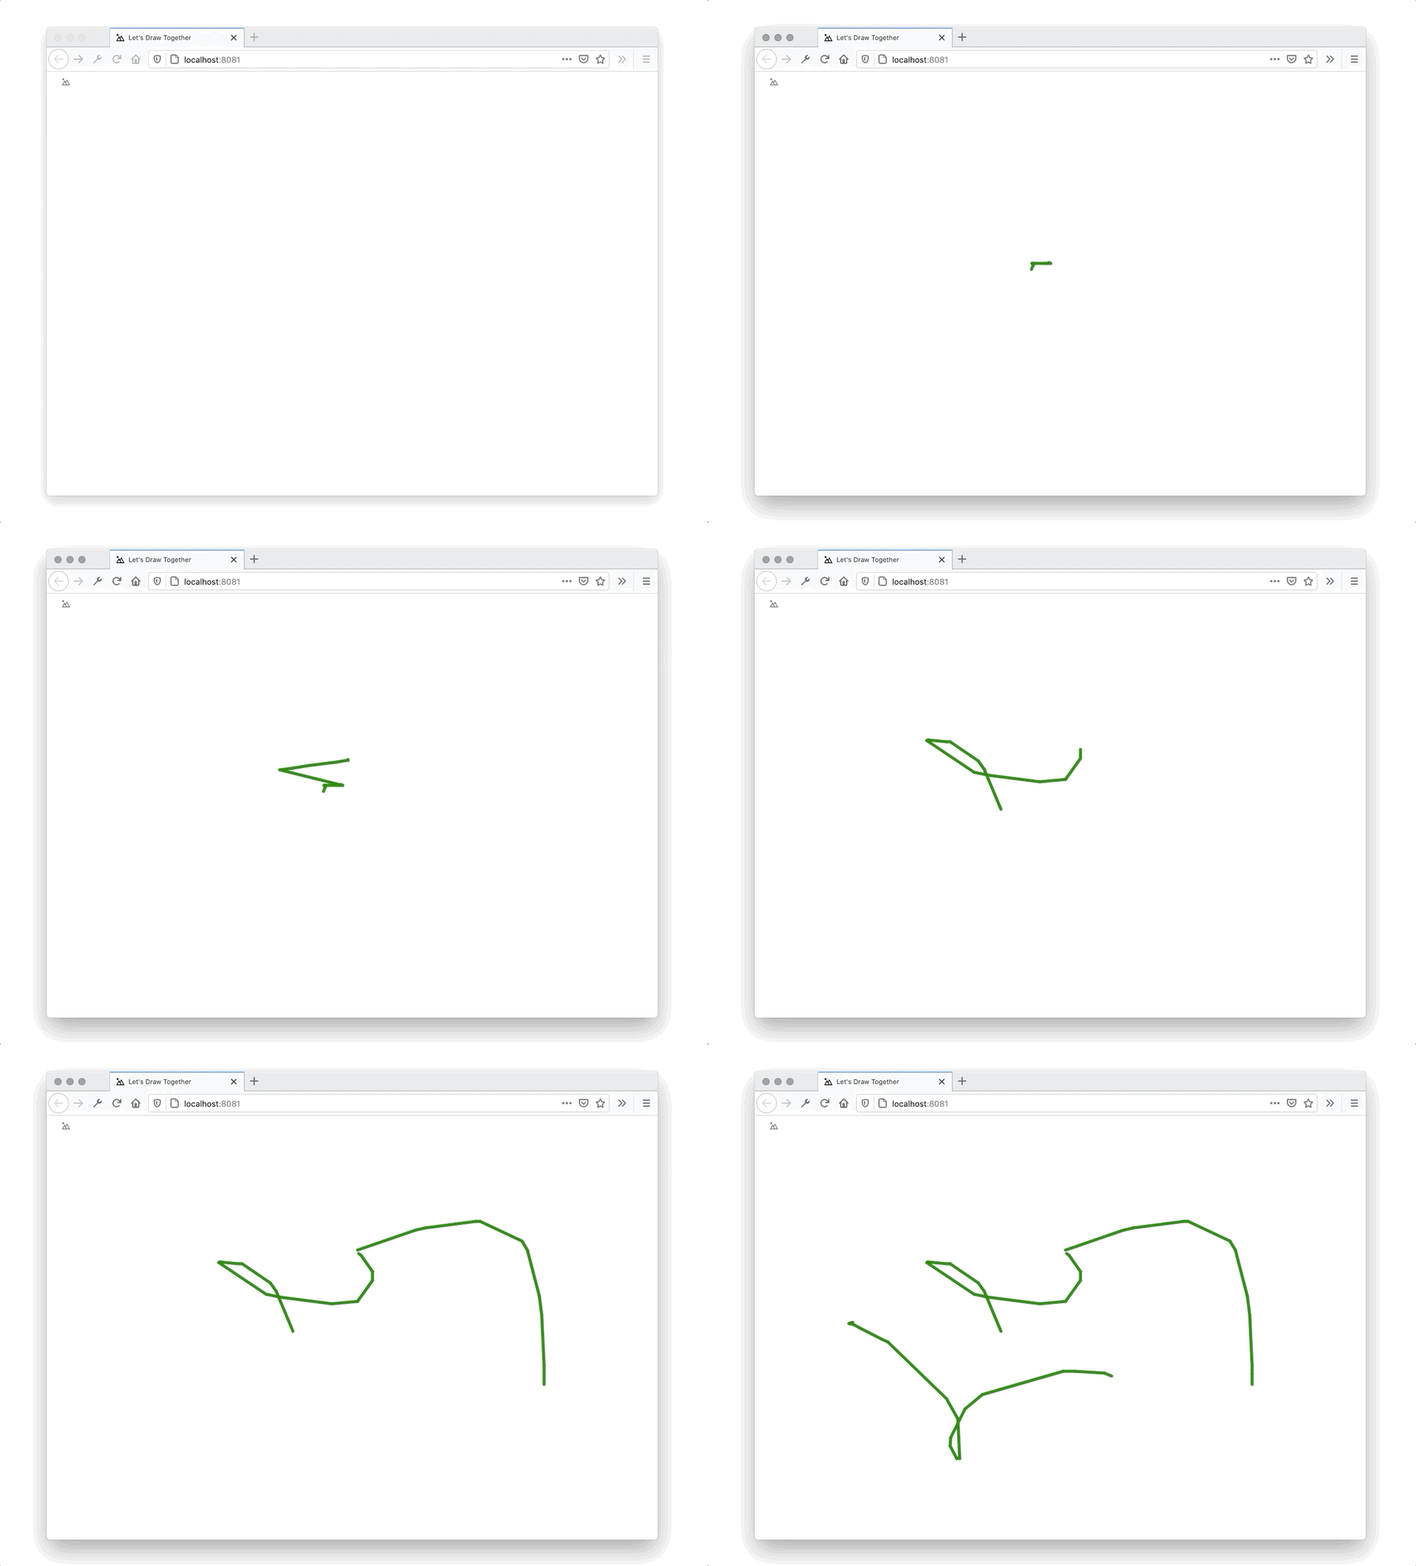
Notice however, that moving the mouse here causes gaps between the mouse events. We actually want a path between these points instead. To do that, we need to keep around the last point and draw a line. Alternatively, we can choose to interpolate the distance between these points and draw many circles in between (this complicates things a bit since now the number of arcs we draw is dependent on the resolution in the steps between points). Instead, let's just use a line approach with a lineCap.
function move(e) {
    if (e.buttons) {
        if (!lastPoint) {
            lastPoint = { x: e.offsetX, y: e.offsetY };
            return;
        }
        context.beginPath();
        context.moveTo(lastPoint.x, lastPoint.y);
        context.lineTo(e.offsetX, e.offsetY);
        context.strokeStyle = 'green';
        context.lineWidth = 5;
        context.lineCap = 'round';
        context.stroke();
        lastPoint = { x: e.offsetX, y: e.offsetY };
    }
}

function key(e) {
    if (e.key === 'Backspace') {
        context.clearRect(0, 0, canvas.width, canvas.height);
    }
}

window.onkeydown = key;
Now we can clear the screen with backspace and the gaps are no longer there because we are drawing paths between the points where the mouse move events occur.
Force / Pressure Sensitivity
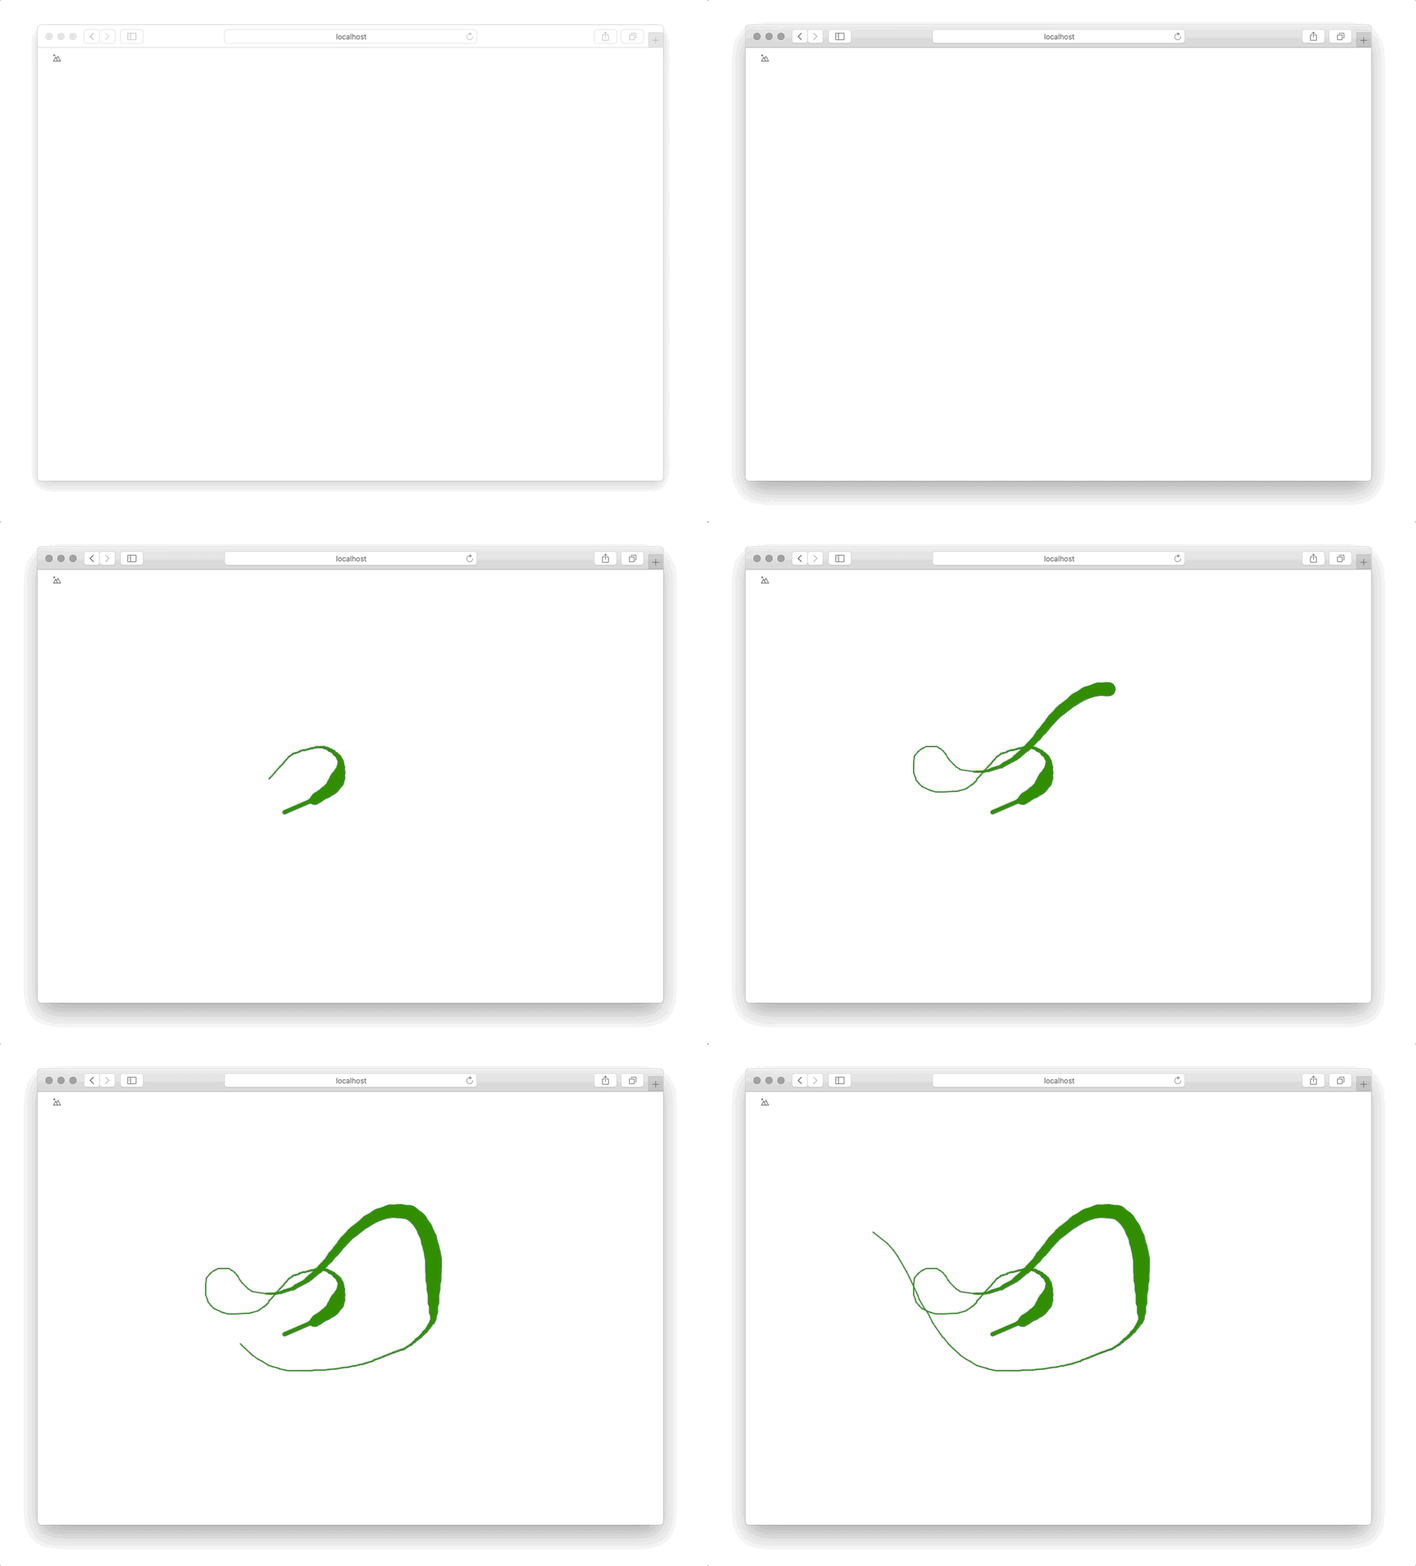
I've actually found that you can hook into a Safari only webkitmouseforcechanged event to handle the pressure sensitivity of the mouse. This also works for pointermove. Unfortunate for us, the pressure values and webkitForce are only populated and change to the proper sensitivity on mobile devices and in Safari. In any case, if you open up the app in Safari on desktop and you have a force trackpad you can do this!
var currentForce = 1;

function force(e) {
    currentForce = e.webkitForce || 1;
}

function move(e) {
    if (e.buttons) {
        if (!lastPoint) {
            lastPoint = { x: e.offsetX, y: e.offsetY };
            return;
        }
        context.beginPath();
        context.moveTo(lastPoint.x, lastPoint.y);
        context.lineTo(e.offsetX, e.offsetY);
        context.strokeStyle = 'green';
        context.lineWidth = Math.pow(currentForce, 4) * 2;
        context.lineCap = 'round';
        context.stroke();
        lastPoint = { x: e.offsetX, y: e.offsetY };
    }
}

window.onwebkitmouseforcechanged = force;
Synchronizing State
So far we haven't done much in the way of realtime drawing with other people. As noted in one of my articles on CRDTs, the two approaches to take for synchronization is either:
- State based synchronization (with CRDTs)
- Op based sychronization (with CRDTs or Operation Transforms)
We're going to instead, stream over each change that is being made through a buffer of changes. On a regular interval we can batch this buffer over the network to the peers in order to update the local state.
If you're interested in learning about how WebRTC works, check out this book, WebRTC for the Curious. It was written by some of the original authors of WebRTC internals! Very helpful for understanding just how much WebRTC does beneath the api.
Setting up a WebSocket Server
In order to negotiate our peers we need to pass along the signals, offers, and connection information through a server. We're going to be using express, http, and ws for the WebSocket library. We want our server to accomplish the following:
- Accept incoming connections
- Broadcast available connections
- Handle RTC handshakes for offers, answers, ice-candidates, hang-ups
First, move the contents of our index.html, draw.js, index.css and related public files to a new folder under /static. Then create a new file called index.js at the root. Run the following command to initialize the node project.
npm init -y
You should see the following output.
{
  "name": "map",
  "version": "1.0.0",
  "description": "",
  "main": "index.js",
  "scripts": {
    "test": "echo \"Error: no test specified\" && exit 1"
  },
  "keywords": [],
  "author": "",
  "license": "ISC"
}
Now, you'll need a few dependencies for our project. Run:
npm install --save ws express uuid
That should save to package.json. Now we just need to setup our server to respond to web socket connections and serve our static content out of /static. Update index.js to include the following:
var express = require('express');
var http = require('http');
var ws = require('ws');
var uuid = require('uuid');

const app = express();
app.use(express.static(`${__dirname}/static`));
app.locals.connections = [];

const server = http.createServer(app);
const wss = new ws.Server({ server });

function broadcastConnections() {
    let ids = app.locals.connections.map(c => c._connId);
    app.locals.connections.forEach(c => {
        c.send(JSON.stringify({ type: 'ids', ids }));
    });
}

wss.on('connection', (ws) => {
    app.locals.connections.push(ws);
    ws._connId = `conn-${uuid.v4()}`;

    // send the local id for the connection
    ws.send(JSON.stringify({ type: 'connection', id: ws._connId }));

    // send the list of connection ids
    broadcastConnections();

    ws.on('close', () => {
        let index = app.locals.connections.indexOf(ws);
        app.locals.connections.splice(index, 1);

        // send the list of connection ids
        broadcastConnections();
    });

    ws.on('message', (message) => {
        for (let i = 0; i < app.locals.connections.length; i++) {
            if (app.locals.connections[i] !== ws) {
                app.locals.connections[i].send(message);
            }
        }
    });

});

app.get('/', (req, res) => {
    res.sendFile(path.join(__dirname, 'static/index.html'));
});

server.listen(process.env.PORT || 8081, () => {
    console.log(`Started server on port ${server.address().port}`);
});
In the above code, we want to setup a new http server wrapping the express app. Then we setup a WebSocket server wrapping the http server. When the WebSocket server receives a new connection, we need to push that connection to the local list and assign it a unique id to reference later.
Whenever that connection closes, we need to clean up the connection list and send out the list of available connections to the current list. We send that list of connections to the incoming connection to let them know whomever is connected. Finally, whenever we receive a message we are simply going to just broadcast that message to everyone else. It's not overly complex here, I just wanted to broadcast to make it easier.
You'll also notice the app.get route. I use that to simply make sure to render the default index.html for that route.
Connecting to WebSocket
Now that we have a WebSocket server setup over express, we can connect to that quite quickly with the following code. Add this to a new file called data.js. Add it as a script reference to our index.html at the bottom after data.js.
<script type="text/javascript" src="/data.js"></script>
const wsConnection = new WebSocket('ws:127.0.0.1:8081', 'json');
wsConnection.onopen = (e) => {
    console.log(`wsConnection open to 127.0.0.1:8081`, e);
};
wsConnection.onerror = (e) => {
    console.error(`wsConnection error `, e);
};
wsConnection.onmessage = (e) => {
    console.log(JSON.parse(e.data));
};
Great! Now we've got a list of ids that have connected. You can open up this same thing in another browser window and you should see 2 connection ids. You can easily test whether our WebSocket server is broadcasting every message by typing the following in the console.
wsConnection.send(JSON.stringify({ type: 'test', msg: 'hello world' }));
WebRTC RTCPeerConnection
Now that we've got a mechanism for broadcasting messages over WebSockets, we just need to setup a WebRTC RTCPeerConnection. For this, I've chosen simplepeer. It simplifies the underlying api quite a bit and it even works server-side as well if you want to establish the server as a peer wtrc. Let's update our data.js file to include our peer setup.
Add the following to our index.html to include simplepeer:
<script src="https://unpkg.com/simple-peer@9.7.2/simplepeer.min.js"></script>
We need to store a few local variables for whenever we first connect, the local peer connection ids, and the peer connections themselves. For now, we aren't going to worry about implementing full mesh connectivity and we'll just do a single initiator broadcast.
var localId, peerIds;
var peerConnections = {};
var initiator = false;

wsConnection.onmessage = (e) => {
    let data = JSON.parse(e.data);
    switch (data.type) {
        case 'connection':
            localId = data.id;
            break;
        case 'ids':
            peerIds = data.ids;
            connect();
            break;
        case 'signal':
            signal(data.id, data.data);
            break;
    }
};

function onPeerData(id, data) {
    console.log(`data from ${id}`, data);
}

function connect() {
    // cleanup peer connections not in peer ids
    Object.keys(peerConnections).forEach(id => {
        if (!peerIds.includes(id)) {
            peerConnections[id].destroy();
            delete peerConnections[id];
        }
    });
    if (peerIds.length === 1) {
        initiator = true;
    }
    peerIds.forEach(id => {
        if (id === localId || peerConnections[id]) {
            return;
        }

        let peer = new SimplePeer({
            initiator: initiator
        });
        peer.on('error', console.error);
        peer.on('signal', data => {
            wsConnection.send(JSON.stringify({
                type: 'signal',
                id: localId,
                data
            }));
        });
        peer.on('data', (data) => onPeerData(id, data));
        peerConnections[id] = peer;
    });
}

function signal(id, data) {
    if (peerConnections[id]) {
        peerConnections[id].signal(data);
    }
}
Great! Now we've setup a way for peers to communicate with one another. A lot is going on here underneath the hood with WebRTC, but the gist of it is this:
-
First User Joins
- When the page first loads, the WebSocket will connect to the WebSocket Server. The WebSocket Server receives the connection and returns that connection's unique id.
- Immediately after this the WebSocket Server will broadcast the connection ids to the client.
- Since
peerIds.length === 1, then we are the first to join! This means we will act as the initiator. Finally, since we are the first and only user, no peer connections can be setup yet.
-
Second User Joins
- When the next user joins, the same flow will work for this user by getting its connection id. User 1 will receive the list of ids for this new connection as well as this user.
-
First User Receives Updated Ids
- A new user has joined and as such we can now initiate a peer connection. When the signal is available (i.e. an RTCPeerConnection Offer can be created), we will transmit the offer over the web socket for the other user to receive it.
-
Second User Receives Offer
- The second user will have a local RTCPeerConnection already ready to setup and ready to answer offers once they have been initiated. A web socket message will be received here in the form of signal and simplepeer will go ahead and setRemoteDescription prior to createAnswer.
-
First User Receives Answer
- Once the second user has sent over the answer for the initial offer, simplepeer can complete the negotiation and begin transmitting whatever information over the data channel or video/voice if we're using the tracks.
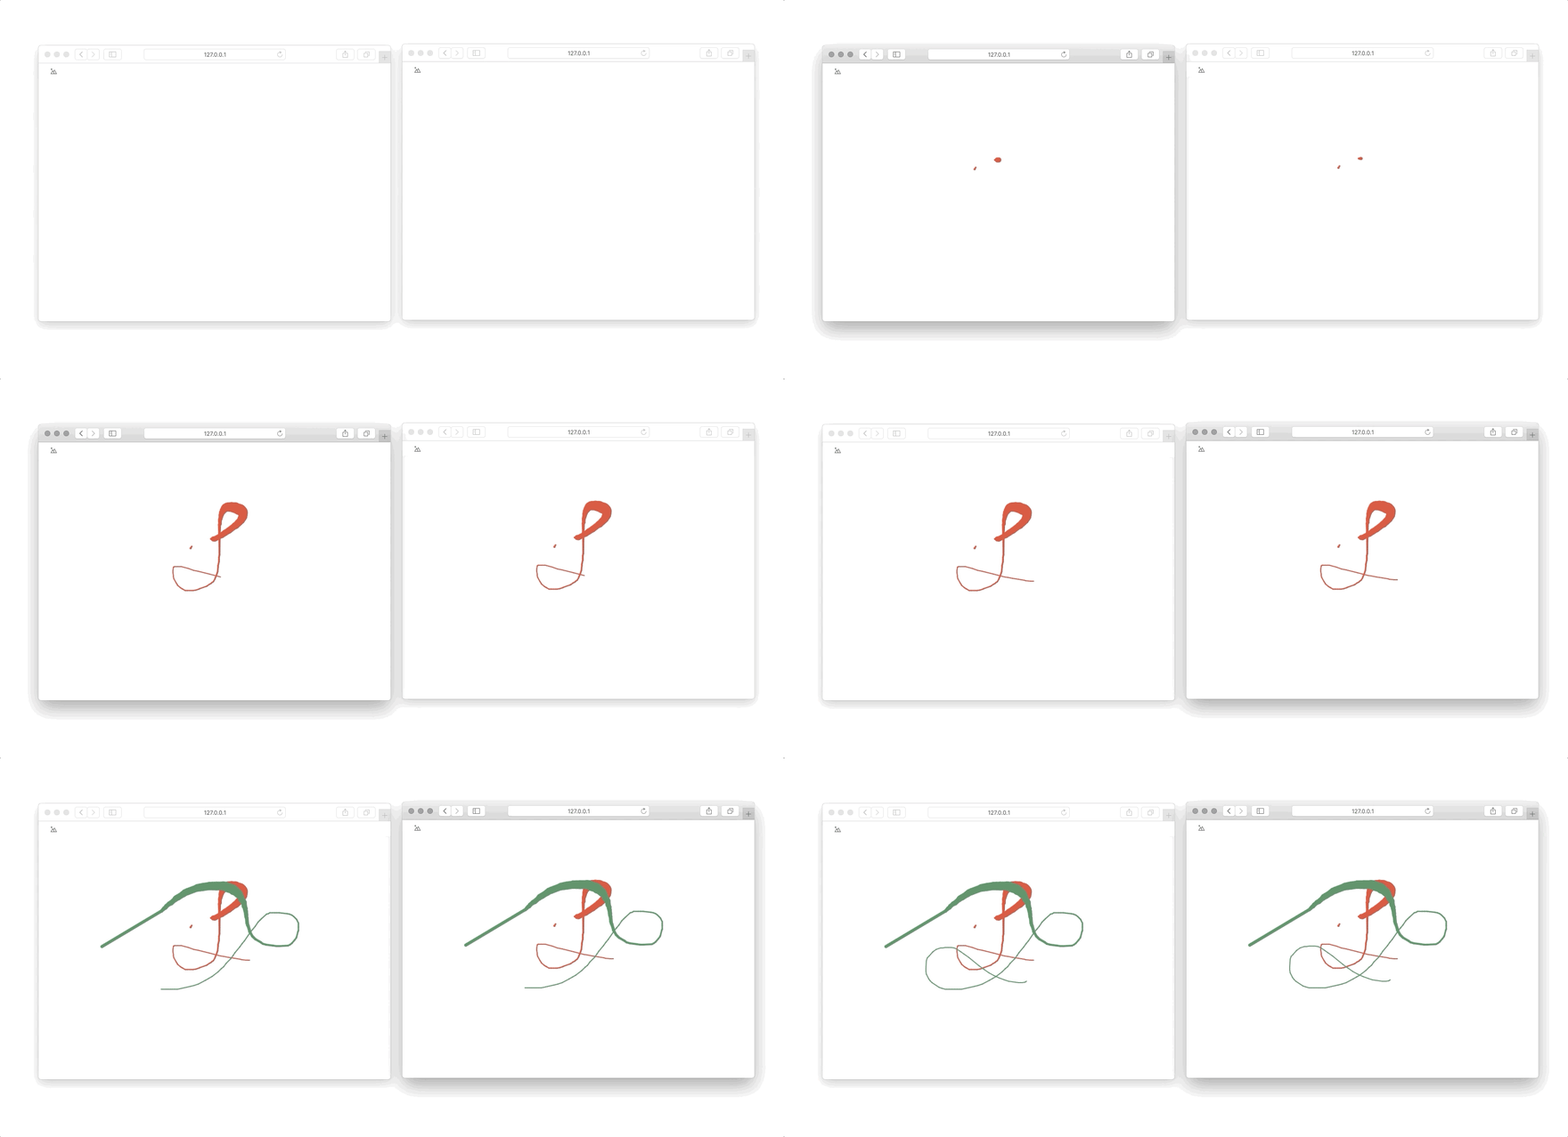
You can test out whether things are working by opening up two separate browser windows after starting up the web server with node ..
Transmitting Draw Information
The only thing left we have to do is transmit our draw data. To do this we simply need to update our move function to additionally broadcast, and the onPeerData function will need to actually draw the result of the message to the canvas. Let's go ahead and do that now.
function broadcast(data) {
    Object.values(peerConnections).forEach(peer => {
        peer.send(data);
    });
}

function onPeerData(id, data) {
    draw(JSON.parse(data));
}

function draw(data) {
    context.beginPath();
    context.moveTo(data.lastPoint.x, data.lastPoint.y);
    context.lineTo(data.x, data.y);
    context.strokeStyle = data.color;
    context.lineWidth = Math.pow(data.force || 1, 4) * 2;
    context.lineCap = 'round';
    context.stroke();
}

function move(e) {
    if (e.buttons) {
        if (!lastPoint) {
            lastPoint = { x: e.offsetX, y: e.offsetY };
            return;
        }

        draw({
            lastPoint,
            x: e.offsetX,
            y: e.offsetY,
            force: force,
            color: color || 'green'
        });

        broadcast(JSON.stringify({
            lastPoint,
            x: e.offsetX,
            y: e.offsetY,
            color: color || 'green',
            force: force
        }));

        lastPoint = { x: e.offsetX, y: e.offsetY };
    }
}
That's it! Let's add a bit of additional flavor by randomizing our color to distinguish between the peers.
function randomColor() {
    let r = Math.random() * 255;
    let g = Math.random() * 255;
    let b = Math.random() * 255;
    return `rgb(${r}, ${g}, ${b})`;
}

var color = randomColor();
Awesome! 🎉
If you liked this article, please give me a follow and a like. Also feel free to check out my twitter if you are so inclined. Thanks again!
Cheers! 🍻
CODE
If you're interested in the code for this series, check out my repository on GitHub below:
https://github.com/nyxtom/drawing-webrtc
Thanks again!






Oldest comments (3)
O M F G 🔥
Why did I never thought about implementing a force / pressure sensitivity in our remote control before?
We have almost the same use case, drawing canvas and using WebRTC, but to display these over the presentations created with our open source editor. Adding such a feature would be neat there too.
That's just brilliant Tom! Thank you for the share 🙏
P.S.: opened an issue about it, definitely not gonna forget your cool idea 😃
So damn awesome!
Hi Tom. Your daughter can be very happy to have such a great teacher!
With peer.school I wrote a similar open source tool for my son, featuring a simple whiteboard, real time collaboration and video chat all via WebRTC. Anybody is invited to join the project ;)
It is really amazing how much potential lays in those technologies and how quickly you can get great results. Especially, I was not aware of the force detection feature you presented before.
For those mothers and fathers looking for a production ready open source solution for their schools I would also like to mention BigBlueButton.