
This post has been written in 08/17/2019 on medium, I've been migrating all posts from medium to dev.to.
Hello everyone! Recently I’ve subscribed to the beta of GitHub Actions.
I was really excited to try it out, since I was getting kinda confused with Travis-CI, which, in my opinion was the best option for C# coders until now.
Well, finally the time has come! And I’ve already did my integration with GitHub Actions on a REAL project.
Explaining with mocked examples and test projects usually are a bit far from the reality of a real project. So I’ve decided to make it with my OpenProtocolInterpreter project.
Project Scenario
This project is a .net standard 2.0 solution, so I must run a dotnet command to build and test. Moreover I need to pack my .nupkg and publish on NuGet.
I’ve tried to use Ubuntu and Mac OS environment but, unfortunately, it’s just throwing up random errors, somehow it just doesn’t works by now. But windows works very well for the case!
Yes, I’ve already opened an issue about that
First things first
You need to create your workflow .yml file and it should be placed on .github/workflows folder, so GitHub can access it to run. Or, if you want, click in the Action tab and it will show you a screen with some templates to create your workflow. (unfortunately I haven’t found a C# template right now)
Above you have my yml file and right below I will try to explain each section:
name: means the name of your workflow, this is also the name that will be shown at our badge on readme file, so I do prefer using “master”;on: means what will trigger our workflow, for example: push, pull_request, etc;push: means that it will trigger when someone pushes a commit into our branch;branches: this section you can filter which branches you want to execute this workflow when the trigger happens (no, you cannot trigger another branch which is not the one that you’re pushing in);jobs: jobs we will execute on this workflow;build: just the name of my job;runs-on: which environment we will run our job? Windows, Ubuntu or Mac? (you can also specify the version);steps: dividing by steps our job workflow, which is nice to separate and to result in a better visualization when we look at GitHub Actions UI;uses: this one I will explain in the below section, since I think it worth to write about it. But think of it like a import or a list of functionalities;steps.name: the name of our step;with: right below it we will write our parameters that ouruseswill need (or maybe optional parameters);with.dotnet-version: of course, the dotnet SDK version we want to use. When looking at .Net Core list of SDKs always take the middle column name. Such as 3.0.100-rc1–014190 and 3.0.100-preview9–014004;run: the command that you want to run (Yeah, the CLI one).
Talking about uses section
Think about it like an IMPORT section, maybe like a using when talking about C#, that will import everything that is in our dll and provide us common methods or for actions: steps/jobs.
We have 3 uses in our yml, they are: actions/checkout@master, actions/setup-dotnet@master and warrenbuckley/Setup-Nuget@v1.
All of them refers to a repository on GitHub that contains a yml with our imported functions that will be ran.
For example actions/setup-dotnet, if you take a look at their action.yml file you will notice our dotnet-version parameter as an input param there.
So, in a few words, we use them to make our life easier.
actions/checkout: help us to checkout our repository;actions/setup-dotnet: help us to download our .net core SDK into our virtual environment;warrenbuckley/Setup-Nuget: help us download NuGet environment NuGet CLI features. (a big shout out to warrenbuckley for sharing this)
Oh, and the
{repo}@mastermeans which branch you want to use.
Run commands
This part might be the easier, since you probably know more about dotnet CLI commands.
We have 3 run commands, which respectively do the following:
- Build my project on release configuration;
- Build and test my unit tests project;
- Publish our generated NuGet package to NuGet API.
Notice that the pipe
|allow us to run multiple commands
Using secrets
You might have a key that cannot be shown to everyone in your yaml, such as my NuGet API key, for that you must register your secret at Settings > Secrets and accessing it by typing ${{ secrets.my_var }}, in my case, it’s name is NUGET_API_KEY.
Adding badge on README
To add the badge you need to use the url: https://github.com/<OWNER>/<REPOSITORY>/workflows/<WORKFLOW_NAME>/badge.svg
-
OWNER: your username (Rickedb); -
REPOSITORY: your repo (OpenProtocolInterpreter); -
WORKFLOW_NAME: the name of your workflow, which I’ve mentioned it’s the firstnameparameter (master).
Mine results in:
https://github.com/rickedb/openprotocolinterpreter/workflows/master/badge.svg
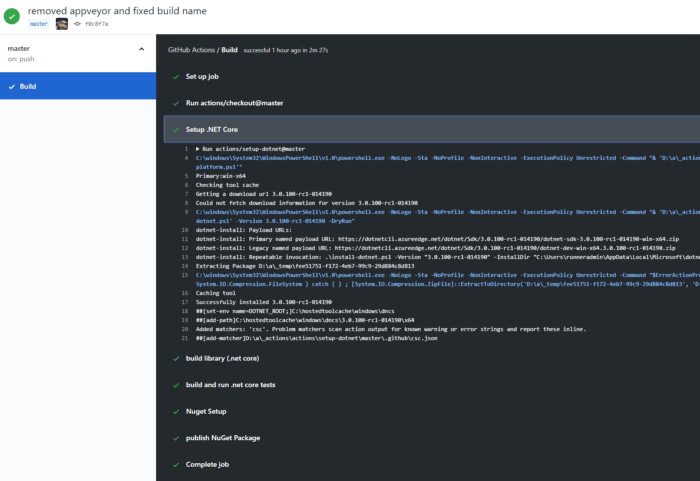
The final result
At Actions tab you can see it live:
README:

References
https://help.github.com/en/articles/about-github-actions

Top comments (0)