In the first part of this tutorial, we wrote an Ethereum smart contract for an NFT project called ReplBots – robot profile pictures with randomly generated colors and accessories. This contract allowed users to create ReplBot NFTs on the blockchain and forms the logic portion of our decentralized NFT application. In this second part of the tutorial, we'll create a web frontend for our smart contract, giving users a way to view their NFTs.
By the end of this tutorial, you will know the basics of interacting with wallets and Ethereum smart contracts from JavaScript and building web3 applications.
Getting started
Open the repl you created in part one of this tutorial, or clone ours.
If you haven't already, install Metamask in your browser.
Once your repl is loaded, create a new directory named frontend. This directory will contain the HTML, JavaScript, and image files used for our frontend. Inside this directory, create a second directory named svg. Download this ZIP folder containing our NFT art assets, unzip it, and upload its contents to the svg directory you just created.
Inside the main frontend directory, create the following files:
-
index.html: This will be our app's single page. -
style.css: This will contain our app's CSS stylesheet. -
app.js: This will contain our app's JavaScript logic, used for connecting to the blockchain and constructing ReplBot images.
Before we start populating these files, we need to have a ReplBots contract instance for our frontend to connect to. Let's deploy a new copy of our contract on the Replit Testnet using our Solidity repl's web interface.
First, run your repl. Once all of the dependencies are installed, you should see the Replit Ethereum web interface in your repl's browser. It looks like this:

Connect your MetaMask wallet to the web interface and switch to the Replit Testnet. If your balance is 0 ETH, click the link marked "Get 1 ETH for testing". Wait until 1 ETH shows up in your wallet balance on the top right of the page.


Now you can deploy your contracts. Select "ReplBots" from the drop-down box and click Deploy. Approve the MetaMask pop-up that appears.
Once this contract has been deployed, it will show up as an expandable box. If you expand the deployed contract, at the bottom, you'll see a value starting with 0x: the contract's address. Click on this address to copy it to your clipboard. Then paste it in a safe place, such as the bottom of your repl's README.md.

Next to the contract's address, you should see a button labeled "Copy ABI". Click on this button to copy the contract's ABI (Application Binary Interface) to your clipboard, and paste it into the same place you put the contract address. You should see a large JSON object.
We'll need both of these pieces of data to interact with our contract later on.
Setting up the front-end
Open frontend/index.html and populate it with the following markup:
<!DOCTYPE html>
<html>
  <head>
    <title>ReplBot NFTs</title>
    <link href="/style.css" rel="stylesheet">
  <head>
  <body>
    <button id="mint" class="button">Mint ReplBot</button><br>
    <form id="breed">
      Parent 1: <input name="parentOneId" type="text"></input><br>
      Parent 2: <input name="parentTwoId" type="text"></input><br>
      <input type="submit" class="button" value="Breed new ReplBot!"></input>
    </form>

    <div id="bots">

    <script src="./app.js"></script>
  </body>
</html>
In this file, we've created the following:
- A
buttonelement for minting a new ReplBot. - A
formelement for breeding a new ReplBot from two parents. - A
divelement for displaying the user's owned ReplBots.
We've also linked our stylesheet at the top of the file and our JavaScript file at the bottom.
Add the following CSS to frontend/style.css:
body {
    font-family: monospace;
}

.button {
    font-size: 1.1em;
    border-width: 2px;
    background-color: white;
    margin: 1em;
}

form {
    border: 4px solid black;
    padding: 1em;
    display: inline-block;
}

#bots {
    display: flex;
    flex-wrap: wrap;
}

#bots > svg {
    width: 30em;
}
Finally, add this code skeleton to frontend/app.js:
App = {
    replbotAddress: "INSERT-CONTRACT-ADDRESS-HERE",
    replbotContract: null,

    init: async function() {},
}

App.init();
This App object will contain all of the status and functionality we'll implement. Insert the contract address you copied earlier as the value of replbotAddress.
Connecting to the blockchain
The majority of Ethereum dapps use one of two libraries for interacting with the blockchain: web3.js or ethers.js. The ethers.js library was used for Replit's Solidity Starter interface, but we'll use web3.js for this tutorial.
We can import web3.js by adding the following line to index.html, just above the line where we import app.js:
<script src="https://cdn.jsdelivr.net/npm/web3@latest/dist/web3.min.js"></script>
Then, returning to frontend/app.js, we'll connect to the blockchain in our app's init function. Add the following code to the function's body:
    init: async function() {

        if (window.ethereum) {
            await window.ethereum.request({ method: 'eth_requestAccounts' });
            window.web3 = new Web3(window.ethereum);
        }
    },
This code will interface with MetaMask and show a pop-up window asking the user to connect their wallet to our dapp. If the user accepts, we'll instantiate a Web3 object using their account details.
The majority of web3.js functions are asynchronous, so we have to use await to get their return values. As await can only be used in asynchronous functions or top-level JavaScript, the majority of our functions will also be asynchronous.
Because we're building on the Replit Testnet, we'll need to add some code that prompts the user to switch to this network. Add the following function definition just below the definition of init:
    switchToReplitTestnet: function() {
        window.ethereum.request({
            method: "wallet_addEthereumChain",
            params: [
                {
                    chainId: "0x7265706c",
                    chainName: "Replit Testnet",
                    rpcUrls: ["https://eth.replit.com"],
                    iconUrls: [
                        "https://upload.wikimedia.org/wikipedia/commons/b/b2/Repl.it_logo.svg",
                    ],
                    nativeCurrency: {
                        name: "Replit ETH",
                        symbol: "RΞ",
                        decimals: 18,
                    },
                },
            ],
        });
    },
This code provides the details MetaMask needs to prompt the user to switch networks. We'll invoke it from our init function, as below:
    init: async function() {

        if (window.ethereum) {
            await window.ethereum.request({ method: 'eth_requestAccounts' });
            window.web3 = new Web3(window.ethereum);

            // NEW CODE BELOW
            // Switch networks
            App.switchToReplitTestnet();
        }

    },
Interfacing with the smart contract
Now that we can connect to the blockchain, we need to access our ReplBots contract. To connect to a contract and run its functions, we need two things: the contract's address, which shows us where to find it, and its ABI, which tells us what functions it implements and what their parameters are. We've already provided the address, so now we just need to specify the ABI.
Create a new file in frontend called replbotABI.js and add the following code to it:
const replbotABI =
Find the ABI data you copied after deploying the ReplBots contract and paste it in as the value of replbotABI. Once that's done, add the following line to frontend/index.html, just below the line where you import web3:
<script src="./replbotABI.js"></script>
Now we can instantiate App.replbotContract as a web3.eth.Contract. Amend your init function in frontend/app.js so that it matches the following:
    init: async function() {

        if (window.ethereum) {
            await window.ethereum.request({ method: 'eth_requestAccounts' });
            window.web3 = new Web3(window.ethereum);

            // Switch networks
            App.switchToReplitTestnet();

            // NEW CODE BELOW
            // Interface with contract
            App.replbotContract = new web3.eth.Contract(replbotABI, App.replbotAddress);
        }
    },
That's all we need to connect to our contract. Now we can implement some of its functions on our frontend.
Running contract functions
We'll start by implementing some functions in App to get information from the contract. This first one, getMyReplBotIds, will return a list of ReplBots in the current user's wallet. Add the following code within the definition of App at the bottom.
    // view data in contract
    getMyReplBotIds: async function() {
        // get user's address
        const accounts = await web3.eth.getAccounts();
        const account = accounts[0];

        // get number of ReplBots owned
        let balance = await App.replbotContract.methods.balanceOf(account).call();

        // get each one's ID
        var botIds = [];
        for (i = 0; i < balance; i++) {
            botIds.push(await App.replbotContract.methods.tokenOfOwnerByIndex(account, i).call());
        }

        return botIds;
    },
In this function, we use web3.eth.getAccounts() to find the user's wallet address, which we use in subsequent calls to balanceOf() and tokenOfOwnerByIndex(). Both of these functions are part of the ERC-721 NFT standard (although the latter belongs to an optional extension, ERC721Enumerable) and are implemented by the OpenZeppelin contract our ReplBots contract inherits from. Note the syntax for calling a contract method using call().
Next, let's implement a function that returns details about a given ReplBot. Add the following code below the definition of getMyReplBotIds():
    getReplBotDetails: async function(tokenId) {
        var bot = {};
        bot.colors = await App.replbotContract.methods.botColors(tokenId).call();
        bot.accessories = await App.replbotContract.methods.botAccessories(tokenId).call();
        bot.parentage = await App.replbotContract.methods.botParentage(tokenId).call();
        return bot;
    },
This code is pretty simple. We've combined all three of our contract's bot information functions into a single function with a single return value.
Those are the only view functions we'll need to worry about for now, so let's move on to functions that change state. First, we'll implement a function for mint. Add the following code to the bottom of your App definition:
    // create new NFTs
    mintReplBot: async function() {
        const accounts = await web3.eth.getAccounts();
        const account = accounts[0];

        // Mint to own address
        App.replbotContract.methods.mint(account).send({from: account});
    },
When we call functions that return information without changing state, we can use .call() and don't have to specify a caller address. This is because external calls to view functions do not cost gas – they can be run on a single, local node instead of by the whole network. Functions that change state, however, must be run by the whole network, to reach consensus, and this costs gas. Therefore, we use .send() instead of .call(), and must specify a sender, who will need to pay for the gas.
Our function for the breed() function is similar. Add the following code just below your mintReplBot definition:
    breedReplBot: async function(parentOneId, parentTwoId) {
        const accounts = await web3.eth.getAccounts();
        const account = accounts[0];

        await App.replbotContract.methods.breed(parentOneId, parentTwoId, account).send({from: account});
    },
Viewing and combining SVGs
We've implemented the key contract functions above, including functions that will allow us to retrieve the details of individual ReplBot NFTs. For the moment, the details of these NFTs are just lists of strings. In this part of the tutorial, we'll turn those lists into unique images, using the powerful SVG image format.
Most common image files, such as JPEGs and PNGs, are raster graphics – highly compressed representations of a grid of pixels. SVGs, on the other hand, are vector graphics, made out of shapes. A good way to think about this is as follows: raster graphics files contain instructions like "color the pixel at (10,20) in red", whereas vector graphics files contain instructions like "draw a red line from point (10,12) to (20,14)".
Both image formats have their advantages and disadvantages – a relevant advantage to SVGs is that they're formatted a lot like HTML files, so it's pretty simple to manipulate them programmatically in JavaScript. To see what an SVG looks like under the hood, rename one of the files in frontend/svg from .svg to .html.

As you can see, an SVG is made up of a whole lot of XML tags. It even includes CSS for styling, inside the <defs> tag – we'll use this to change colors. When you're done looking at the file, change its file extension back to .svg.
SVGs can be stored in external files or written inline in HTML. To keep our code clean, we'll keep them in external files. So the first thing we'll need is a function that fetches SVG data from external files. Open frontend/app.js and add the following helper function code above the definition of App:
// helper function
async function fetchSvg(filename) {
    let svgFile = await fetch(`svg/${filename}`);
    let svgText = await svgFile.text();

    const parser = new DOMParser();
    return parser.parseFromString(svgText, "text/html").getElementsByTagName("svg")[0];
}
Here we use fetch() to retrieve a specified file from our svg directory. We then extract the file's text, which will be a string, and use a DOMParser to convert this text to HTML. This will allow us to manipulate it using standard JavaScript DOM functions.
Now we have everything we need to write our SVG construction function. This function needs to do the following:
- Get the color and accessory details of a given tokenID.
- Fetch SVGs for the ReplBot's head and change its colors per the ReplBot's details.
- Fetch SVGs for the ReplBot's accessories and merge them with the ReplBot head.
Add the code below within your App definition at the bottom:
    // SVG handling
    createReplBotSVG: async function(tokenId) {
        // get bot details
        let details = await App.getReplBotDetails(tokenId);

        // get bothead
        let botSvg = await fetchSvg("bothead.svg");

        // change bot colors
        botSvg.querySelectorAll('.frame').forEach(f => {
            f.style.fill = `rgb${details.colors[0]}`;
        });

        botSvg.querySelectorAll('.visor').forEach(v => {
            v.style.fill = `rgb${details.colors[1]}`;
        });

        botSvg.querySelectorAll('.background').forEach(b => {
            b.style.fill = `rgb${details.colors[2]}`;
        });
    },
First, we get the ReplBot details and the base ReplBot SVG. We then apply the bot's colors by setting style.fill for every instance of each of the relevant classes, using the CSS rgb() function with the color information from details.
Next, we need to get the bot's accessories. Add the following code above this function's closing curly brace (}):
        // get bot accessories
        let accessorySvgs = [];
        for (let i = 0; i < 3; i++) {
            let filename = details.accessories[i].toLowerCase().replaceAll(" ","-") + ".svg";

            let svg = await fetchSvg(filename);
            accessorySvgs.push(svg);
        }
Here we fetch each of the bot's three accessories and add them to a list. We get the filename for the accessory by transforming the string we received from getReplBotDetails(). So, for example, "Bunny Ears" becomes "bunny-ears.svg".
Once we've got our accessory SVGs, we can merge them into the base ReplBot SVG. Enter the following code just below the for loop above:
        // merge SVGs
        accessorySvgs.forEach(a => {
            Array.from(a.getElementsByTagName("style")).forEach(e => {
                botSvg.getElementsByTagName("defs")[0].appendChild(e);
            });

            Array.from(a.getElementsByTagName("path")).forEach(e => {
                botSvg.appendChild(e);
            });

            Array.from(a.getElementsByTagName("polyline")).forEach(e => {
                botSvg.appendChild(e);
            });

        });
We merge SVGs by appending all of <style> elements in our accessory SVG to the <defs> element in our base ReplBot SVG, and all of the accessory's <path> and <polyline> elements to the SVG's main body. This is sufficient for the collection of SVGs we're using for this tutorial, but other SVGs may have additional elements that you'll need to account for.
Finally, we'll add the following code that uses insertAdjacentHTML() to add details about the ReplBot's ID and generation before returning the final botSvg in all its glory. Add the following code just below the code above:
        // add ID and generation details
        botSvg.insertAdjacentHTML("beforeend", `<text x="5" y="20">ID: ${tokenId}</text>`);
        botSvg.insertAdjacentHTML("beforeend", `<text x="5" y="40">Gen: ${details.parentage[0]}</text>`);

        return botSvg;
Connecting the UI
We've written all of our app functionality – now we just need to make it usable by binding our HTML interface to our JavaScript functions. Add the following function definition to App.js, just below the definition of switchToReplitTestnet:
    // interface
    bindEvents: function () {
        // mint
        const mintButton = document.getElementById("mint");
        mintButton.addEventListener("click", () => {
            App.mintReplBot();
        });

        // breed
        const breedForm = document.getElementById("breed");
        breedForm.addEventListener("submit", (event) => {
            event.preventDefault();
            App.breedReplBot(breedForm.elements['parentOneId'].value, breedForm.elements['parentTwoId'].value);
        });
    },
This code will trigger mintReplBot() when the mint button is pressed, and breedReplBot() when the ReplBot breeding form is submitted. We'll invoke this function in init, by adding the following:
    init: async function() {

        if (window.ethereum) {
            await window.ethereum.request({ method: 'eth_requestAccounts' });
            window.web3 = new Web3(window.ethereum);

            // Switch networks
            App.switchToReplitTestnet();

            // Interface with contract
            App.replbotContract = new web3.eth.Contract(replbotABI, App.replbotAddress);
        }

        App.bindEvents(); // <-- NEW LINE
    },
Next, let's create a function to display our NFT collection. This function will retrieve a list of the current user's NFTs and create an SVG for each of them. Add the following code below the definition of bindEvents:
    populateCollection: async function() {
        // get bot IDs
        let botIds = await App.getMyReplBotIds();

        // get container
        let botContainer = document.getElementById("bots");
        botContainer.innerHTML = ""; // clear current content

        // create bot SVGs
        botIds.forEach((id) => {
            App.createReplBotSVG(id).then(result => {
                botContainer.appendChild(result);
            });
        });
    },
We'll want to call this function periodically to keep our ReplBot collection up to date. We can use JavaScript's setInterval for this. Add a new line to the definition of bindEvents as below:
    // interface
    bindEvents: function () {
        // mint
        const mintButton = document.getElementById("mint");
        mintButton.addEventListener("click", () => {
            App.mintReplBot();
        });

        // breed
        const breedForm = document.getElementById("breed");
        breedForm.addEventListener("submit", (event) => {
            event.preventDefault();
            App.breedReplBot(breedForm.elements['parentOneId'].value, breedForm.elements['parentTwoId'].value);
        });

        // show collection
        setInterval(App.populateCollection, 5000); // <-- new line
    },
This will work, but it will recreate all of our SVGs once per second, which will usually be more than we need, and will cause the page to flash constantly. Let's add some caching to prevent this. First, we'll define a new attribute near the top of our App definition:
App = {
  replbotAddress: "YOUR-CONTRACT-ADDRESS",
  replbotContract: null,
  ownedReplBots: [], // <-- NEW
  ....
}
This attribute will store our list of ReplBot IDs. Every time we call populateCollection, we'll first check whether the list we get from the contract matches our local list. If it does, we'll skip the rest of the function, otherwise, we'll update the cache and continue. Add the following new code to the populateCollection function:
    populateCollection: async function() {
        // get bot IDs
        let botIds = await App.getMyReplBotIds();

        // === NEW CODE BELOW ===
        // check cache
        if (compareArrays(botIds, App.ownedReplBots)) {
            return; // array is unchanged
        }
        else {
            App.ownedReplBots = botIds.slice(); // update cache and continue
        }
        // === NEW CODE ABOVE ===

        // get container
        let botContainer = document.getElementById("bots");
        botContainer.innerHTML = "";

        // create bot SVGs
        botIds.forEach((id) => {
            App.createReplBotSVG(id).then(result => {
                botContainer.appendChild(result);
            });
        });
    },
Note the use of slice() – this will ensure that ownedReplBots contains a copy of botIds rather than a reference to it.
JavaScript does not have a built-in compareArrays() function, so we'll need to define one. Navigate to the top of frontend/app.js and add the following code below the definition of fetchSvg():
function compareArrays(array1, array2) {
    // arrays must be same length
    if (array1.length !== array2.length) {
        return false
    }

    // arrays must be sorted
    let array1Sorted = array1.slice().sort();
    let array2Sorted = array2.slice().sort();

    // all values must match
    for (let i = 0; i < array1.length; i++) {
        if (array1Sorted[i] !== array2Sorted[i]) {
            return false;
        }
    }

    return true;
}
This function checks that our two arrays are the same length, sorts them and then compares each value. If a single value is different, it returns false, otherwise, it returns true.
Running our application
To run our frontend, we'll create a simple Node.js Express application. Create a file named frontend.js at the home directory of your repl and add the following code to it:
const express = require('express');
const app = express();
const PORT = 433;

app.use(express.static('frontend'));

app.listen(PORT, () => console.log(`Server listening on port: ${PORT}`));
This script will serve the files we created in frontend. To make it execute when we run our repl, make sure that config files are showing and open .replit.
In .replit, replace the line run = "node tools" with the following:
run = "node frontend.js"
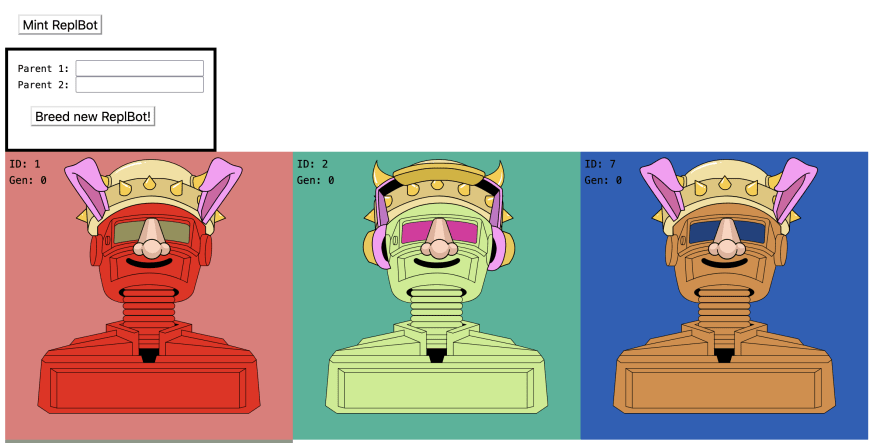
Run your repl. You should now see your frontend. If you've minted any ReplBot NFTs already, those will also show up.
Where next?
In this two-part tutorial, we've built a fully functional decentralised application, but there's a lot more you can do to improve it. Some suggestions:
- Implement an interface for viewing ReplBot NFTs owned by other users.
- Implement an interface for transferring ReplBot tokens to other addresses.
- Alter the breeding form to show drop-down menus of the user's ReplBots.
- Use the contract event log to track ReplBot creations and births.
- Change the dapp's stylesheet.
- Implement frontend components for any of the new functions you added to the contract after completing part one!
Your can find our repl here.

Top comments (0)