
Introduction
Programming tutorials consist of three things: text, images, and code. Text should be readable, images should be pretty, and code should have syntax highlighting. It is way more time-consuming than it sounds: converting Markdown to HTML, you often find yourself spending more time trying to perfect the look and feel than writing the content.
Usually, If you want to write a programming tutorial and share it with the world your options are:
- Upload it to managed publishing platforms like Medium, give up control and let them bloat your content with trackers, paywalls, and dark patterns. Have a look at this article for a comparison of the top publishing platforms.
- Spend a few hours or days yourself setting up something like Hugo with GitHub pages and trying to get the theme to work just right.
- Use something super minimalistic but not to everyone’s aesthetic taste like bearblog.dev.
As a fourth option, you can use this Opinionated Tutorial Publisher in three steps.
- Write your tutorial in Markdown.
- Run a curl command or upload your Markdown on this page.
- Upload the resulting single HTML file anywhere you want.
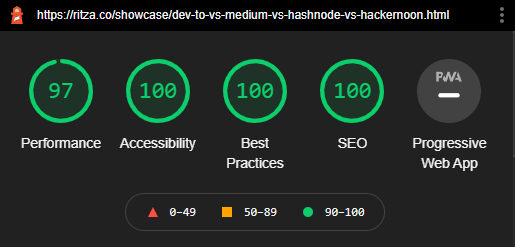
Your tutorial will look like this example and get good lighthouse scores as it's lightweight and simplistic. With syntax highlighting it will add about 25KB of "bloat" on top of your Markdown.
In this tutorial, we will build the Tutorial Publisher application that will convert a Markdown file into a beautiful but simplistic HTML page that you can host anywhere. We will build a Flask front end for your application and we will show how you can add PrismJS syntax highlighting as well as change the CSS template.
The final Python application will consist of the following:
- Flask for serving a simple web interface.
- Water.css for basic CSS styling (default CSS).
- PrismJS for syntax highlighting.
- Pandoc for the Markdown to HTML conversion with a Pandoc filter to make the HTML output play nicely with PrismJS.
This project repository is also available here on GitHub.
Setting up the environment
Installing Flask
First, we will build a Flask web application, which will serve a basic HTML page that will allow us to upload our Markdown file.
Flask is a micro web framework for Python. Flask is one of the quickest ways you can get a web application up and running, hence its popularity among web developers. It is not only great for small POC (proof of concept) projects but also capable of running large-scale production solutions. We will use Flask in this tutorial to serve a simple HTML page where we can interact with our tutorial publisher.
-
Install Flask by typing
pyhton3 -m pip install flaskinto the command line.
$ python3 -m pip install flask
Collecting flask
Using cached https://files.pythonhosted.org/packages/f2/28/2a03252dfb9ebf377f40fba6a7841b47083260bf8bd8e737b0c6952df83f/Flask-1.1.2-py2.py3-none-any.whl
<<<...some output omitted...>>>
Installing collected packages: itsdangerous, Werkzeug, click, MarkupSafe, Jinja2, flask
Successfully installed Jinja2-2.11.2 MarkupSafe-1.1.1 Werkzeug-1.0.1 click-7.1.2 flask-1.1.2 itsdangerous-1.1.0
From the output above we can see that Flask and its dependencies were installed successfully.
Installing Pandoc
Pandoc is a command line tool for document format conversion and also needs to be installed before we can use it.
- Follow the instructions for your operating system.
Creating your project directory
Create a file called
app.pywithin your project directory.-
Download assets.zip and extract the contents to your project directory. This includes: fix-pre-code.lua, template_pre.html and template_post.html.
On Linux you can copy the following command and run it from within your project directory. This will download and extract the assets folder to the current directory.
wget https://i.ritzastatic.com/tutorial-publisher/assets.zip && unzip -o assets.zipYou should now have the following within your project directory:
- project directory/ - assets/ - fix-pre-code.lua
                               - template_pre.html
                               - tempalte_post.html
                     - app.py
Depending on your extraction method assets.zip could also be in your project directory
Building the Flask web application
Now that we have our environment set up, let's build the web server. Open the app.py file and add the following code:
from flask import Flask, request

app = Flask(__name__)

@app.route('/', methods=['GET', 'POST'])
def publish_tutorial():
    return '''
        <!doctype html>
        <title>Upload new file</title>
        <h1>Upload new file</h1>
        <p>Upload a Markdown file and get a beautiful HTML file with code highlighting in return</p>
        <form method=post enctype=multipart/form-data>
        <input type=file name=file>
        <input type=submit value=Upload>
        </form>
        '''

if __name__ == "__main__":
    app.run("0.0.0.0")
In the above code, we import the Flask libraries, create the Flask app and create the app route. Within the app route (triggered from the root dir '/') we define a function that will return a simple HTML page with two inputs: one for uploading the file and one for submitting it to the tutorial publisher. In the end, we have an if statement that will start the web server when you run the app.py script.
Now run the app by typing python3 app.py in the terminal from within your project directory.
$ python3 app.py
 * Serving Flask app "app" (lazy loading)
 * Environment: production
   WARNING: This is a development server. Do not use it in a production deployment.
   Use a production WSGI server instead.
 * Debug mode: off
 * Running on http://0.0.0.0:5000/ (Press CTRL+C to quit)
From the above output, we can see that our web app is now running and is listening for requests on any (0.0.0.0) IP on port 5000.
Open your browser and navigate to 127.0.0.1:5000. This should render the HTML page like in the image below.
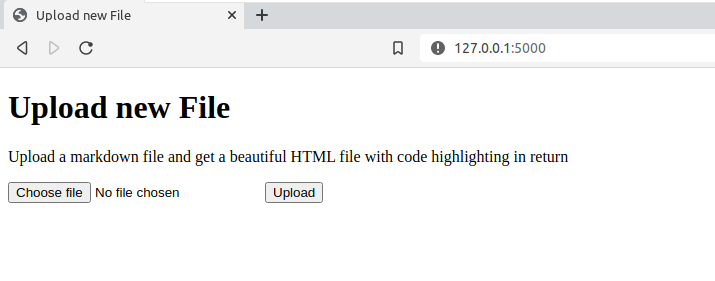
We have now built our web server with a basic HTML page. The buttons don't do anything at the moment so let's add some functionality to them.
Uploading files
Now we will write the code that allows us to upload a Markdown file. In order to do this we will need to import some more libraries.
Add the following code under from flask import Flask, request to import the rest of the libraries needed.
from flask import send_from_directory
from flask import redirect
from werkzeug.utils import secure_filename

import os
import random
import string
import subprocess
Before we write the code that will upload a file to the server we need to add the following code that will ensure the uploaded file is a Markdown file. Add the following code under your imports.
ALLOWED_EXTENSIONS = {'md', 'markdown'}

def allowed_file(filename):
    return '.' in filename and filename.rsplit('.', 1)[1].lower() in ALLOWED_EXTENSIONS
This code will check that the uploaded file is a Markdown file and correctly format it for later use.
Add the following code to your app.py file right after def publish_tutorial():.
    if request.method == 'POST':
        if 'file' not in request.files:
            return redirect(request.url)
        fle = request.files['file']
        if fle.filename == '':
            return redirect(request.url)
        if fle and allowed_file(fle.filename):
            filename = secure_filename(fle.filename)
            save_name = ''.join(random.sample(string.ascii_letters, 6))
            out_noex = os.path.join("/tmp/uploads", save_name)
            out_md = out_noex + ".md"
            out_html = out_noex + ".html"
            out_html_final = out_noex + "f" + ".html"

            fle.save(out_md)
In the code above we check for a POST request. When we hit the submit button from our front end it sends a POST request to our back end (main.py). The first line of code catches that request and executes the code within the if statement. The next two if statements check that there is a file in the request and that the filename is not empty. If any of these two checks fail we redirect back to the home page. (Note: NameError: name 'redirect' is not defined.)
In the last if statement, we check that the file is a Markdown file, use secure_filename to return a secure version of the filename that we can safely store on the file system and pass it to os.path.join, create a temp name for the files with 6 random ASCII letters, add the file extensions to each file (".md", ".html", "f.html"), and save the Markdown file.
We can now use our app to upload a Markdown file to the server. In this case, the server saves the uploaded file in tmp/uploads. Note: you have to create the uploads directory on your server manually. We use the tmp/ directory as we temporarily save a few files in order to build the final file. The tmp/ directory gets cleaned after each reboot ensuring we don't pile up these temporary files. This also means however that the uploads directory will be removed after a reboot and you will have to recreate it on system startup.
Getting a title and metadata from the uploaded file
From here let's use the uploaded file and get a title and meta description from it. To accomplish this, add the following code to your app.py file under the line fle.save(out_md).
            title = ""
            metadescription = ""
            try:
                with open(out_md) as f:
                    head = [next(f) for x in range(10)]
                    head = [x for x in head if len(x) > 2]

                    title = head[0].replace("#", "").strip()
                    metadescription = ' '.join(head[1:3])[:150]
            except Exception as e:
                print(e)
For SEO and general readability, it’s good to have a title and meta description saved in your HTML file. We don’t want to overcomplicate our program by making the user define these, but we can make a "guess" at them by taking the first line that contains content as the title and the first 150 characters as the meta description. The code above does exactly this.
We specify two empty variables: one for the title and one for the meta description. We then open out_md (which is the saved Markdown file) and we loop through the first 10 lines to create a list called head and then remove all the blank lines from it. We then take the first item [0] from the head list, remove the #, remove leading and trailing white spaces, and add it to the title variable. We then take the rest of the head from the second [1] item until the third item ([1:3], excluding the fourth item [3]), limit it to 150 characters and add it to the metadescription variable.
Converting Markdown to HTML with Pandoc
We currently have a program that can get a Markdown file through a web page, save it to the system and get a title and meta description from it.
Now comes the conversion of the content from Markdown to HTML. We can accomplish this with Pandoc, a universal document converter. There are a lot of Markdown converter libraries out there but none of them works quite as well as Pandoc and it can convert other formats too, a lot of them.
By default Pandoc will mark up code blocks like this: <pre class="*"><code>. PrismJS follows the recommended way to mark up a code block by having a <pre> element with a <code> element inside it like this: <pre><code class="language-*". So in order to get PrismJS working with Pandoc we will add a Pandoc filter. Pandoc reads the input file and writes an output file. Between these steps Pandoc allows us to add a filter that the input file will pass through before it writes the output file.
INPUT --reader--> AST --filter--> AST --writer--> OUTPUT
This filter can be written in Lua or JSON. We are using a Lua filter as it has some advantages over JSON and is usually slightly faster.
The fix-pre-code.lua file in your assets directory is the Lua filter that finds and converts the Pandoc code block markup to the PrismJS supported markup.
Now we can add the code that pulls the Pandoc filter into our code for later use. Add the following code under print(e). Make sure that your indentation is correct so that this code falls within the if fle and allowed_file(fle.filename): block.
            assets_path = os.path.join(os.getcwd(), "assets")
            pandoc_filter = os.path.join(assets_path, "fix-pre-code.lua")
In the code above, we specify the assets_path which points to the assets directory. Then we specify the pandoc_filter by adding the fix-pre-code.lua file.
Now we are ready to convert the Markdown content with Pandoc. Add the following code under pandoc_filter = os.path.join(assets_path, "fix-pre-code.lua"), also checking that it falls within the if fle and allowed_file(fle.filename): block.
            try:
                output = subprocess.check_output([
                    'pandoc',
                    out_md,
                    '--no-highlight',
                    '-f', 'markdown-auto_identifiers-citations',
                    '-t', 'html',
                    '--lua-filter', pandoc_filter,
                    '-o', out_html
                    ])
            except subprocess.CalledProcessError as e:
                print(e.output)
In this code, we use the subprocess library to run a command line command pandoc and pass a list of parameters: out_md is the input file, Pandoc syntax highlighting is disabled, the "from" format is markdown-auto_identifiers-citations, the "to" format is html, pandoc_filter is the Lua filter, and the output file is out_html.
Building the final HTML file
Now that we have the Markdown content converted to HTML we can add it to our HTML template which includes a basic CSS theme.
We have two HTML templates: one to prepend the top part to the content, called template_pre.html, and one to append the last part, called template_post.html. Together these will form the complete HTML page.
The template_pre.html file contains the HTML head with metadata and the start of the body element. The template_post.html file contains the CSS styling and the end of the body element. The post template is also where we will add PrismJS syntax highlighting.
Let's add the code that will combine all three HTML files into the final HTML page. Add the following code under print(e.output), checking that your indentation falls within the if fle and allowed_file(fle.filename): block.
            try:
                # open the templates to prepend and append to the file
                template_pre = os.path.join(assets_path, "template_pre.html")
                template_post = os.path.join(assets_path, "template_post.html")
                with open(template_pre, encoding="utf-8") as f:
                    pre = f.read()
                    pre = pre.replace("{title}", title)
                    pre = pre.replace("{metadescription}", metadescription)
                with open(template_post, encoding="utf-8") as f:
                    post = f.read()

                with open("/tmp/uploads/{}.html".format(save_name), encoding="utf-8") as f:
                    content = f.read()
                complete = pre + content + post
                with open(out_html_final, "w", encoding="utf-8") as f:
                    f.write(complete)

                return send_from_directory("/tmp/uploads/", save_name + "f" + ".html" , as_attachment=True)

            except Exception as e:
                print(e)
                return "Sorry :( something went wrong."
In the code above we specify the locations of the templates with variables, open and read the pre template to add the title and meta description. We then load the post template into our program as well as the content (Pandoc converted HTML). We then combine the three and save the final (complete) HTML doc to the server. Lastly, we return the final document for download through our Flask front end.
That's it for app.py; the whole file should now look like this.
from flask import Flask, request
from flask import send_from_directory
from flask import redirect
from werkzeug.utils import secure_filename

import os
import random
import string
import subprocess

ALLOWED_EXTENSIONS = {'md', 'markdown'}

def allowed_file(filename):
    return '.' in filename and filename.rsplit('.', 1)[1].lower() in ALLOWED_EXTENSIONS

app = Flask(__name__)

@app.route('/', methods=['GET', 'POST'])
def publish_tutorial():
    if request.method == 'POST':
        if 'file' not in request.files:
            return redirect(request.url)
        fle = request.files['file']
        if fle.filename == '':
            return redirect(request.url)
        if fle and allowed_file(fle.filename):
            filename = secure_filename(fle.filename)
            save_name = ''.join(random.sample(string.ascii_letters, 6))
            out_noex = os.path.join("/tmp/uploads", save_name)
            out_md = out_noex + ".md"
            out_html = out_noex + ".html"
            out_html_final = out_noex + "f" + ".html"

            fle.save(out_md)

            title = ""
            metadescription = ""
            try:
                with open(out_md) as f:
                    head = [next(f) for x in range(10)]
                    head = [x for x in head if len(x) > 2]

                    title = head[0].replace("#", "").strip()
                    metadescription = ' '.join(head[1:3])[:150]
            except Exception as e:
                print(e)

            assets_path = os.path.join(os.getcwd(), "assets")
            pandoc_filter = os.path.join(assets_path, "fix-pre-code.lua")

            try:
                output = subprocess.check_output([
                    'pandoc',
                    out_md,
                    '--no-highlight',
                    '-f', 'markdown-auto_identifiers-citations',
                    '-t', 'html',
                    '--lua-filter', pandoc_filter,
                    '-o', out_html
                    ])
            except subprocess.CalledProcessError as e:
                print(e.output)

            try:
                # open the templates to prepend and append to the file
                template_pre = os.path.join(assets_path, "template_pre.html")
                template_post = os.path.join(assets_path, "template_post.html")
                with open(template_pre, encoding="utf-8") as f:
                    pre = f.read()
                    pre = pre.replace("{title}", title)
                    pre = pre.replace("{metadescription}", metadescription)
                with open(template_post, encoding="utf-8") as f:
                    post = f.read()

                with open("/tmp/uploads/{}.html".format(save_name), encoding="utf-8") as f:
                    content = f.read()
                complete = pre + content + post
                with open(out_html_final, "w", encoding="utf-8") as f:
                    f.write(complete)

                return send_from_directory("/tmp/uploads/", save_name + "f" + ".html" , as_attachment=True)

            except Exception as e:
                print(e)
                return "Sorry :( something went wrong."

    return '''
        <!doctype html>
        <title>Upload new file</title>
        <h1>Upload new file</h1>
        <p>Upload a markdown file and get a beautiful HTML file with code highlighting in return</p>
        <form method=post enctype=multipart/form-data>
        <input type=file name=file>
        <input type=submit value=Upload>
        </form>
        '''

if __name__ == "__main__":
    app.run("0.0.0.0"
Adding PrismJS to the post template
For syntax highlighting we will use PrismJS, a lightweight and extensible syntax highlighter.
TIP: Don't include syntax highlighting into your HTML template if your tutorial doesn't have code snippets as you don't want to include unnecessary overheads to your final file.
- Download PrismJS from here.
A customization page will open where you can customize the look of the syntax highlighting as well as choose languages and plugins that you want to include. Note: the more languages and plugins you choose the larger your final HTML page will be.
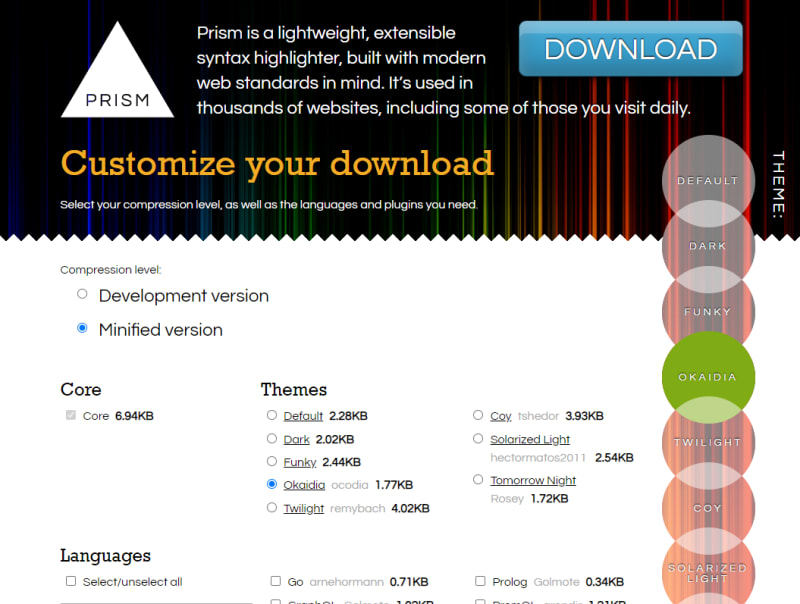
- Choose compression level: Minified version.
- Choose your theme, in our case Okaidia.
- Choose the languages you want it to support.
- Choose plugins. In this tutorial publisher we don't use any plugins.
After you have selected all that you want to include you'll find the JS and CSS files at the bottom of the page.

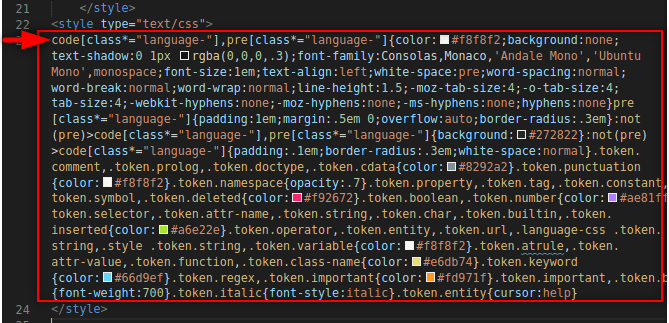
First copy all of the CSS content, open minifier.org, paste and minify the CSS.

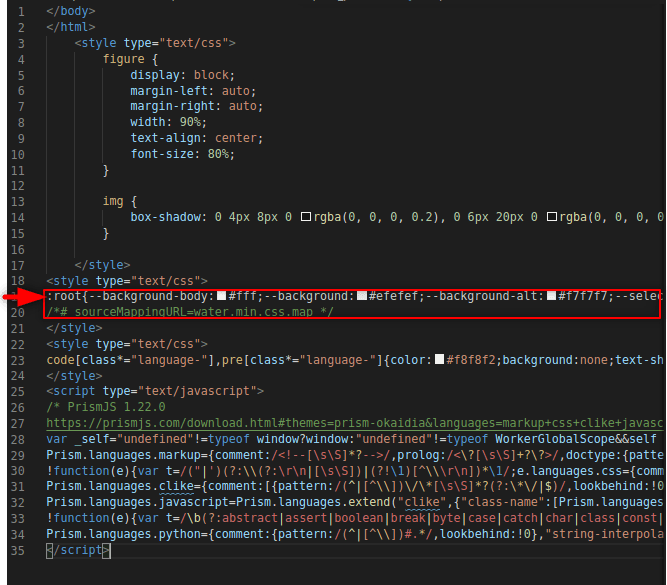
Now open the template_post.html file in the assets directory.
Add the following under the last </style> and paste the minified CSS between <style type="text/css"> and </style>.
<style type="text/css">

</style>
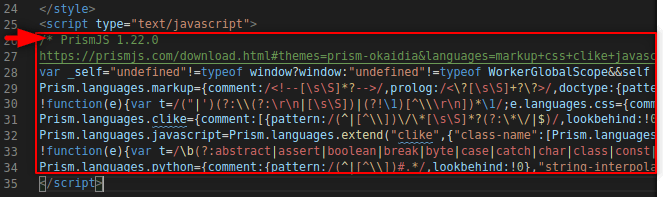
Now copy the PrismJS content (already minified) from the PrismJS download page. Create the following under the last </style> (created above) and paste the minified PrismJS between <script type="text/javascript"> and </style>.
<script type="text/javascript">

</script>
Great! Now we have included PrismJS syntax highlighting to our HTML template.
Run your app again with python3 app.py and navigate to 127.0.0.1:5000 in your browser.
Upload your Markdown formatted document and hit the submit button. A download screen will pop up where you can save your HTML file.
Open your HTML file in your browser. You should now be looking at a pretty HTML version of your tutorial. You can host this page anywhere you want. Hosting is pretty complicated, but it’s easier if you just want to host one HTML file. You can push it to GitHub pages, scp it to a VPS running Apache or nginx, ask your Internet Service Provider for a static hosting package, or use one of the many free hosting services online. You can put it in AWS S3, use Netlify, or Repl.it.
Changing the CSS template
If you don't like the default CSS theme you can swap it out for another or your own custom one.
To do this simply open up the template_post.html file and replace the CSS between the second <style type="text/css"> and </style> tags where it says :root.... Remember to minify your CSS before adding it.
Conclusion
Congratulations! You have built your own tutorial publisher that'll save you a lot of time. You can now write your tutorials in Markdown and use this publisher to create a beautiful HTML page that you can host anywhere. Writing the tutorials is the hard part though, so we'll leave that up to you. Happy publishing!

Top comments (0)