
So, I've found a lot of crappy guides on the internet about how to integrate TailwindCSS with Angular 8, a lot of them involve some nasty hacks that I think are basically, shit. I've collated some information from various sources online to show you how I go about implementing TailwindCSS with Angular 8. If you're reading this and you don't know what TailwindCSS is, two things, one, where the hell have you been the past few years and two, go to tailwindcss.com and feast in the amazingness (is that even a word) that is Tailwind.
We'll be utilising the @angular-builders/custom-webpack package which will essentially allow us to tailor the webpack build to add tailwind into the build process.
First things first, install the following:
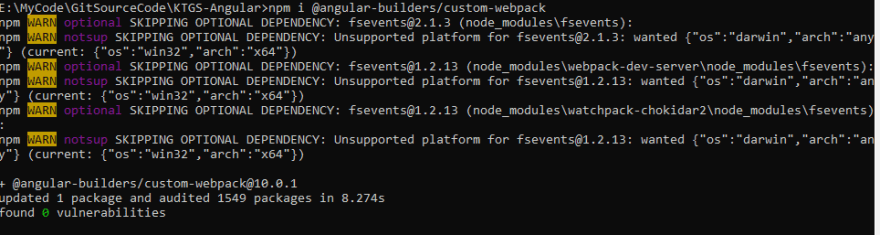
npm i tailwindcss postcss-scss postcss-import postcss-loader @angular-builders/custom-webpack -D
Next you need to open up your Angular project, I'm going to assume you're using sass, as well, why the fuck not?
Open your styles.scss file and add the following at the top.
@import 'tailwindcss/base';
@import 'tailwindcss/components';
@import 'tailwindcss/utilities';
Next, you need to create the tailwind config file, to do so, open your terminal and smash in the following (inside the directory of your app of course).
npx tailwind init
Now we need to extend the webpack config, first, start by creating webpack.config.js at the root of your project, this is what it should look like
module.exports = {
    module: {
        rules: [
            {
                test: /\.scss$/,
                loader: 'postcss-loader',
                options: {
                    ident: 'postcss',
                    syntax: 'postcss-scss',
                    plugins: () => [
                        require('postcss-import'),
                        require('tailwindcss'),
                        require('autoprefixer'),
                    ]
                }
            }
        ]
    }
};
Once you've added that, modify the angular.json file to tell it to use the custom builder and config file.
{
  "architect": {
    "build": {
      "builder": "@angular-builders/custom-webpack:browser",
      "options": {
        "customWebpackConfig": {
          "path": "./webpack.config.js"
        }
      }
    },
    "serve": {
      "builder": "@angular-builders/custom-webpack:dev-server",
      "options": {
        "customWebpackConfig": {
          "path": "./webpack.config.js"
        }
      }
    }
  }
}
Now we're all up and ready to rumble, add some tailwind classes to an object and run
npm start
Extra
The whole point of Tailwind is to create custom utilities, you can do so by doing the following:
Modify your styles.scss and add 2 new custom imports.
@import 'tailwindcss/base';
@import 'tailwindcss/components';
@import './custom-tailwind/custom-components.css'; // added
@import 'tailwindcss/utilities';
@import './custom-tailwind/custom-utilities.css'; // added
Make sure that they're added in the exact order above.
You can now create a folder inside the src directory called custom-tailwind
Inside this, you create the 2 files the same names as above, now you can create custom reusable utilities and components, for example:
custom-components.css
.btn {
  @apply px-4;
  @apply py-2;
  @apply rounded;
  @apply bg-indigo-500;
  @apply text-white;
  transition: 200ms;
}

.btn:hover {
  @apply bg-indigo-600;
}
And now anywhere you want a button, just give it the class .btn and it will apply all the tailwind classes.
For custom-utilities.css, you can do the following:
.rotate-0 {
    transform: rotate(0deg);
}
.rotate-90 {
    transform: rotate(90deg);
}
.rotate-180 {
    transform: rotate(180deg);
}
.rotate-270 {
    transform: rotate(270deg);
}
And now anywhere, you can just call these classes. Neat huh!
Enjoy the power that is TailwindCSS + Angular 8!
Update:
I realise this is a repeated post, for some reason I had 3 dev.to accounts (god knows why) and this is the account I wanted to use, so I deleted this post along with the other account and re-created it here.
Update 2:
This also works the same way with Angular 9, I have this working using angular version "@angular/core": "~9.0.0",
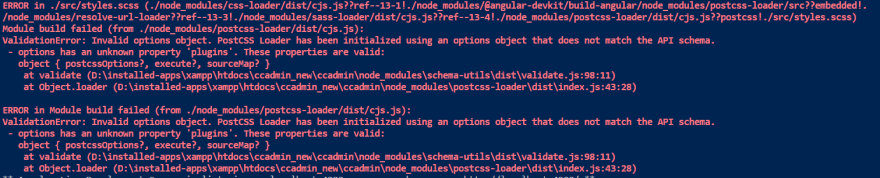
Update 3: Angular 10.X
postcss-loader came with some breaking changes when it jumped from version 3 to 4.
I managed to get Angular 10 and Tailwind to play nicely by changing my webpack.config.js to the following:
module.exports = {
  module: {
    rules: [
      {
        test: /\.scss$/,
        loader: 'postcss-loader',
        options: {
-          ident: 'postcss',
-          syntax: 'postcss-scss',
-          plugins: () => [
-            require('postcss-import'),
-            require('tailwindcss'),
-            require('autoprefixer'),
-          ],
+          postcssOptions: {
+           ident: 'postcss',
+            syntax: 'postcss-scss',
+            plugins: [
+              require('postcss-import'),
+              require('tailwindcss'),
+              require('autoprefixer'),
            ],
          },
        },
      },
    ],
  },
};
Thanks to @phileagleson for spotting this!
You can also skip the entire above process and just the the Schematic that was created to do the work for you.
Note, you will still need to change the webpack.config.js even if you use the Schematic when using this with postcss-loader Version 4 and Angular 10
Update
Thanks to thieugiatri4492 for pointing out that if you used my manual method of installing Tailwind, and then moved over to use the schematic, you'll need to remove the webpack.config.js before using the schematic otherwise it will throw an error that it already exists!

Latest comments (60)
Hi,
Thanks, this helps me to install tailwind to an old Angular 8 app. Though I encounter several issues because the install script provided will install latest versions of its packages, thus breaks due to incompatibility with each other.
I added specific versions to correct them.
npm i tailwindcss@1.9.6 postcss-scss@3.0.4 postcss-import@12.0.1 postcss-loader@3.0.0 @angular-builders/custom-webpack@8.4.1 postcss@7.0.35 -D
This work with me in angular 8.
Hi,
After setting it with the custom webpack builder before using the schema is easy.
We implemented the apply via custom repository packages.
To make this work we modified the webpack config to also use the sass loader and url-resolver:
module.exports = {

  module: {

    rules: [

      {

        test: /\.scss$/,

        use: [

          {

            loader: 'postcss-loader',

          options: {

            postcssOptions: {

              ident: 'postcss',

              syntax: 'postcss-scss',

              plugins: [

                require('postcss-import'),

                require('tailwindcss'),

                require('autoprefixer'),

              ],

            },

          },

        },

        "resolve-url-loader",

        "sass-loader",

        ]

      },

    ],

  },

};
So in the style.scss we can add
@import 'tailwindcss/base';
@import 'tailwindcss/components';
@import 'tailwindcss/utilities';
/* You can add global styles to this file, and also import other style files */
@import "~@"; @import "~@....";
After a few hours of trying to install tailwind, finally, I found this (garygrossgarten/ngx-tailwind) in your article, it's work great.
Thanks. 🤟🏼🥳
Great post
I can't seem to make the style work. I'm currently running Angular 11 and Tailwindcss 2. Followed webpack and tailwindcss config and updated angular.json. It runs but the style is not reflecting
I haven’t look at Angular 11 with the new Tailwind2 - I will look at this and get back to you
for everyone having this error i found a solution at stackOverflow by changing the plugins to array here is the link stackoverflow.com/questions/638589...
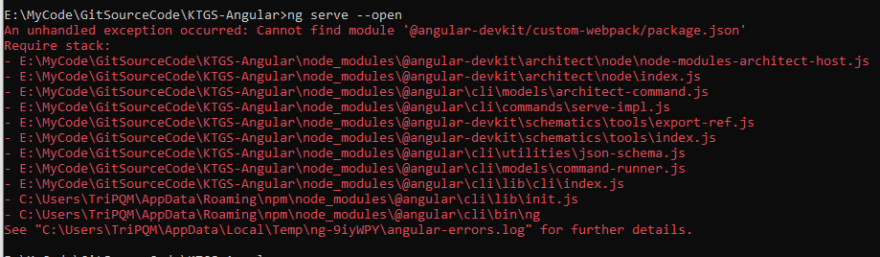
I have this problem when i try to start the app with ng serve. Can you please help me? :
By any chance are you using Angular 10.x?
I think i have encountered the same issue when making a new application using angular 10, I didn't spend much time looking into fixing it. I was just playing with something...
I will update here once I have a working example and how i did it for Angular 10.
Yes, im using angular 10. I occured this problem , i think i have to revert to angular 9
Read the update to my guide. I changed it to work with Angular10
Now i face the problem with custom webpack builder, did you have occured this problem with angular 10?
I have moved to use the schematic garygrossgarten/ngx-tailwind which i dont use a custom-webpack anymore, my angular.json looks like this
I suggest you try installing the schematic and go from there!
So, do i have to remove the custom webpack ? Or just install the schematic garygrossgarten/ngx-tailwind directly on my project?
You can try just installing the schematic. I’ve never tried undoing my own work in favour of the schematic.
If you do install it. All you should need to do is update the angular.Json to match mine
Thank you, i have successfully run with tailwind thank to your guide. But in your post, you have to warn people who already create webpack.config.js, remove it before install schematic because it will throw error that webpack.config.js already exist
Glad you got it to work!
As the guy writing the "crappy guides" prior to the advent of angular 8, I'm happy to hear we can finally do this "the Angular way." 😁
I'm trying to follow this guide in a project using angular custom elements. Can't get it to work, the /postcss-loader is looking for my
styles.scssin~projects/eddy-library/src/app/styles.scss. But the correct director is without app, i.e.~projects/eddy-library/src/styles.scss. How do I fix this?Hi,
Great tutorial on how to implement Tailwind within Angular 9. Thanks for the easy to follow Tutorial. I do come across an issue. I see tailwind being loaded correctly but somehow my components are not getting styled. The styling only goes till root level. Any idea what I'm doing wrong?
Thanks in advance.
Leroy
This will only work for the
style.scssat root level, the custom web pack doesn't know about the deep level component css files so you can't use the@applymethod in component level stylesheets.In fact, you shouldn't do this as a rule of thumb with Tailwind anyway. Creating your own custom utilities at root level is fine to use everywhere like a
.btnclass globally, but there is no need for component level utilities, just use the classes in the html. There's a really good video from Adam Watham about the best practices of Tailwind.youtube.com/watch?v=J_7_mnFSLDg