
Next.js provides a solid foundation for building React applications with server-side rendering, while Supabase offers a scalable and easy-to-use backend-as-a-service with PostgreSQL as the database.
Since the release of Next.js 13 and then Next.js 14, there have been a lot of changes. We now have the:
- App Router
- Client and Server components
- Route Handlers
- Server Actions
Combining these new features with Supabase will speed up the development process and will help you build things faster. So in this article, we will learn how to integrate Supabase with your Next.Js 14 project.
Setting up a Next.Js Project
npx create-next-app@latest
On installation, you'll see the following prompts:
What is your project named? my-app
Would you like to use TypeScript? No / Yes
Would you like to use ESLint? No / Yes
Would you like to use Tailwind CSS? No / Yes
Would you like to use `src/` directory? No / Yes
Would you like to use App Router? (recommended) No / Yes
Would you like to customize the default import alias (@/*)? No / Yes
What import alias would you like configured? @/*
After the prompts, create-next-app will create a folder with your project name and install the required dependencies.
Using Supabase in the Project
Now to use Supabase in the project we have to follow the following steps:
Installing the Supabase Libraries
Next, we have to install the required libraries to work with Supabase.
npm install @supabase/auth-helpers-nextjs @supabase/supabase-js
Setting the Environment Variables
Create a new file named .env.local in the root of your project and paste your Supabase Project URL and Anon Key.
You can get this information by going to the supabase project dashboard then on the left side click settings and then click on API.
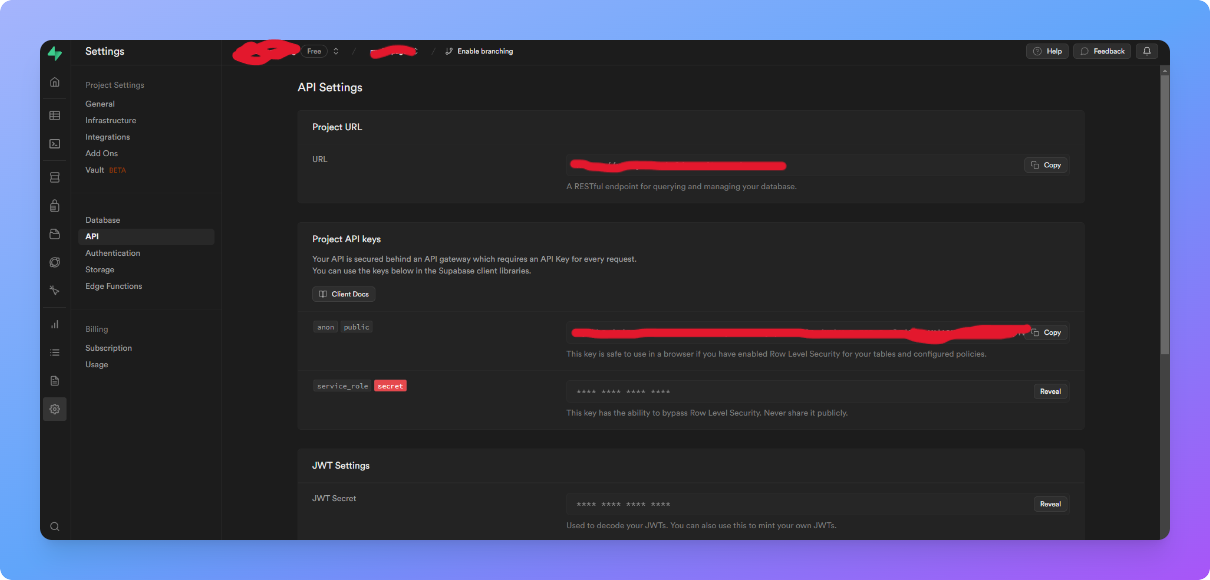
NEXT_PUBLIC_SUPABASE_URL=PROJECT_URL
NEXT_PUBLIC_SUPABASE_ANON_KEY=ANON_KEY
Using Supabase in Client Components
To use Supabase in client components, call the createClientComponentClient function to create a Supabase client. You can then use this client to perform operations.
"use client"

import { createClientComponentClient } from "@supabase/auth-helpers-nextjs"
import { useState, useEffect } from "react"

export const ClientComponent = () => {
  const supabase = createClientComponentClient()
  const [users, setUsers] = useState([])

  const getUsers = async () => {
    const { data, error } = await supabase.from("users").select("*")
    setUsers(data)
  }

  useEffect(() => {
    getUsers()
  }, [])

  return <h2>This is a client component</h2>
}
Using Supabase in Server Components
To use Supabase in server components, call the cookies function and then call the createServerComponentClient function and pass the cookies object to create a Supabase client. You can then use this client to perform operations.
import { createServerComponentClient } from "@supabase/auth-helpers-nextjs"
import { cookies } from "next/headers"

export const ServerComponent = async () => {
  const cookieStore = cookies()
  const supabase = createServerComponentClient({
    cookies: () => cookieStore
  })

  const { data, error} = await supabase.from("users").select("*");

  return <h2>This is a server component</h2>
}
Using Supabase in Server Actions
To use Supabase in server actions, call the createServerActionClient function and pass the cookies function to create a Supabase client. You can then use this client to perform operations.
import { createServerActionClient } from "@supabase/auth-helpers-nextjs"
import { cookies } from "next/headers"

export const Form = () => {
  const addPost = async (formData: FormData) => {
    "use server"

    const title = formData.get("title") as string
    const description = formData.get("description") as string

    const supabase = createServerActionClient({
      cookies
    })

    const { data, error } = await supabase.from("posts").insert({
      title,
      description
    })
  }

  return (
    <form action={addPost}>
      <input type="text" name="title" />
      <input type="text" name="description" />
      <button type="submit">Submit</button>
    </form>
  )
}
Using Supabase in Route Handlers
To use Supabase in route handlers, call the cookies function and then call the createRouteHandlerClient function and pass the cookies object to create a Supabase client. You can then use this client to perform operations.
import { createRouteHandlerClient } from "@supabase/auth-helpers-nextjs"
import { cookies } from "next/headers"

export const GET = async (request: Request) => {
  const cookieStore = cookies()
  const supabase = createRouteHandlerClient({ cookies: () => cookieStore })

  const { data, error} = await supabase.from("users").select("*")

  return Response.json(data)
}
Supabase Authentication
Next, we will learn how to authenticate users and add authorization using Supabase.
Creating a Middleware
When using the Supabase client on the server, you must perform extra steps to ensure the user's auth session remains active. Since the user's session is tracked in a cookie, we need to read this cookie and update it if necessary.
Next.js Server Components allow us to read a cookie but not write back to it. Middleware on the other hand allows us to both read and write to cookies.
Create a new file named middleware.ts in the src folder (if you have one) or in the root of your project. And paste the following code:
import { createMiddlewareClient } from '@supabase/auth-helpers-nextjs'
import { NextResponse } from 'next/server'

import type { NextRequest } from 'next/server'

export async function middleware(req: NextRequest) {
  const res = NextResponse.next()

  const supabase = createMiddlewareClient({ req, res })

  // Refresh session if expired - required for Server Components
  await supabase.auth.getSession()

  return res
}
API Route for Code Exchange
Supabase requires us to set up a Code Exchange route, to exchange an auth code for the user's session, which is set as a cookie for future requests made to Supabase.
Create a new folder named auth inside the app folder, inside of this create another folder callback and then create a route.ts file and paste the following code
import { createRouteHandlerClient } from "@supabase/auth-helpers-nextjs"
import { cookies } from "next/headers"
import { NextResponse } from "next/server"

import type { NextRequest } from "next/server"

export async function GET(request: NextRequest) {
  const requestUrl = new URL(request.url)
  const code = requestUrl.searchParams.get("code")

  if (code) {
    const cookieStore = cookies()
    const supabase = createRouteHandlerClient({
      cookies: () => cookieStore
    })
    await supabase.auth.exchangeCodeForSession(code)
  }

  // URL to redirect to after sign in process completes
  return NextResponse.redirect(`http://localhost:3000/`)
}
Sign Up a User
import { createServerActionClient } from "@supabase/auth-helpers-nextjs"
import { cookies } from "next/headers"

export const SignUp = () => {
  const signUp = async (formData: FormData) => {
    "use server"

    const name = formData.get("name") as string
    const email = formData.get("email") as string
    const password = formData.get("password") as string

    const supabase = createServerActionClient({
      cookies
    })

    const { data, error } = await supabase.auth.signUp({
      email,
      password,
      options: {
        data: {
          name
        },
        emailRedirectTo: `http://localhost:3000/auth/callback`
      }
    })
  }

  return (
    <form action={signUp}>
      <input type="text" name="name" />
      <input type="email" name="email" />
      <input type="password" name="password" />
      <button type="submit">Submit</button>
    </form>
  )
}
Log In a User
import { createServerActionClient } from "@supabase/auth-helpers-nextjs"
import { cookies } from "next/headers"

export const LogIn = () => {
  const logIn = async (formData: FormData) => {
    "use server"

    const email = formData.get("email") as string
    const password = formData.get("password") as string

    const supabase = createServerActionClient({
      cookies
    })

    const { data, error } = await supabase.auth.signInWithPassword({
      email,
      password
    })
  }

  return (
    <form action={logIn}>
      <input type="email" name="email" />
      <input type="password" name="password" />
      <button type="submit">Submit</button>
    </form>
  )
}
Log Out a User
"use client"

import { createClientComponentClient } from "@supabase/auth-helpers-nextjs"

export const LogOut = () => {
  const supabase = createClientComponentClient()

  const logOut = async () => {
    await supabase.auth.signOut()
  }

  return <button onClick={logOut}>LogOut</button>
}
Get the Logged In User
import { createServerComponentClient } from "@supabase/auth-helpers-nextjs"
import { cookies } from "next/headers"
import { redirect } from "next/navigation"

export const Profile = async () => {
  const cookieStore = cookies()
  const supabase = createServerComponentClient({
    cookies: () => cookieStore
  })

  const {
    data: { session }
  } = await supabase.auth.getSession()

  if (!session) {
    redirect("/login")
  }

  const user = session.user

  return <h2>User Profile</h2>
}
Conclusion
Next.Js 14 and Supabase is a powerful combination and it allows us to build things faster. From setting up a Next.js project to initializing the Supabase client, fetching data, and implementing user authentication, this guide has provided a comprehensive overview of using Supabase with Next.Js 14. To learn more about Next.Js 14 and Supabase, read their official documentation.
MyDevPage: Create a Portfolio Website in Minutes
MyDevPage allows you to build a portfolio website in minutes. Focus on building great projects and enhancing your skills rather than wasting your time in building a portfolio website from scratch or customizing expensive templates.
MyDevPage handles everything:
- Creating a portfolio
- SEO
- Analytics
- Customization
- Custom Domain
- Contact Form


Top comments (2)
Handy Guide on setting up Supabase with nextjs 14 thanks for sharing 💖🙏
Thanks for reading. It was my pleasure.