Hey devs,
In this blog, we will learn how to push CSV data in a S3 bucket and automatically populate a DynamoDB table. We will provision the S3 bucket and DynamoDB table, and upload our CSV files in the bucket using Terraform. Also, this project will leverage a Lambda function that takes data from our CSV file and adds it to our DynamoDB table.
Get the configuration files and source codes for this project here

Before you dive into the project, please ensure that you check on all prerequisites mentioned below.
Prerequisites:
Make sure that you have -
An AWS account with Access Key and Secret Access Key
Working knowledge of Terraform (good-to-have)
Steps to Follow:
Alright! Let’s understand how you can put the pieces together and build this project. Follow along with me!
🚀 Create an EC2 jumphost
I always prefer using Terraform through an EC2 jumphost. Instead of running Terraform on your local machine, we will install Terraform and issue commands on this jumphost. So, let’s launch our jumphost!
Log into your AWS Management Console
Before beginning, please ensure that you are in the us-east-1 (N. Virginia) region in the AWS console.

- Now, type ‘EC2’ in the topmost search bar.

- Click on EC2

- On your left-hand side pane, click on Instances

- Click on ‘Launch Instances’
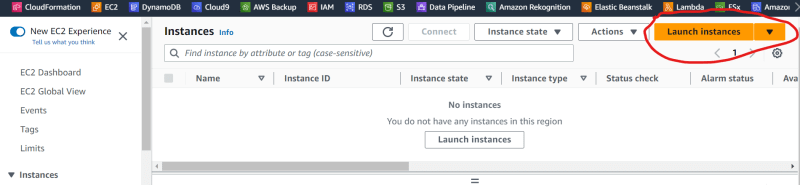
- In the field for Names and tags, type ‘terraform_jumphost’.

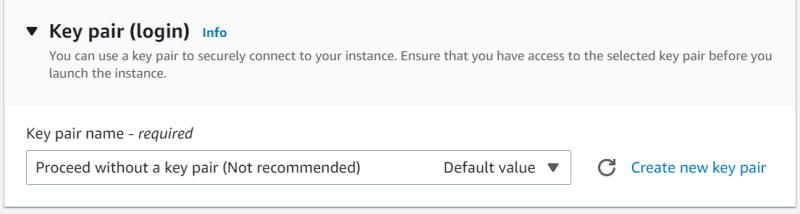
- In Key pair (login), under key pair name, choose ‘Proceed without a key pair (Not recommended)’ from the drop-down menu.
- Hit ‘Launch Instance’.
🚀 Connect with your Terraform jumphost
You have already created our jumphost for this project. Now, wait for its status to change from “pending” to “running”.

- Once your jumphost gets in the running state, you can connect with it, by selecting the instance and clicking the ‘Connect’ button above it.

- A new screen will pop up right after you click on the connect option. Leave everything as it is, and hit the ‘Connect’ button at the bottom.

🚀 Install Terraform on jumphost
If you have strictly followed the above steps, you might have received a linux terminal before you. You can talk to the instance and issue commands through this terminal. We will install Terraform on our jumphost through this terminal and issue further commands for S3 and DDB provisioning.
Run the following commands in the terminal to install Terraform without hassles:
sudo -icd /home/ec2-usermkdir terraformcd terraform
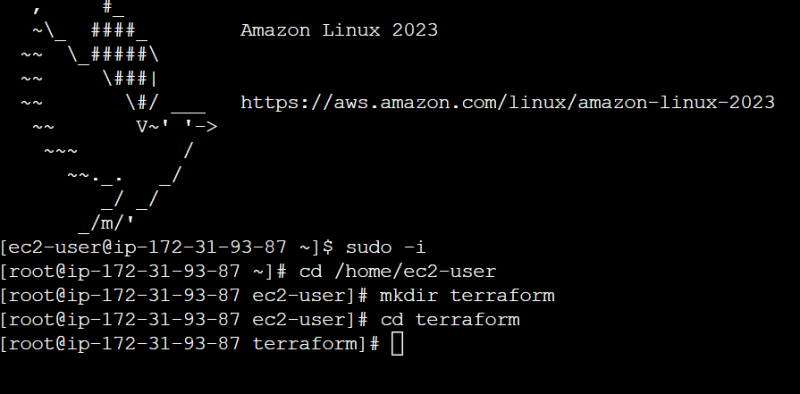
Basically, we have created a new directory, called ‘terraform’, inside /home/ec2-user, where we would install Terraform. The following commands will install Terraform in your jumphost. Keep issuing them one by one!
sudo yum install -y yum-utilssudo yum-config-manager --add-repo https://rpm.releases.hashicorp.com/AmazonLinux/hashicorp.reposudo yum -y install terraform
You will get a ‘Complete!’ message after the last step.

🚀 Add files to EC2 jumphost
By now, your jumphost is up and running, with Terraform installed on it. So, let’s push a few integral Terraform files in our jumpost to provision S3 and DDB resources.
Follow these steps to do so:
Run these commands in your terminal:
touch provider.tf
touch variable.tf
touch main.tf
touch scores.csvType
vi provider.tfand press enter. Now, hit ‘insert’ and copy the following script in your terminal.
terraform {
  required_providers {
    aws = {
      source  = "hashicorp/aws"
      version = "~>3.0"
    }
  }
}

provider "aws" {
  region     = var.region
  access_key = var.access_key
  secret_key = var.secret_key
}
Press escape and then type ‘:wq’ to return to your previous screen.
Do the same thing after typing
vi variable.tf.Copy the following snippet in the editor. Remember to replace YOUR_ACCESS_KEY with your access key and YOUR_SECRET_KEY with your secret key in the below snippet before pasting it in the editor.
variable "region" {
  default = "us-east-1"
}

variable "access_key" {
  default = "YOUR_ACCESS_KEY"
}

variable "secret_key" {
  default = "YOUR_SECRET_KEY"
}
Save the file by pressing escape and hitting ‘:wq’.
Now, type
vi main.tfand copy the following snippet in the editor after changing ‘firstname’ with your first name and ‘birthday’ with your date of birth in ‘score-bucket-csv-firstname-birthday’. (Notice that the last resource is commented out. We will uncomment it soon!)
resource "aws_dynamodb_table" "basic-dynamodb-table" {
  name           = "ScoresDatabase"
  billing_mode   = "PROVISIONED"
  read_capacity  = 5
  write_capacity = 5
  hash_key       = "Id"

  attribute {
    name = "Id"
    type = "S"
  }
}

resource "aws_s3_bucket" "s3_bucket" {
  bucket = "score-bucket-csv-firstname-birthday"

  tags = {
    Name        = "Scores Bucket"
  }
}

resource "aws_s3_bucket_object" "object" {
  bucket = aws_s3_bucket.s3_bucket.id
  key    = "scores.csv"
  acl    = "private"
  source = "/home/ec2-user/terraform/scores.csv"
  etag = filemd5("/home/ec2-user/terraform/scores.csv")
  content_type = "text/csv"
}

/*
resource "aws_s3_bucket_object" "object2" {
  bucket = aws_s3_bucket.s3_bucket.id
  key    = "new_scores"
  acl    = "private"
  source = "/home/ec2-user/terraform/new_scores.csv"
  etag = filemd5("/home/ec2-user/terraform/new_scores.csv")
  content_type = "text/csv"
}
*/
- Once you save the main.tf file, type
vi scores.csvand copy the following snippet.
1,Shiva,100
2,Ganesh,90
3,Durga,80
4,Kartik,95
5,Saraswati,89
6,Lakshmi,97
🚀 Run Terraform to provision S3 bucket, DynamoDB, and upload S3 object
Great! So, you have uploaded all configuration files in your jumphost. Now, let’s trigger Terraform to deploy the resources in your AWS account. Run the following commands in the EC2 terminal to do so:
terraform initterraform validateterraform planterraform apply
Type ‘yes’ and press enter, when prompted. You’ll get the following message after terraform finishes applying the stated configuration in your AWS account.

🚀 Create IAM role
By now, Terraform has already created a DynamoDB table and a S3 bucket for us. Also, it has uploaded the CSV file in our bucket. Search for S3 in the topmost search bar in the AWS console and click on ‘S3’. You will see the bucket has been already created.

If you click on your newly-created bucket, you will see the CSV file (scores.csv) uploaded as an object.

Also, if you visit the DynamoDB console in a similar way, you will see ‘Tables’ in your left-hand side pane.

Click on it and a new screen will open, where you can find your newly-created ScoresDatabase table.
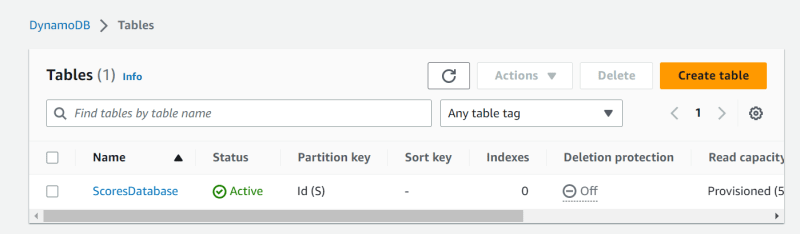
Somewhere, on your right-hand side, you will see an option for ‘Explore table items’.
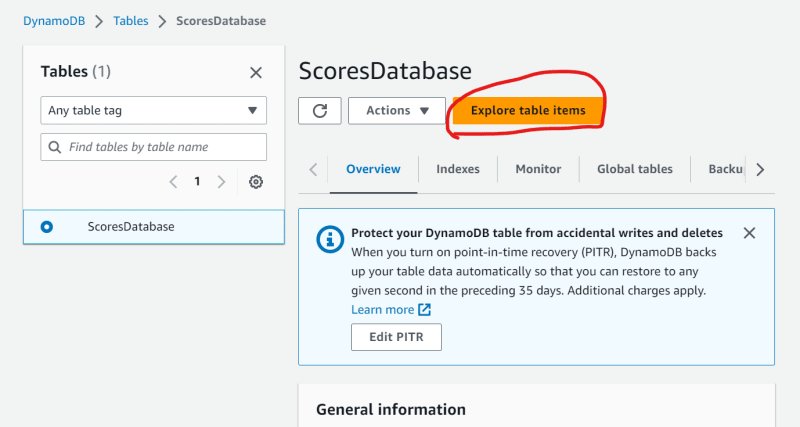
If you click on it, and scroll below, you will see that currently your table has 0 elements.

Let’s now create a suitable IAM role which will provide required access to our Lambda function. Keep following these steps:
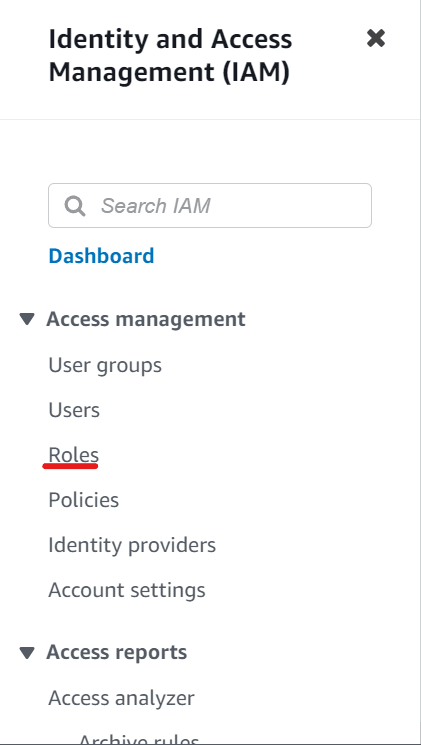
Search for and click on ‘IAM’ in the topmost search bar.
In the left pane, click on ‘Roles’.
- On your right-hand side, find and click on ‘Create role’.

- In the new screen, click on the radio button beside ‘AWS Service’ and ‘Lambda’ under Use case. Now, click on ‘Next’.

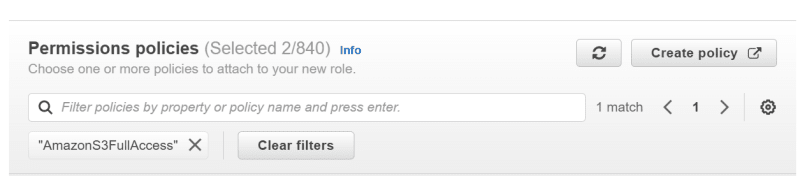
- Now, search and click on ‘AmazonDynamoDBFullAccess’ and ‘AmazonS3FullAccess’ one-by-one in the search bar mentioning ‘Filter policies by property or policy name and press enter’.
Click on ‘next’.
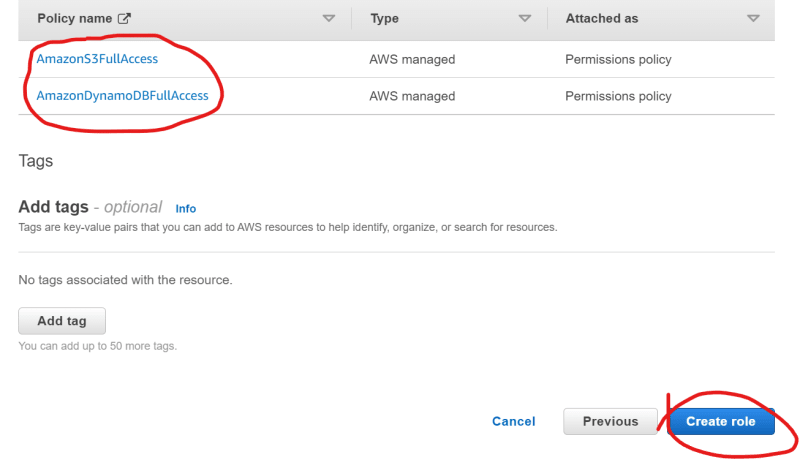
In the ‘Name, review, and create’ screen, type ‘LambdaRoleForCSV’ as the role name.

- Scroll down and ensure that ‘AmazonDynamoDBFullAccess’ and ‘AmazonS3FullAccess’ are mentioned under policy names. Then, click on ‘Create role’.
🚀 Build Lambda function
Good job, so far!
It’s time to create the logic tier for us now, that is, the Lambda function. Here are the steps to build the serverless function in minutes!
Search for and click on Lambda in your AWS console.
On the landing page, click on ‘Create function’.

Select the radio button beside ‘Author from scratch’ in the new screen.
Give your function a name, like lambda_function, and select Pyhton3.9 as the runtime environment.
Create the function.

Now, a new screen will open, where you can configure your Lambda function.
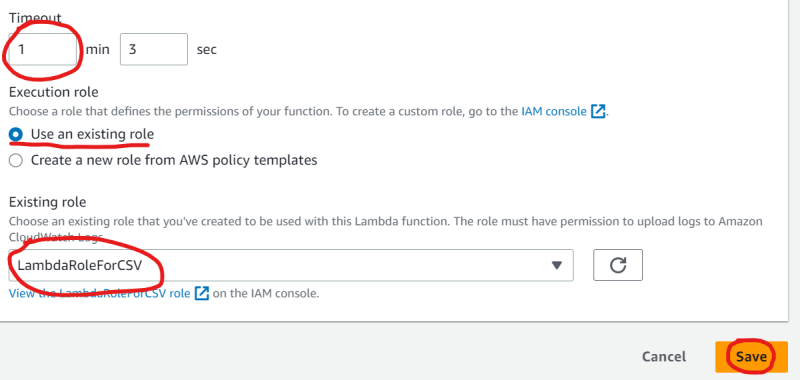
Go to the configuration tab

- Click on ‘Edit’

Now, increase the timeout to 1 minute and 3 seconds.
Under the execution role, choose ‘Use an existing role’.
Then, select your newly-created LambdaRoleForCSV role, from the drop-down menu under the existing role. Finally, click on ‘Save’.
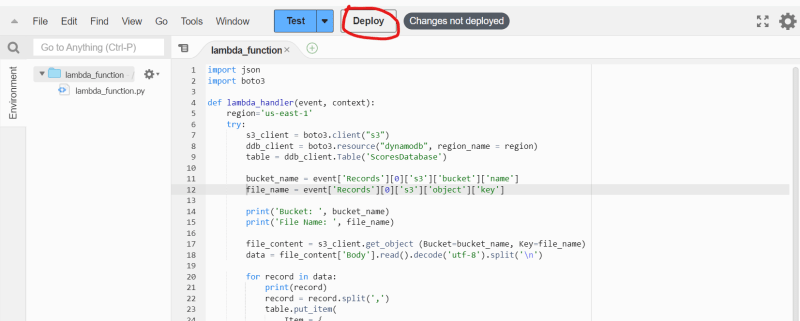
- Now, get back to the ‘Code’ pane.

- In the code editor, replace the existing snippet with the following Python code:
import json
import boto3

def lambda_handler(event, context):
    region='us-east-1'
    try:
        s3_client = boto3.client("s3")
                ddb_client = boto3.resource("dynamodb", region_name = region)
        table = ddb_client.Table('ScoresDatabase')

        bucket_name = event['Records'][0]['s3']['bucket']['name']
            file_name = event['Records'][0]['s3']['object']['key']

        print('Bucket: ', bucket_name)
        print('File Name: ', file_name)

        file_content = s3_client.get_object (Bucket=bucket_name, Key=file_name)
        data = file_content['Body'].read().decode('utf-8').split('\n')

        for record in data:
            print(record)
            record = record.split(',')
            table.put_item(
                Item = {
                    'Id':str(record[0]),
                    'Name':str(record[1]),
                    'Score':str(record[2])
                }
                )

        return {
            'statusCode': 200,
            'body': json.dumps('Job run!')
            }
    except Exception as e:
        print(str(e))
        raise(e)
- Next, click on Deploy to save your code.
🚀 Test the workflow
You have put everything in place by now.
Let’s test whether our function gives the desired output or not. In other words, our function should pick the data from the CSV file stored in our S3 bucket and populate our DDB table.
Follow the steps to test the flow:
- Go to the ‘Test’ pane.
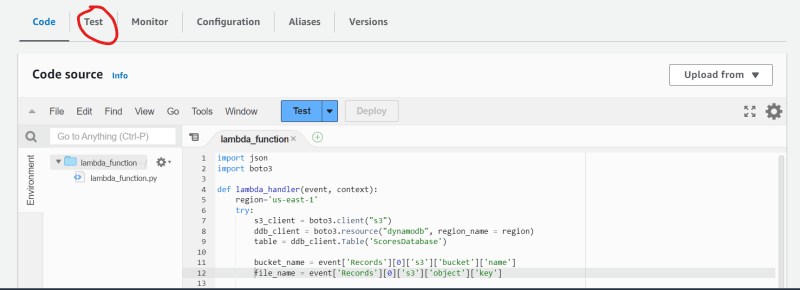
In the new screen, click on ‘Create new event’ under Test event action.
Type ‘csv’ under event name.
Choose s3-put from the drop-down menu under Template.

- In the code snippet, you must make three changes.
- Replace ‘example-bucket’ by the name of your S3 bucket.
- Update the arn of your S3 bucket.
- Finally, update the name of your S3 object (CSV file, scores.csv)

- Scroll up and click on ‘Save’.

- Now, click on ‘Test’. You can ignore the error message and proceed to check the DynamoDB table.

- The table will now contain the six items as mentioned in the CSV file.
🚀 Setup S3 event notifications
One final thing! Let’s configure S3 event notifications which would trigger the Lambda function, whenever a new file is uploaded in our S3 bucket. Consequently, the function will repopulate our DDB table with new entries. Follow the steps to do so:
Go to the S3 console and click on your bucket.
Click on the Properties tab in the new screen.

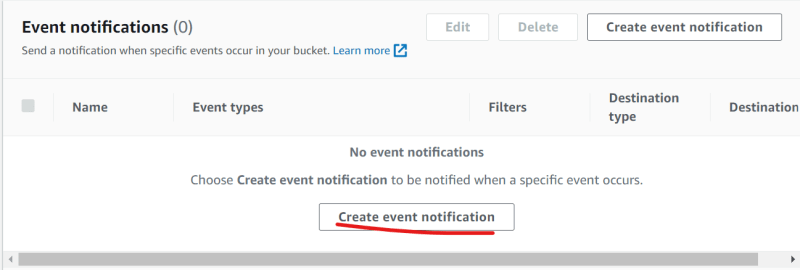
Scroll down till you find Event notifications.
Click on ‘Create event notification’.
Write new_csv as the event name.
Select ‘All object create events’ under Event types > Object creation.

Scroll down and choose ‘Lambda function’ under Destination.
Select ‘Choose from your Lambda functions’ under Specify Lambda function.
Now, select your function (lambda_function) from the drop-down menu under ‘Lambda function’.
Click on ‘Save changes’

🚀 Retest your flow
It’s time to retest our flow to check whether the Lambda function is working as expected.
Go back to your jumphost connect terminal.
Run the command,
vi main.tf.Scroll down and uncomment the last resource block.
Save the file and run the command,
vi new_scores.csv.Press Insert.
Copy and paste the following data in your editor.
1,John,100
2,Macie,90
3,Matteo,80
4,Karlo,95
5,Julien,89
6,Swarna,97
Save the file
Run the command
terraform validate.Next, issue the command
terraform plan.And lastly apply the changes with
terraform apply. Type ‘yes’ and press enter, when prompted.Get back to your S3 bucket and you will see the new object ‘new_scores’ added into your bucket.
Go to your DDB table, under ‘Explore table items’, refresh the elements once or twice to see the new entries being populated in your database.
Final Words!
That’s it. In this project, we have learned:
Creating an EC2 jumphost and configuring it to run Terraform.
Uploading the configuration files in our jumphost and using Terraform to provision resources in our AWS account.
Creating IAM roles
Building, configuring, and testing a Lambda function and configuring S3 event notifications.

Top comments (0)