
An Evolutionary Path from Standalone Server to Scalable
Architecture and implementation of AWS Developer Tools for continuous integration & continuous delivery
Table of Contents
- Introduction
- References
- GitHub Repositories
- Part 1: Standalone Application
- Part 2: Migration to RDS, User Pool Creation, Secrets Management and Logging
- Part 3: Transitioning to a Scalable and Secure Infrastructure
- Part 4: Implementing Continuous Integration/Continuous Deployment (CI/CD)
Introduction
In today's rapidly evolving technological landscape, designing scalable and resilient software applications is essential. The journey of scaling an application's architecture involves various stages, from single-tier to multi-tier, with each tier bringing a unique set of complexities and advantages. In this blog, we're going to delve into the process of transitioning a simple Golang application from a single-tier architecture to a more complex, but efficient, three-tier design.
Moreover, to ensure the stability and reliability of the application, a robust Continuous Integration and Continuous Delivery (CI/CD) pipeline becomes paramount. We'll also discuss the implementation of an effective CI/CD system for our upgraded Golang application.
Join me in this exciting expedition, as we navigate the intricacies of application scaling and pipeline development, providing you with practical insights and methodologies for your own software engineering journeys.
As we undertake this transformation journey for our demo Golang application, we're not working alone. We'll be leveraging a host of powerful tools and services from Amazon Web Services (AWS).
For our user management, we'll utilize AWS Cognito, which will act as our user pool, ensuring we can effectively manage, authenticate, and authorize our users. Handling secrets securely is a fundamental part of any application, for which we'll employ the AWS Systems Manager Parameter Store.
Our data persistence layer will be anchored on AWS Relational Database Service (RDS) using the robust Postgres engine, providing us with scalable and reliable database services. To handle our application deployment, we'll implement AWS CodePipeline, CodeBuild, and CodeDeploy, forming our Continuous Integration and Continuous Delivery (CI/CD) pipeline. These services will streamline our development process by automating build, test, and deployment phases.
Monitoring and logging are crucial aspects of maintaining the health of our application. Here, AWS CloudWatch steps in, offering us comprehensive visibility over our application and resources.
Our application will be hosted on EC2 instances, providing secure and resizable compute capacity in the cloud. To ensure our application can handle varying loads efficiently, we'll incorporate AWS Auto Scaling groups. This service will dynamically adjust our EC2 instance count based on real-time demands.
Finally, to secure and route end-user requests to our application, we'll leverage AWS Certificate Manager (ACM) and Route 53. ACM will take care of the SSL/TLS certificate needs for our application, while Route 53, AWS's scalable Domain Name System (DNS) service, will handle the routing of end-user requests to our application hosted on EC2 instances.
In essence, we are going to fully immerse our application in a cloud-native environment, harnessing the power of AWS services to ensure scalability, reliability, and operational efficiency. Follow along as we detail this evolutionary journey of our application, providing valuable insights into the intricacies of multi-tier architecture and the practical application of AWS services.
References:
For further reading and deeper insights, feel free to check out the following resources:
Amazon Web Services Documentation:
Instance Metadata and User Data: Provides a comprehensive guide on how to retrieve instance metadata.
AWS Database Migration Service: Explains how to manage PostgreSQL databases using AWS RDS.
Connecting to an Amazon RDS or Amazon EC2 Database Instance Remotely: A blog post that guides you through securely connecting to a remote database instance.
Installing the CloudWatch Agent Using AWS Systems Manager: Guides you through the installation process of the CloudWatch agent using AWS Systems Manager.
GitHub Documentation:
Commit Status API: An API reference on how to check and set commit statuses.
PostgreSQL Documentation:
pg_dumpall: Documentation on how to use the pg_dumpall utility.
In the course of our transformation journey, we will be referencing two key GitHub repositories:
AWS Go Demo: This repository plays a central role in our demonstration, featuring an AWS Golang application as a sample. Different branches of this repository will serve as references during various stages of our architectural evolution, providing you with practical examples and insights.
Commit Status Lambda: As we reach the final stages of our transformation, the implementation of this Lambda function becomes essential. This repository helps us set commit statuses on GitHub, a crucial component in our CI/CD pipeline that enhances transparency and facilitates better tracking of code changes.
These repositories will serve as a roadmap guiding us through our exploration. Their practical implementations offer invaluable insights and further deepen your understanding of the architectural transition and CI/CD pipeline establishment.
Happy learning!
Part 1: Standalone application
Our transformation journey begins from a simple standalone server architecture. A standalone server, essentially a single-tier architecture, is the most basic form of a computing system. Here, the user interface, application logic, and data storage all reside in the same environment.
Architecture diagram

Step-by-step Implementation
In the first part of our application's transformation journey, we'll lay down the foundation of our infrastructure and deploy the initial version of our Golang application on an AWS EC2 instance. Let's go through the steps:
Create and configure a Virtual Private Cloud (VPC) in your AWS environment.
Enable DNS hostnames for your VPC. This is essential for our instances to communicate with each other using DNS hostnames.
Create an Internet Gateway (IGW) and attach it to the VPC. This gateway allows our VPC to communicate with the internet.
Set up Route Tables for your VPC to control the routing of traffic.
Configure public and private subnets within your VPC.
Create a Security Group for your EC2 instance. This will serve as a virtual firewall to control inbound and outbound traffic.
Generate or import a key-pair. This is crucial for secure SSH connections to your instance.
Launch an EC2 instance using the Ubuntu 20.04 LTS AMI and attach an Elastic IP (EIP) to it.
Connect to the instance via SSH over EIP and create a directory for your application:
  $ sudo mkdir /etc/demo-app
  $ sudo -i
  $ echo APPDIR=/etc/demo-app >> /etc/environment
  $ exit
Database & Application
- Install Postgres stable version on the instance and configure it:
$ sudo apt update && sudo apt install -y postgresql postgresql-contrib
$ sudo systemctl start postgresql.service
$ sudo -u postgres createuser demouser
$ sudo -u postgres createdb awsgodemo
$ sudo -u postgres psql
postgres=# alter user demouser with encrypted password 'demopass';
postgres=# grant all privileges on database awsgodemo to demouser;
postgres=# \l
postgres=# \q
- Check out the
demo-1branch from the AWS Go Demo repository. Build the application and deploy the executablemain(make sure it's executable) to the APPDIR you created.
Run and test the application:
$ sudo chmod +x main
$ ./main
- Configure Route53 records for your domain and add user entries via the “/log” route of your application.
By following these steps, you'll have successfully deployed the initial version of your Golang application within a robust, secure AWS environment, setting the stage for further enhancements and the upcoming transition to a three-tier architecture.
AWS Service Documentation references for Part 1.
What is EC2 ?
What is VPC ?
What is Route53 ?
Part 2: Migration to RDS, User Pool Creation, Secrets Management and logging
In the second part of our journey, we shift gears towards a more resilient and scalable configuration by migrating our standalone database to AWS RDS. Additionally, we'll enhance our user management and security by creating a user pool via AWS Cognito and transferring our secrets to the AWS Systems Manager (SSM) Parameter Store. Let's delve into these enhancements:
Migrating Database to AWS RDS: As a managed service, AWS RDS offers scalability, reliability, and ease of management, which is why we'll migrate our standalone Postgres database to RDS. The process involves creating an RDS instance, exporting data from our standalone database, and importing it into the RDS instance.
User Pool Creation with AWS Cognito: User management is a key aspect of any application. AWS Cognito provides an easy-to-use user identity and data synchronization service that helps us manage user pools. We'll create a user pool for our application, allowing us to handle user registration, authentication, and account recovery seamlessly.
Secrets Management with SSM Parameter Store: For improved security and centralized management, we'll transfer our application secrets (such as database credentials) to the AWS SSM Parameter Store. It provides secure, hierarchical storage for configuration data management and secrets management.
Deploying Application as a Linux Service: To ensure our application is always up and running, we'll deploy it as a Linux service. This allows the application to start automatically upon system boot, restart after a crash, and benefit from various other systemd features.
Logging with AWS CloudWatch: For efficient monitoring and debugging, we'll set up our application to write logs to AWS CloudWatch. This service collects and tracks metrics, collects and monitors log files, sets alarms, and automatically reacts to changes in AWS resources.
Stay tuned for the detailed steps of this part, as we further enhance the robustness and security of our application by harnessing the power of AWS services. By the end of this part, we'll be one step closer to a full-fledged three-tier architecture, providing a scalable and reliable platform for our evolving Golang application.
Architecture diagram

Step-by-step Implementation
Now that we have outlined our strategy, let's delve into the step-by-step implementation of each aspect.
-
Migrate Database to RDS:
- Start by creating a subnet group, security group, and a Multi-AZ RDS Database with Postgres Engine v 12.14.
- Utilize the PostgreSQL native tools
pg_dumpandpg_restoreto migrate the database:
# Backup your database $ pg_dump -Fc -b -v -f awsgodemo.sql -d awsgodemo # Connect to your RDS instance and set up your database and user $ psql -h <rds endpoint> -U postgres -d postgres postgres=> create database awsgodemo; postgres=> create role demouser; postgres=> alter user demouser with login; postgres=> alter user demouser with encrypted password 'demopass'; postgres=> grant all privileges on database awsgodemo to demouser; # Restore your database to your RDS instance $ pg_restore -v -h <rds endpoint> -U <username> -d awsgodemo awsgodemo.sql # Add new upcoming column to our table $ psql -h <rds endpoint> -U demouser -d awsgodemo awsgodemo=> alter table userlog add column email varchar(255); awsgodemo=> update userlog set email = 'NOEMAIL' where email is null;- Remove the local database from the instance:
$ apt list --installed | grep postgres $ apt remove postgresql* $ sudo apt-get autoremove $ rm -rf /etc/postgresql $ rm -rf /var/lib/postgresql $ rm -rf /etc/postgresql-common/ -
Create Cognito user pool:
- Set up email and password authentication, enable the "forgot password" feature and email confirmation.
- Generate a client secret and add authentication flows.
- Note down the Client ID and Client Secret for future use.

-
Create Instance Role:
- Attach the following IAM Policy to allow our instance to access SSM Parameters:
{ "Version": "2012-10-17", "Statement": [ { "Sid": "AllowSSM", "Effect": "Allow", "Action": [ "ssm:GetParameter" ], "Resource": [ "arn:aws:ssm:<region>:<account_id>:parameter/demo-app/*" ] } ] } -
Create SSM Parameters:
- Store your application secrets (like database credentials and Client ID/Secret from Cognito) in the SSM Parameter Store as SecureString.

NOTE: SESSION_ENCRYPTION_SECRET should be a random hashed string The sessionEncryptSecret in the NewCookieStore function is used as a secret key for encrypting and authenticating the session data stored in the cookie. This ensures that the session data cannot be tampered with or read by unauthorized parties. It's important to keep this secret key secure and not expose it in your codebase or version control.
-
Deploy the application:
- Check out the
demo-2branch from the AWS Go Demo repository, build and deploy the application.
$ sudo chmod +x main $ ./main - Check out the
-
Create a SystemD service for the application:
- Set up a new service file for your application and manage it with systemd:
$ sudo vi /etc/systemd/system/demo-app.service [Unit] Description=My GO Service After=network.target [Service] User=root ExecStart=/etc/demo-app/main WorkingDirectory=/etc/demo-app Restart=always StandardOutput=file:/etc/demo-app/main.log StandardError=file:/etc/demo-app/main.log [Install] WantedBy=multi-user.target $ sudo systemctl daemon-reload $ sudo systemctl enable (--now) demo-app $ sudo systemctl start demo-app -
Install and configure CloudWatch Logs with AWS Systems Manager:
- Follow the official AWS documentation to install and configure CloudWatch Logs with AWS Systems Manager. Official AWS documentation link is provided in References.
- Check the ssm-agent version and install the CloudWatch agent, configure it, and store the configuration in the Parameter Store. Finally, verify your setup by checking the CloudWatch log group and stream.
After following these steps, your Golang application is now running on a resilient and scalable setup, logging to CloudWatch, and using AWS Cognito for user management and SSM Parameter Store for secrets management. We've successfully achieved the second part of our journey to a three-tier architecture. Stay tuned for the final transformation!
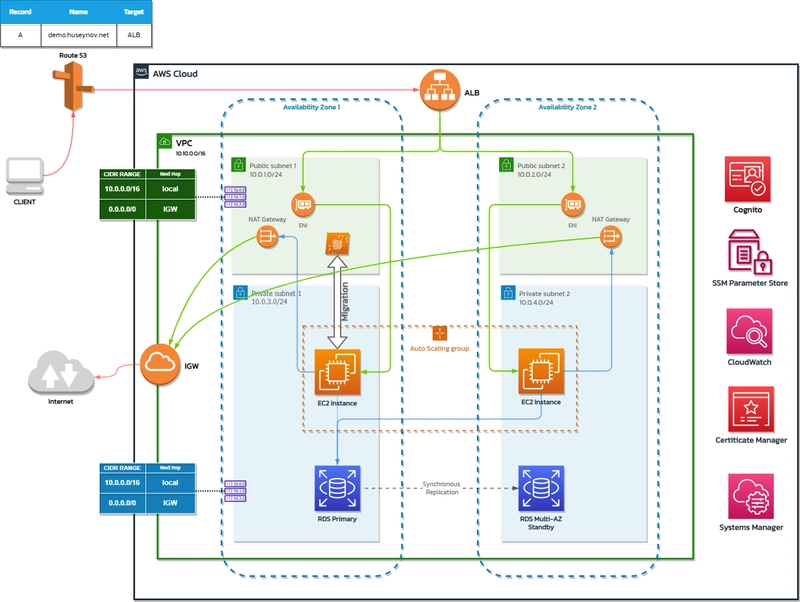
Part 3: Transitioning to a Scalable and Secure Infrastructure
In this part of our journey, we'll adjust our networking resources for enhanced security and scalability, introduce Auto Scaling groups (ASGs) for resilience and elasticity, and implement secure HTTPs communication with an Application Load Balancer (ALB). This step will see our application evolve into a scalable, three-tier architecture.
Architecture diagram
Step-by-step Implementation
Adjust Networking Resources: Create Network Address Translation (NAT) gateways and Elastic IPs (EIPs). These will allow instances in the private subnets to connect to the internet or other AWS services. Adjust the routing tables of the private subnets to direct their default routes to these NAT gateways.
Capture Amazon Machine Image (AMI) of the EC2 Instance: Create an Amazon Machine Image (AMI) of our EC2 instance. An AMI is like a blueprint of the running instance, which includes the instance's operating system, the applications running on it, and their configurations.
Create Launch Template from the AMI: Use the AMI to create a launch template. A launch template is a specification that contains the settings and configurations to launch instances. You can define settings such as the instance type, the AMI ID, the key pair, and many others.
Create Auto Scaling Group: Create an Auto Scaling Group (ASG) using the launch template. ASGs enable you to ensure that you have the correct number of Amazon EC2 instances available to handle the load for your application. You create collections, or groups, of EC2 instances, and then set policies that control when instances are launched or terminated.
Migrate Workload to Private Subnet 1: For enhanced security, migrate your workload to the first private subnet. Private subnets are not exposed directly to the internet, which helps reduce the potential attack surface for your application.
Create ASG Target Group for ALB: Create a target group for the Application Load Balancer (ALB) and associate it with the ASG. The ALB will distribute incoming traffic across the EC2 instances that are registered with these target groups.
Create ACM Certificate: Create an Amazon Certificate Manager (ACM) certificate for your domain and verify it. ACM handles the complexity of creating and managing public SSL/TLS certificates for your AWS based websites and applications.
Set Up the Application Load Balancer (ALB): Create the ALB, ALB listeners, and a dedicated security group for it. Adjust the security group attached to the instances accordingly. The ALB listener should be set up for HTTP (port 80) and redirect to HTTPS (port 443). Another listener for HTTPS (port 443) should target the target group with the ASG.
Update Route 53 Record: Adjust an A Record in Route 53 to point to the ALB as an alias. This allows the domain to resolve to the ALB, and therefore to the instances that are serving our application.
Part 4: Implementing Continuous Integration/Continuous Deployment (CI/CD)
Architecture diagram

In this section, we will set up a CI/CD pipeline using AWS CodeBuild, CodeDeploy, and CodePipeline. The pipeline will automatically build and deploy our application whenever changes are pushed to the GitHub repository.
To manage and visualize the whole workflow, we'll leverage AWS CodePipeline, and to notify GitHub about the state of the deployment process, we will use a Lambda function.
Step-by-Step Implementation:
Step 1: Setup AWS CodeBuild
CodeBuild will be used to build our application. We will instruct CodeBuild on how to handle the building of our application via a buildspec file. The file will list the commands to be executed during the build phase and specify the artifacts to be created. Here is the buildspec file that we'll use:
version: 0.2

phases:
  build:
    commands:
      - echo Build started on `date`
      - go build -o main

  post_build:
    commands:
      - echo Build completed on `date`

artifacts:
  files:
    - main
    - templates/**/*
    - scripts/**/*
    - appspec.yml
    - .env
Step 2: Setup AWS CodeDeploy
We will use AWS CodeDeploy to deploy our application. CodeDeploy will use the build artifacts created by CodeBuild and deploy them to the application servers managed by an Auto Scaling group. The deployment instructions are defined in the appspec.yml file in the demo-4-cicd-integration branch of our GitHub repository.
Step 3: Setup AWS CodePipeline
AWS CodePipeline will manage the overall workflow. It will listen for changes to the demo-4-cicd-integration branch of the GitHub repository, trigger a build on CodeBuild whenever changes are pushed, and if the build is successful, it will trigger a deployment on CodeDeploy. Note that demo-4 branch is already merged to main, and we are triggering deployments on push to main.
We will use AWS CodeStar connections to connect our GitHub repository to CodePipeline. This connection allows CodePipeline to get the source code from the GitHub repository using the GitHub version 2 source action.
Step 4: Setup AWS Lambda for GitHub Commit Status updates
The AWS Lambda function will listen to the state change events of CodePipeline, format the received data to be compatible with GitHub's Commit Status API, and send the status updates to GitHub.
For this, we will use the code from the Commit Status Lambda repository. Make sure to provide the necessary permissions for the Lambda function to interact with GitHub and CodePipeline. Analyze the readme carefully.
Description
This lambda written in Golang interacts with "Commit Status REST API" to update pipeline status visually in Github.
Required IAM policies for lambda
  {
  "Version": "2012-10-17",
  "Statement": [
    {
      "Sid": "VisualEditor0",
      "Effect": "Allow",
      "Action": [
        "codepipeline:ListActionExecutions",
        "codepipeline:GetPipelineExecution"
      ],
      "Resource": "*"
    },
    {
      "Sid": "",
      "Effect": "Allow",
      "Action": [
        "ssm:GetParameters"
      ],
      "Resource": "arn:aws:ssm:region:account_id:parameter/parameter_name"
    }
  ]
}
Note: default labmda policies for logging are also needed
SNS Topic policy
{
  "Version": "2012-10-17",
  "Statement": [
    {
      "Effect": "Allow",
      "Principal": {
        "Service": "codestar-notifications.amazonaws.com"
      },
      "Action": "SNS:Publish",
      "Resource": "arn:aws:sns:eu-west-1:166733594871:githubCommitNotifier"
    }
  ]
}
ParameterStore secret
// Github classic token with…By following these steps, you can establish a CI/CD pipeline for your application. This pipeline will enable you to automatically build and deploy your application while also providing status updates directly to GitHub.
Remember that CI/CD pipelines are a fundamental part of modern application development practices. They allow for quicker, more reliable deployments and help maintain high standards of code quality. By integrating our pipeline with GitHub, we can ensure that our application remains up-to-date and ready for deployment at any time.
AWS Service Documentation references for Part 4.
What is CodeBuild?
What is CodeDeploy?
What is CodePipeline?
Getting started with CodeDeploy
Appspec file structure
CodeDeploy Lifecycle hooks
CodeDeploy with ASG
CodeDeploy Agent

Top comments (0)