
In this tutorial, we will configure a Jenkins pipeline on Kubernetes that leverages Jenkins and Webhook Relay operators. Jenkins Kubernetes operator will be creating Jenkins instances with a predefined seed job. Webhook Relay operator will ensure that GitHub webhooks on push events trigger new Jenkins builds for a fast and efficient CI/CD experience.
Advantages of this setup:
- Your Jenkins instance is only accessible through kubectl port-forward while maintaining the ability to receive webhooks from public destinations.
- Jenkins pipeline configuration is stored in Git.
- Webhook Relay routing configuration is stored in Git, the same as the Jenkins itself.
You can read about operator pattern in Kubernetes docs.
Prerequisites
Prerequisites:
- Helm
- Webhook Relay account
- Kubernetes environment, Minikube, k3s, GKE, AKS, etc. are fine.
- Configured kubectl
- Git
Installation
The installation will consist of several steps:
- Installing Jenkins operator
- Installing Webhook Relay operator
Create a fresh namespace
Let's start by creating a new namespace where we will put our Jenkins instance and run builds. I will call it 'jenkins' but you can choose any other name:
kubectl create namespace jenkins
And then switch to it:
kubectl config set-context $(kubectl config current-context) --namespace=jenkins
Jenkins Operator
We will install Jenkins operator using Helm. First, add the repository:
helm repo add jenkins https://raw.githubusercontent.com/jenkinsci/kubernetes-operator/master/chart
helm repo update
Once the repository has been added, install it:
helm install jenkins-operator jenkins/jenkins-operator
Official docs can be found here: https://jenkinsci.github.io/kubernetes-operator/docs/installation/. The operator is not the Jenkins itself so to get our Jenkins instance, we will have to create a Custom Resource.
Custom resources are extensions of the Kubernetes API. This page discusses when to add a custom resource to your Kubernetes cluster and when to use a standalone service. It describes the two methods for adding custom resources and how to choose between them.
Start Jenkins (using Custom Resource)
We will need to create a CR. You can either use Jenkins Operator docs to create one or you can fork this https://github.com/webhookrelay/jenkins-operator-example.git repository and clone it. Then:
- Update jenkins_cr.yaml file
https://github.com/webhookrelay/jenkins-operator-example.gitto your own repository fork (it will usually behttps://github.com/<your username or organization>/jenkins-operator-example.git). - Create it with kubectl:
kubectl apply -f jenkins_cr.yaml
Main differences in this file from the stock example:
- Added
githubplugin as we will need it to trigger jobs - Seed job got
githubPushTrigger: trueset as well
Creating this PR should result in two additional containers:
kubectl get pods
NAME                                      READY   STATUS    RESTARTS   AGE
jenkins-jenkins                           1/1     Running   0          7m11s
jenkins-operator-6dbbc458c9-gmx6p         1/1     Running   0          18m
seed-job-agent-jenkins-65cc4bc684-9ztr5   1/1     Running   0          6m21s
Let's connect to Jenkins. First, get username and password:
kubectl --namespace jenkins get secret jenkins-operator-credentials-jenkins -o 'jsonpath={.data.user}' | base64 -d
kubectl --namespace jenkins get secret jenkins-operator-credentials-jenkins -o 'jsonpath={.data.password}' | base64 -d
Then, in one terminal start port forwarding:
kubectl port-forward jenkins-jenkins 8080:8080
And then just open http://localhost:8080 in your browser.

Webhook Relay
Retrieve your access token key & secret pair from https://my.webhookrelay.com/tokens and set them as an environment variables:
export RELAY_KEY=xxxxxxxxxxxx
export RELAY_SECRET=xxxxx
Add Webhook Relay Operator Helm repository and install it:
helm repo add webhookrelay https://charts.webhookrelay.com
helm repo update
helm upgrade --install webhookrelay-operator --namespace=jenkins webhookrelay/webhookrelay-operator \
  --set credentials.key=$RELAY_KEY --set credentials.secret=$RELAY_SECRET
Operator doesn't forward webhooks on its own. Each created CR will ensure an agent deployment that is configured to route specific buckets.
From the operator example repository we will need to create Webhook Relay Custom Resource:
kubectl apply -f webhookrelay_cr.yaml
Note that if you have modified Jenkins CR name you will need to update webhookrelay_cr.yaml "destination" field from
destination: http://jenkins-operator-http-jenkins:8080/github-webhook/to whatever your current Jenkins service is. Typically it will be in a formatjenkins-operator-http-<CR name>.
GitHub Configuration
This step could be automated by making Jenkins automatically configure Github repositories to forwarding to this endpoint, however for simplicity and so that it's more clear how it works, we will add this URL manually.
Get your Webhook Relay public URL
To get your public endpoint you can either visit https://my.webhookrelay.com/buckets page or get it via CR status:
kubectl get webhookrelayforwards.forward.webhookrelay.com forward-to-jenkins -o 'jsonpath={.status.publicEndpoints[0]}'
Result should look something like:
$ kubectl get webhookrelayforwards.forward.webhookrelay.com forward-to-jenkins -o 'jsonpath={.status.publicEndpoints[0]}'
https://k0yv9ip5sxxp55ncsu936k.hooks.webhookrelay.com
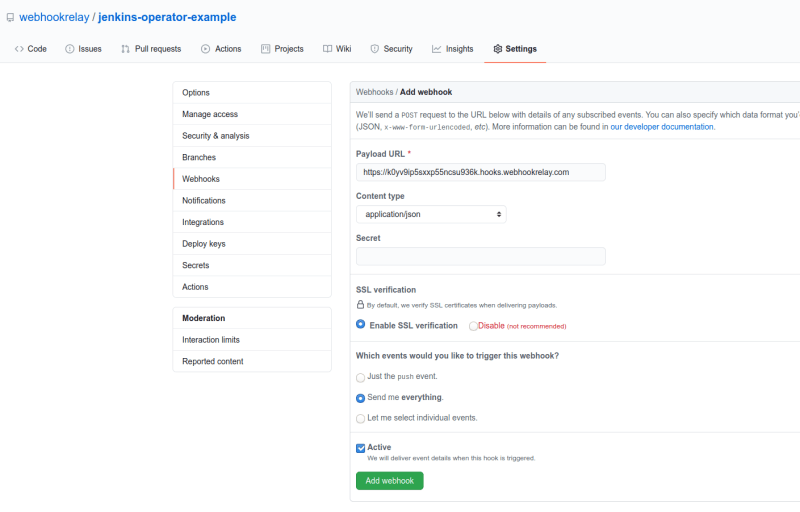
Add public URL to GitHub repository settings
Take the public endpoint URL and add it to your GitHub repository:
Using the pipeline
First, when the pipeline is created, trigger the build manually. After that, any push to your GitHub repository will send a webhook through Webhook Relay to your Jenkins instance that's running inside a Kubernetes cluster:

This tutorial was initially published on Webhook Relay website: https://webhookrelay.com/v1/tutorials/webhooks-jenkins-operator-kubernetes.html

Top comments (0)