Introduction
State machine
The state machine is the tool that developers must have in their toolbox.
If you are new to the state machine, check out the reference section below.
How can a state machine help?
Typically, when building applications, we follow what's known as the event-driven — where an event happens in the application, we update the application state and render the state to the screen.
Events can happen anytime during user interactions and system interactions while the application can be in any state. Before we start to handle the events, we first have to determine what is the current state and then handle the event accordingly. Sometimes it can be challenging.
The state machine provides a state-event-state mapping. Before we start to handle the events, we know the current state and the future state, so that we only need to focus on the limited state-event scope.
The specific state machine we are going to use is the Mealy machine. It has an initial state and then transitions to new states based on events and its current state.
We are going to build a calculator application as an example. You will learn from this post:
- Model a state machine declaratively,
- Make the state machine type-safe
- Add the state machine to the AppRun application
AppRun
AppRun is a library for building web applications using the Elm inspired architecture, events, and components. Its architecture concept is to is broken down the application logic into three separate parts.
- State (a.k.a. Model) — the state of your application
- View — a function to display the state
- Update — a collection of event handlers to update the state
AppRun ties the three parts together and drives the applications using events.
AppRun is event-driven. It also has state management. Therefore, a state machine can naturally fit into the AppRun architecture.
If you are new to AppRun, read the AppRun Book or visit AppRun Docs.
Model a Calculator
State and Event
The calculator application looks like:
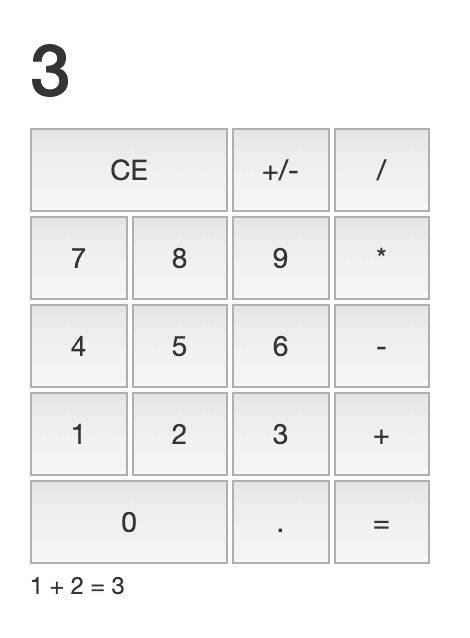
It has a grid of buttons that users can click at any time. It also displays:
- The numbers that the user types, or the calculation result.
- The calculation formula, which includes the first argument, the operator and the second argument, and the calculation result.
The initial state of the calculator looks like:
const state = {
  display: '0',
  arg1: 0,
  arg2: 0,
  op: '',
};
We handle the buttons' click events in the event handler, button_click. Because of the HTML event bubbling, we just need one event handler for all buttons
const view =
  <div class="buttons" $onclick={button_click}>
  ......
  </div>

const button_click = (state, e) => {
}
That's all we need to do to create an AppRun application, an initial state, a view, and event handlers.
Next, we will add a state machine.
State Machine
We follow and extend the calculator state machine from David's post. The post also provides a diagram helpful to understand the state machine.
We first define the states and events of the state machine using TypeScript Discriminated Unions.
type Events = 'NUM' | 'OP' | 'DOT' | 'CE' | 'EQ' | '+/-';

type States =
  'START' |
  'FIRST_ARG' |
  'FIRST_ARG_FLOAT' |
  'OP' |
  'SECOND_ARG' |
  'SECOND_ARG_FLOAT' |
  'EQ';
We then define the state machine. It is a collection of all the states. Each state has a list of available events and transitions in an array. The transition is the function to update the state.
const state_machine = {
  START: [
    ['NUM', 'FIRST_ARG', () => display = key],
    ['DOT', 'FIRST_ARG_FLOAT', () => display = '0.']
  ],
  FIRST_ARG: [
    ['+/-', 'FIRST_ARG', negative],
    ['NUM', 'FIRST_ARG', () => display += key],
    ['DOT', 'FIRST_ARG_FLOAT', () => display += key],
    ['OP', 'OP', op1],
    ['CE', 'START', clear]
  ],
   ...
}
For example, when the current state is START, and the NUM event comes, the new state should be 'FIRST_ARG (waiting for 1st argument)'. The display property of the state should be the user's input.
Another example, when the current state is FIRST_ARG, and the +/- event comes, the display property should toggle between positive and negative.
So on and so forth. It is straightforward to create the state machine object according to the diagram.
Next, we make the state machine type-safe by adding more types.
export type Transition = () => void;
export type EventStateTransition<E, S> = [E, S, Transition];
export type StateMachine<S extends string, E> = {
  [key in S]: EventStateTransition<E, S>[];
};
- The Tansition is a function to update the application state.
- The EventStateTransition is a TypeScript Tuple. It describes which event leads to which new state.
- The StateMachine is an object that uses the _States as the index key.
Now, the state machine is type-safe. The TypeScript compiler only allows you to use the states and events defined in States and Events.
const state_machine: StateMachine<States, Events> = {
  START0: [ // Error on START0
    ['NUM0', 'FIRST_ARG', () => {}], // Error on NUM0
    ['DOT', 'FIRST_ARG_FLOAT0', () => {}] // Error on FIRST_ARG_FLOAT0
  ],
}
Also, the compiler makes sure all States have their relevant entries in the state machine.
const state_machine: StateMachine<States, Events> = {
  START: [],
  FIRST_ARG: [],
  FIRST_ARG_FLOAT: [],
  OP:[], SECOND_ARG:[],
  SECOND_ARG_FLOAT:[],
  //EQ:[] // Error on missing EQ state, if we commented it out
}
Compare to many other different ways of implementing the state machine in JavaScript/TypeScript found online, the state machine in this post has the following advantages:
- Declarative - it tells whats, not how;
- Independent - technology stack agnostic;
- KISS - no worry of preconditions, postconditions, etc...
You can see the state machine is just a simple data structure. We can easily add it to the AppRun applications. Explained step by step below.
Add State Machine to AppRun Application
Add State Machine State
We add a new property for tracking the state-machine state, called _state into the application state.
const state = {
  _state: 'START' as States,
  display: '0',
  arg1: 0,
  arg2: 0,
  op: '',
};
export type State = typeof state;
Convert UI Events
All button clicks use the button_click event handler. We convert UI events into different state-machine events.
export const button_click = (state: State, e: any) => {

  const getEvent = (c: string): Events => {
    switch (c) {
      case '+/-':
        return '+/-';
      case 'CE':
        return 'CE';
      case '.':
        return 'DOT';
      case '=':
        return 'EQ';
      default:
        return /\d/.test(c) ? 'NUM' : 'OP';
    }
  };

  const key = e.target?.textContent || e;
  const event = getEvent(key);


}
Use State Machine
Now that we know the current state-machine state from the _state property of the application state. We also know which state-machine event we are in. We now can use the state_machine to find the matching transition.
Finding transitions from the state_machine is straightforward.
export const find_transition = <S extends string, E>(
  state_machine: StateMachine<S, E>,
  state: S,
  event: E
): { next_state?: S, transition?: Transition } => {
  const current_state = state_machine[state];
  if (!current_state) throw new Error(`No state: ${current_state} found in state machine`);
  const event_tuple = current_state.find(s => s[0] === event);
  return event_tuple ? {
    next_state: event_tuple[1],
    transition: event_tuple[2]
  } : {}
};
If we found the transition, we run the transition function. It updates the destructed application state properties, such as op, arg1, arg2, and display accordingly. We then update the application state to be the next state.
const button_click = (state, e) => {
  let { _state, op, arg1, arg2, display } = state;
  const event = getEvent(s);
  const state_machine = {
  };

  const { next_state, transition } = find_transition(state_machine, _state, event);
  transition && transition();
  _state = next_state || _state;

  return { _state, op, arg1, arg2, display };
}
If no transition found, nothing will happen.
Finally, we return a new state from the event handler, AppRun will render the screen accordingly.
Now, the application is wired up with AppRun architecture. We have successfully created the calculator application.
You can try the live app here and find the source code here.
Conclusion
We have created a declarative and type-safe state machine. The state machine data structure is technology agnostic. You can try to use it in React or other frameworks you like. It can naturally fit into AppRun applications.
AppRun is event-driven. Often I feel it is challenging to make events right. Sometimes we define too many events. Sometimes the events come out of order. By using the state machine, I can handle the events within limited state scopes. I have started to think of using more state machines to control the events.
References
There are many references online about the state machine. I got most of my inspiration from the following posts. I recommend you read the concept explanation of the posts and pay less attention to the implementations, because using AppRun, you can do better.
[1] Krasimir Tsonev explains Mealy and Moore in the post: The Rise Of The State Machines
[2] Jon Bellah describes the paradigm shift from event-driven to the state machine in this post: A Complete Introduction to State Machines in JavaScript
[3] Erik Mogensen explains state machine and introduced the statechart in this post: What is a state machine?
Have fun coding!

Top comments (0)