In this post, I will provide a step-by-step guide on how to deploy your full stack application using Amazon Web Services (AWS) without paying a cent
.
Prerequisites:
• A decent understanding of Laravel, Angular, and MongoDB.
• PHP, Composer, Node.js installed.
• A project built with angular Laravel and mongodb
SETTING UP MONGODB DATABASE
Let’s begin by creating our database MongoDB, well since our goal is to fully deploy our application online, it's wise to use a hosted database. Fortunately, MongoDB offers a cloud database service known as MongoDB Atlas. Let's start by heading over to MongoDB Atlas and creating our database for free using the following URL

Click on try free, and create your account for free(or you can simply use your google account).
Next, they will prompt you with a series of questions about their service. Don't worry too much about these questions, just provide your answers.
Eventually, you will encounter this interface:

Make sure to select the free plan. For the provider, choose AWS since we will be using Amazon Web Services to deploy our application. As for the region, simply select the one closest to your location. Lastly, give a name to your cluster.
A cluster is essentially a group of MongoDB servers that collaborate to ensure your database remains scalable and secure, even in the event of server failures.

Don't worry too much on the technical details of the cluster, just think of it as a technology that ensures your database runs smoothly and securely.
Then click Create
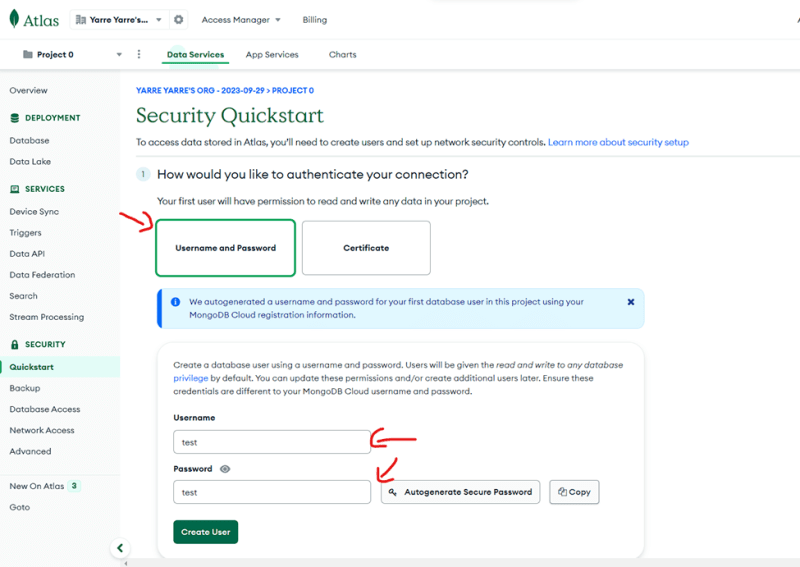
Next, you will encounter this interface. Choose the "Username and Password" option, indicating the authentication method for our database. Fill in your desired username and password, then click Create User

Now Simply click Finish and close. We will revisit this address list later when setting up AWS.

Now that our database has been successfully created, all we need to do is obtain the connection string, which we will use in Laravel to connect to the newly created database.
And to do that Click on CONNECT

Now click on MongoDb for Vs Code

Finally, here's our connection string. In my case, it is:
mongodb+srv://test:<password>@cluster0.zuehizv.mongodb.net/
Yours should be similar, with your username and password included. Be sure to replace with the password you created earlier, and simply now use it in your Laravel project.
To ensure our application can interact with our newly hosted database, we need to make a minor adjustment in the MongoDB Atlas dashboard. Follow these steps:
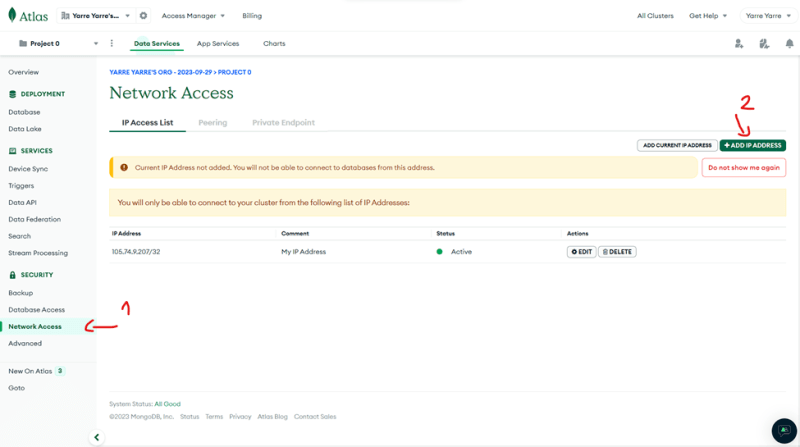
• In the MongoDB Atlas dashboard, navigate to "Network Access." You can find this option in the left-hand side menu.
• Click on "ADD IP ADDRESS."
• Add the address 0.0.0.0/0. This address essentially allows
all possible IP addresses, including our localhost address.
Please note that this is not a secure practice
but it's used for testing our local application with the hosted database.
Later on, we will restrict access to a specific IP address for our backend.

Now, to test our application, let's try migrating our tables to the database to ensure everything works as expected.

As you can observe, our tables have been successfully migrated to our newly created database.
DEPLOYING LARAVEL
we are now ready to begin the process of deploying our backend on AWS using the Elastic Beanstalk service.
To get started, the first step is to create an AWS account and activate it. You can activate your account by linking your credit card to your AWS account. Don't worry, they will not charge you anything. As mentioned before, this tutorial is completely free.
Now head to aws website using this url
Once you have set up your account,We need create a key-pair before starting with deploying our application.
key pair acts as a secure authentication mechanism, ensuring that only authorized users can access and manage AWS instances. so basically it’s a feature that allows us to connect to our instance in a secure way
The reason we need to create a key pair in the first place is because we will have to connect to our deployed instance later on to make configuration changes.
to do so navigate to the search bar and search for ec2 instance, and on your left side of the menu click on key pairs, then click on Create key pair


Give a name to your key-pair and then select .pem key format and click on create key pair, a file will be downloaded, this is your key to use if you want to connect to your instance using ssh through your terminal but in this tutorial we going to use another way simpler way so don’t worry too much about the file, now let start by creating an instance where we going to deploy our back-end laravel

navigate to the search bar and search for "Elastic Beanstalk," as shown in the image below:

Now click on create environment

Next, provide your application's name, then make sure to select the appropriate platform, which in our case, is PHP. Also, specify the PHP version you want to use

To upload your code, click on Upload your code, then check Local file and finally Choose file but Before doing so, we should create a zip file of our application. Here's how:
- 1. Navigate to your Laravel application's location.
- 2. Compress your application files into a single zip file. Make sure not to place them inside a folder; your application files should be at the root level. You can also skip adding the vendor folder to your zip file, it's not necessary to include it. Then select your zip file then hit next
Regarding the service access, make sure to select the key-pair that we’ve created earlier and then hit "Next."
NOTE: If the EC2 instance profile are empty and not there by default, you will need to create a new IAM profile role.
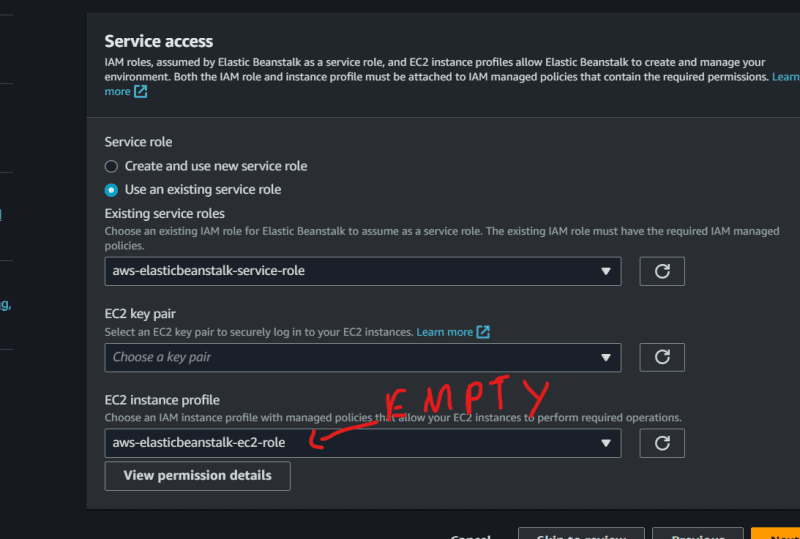
IAM (Identity and Access Management) roles helps you manage access to your AWS resources securely. creating IAM roles is often necessary to grant permissions for these services to access other AWS resources securely.
Here are the steps to create a new IAM (Identity and Access Management) role. If you already have one or AWS has provided you with default ones, you can skip these steps:
STEPS FOR CREATING A IAM ROLE
Search for "IAM" in the search bar at the top of the AWS Management Console.

Ensure that you select "Roles" on the left-hand side menu, and then click on the Create role button

Make sure you select "AWS service" since you'll use this role to access and control AWS services. In the "Use case" section, choose "EC2 (Elastic Compute Cloud)" because your instances will be hosted on EC2. Then click Next

For permissions policies, select the following policies:
• AWSElasticBeanstalkWebTier
• AWSElasticBeanstalkWorkerTier
• AWSElasticBeanstalkMulticontainerDocker
Then click Next

Provide a name for your role and an optional description. After that, click Create role

Now that your role has been created, go back to Elastic Beanstalk and create a new environment. When you reach the "Service access" section, you should be able to see the role you created earlier. Select it to grant the necessary permissions for your Elastic Beanstalk environment

THE END OF CREATING A NEW ROLE
Don't forget to select the key-pair that we've created earlier too

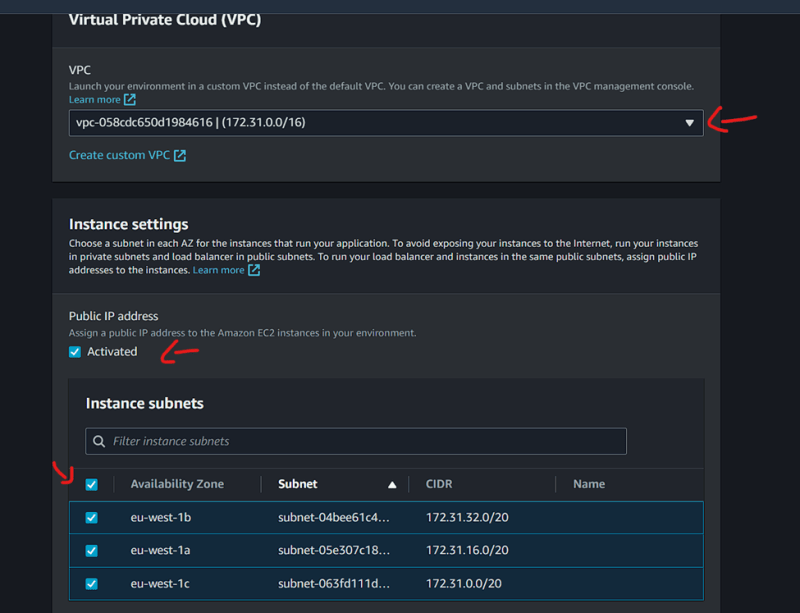
When selecting the VPC, you should normally find a default one that you can choose.
Make sure to check the "Public IP address" option along with its subnets, and then click Next.
In the instance configuration, there's no need to make any changes, just proceed by clicking Next.
In the following section, make sure to modify the document root. Set it to /public.

Additionally, add an environment variable named EXTENSIONS with a value of mongodb. Ensure that EXTENSIONS is in uppercase letters, and then click Next
The environment is for telling the instance to install the mongoDB driver

At this point, you should be all set. You can review your environment configuration, and if everything appears correct, click "Submit" to start creating your environment where your Laravel application will be hosted.
Now, wait patiently until your environment is successfully created. You can verify its status by checking for a notification similar to the one shown in the image:

This notification indicates that our Laravel application has been successfully deployed. To access it online, you can click on the link provided under the "Domain" label.

If you've noticed that your API routes are not working, don't worry, we can fix this with a minor change in our instance configuration.
To make this change, you'll need to connect to your instance, and you can do this either via SSH or using "Instance Connect," a feature provided by AWS to simplify instance connections. In this tutorial, we'll use Instance Connect Here's how:
First, navigate to the EC2 service. You can find it by searching for EC2 in the search bar.

navigate to the Instances section. You can find it in the left-side menu. Here, you'll see the instance we created in the Elastic Beanstalk service, which is currently running.

Click on the instance ID of your instance to access its details. Then, you'll find an option labeled "Connect." Click on it.

Simply click Connect again, and a new page will pop up, establishing a connection to your instance. Wait until the connection is established, and then open the following file using your favorite Linux text editor (such as Vim or Nano). In this case, we'll use Nano. Execute the following command:
nano /etc/nginx/conf.d/elasticbeanstalk/php.conf
Copy the following block of code:
location / {
    try_files $uri $uri/ /index.php?$query_string;
    gzip_static on;
}
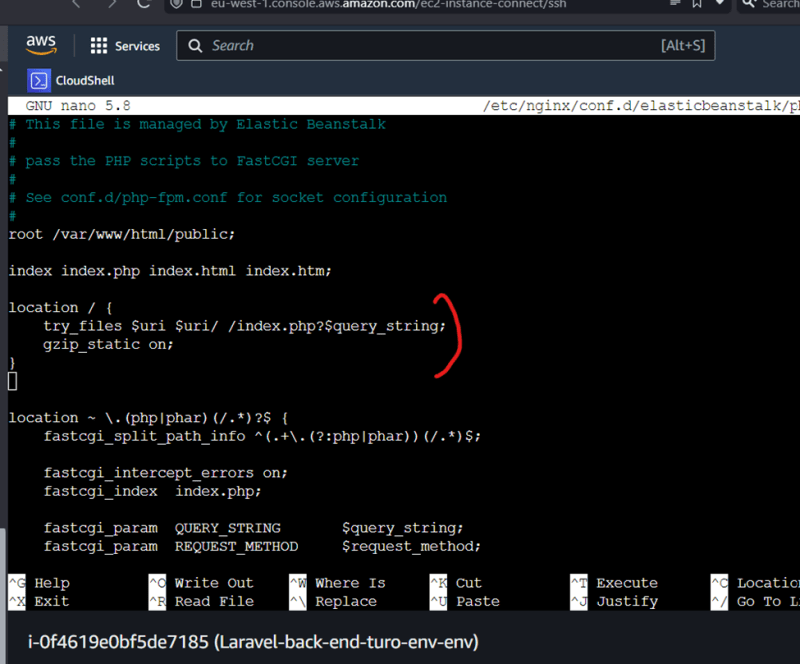
To save the changes, press Ctrl + S, and then press Ctrl + X to exit. Now, execute the following command to reload the Nginx web server:
nginx -s reload
Nginx is a web server that can handle HTTP requests. Our instance utilizes Nginx, which is similar in function to Apache if you've had experience with it before.
Now your setup is complete, and your API routes should be working fine. You can access your deployed backend to confirm.
Don't forget about the database IP access restriction we discussed; it's time to implement it now. Here are the steps:
Go to your EC2 instance in the EC2 service, and copy the public IP address.

Head to your MongoDB Atlas cluster, and select the "Network Access" section from the left-side menu. Delete the "0.0.0.0/0" address that we added earlier, and then add the public IP address of your instance.


That's it! Now, your MongoDB Atlas cluster should only be accessible from your instance, enhancing the security of your database.
DEPLOYING FRONT-END
Next, let's begin deploying our front-end application built with Angular using the AWS S3 service.
Before we start, there are a few important steps to follow:
- Ensure that you have updated your Angular application to use the deployed backend's domain URL.
- Build your Angular application using the following command:
ng buildThis command will generate a new folder inside your project directory called dist which contains your built application. We do this so that we can upload our built application to the AWS S3 service. Now, head to the search bar and search for S3.

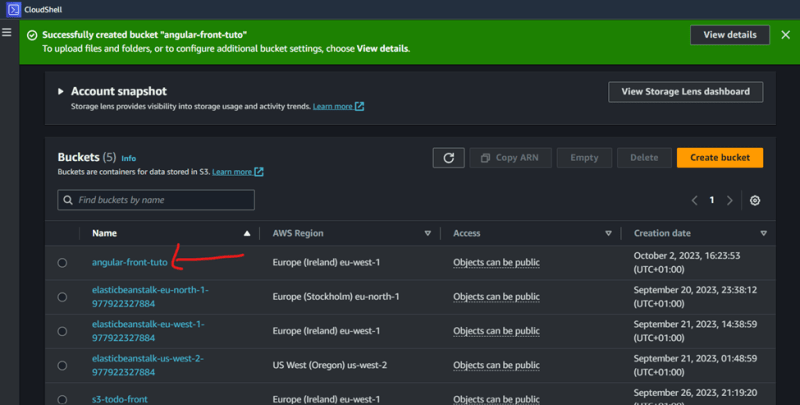
Click on create bucket :

Then give a name to your bucket and make sure to select ACLs enabled:

Uncheck Block all public access and confirm the warning message. You don't need to change anything else at this point. Then, click Create bucket.

Click on the bucket you've just created, we still need to upload your built application to this bucket.
Click on Upload to start uploading your built application.

Click on Add files and navigate to your built application located in the **dist **folder that we generated. Select all the files within that folder and click Open.


Extend the Access control list (ACL) section, select Grant public-read access, and confirm the warning message. Then, click on Upload.

Wait for your application files to finish uploading, and click Close when it's done.

Now, go to the Properties section and scroll all the way down to Static website hosting. Click on Edit.


Enable static website hosting, and make sure to fill in Index document with index.html. Then, click Save changes.
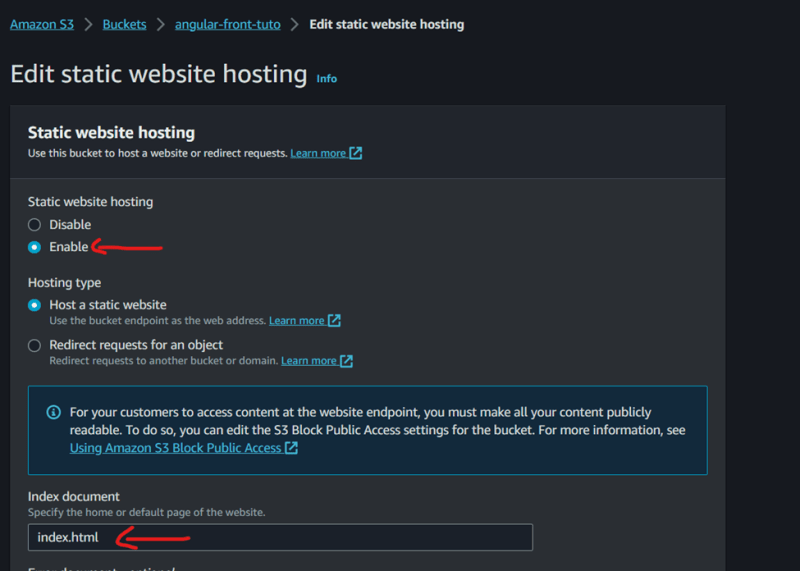
That should be it! Your application should now be ready. Scroll down to find the URL for your deployed application.


Conclusion
In this tutorial documentation, we've walked through the process of deploying a full-stack application built with Angular, Laravel, and MongoDB Atlas on AWS (Amazon Web Services). Here are the key steps and components we covered:
- Backend Deployment with AWS Elastic Beanstalk: • Created a new Laravel project and configured it to work with MongoDB. • Deployed the Laravel application using AWS Elastic Beanstalk. • Made necessary configuration changes in the Nginx server to ensure API routes work correctly. • Used AWS Identity and Access Management (IAM) roles and users for secure access to AWS resources.
- Frontend Deployment with AWS S3: • Built the Angular application and prepared it for deployment. • Created an S3 bucket to host the frontend files. • Uploaded the built Angular application to the S3 bucket. • Enabled static website hosting and configured the index document.

Top comments (0)