
In my previous post, I talked about how you can containerize your Machine Learning application using Docker, but unfortunately, I was only able to build and deploy that application locally on my machine. In this article, I will show you how you can deploy that dockerized image to the cloud with AWS using AWS EC2 instance.
Pushing Image to Docker Hub
The first step is to push your custom image to a container registry, in this case, I’ll be using Docker Hub. To use Docker Hub you’ll have to create an account, you can do that here. Then head over to your terminal and run the following commands:
To check all the images you have locally, enter the command below:
israel@israel:~$ sudo docker images
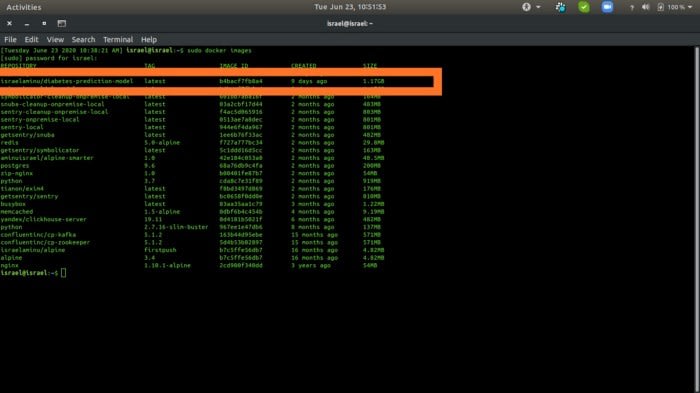
For this article, the images I’ll be pushing to Docker Hub is the israelaminu/diabetes-prediction-model. To check how I built this image, you can check here.
If you’re doing this for the first time, you’ll have to log in to Docker Hub using the command below:
israel@israel:~$ sudo docker login --username=yourhubusername
Next, copy the IMAGE ID for that particular image and tag it using the command below:
israel@israel:~$ sudo docker tag b4bacf7fb8a4 yourhubusername/model-deployment:latest
The alphanumeric digit must match the IMAGE ID for that image, yourhubusername/model-deployment represents the repository you’re creating on Docker Hub and :latest is the tag.
Then push your image to Docker Hub using the repository you created with the command:
israel@israel:~$ sudo docker push yourhubusername/model-deployment
You should see the following output:
The push refers to repository [docker.io/israelaminu/model-deployment]
dc29bdeebb3b: Pushed
87397f1e0ca2: Pushed
0b2a46dd78d7: Pushed
abe258d83872: Pushed
21fe8a57cd01: Pushed
0f3ecf0004ca: Pushed
...
55109ad1bdfa: Pushed
46829331b1e4: Pushed
d35c5bda4793: Pushed
a3c1026c6bcc: Pushed
f1d420c2af1a: Pushed
461719022993: Pushed
latest: digest: sha256:221424ffd34434c7834504980b845889722d3aa1bed0535fe666dbae25072357 size: 3676
If you go to Docker Hub, you’ll see your Docker Image in your repository.

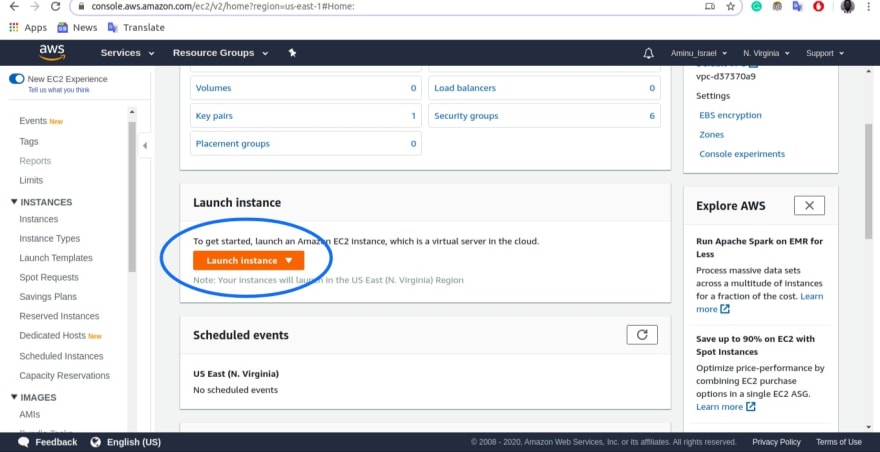
Setting up AWS EC2 Instance
Login to your AWS console Dashboard on and click on EC2
Scroll to the Launch Instance and click the Launch instance button
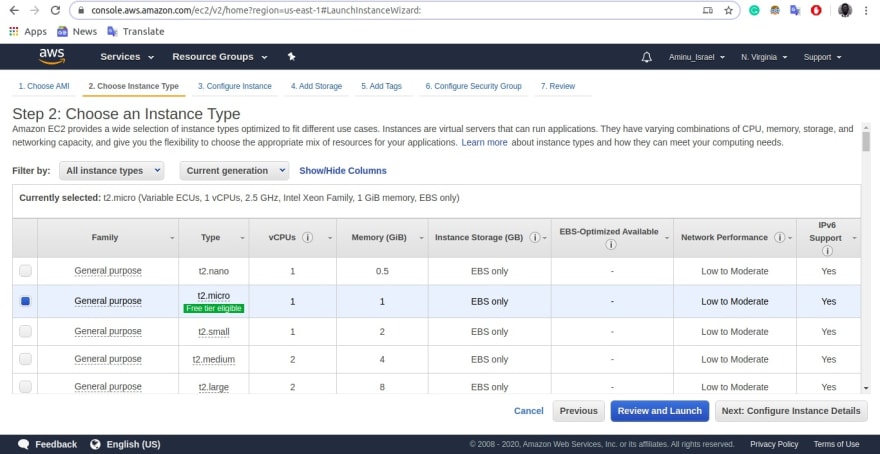
Next, choose an Amazon Machine Image (AMI), for my case, I’m selecting the Amazon Linux AMI 2018.03.0 (HVM) because it has all the dependencies and it’s free tier which means I can run the instance with little or no cost.

For the Instance Type, I selected the General Purpose t2.micro
Also in the Configure Security Group section, I created a new security group. The SSH allows me to connect to my instance on my machine and the HTTP routes my server IP to the DNS for me to make the DNS accessible anywhere.
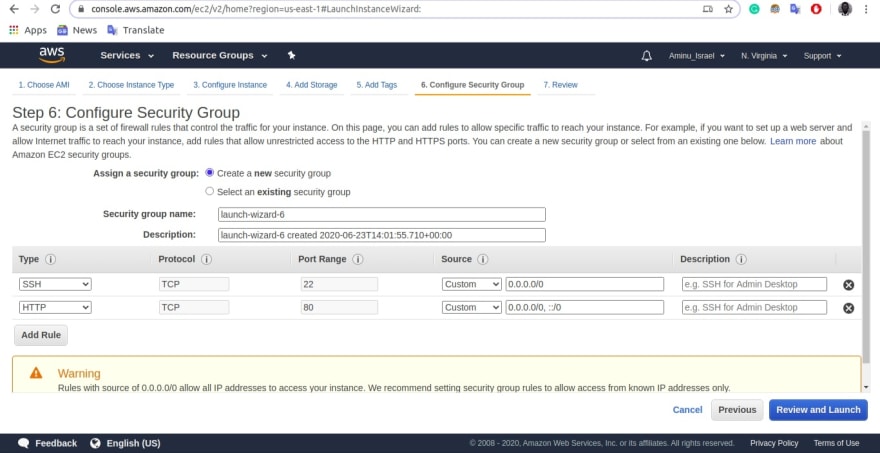
Those are the configuration I’ll be doing. You can choose to set other configurations also.
Click on Review and Launch.
You will be prompted to create or use an existing pair key which allows you to SSH to your instance in your local machine. After you select the preferred option, click on Launch Instance
You should see the image below:

Run the Docker Image on the EC2 instance
SSH to your EC2 instance on your machine using the command below:
sudo ssh -i yourpairkey.pem ec2-user@my-instance-public-dns-name
You will see the following output:
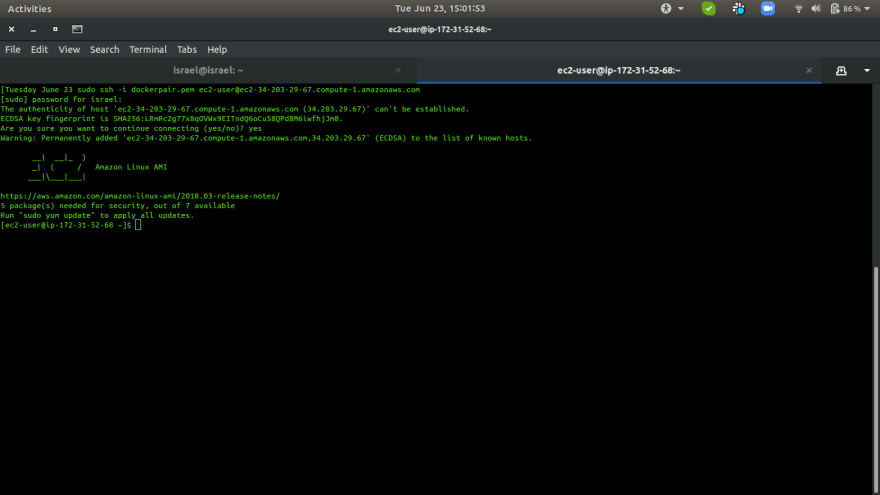
Run the following to update your instance packages
[ec2-user@ip-172–31–52–68 ~]$ sudo yum update
Install Docker:
[ec2-user@ip-172–31–52–68 ~]$ sudo yum install docker
After installation, pull the docker image we pushed to the repository.
[ec2-user@ip-172–31–52–68 ~]$ docker pull israelaminu/model-deployment:latest
You may likely face an error like:
Cannot connect to the Docker daemon at unix:///var/run/docker.sock. Is the docker daemon running?
To resolve this, just use the command below:
[ec2-user@ip-172–31–52–68 ~]$ sudo service docker start
Then pull the image again.
You should see the following output:
latest: Pulling from israelaminu/model-deployment
7e2b2a5af8f6: Pull complete
09b6f03ffac4: Pull complete
dc3f0c679f0f: Pull complete
fd4b47407fc3: Pull complete
b32f6bf7d96d: Pull complete
3940e1b57073: Pull complete
cabba05798b6: Pull complete
abe267d9b00c: Pull complete
b327ce3e08b8: Pull complete
7865c684e647: Pull complete
29f11117a112: Pull complete
0f5c2847ba27: Pull complete
e36cccfef176: Pull complete
3f1641cdd547: Pull complete
9cbaf6cfc5c1: Pull complete
865a221af195: Pull complete
Digest: sha256:221424ffd34434c7834504980b845889722d3aa1bed0535fe666dbae25072357
Status: Downloaded newer image for israelaminu/diabetes-model-deployment:latest
docker.io/israelaminu/model-deployment:latest
Confirm image is downloaded by running
[ec2-user@ip-172–31–52–68 ~]$ sudo docker images
Output:
To run the Docker Image, use the command:
[ec2-user@ip-172–31–52–68 ~]$ sudo docker run --name deploy_model -p 80:8080 israelaminu/model-deployment
You should see the following output:
Serving Flask app “app” (lazy loading)
 * Environment: production
   WARNING: This is a development server. Do not use it in a       production deployment.
 Use a production WSGI server instead.
 * Debug mode: off
 * Running on http://0.0.0.0:8080/ (Press CTRL+C to quit)
There you have it, your container is fully running on an AWS instance
You can test the API on your browser with the Public DNS for your instance and you’ll see the following output:
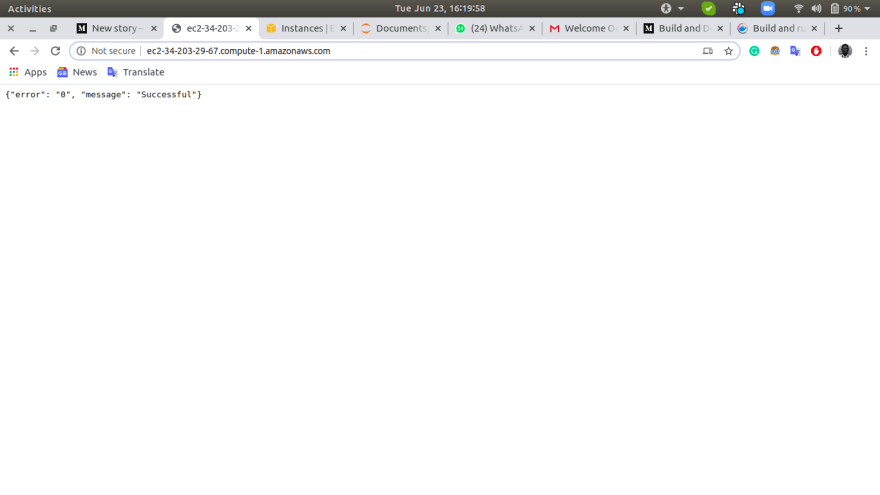
Testing and Making Predictions using POSTMAN
I tested the endpoint by passing in the features and the values to get the Diabetic Type of the patient and the confidence score, it took 492 milliseconds to return the response, which is fair enough.

So far we’ve been able to deploy a Machine Learning model by running it on a Docker Container and using hosting it on an AWS EC2 instance.

Top comments (2)
Hi Aminu. Thank you very much,this has been very helpful. I am having trouble with a post request in POSTMAN did u have to set AWS_ACCESS_KEY_ID or AWS_SECRET_ACCESS_KEY as environment variables or in postman?
Hi Rae, am sorry this is coming late. I set the environmental variable in my OS. To do this, just cd to your config or credentials file:
Use nano to enter the credentials file and add your AWS_ACCESS_KEY_ID and AWS_SECRET_ACCESS_KEY
And it should work