The AWS CDK is a software development framework used to define cloud infrastructure as code and provision it through CloudFormation. The CDK integrates fully with AWS services and allows developers to use a high-level construct to define cloud infrastructure in code.
In this article, we will build a CDK version of the AWS EC2 Instance Scheduler solution that enables us to easily configure custom start and stop schedules for our Amazon EC2 and Amazon RDS instances.
The Architecture
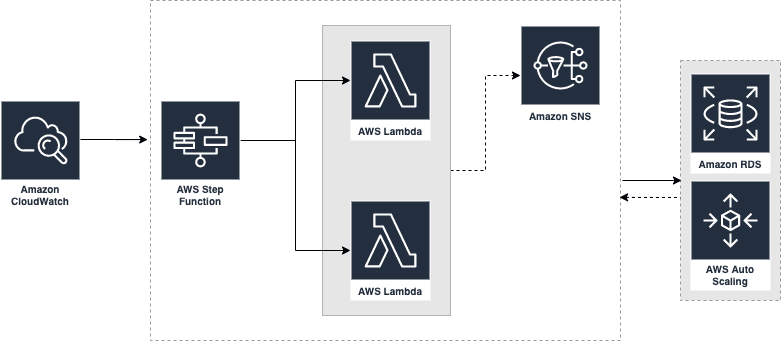
By the end of this article, we will have a pipeline to deploy a serverless solution that starts and stops Amazon EC2 instances in an autoscaling group and Amazon RDS instances based on a schedule.
Here’s the architecture diagram:

Through the article we will be covering the following actions:
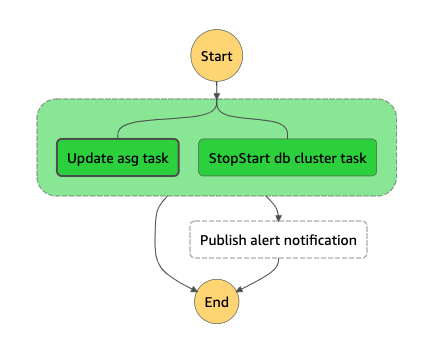
- Deploying an AWS Step Function with two parallel tasks.
- Creating an SNS topic to send notifications.
- Creating a Cloudeatch event rule which will trigger Step Function based on a schedule.
- Creating a CI/CD pipeline with CodeBuild and CodePipeline.
Prerequisites
To deploy the CDK application, there are a few prerequisites that need to be met:
- Setup an AWS account.
- Install the latest aws-cli.
- Install AWS CDK CLI.
- Deploy a multi-AZ WordPress website with RDS (optional).
Before you begin
First, create an AWS CDK project by entering the following commands at the command line.
$mkdir cdk-sample
$cd cdk-sample cdk init --language=javascript
Next, install CDK modules, we will use the below modules in our project.
$npm install @aws-cdk/core @aws-cdk/aws-codebuild @aws-cdk/aws-codepipeline @aws-cdk/aws-codepipeline-actions @aws-cdk/aws-events @aws-cdk/aws-events-targets @aws-cdk/aws-iam @aws-cdk/aws-lambda @aws-cdk/aws-sns @aws-cdk/aws-ssm @aws-cdk/aws-stepfunctions @aws-cdk/aws-stepfunctions-tasks
We need to add a stage parameter because we want to deploy our stack to multiple stages (dev and production).
Let’s add DEP_ENV in bin/cdk-sample.js.
Define the base stack class
Now let’s define our base stack class. In the base stack class, we’ll add the code to instantiate three separate stacks: SNS stack, StepFunction stack, and CodePipeline stack.
Make the code look like the following.
We can set the optional environment variable MANUAL_DEPLOY to true if we want to deploy only step function locally.
$export MANUAL_DEPLOY=true && cdk deploy Stepfunction-dev
Define SNS stack
We’ll add the code (lib/sns-stack.js) to create an SNS topic and subscribe to an email to the created topic.
Define Step function and Lambdas
Now we’ll expand our lib/lambda-stack.js file and add Lambda functions and Step function.
In this example, we will create two lambda functions, updateScalingGroupFn to update auto-scaling group and updateDBClusterFn to start/stop RDS instances.
Next, we will continue by adding our step function definitions. Add the following code to
lib/lambda-stack.js .As we can see, for each Lambda there is a corresponding taskEvent. We only want to parallelize the Lamba workload (one task for the ec2 autoscaling group and another task for RDS instances). Hence we will add a chain to our workflow by calling the branch() function.
To send a notification to the Amazon SNS topic if the Lambda fails, we can add an error handling chain to the workflow by calling addCatch() function.
Finally, let’s define a CloudWatch Events rule, CloudWatch is triggering execution of state machine workflow every day at 7 am and 6 pm (UTC). Add the following code to lib/lambda-stack.js.
new Rule(this, 'Rule', {
  schedule: Schedule.expression('cron(0 7,18 * * ? *)'),
  targets: [new SfnStateMachine(toggleAWSServices)],
});
Define pipeline stack
We define our final stack, codepiepeline-stack. It has a source Action targeting the Github repository, a build Action that builds previously defined stacks, and finally a deploy Action that uses AWS CloudFormation. It takes the Cloudformation template (CDK.out/*.template.json) generated by the AWS CDK build action and passes it to AWS CloudFormation for deployment.
Create lib/codepipeline-stack.js and put the following code in it.
Next, create a dev branch and check the code into Git then push it to Github repo.
$git branch dev
$git checkout dev
$git add .
$git commit -m "xxxx"
$git push
Deploying the pipeline
Now we can deploy the pipeline with multiple Stages.
Deploy pipeline to dev stage, source action targets the Github repository dev branch.
$export DEPLOY_ENV=dev && cdk deploy CodepipelienStack-dev
Deploy pipeline to the production stage, source action targets the Github repository master branch.
$export DEPLOY_ENV=production && cdk deploy CodepipelienStack-production
After the deployment finishes, we should have a three-stage pipeline that looks like the following.
Once all stacks have deployed, we can explore it in the AWS Console and give it a try. Navigate to the Step Function in the console and click “Start execution”.
We should see that it passes. Let’s check the EC2 autoscaling group’s DesiredCapacity and RDS instance's status.
$aws rds describe-db-instances
"DBInstances": [
{
"DBInstanceIdentifier": "cxxxxxx",
"DBInstanceClass": "db.t2.small",
"Engine": "mysql",
"DBInstanceStatus": "stopped"
...
$aws rds describe-db-instances
"AutoScalingGroups": [
{
"AutoScalingGroupName": "cdk-sample-WebServerGroup-xxxxxx",
"MinSize": 0,
"MaxSize": 0,
"DesiredCapacity": 0,
...
Finally, let’s check the cloud watch event rule. We should see the cloud watch event rule looks like the following:
$aws events list-rules
{
"Rules": [
{
"Name": "StepfunctionStack-dev-Rulexxxxxxx",
"Arn": "arn:aws:events:ap-southeast-2:xxxxxxx:rule/StepfunctionStack-dev-Rulexxxxxxx-xxxxxxx",
"State": "ENABLED",
"ScheduleExpression": "cron(0 7,18 * * ? *)",
"EventBusName": "default"
}
  ]
}
That’s about it, Thanks for reading! You can find the complete project in my GitHub repo.


Top comments (0)