
Ahh vim. For me, it was just a funny meme I saw every once in a while about how people can't seem to exit it.
But then, as most adventures in a dev's life start, I went on the internet while procrastinating from doing my real work and I instead watched a former meth addict and Netflix engineer talking about neovim, its shortcuts, plugins, theming, etc.. and it sort of clicked for me. I tried it and I've been hooked ever since.
In my following article(s), I want to show you how you can get started with vim, specifically Neovim, including avoiding some the mistakes I fell into. This will help you turn your IDE (integrated development environment) into a PDE (Personal development environment)
With this article and the ones I plan on making in this series, you will make vim into a personalized code editing powerhouse custom tailored for exactly your flow and yourself.

Here's a link to my config if you're interested.
Before You Start
For me, the vim roller coaster looked something like this:
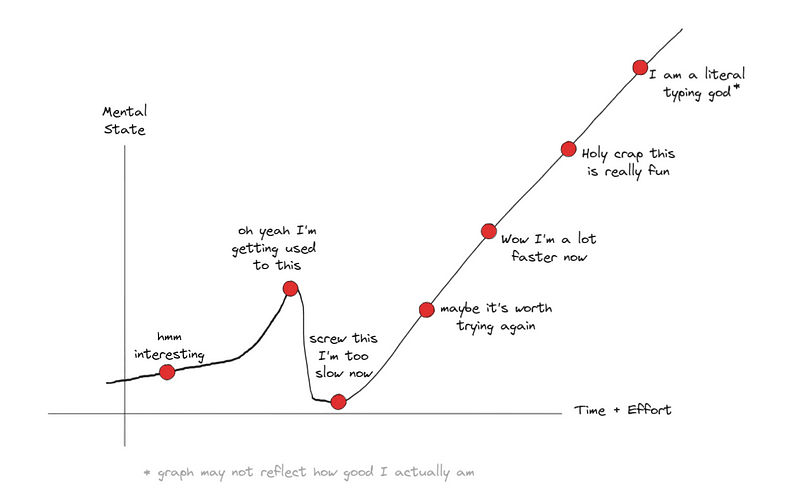
The point is to keep pouring in effort and you'll get there, but you'll probably have to push through it at some point.
Once you're used to vim, you'll have a hard time going back to your default editor without at least using vim motions because although you can switch your brain to the old ways again, you won't want to!
Also, I want to mention some important points about things that I was doing wrong, in my opinion, that may help you as well:
- Stop using a non-qwerty layout unless you know what you're doing. Switching to the US QWERTY layout was the best thing I did for my coding speed (I used Turkish Q before)
- Don't think you need more experience before you start. You are literally as ready as you will ever be right now.
- Ease into it. Do things YOUR way at YOUR pace 🫵. Don't stop using your favorite editor cold-turkey. Your productivity will plummet to the ground and you will feel like crap. For starters, you could check out this vim extension for VS code, for example.
- Don't use Vimscript. This is my ⚠️ personal opinion ⚠️, but I've had a much easier time using plain old lua which is how you setup your vim config, as I'll show you in an upcoming section.
One last thing: I'm using the words ' vim' and 'neovim' interchangeably here, but I'm strictly talking about neovim in pretty much all instances.
Why Vim?
Here is one good explanation:
My reasons are:
- Incredibly fast startup
- Clean. Simple. Nothing more than an editor.
- Minimal hand movement. I don't even need to move my - hand to the arrow keys.
- Tailored exactly to your needs
- Unmatched customizability
- Brag rights
It's not even funny how much quicker neovim is to start than my VS Code. Maybe I made my VS Code installation a bloated mess of extensions and other crap, or maybe I just want a functional but customized editor that doesn't take half my RAM to edit an HTML file.
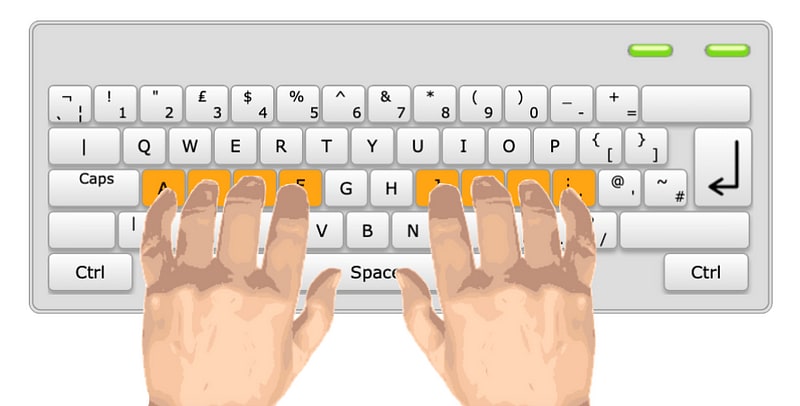
Vim's shortcuts are also all close to the center of the keyboard. You don't have to move your hands that much even on the keyboard itself, let alone away from the keyboard to the mouse.
Not to mention the insane amount of customization you can do. I cannot stress this enough, but you will never run out of ways to make vim your own.
Most importantly, you now get to brag (I use arch AND vim btw 😎).
Installing Neovim
There's no better guide than here.
The Modes of Vim
This is probably one of the biggest differences between your conventional text editing environment and vim. I'm not going to go into too much depth about these but you can read about them here. (probably do some more research though)
In a normal text editor, you can just write immediately, and you can use combinations of Ctrl, Shift, Super/Opt, and Alt/Cmd and a key for your shortcuts.
In vim, there are 4 modes you should be familiar with:
- Normal: all your keys (yes, including the letters) are shortcuts for text manipulation and many other functions.
- Insert: pretty much exactly like a normal text editor.
- Visual: Select text and do something with it (copy, paste, delete, format, etc.)
- Command: Run a vim command.
You already know how to use Insert, Visual, and probably even Command modes.
VS Code's default is in insert mode, you are in "Visual" mode when selecting any text, and Ctrl+Shift+P opens the command palette which is a sort of command mode in itself.
What makes vim special for me is its Normal mode. Instead of reaching for the bottom left corner of your keyboard, your fingers can stay on the home row of your keyboard.
I won't sugar coat it. It's a slow start to get used to it, but practice makes perfect.
Once you know your way around these modes, it becomes a matter of wanting to do something and your fingers will simply do it.
The Most Basic Motions and Shortcuts
There is not a chance in heehaw that I can list all the shortcuts you will need and use in vim in an article. Instead, I will list some resources where you can get into it yourself.
To get right into the action, you can use vim's built-in interactive tutorial by running the :Tutor command. Try it, it's pretty nice!
I can also recommend the following resources which personally helped me:
- http://www.viemu.com/a_vi_vim_graphical_cheat_sheet_tutorial.html (recommend starting with this one ⭐)
- https://devhints.io/vim
- https://vimsheet.com/
- https://vim.rtorr.com/
- https://vim.fandom.com/wiki/Tutorial#Vim_tutor
What's a Config?
Your config is how you tell neovim about your plugins, themes, shortcut maps, and so on.
Your config will most likely be found under ~/.config/nvim. It can be split into different files each responsible for configuring a different aspect of vim, like theme.lua for your theme, sets.lua for your settings, etc.
It all starts with one file: init.lua which is loaded automatically when you open vim. This file loads the rest of your config.
An init.lua file is almost like an index.js. You can write your program code in it, or you can write your code in different files and then export the whole thing through this file, which is what we're going to do.

Here's what the inside of your top-level init.lua will look like:
require('yourname')
What's yourname? This is just a namespace where you write your config. It's a convention people follow in their configs to avoid clashes with the built-in neovim config. You can replace yourname with anything within reason.
Next, you want to create a few more things:
- a directory called
lua - a directory below
luacalledyournamewhich has to match what you picked before for that. - an
init.luafile underlua/yourname/.
The lua directory means something in the lua programming language so make sure to name it exactly so. Now our top-level init.lua file makes sense, doesn't it? It's importing the init.lua under lua/yourname. Piece of cake.
Here's a cool pic:
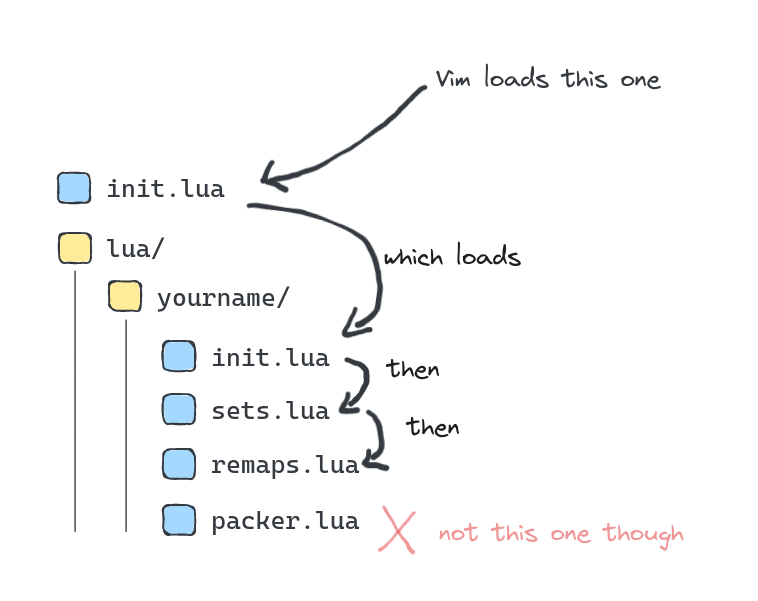
So it's basically the top init file calling the init file below it which in turn calls any files you want.
the init file under yourname will typically look like this:
require('sets.lua')
require('remaps.lua')
-- any other files ...
What about the packer.lua file though? Why not load that too?
The reason is that this file is special. It's a config for a plugin manager called Packer which I use to install and manage my plugins. It's sort of like your package.json.
I'll show you how you can basically set up this file with your first plugin so you can get started installing plugins as soon as possible.
Create the packer.lua file under lua/yourname/ and add the following into it:
vim.cmd [[packadd packer.nvim]]

return require("packer").startup(
    function(use)
      -- your plugin installation code will go here
    end
)
To find plugins, I personally just google something like neovim plugin copilot and usually the gets me a github page with instructions I can follow.
So if you want to install the github copilot extension, you would do the following:
vim.cmd [[packadd packer.nvim]]

return require("packer").startup(
    function(use)
        use("zbirenbaum/copilot.lua")
    end
)
Then, run the following commands to install the newly added plugin(s):
:so            -- to load packer into the context
:PackerSync    -- to install the newly added plugin
Remember, you run these commands by clicking shift + semicolon, type the command (without the colon since it would already be there), then press enter.
Many plugins require you to also set them up before you can use them. make sure to refer to the documentation. Here is a link to the documentation for this copilot extension, which requires us to do something before the plugin actually works.
So, let's add the config for the plugin. You'll add this under a new folder called after/plugin.
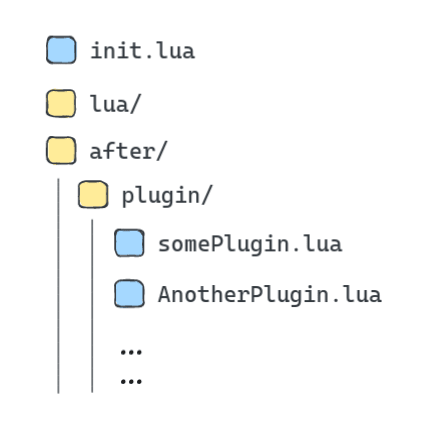
Just like the lua folder, this folder is special in that everything in it is executed after your own config is loaded.
Add a file called copilot.lua (name is not important) and paste what the docs recommends into it:
require("copilot").setup()
Exit vim and start it up again and you should now have a :Copilot command. To authenticate your account, run :Copilot auth and follow the instructions.
Now you have copilot in neovim!

You've just gone through the basic flow to install a plugin. Remember to read the docs for any given plugin well to avoid unnecessary headaches.
Here's my own config if you're interested.
Other Resources
- My own neovim config
- Tips for using vim: https://vim.fandom.com/wiki/Best_Vim_Tips
- A game for learning vim, in vim: https://github.com/ThePrimeagen/vim-be-good
- Collection of Awesome Plugins: https://github.com/rockerBOO/awesome-neovim
- Some more popular plugins: https://hannadrehman.com/top-neovim-plugins-for-developers-in-2022
Next
There are so many topics to cover that I plan on splitting it all up over multiple articles. I plan to tackle the following topics:
- Theming
- Language Servers and Autocomplete
- Must-Have plugins
- Finding your files
- Git
Stay tuned for these and let me know if there is anything in specific that you'd like me to cover.

Top comments (2)
If you allow me, I’d like to contribute for your post recommending this amazing NvChat tutorial.
Dreams of Code is one of the best NeoVim YouTubers I know.
this is a phenomenal read! Thank you, this is going to help me quite a bit as I try to make the switch from Visual Studio Code.