The Image Carousel
To add a little spice to your web application we can add an image carousel for the user to flip through some of the images fetched from your backend database. In order to get started first we are going to need some data with some image links.
Here we are creating some data for our Properties array and we have image_url as one of our attributes. We need this in order to call on our data and extract image_url from our Properties array.
Mapping over our Data
First we need to go inside of our component in which we are looking to place our image carousel. In our return we must then map over our data, so we will take the state in which we have placed our data and map over that array in order to pull out the image_url attribute.
Here we are mapping over that data and creating an img html element for each property and pulling out the image_url attribute to place into the src. this will append our images to the DOM for our user to display. We are also conditionally rendering some CSS that will display an effect whenever our slide is changing to a different image.
Next we need to install react icons into our application via our terminal. This can be achieved by running this command "npm install react icons". Once we have react icons downloaded we will then import our arrows from the react icons library. It will look like this...
Once we have our arrow icons we can place them inside of our component just above our mapped data. We will then set a new state called current that will take in the index of our mapped data and set the initial state to 0 then we will set a variable called "length" and set that to "properties.length" this will take our array and take the number of how many properties are in our array. This is how we will access the exact property image we are looking for in order for us to flip through our images. We will then create onClick event handler functions for our arrows that will flip through our properties array image_urls.
Here we have set up our react icon arrow elements and have attached onClick event handlers to them. We have written functions for each arrow that will do some coniditional rendering for us. For our nextSlide function we are saying if the state of current is equal to length - 1, then return 0, otherwise add 1 to the state of current. This will trigger anytime the right arrow is clicked. For our prevSlide function we are saying if current is equal to 0, then return then return length - 1, otherwise subtract 1 from current. This will allow us to flip through each image and return us to our first image if we have reached the end of our array.
CSS styling
Finally we have to make our image carousel look good. We can add classNames to each element in order to write some CSS code to style.
Here we have attached classNames to our elements along with some conditional rendering on our outer div where our data is being mapped over. If index equals our state of current then render the "slide-active" for our outer div otherwise render the "slide" className.
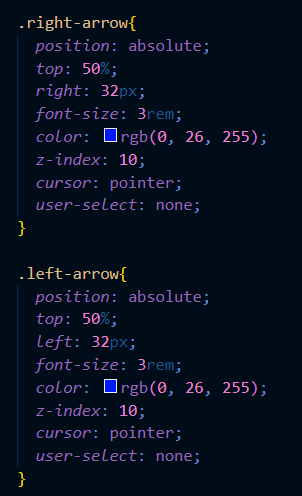
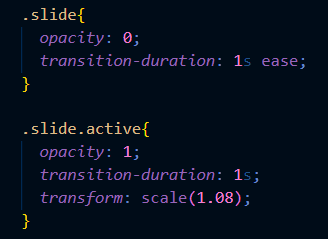
Finally we call on those classNames in our CSS file and add this code in order to size our arrows as well as position them onto our page. Then we add the above code to our "slide-active" className as well as our "slide className and what this code does is adds a cool effect of fading in the images upon a click of our arrows.
There you have it, easy as that. Now go build an image carousel for your Projects.


Top comments (2)
thanks man for sharing your code i have book marked your post! I will test it soon in my project.
Do you have a demo of your code? :)