The way we write CSS is about to change. No, I don’t mean you have to change how you write your styles, but we as developers are about to get a lot more control.
What am I talking about? That would be the CSS Houdini spec and the new browser APIs that are coming out as a part of it.

Houdini 101
So what is Houdini? Well, I’m glad you asked. Houdini gives developers access to the CSS object model (CSSOM) for the very first time. Instead of updating styles in JavaScript, developers can write code that the browser understands and can parse as CSS!
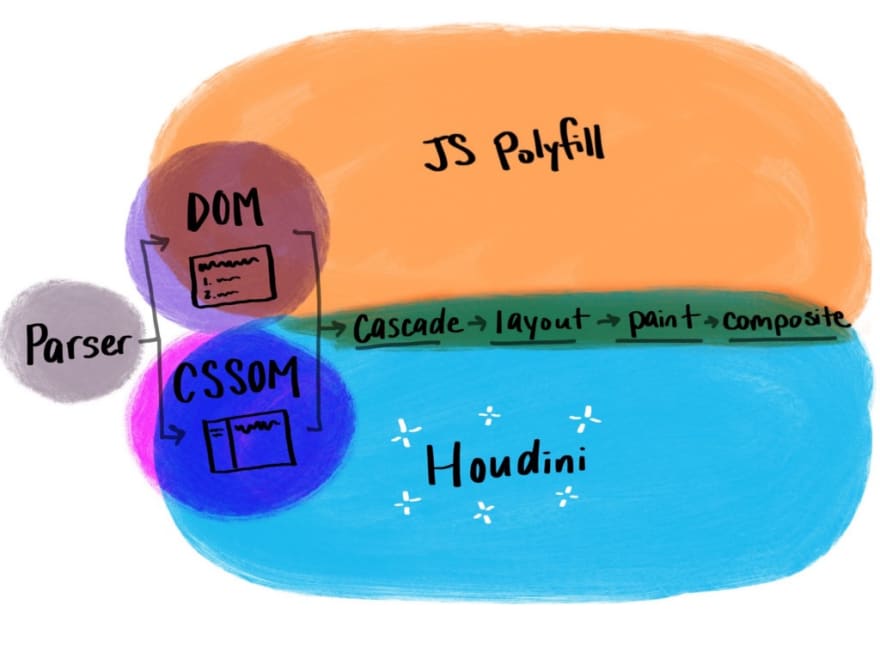
Right now, when we want to apply styles that don’t exist as CSS properties, we need to use JavaScript to overwrite the existing CSS. That means the browser goes through an entire cascade, layout, paint, and composite process before needing to go through the layout, paint, and composite process again for your JavaScript style update to be rendered (this, of course, depends on what you’re updating).
With Houdini, we can write code the browser understands and apply it to the beginning of the cycle, where the CSS is being tokenized and comprehended. That means:
- Faster parse times for complex styles (since the styling is happening at the CSS step)
- Developers no longer need to wait for web browser vendors to add CSS functionality — they can just polyfill it (this would happen when all browsers support Houdini — each Houdini worklet could then work interchangeably between browsers, like CSS plugins)
- Polyfills are more performant, so pages will render faster
- Better separation of logic and style (style kept in CSS, logic kept in JS)
- More customized styles and design systems (since this approach allows us to add in styles that we can’t create with CSS today, as well as allows us to create default values and fallbacks in visual systems)
With Houdini, you could write your styles in JavaScript, invoke the file that registers them to the browser, and then apply those styles in your CSS.
The process looks like this:

The full Houdini spec is pretty huge, encompasses a lot of different elements, and is a work in progress. To see a great overview, check out ishoudinireadyyet.com. This is a great resource with an overview of progress for each Houdini API with relevant links included.
For this post I want to focus on only one of the capabilities — While still in draft state, the CSS Painting API, is the most developed and supported one at the time of this writing.
The Paint API
The Paint API lets us write to the paint process of the DOM rendering engine. We can create unique styles, such as sparkles on text, unique corners, or stylized borders. The possibilities really are endless, and a great place to see some of those examples is the CSS Houdini Rocks site by Vincent de Oliveira. The Paint API uses a class and accepts the context (element we’re applying the style to), and size (that element’s physical bounding size). It also accepts the arguments of props for static properties, and args for input arguments.
registerPaint(‘redBackground’, class {
  paint(ctx, size) {
    ctx.fillStyle = ‘red’;
    ctx.fillRect(0, 0, size.width, size.height);
  }
})
This worklet file code would create a red rectangle. If you’re familiar with HTML Canvas you may notice that the code looks similar to canvas — and it does. The context (ctx) is the canvas here, and we’re using canvas-like syntax to apply styles (like widths and colors) and draw those styles — in this case, we’re using fillStyle to set the fill color, and fillRect to fill a rectangle, specified to start at (0,0) and fill in the element’s width and height.
If we wanted to use the worklet above, we would need to invoke the workout in our HTML with:
 if ('paintWorklet' in CSS) {
    CSS.paintWorklet.addModule('./worklet.js');
  }
And in CSS:
.element {
  background: paint(redBackground);
}
This previous example shows us nothing that a simple background-color:red could not do, but the exciting thing about Houdini is that there are so many more possibilities here!
Let’s paint
To work with the paint API, you must either serve the file from a secure website (https) or locally. This is because Houdini worklets are similar to service workers in that they’re a layer which lives between your browser and the network, running when they need to, and shutting down when they need to.
So to get started without setting up an entire development environment, I’d suggest running a local server with a command like: python -m SimpleHTTPServer 8000, which starts and runs a server on port 8000.
We’re going to go over an example called SUPER UNDERLINE :D where we can specify and create multiple underlines for our document (it’s just a simple example to get started, but the world is your oyster with Houdini, especially if you know HTML canvas!). It looks like this:

In this example, we have randomly generated underlines being drawn for each element, while we specify how many we want (the number of underlines), the color of the underline, the weight of the underline, and how far they should be spread (how angled they will be). To set everything up, we’ll need 3 files: an HTML file where we register the workout, a worklet file where we define the paint, and the CSS where we are going to be using the worklet (as shown in the diagram earlier on).
The body of the HTML code looks like this:
<h1>Hello World</h1>
<!— check if paint workout is supported in the browser and register a file called `worklet.js` if it is —>  if ('paintWorklet' in CSS) {
    CSS.paintWorklet.addModule('./worklet.js');
  }
We then want to start building our worklet file, checking for support in the browser as well:
if (typeof registerPaint !== 'undefined') {
  class SuperUnderline {
    paint(ctx, size) {
      // paint instructions will go here
    }
  }
}
registerPaint('superUnderline', SuperUnderline)
}
And we need to make sure we’re including this in CSS as well, while we again, check for support:
@supports (background: paint(something)) {
  h1 {
    background: paint(superUnderline);
  }
}
Now, nothing is going to happen at this point, so let’s specify something to paint within our worklet. Inside of the class, we can use the ctx and size parameters to hook onto our element:
// random function can live outside of the class
const getRandom = (min, max) => {
  return Math.floor(Math.random() \* (max - min + 1)) + min
}

// values to set for the paint
const numUnderlines = 3
const spread = 20
ctx.lineWidth = 3
ctx.strokeStyle = ‘red’

for (let i = 0; i < numUnderlines; i++) {
  ctx.beginPath()
  ctx.moveTo(0, getRandom(0, spread) + size.height/1.4)
  ctx.lineTo(size.width, getRandom(0, spread) + size.height/1.4)
  ctx.stroke()
}
In the code above, we’re drawing 3 random red lines toward the bottom of the div (1.4 is a bit of a random number there because we can’t really go outside of the canvas or the lines will not appear, like a true underline). The spread is set to 20 and the width of the lines is 1.
Our example currently looks like this:

SIDE NOTE: If you don’t see anything or any changes, first make sure that you’re using a browser with support for the Paint API. Then, open up your developer tools and disable cache with dev tools open. Right now, developing with Houdini is a bit tricky :P
Back to our example: we can do a lot better than this! We should make this code a little more flexible so that users can update the width, spread, color, and the number of underlines. And we can do this with CSS custom properties!
CSS custom properties
If you’ve used variables in CSS, which you set on the root (or local scope), those are custom properties. But you have a ton of control now in CSS to set your own custom properties, specify default values, and give them a syntax(!)! I added double exclamations there because this is SO cool! Now, when you’re using these custom properties and override one of them, you can do some sanity and error handling. If it doesn’t match a defined syntax, for example, it will fall back to a predefined value instead of ignoring the line altogether like CSS currently does.
I can go on and on about CSS custom properties, but I’ll cut to the chase here. Let’s create a properties.js file and set up some new variables that we’ll use in our example:
CSS.registerProperty({
  name: '--underlineNumber',
  syntax: '<number>',
  inherits: false,
  initialValue: 3
});

CSS.registerProperty({
  name: '--underlineColor',
  syntax: '<color>',
  inherits: true,
  initialValue: 'black'
});

CSS.registerProperty({
  name: '--underlineSpread',
  syntax: '<number>',
  inherits: false,
  initialValue: 20
});

CSS.registerProperty({
  name: '--underlineWidth',
  syntax: '<number>',
  inherits: false,
  initialValue: 2
});
Now we need to remember to include this file in the JS if it is separate or import it into our worklet file. In the example above, we’ve set a few properties which inherit from the number syntax ( underlineNumber, underlineSpread, and underlineWidth), and a property that inherits from color ( underlineColor). This is handy because now we can animate our underlines if we update the values, and the browser will know how to interpolate those values. This is why with Houdini, we can now create animated gradients.
In CSS, we’ll be able to set these values like so:
@supports (background: paint(something)) {
  h1 {
    /*
      Optionally set property values.
      This can be done at root or local scope
    */
    --underlineNumber: 5; /* default: 3 */
    --underlineColor: #8266ff; /* default: black */
    --underlineSpread: 15; /* default: 20 */
    --underlineWidth: 1; /* default: 2 */
background: paint(superUnderline);
    line-height: 1.5;
  }
}
And now lets return to our worklet to ensure that we’re passing down these custom properties into the paint function so we can use them. We’ll use static get inputProperties() and include an array of properties that we will then be able to pull into our function using properties.get and passing in the properties. All together it looks like this:
const getRandom = (min, max) => {
  return Math.floor(Math.random() * (max - min + 1)) + min
}
if (typeof registerPaint !== 'undefined') {
  class SuperUnderline {
    static get inputProperties() {
      return ['--underlineNumber', '--underlineColor', '--underlineSpread', '--underlineWidth']
    }
paint(ctx, size, properties) {
      const numUnderlines = properties.get('--underlineNumber')
      const lineWidth = properties.get('--underlineWidth')
      const color = properties.get('--underlineColor')
      const spread = properties.get('--underlineSpread')
ctx.lineWidth = lineWidth
      ctx.strokeStyle = color
for (let i = 0; i < numUnderlines; i++) {
        ctx.beginPath()
        ctx.moveTo(0, getRandom(0, spread) + size.height/1.4)
        ctx.lineTo(size.width, getRandom(0, spread) + size.height/1.4)
        ctx.stroke()
      }
    }
  }
registerPaint('superUnderline', SuperUnderline)
}
We’ve successfully created custom properties that we are passing into our Houdini worklet from CSS and using CSS to pull visual instructions from our worklet! As I mentioned earlier, you can animate these and update the properties as you wish. When you resize your browser window, also be aware that the element may repaint since its size is changing, and it will look quite different on each repaint since this example uses randomization to make the magic happen.

A word of warning
It’s such an exciting time to be a web developer, and Houdini is about to give a TON of power to people who love to design and build visually on the web. The things that we complain about with CSS can be resolved, and we can define our own way to style things. While it’s early, there have already been so many great examples and demos of Houdini in action.
However, keep in mind that Houdini is an experimental technology and is not production ready yet. You should always check for browser support before implementing any styles using this technique. Also, the wins that we get in performance can easily be overshadowed by an overexcited developer, since this technology gives us so much power. You still have to be careful not to overdo it, especially with animated effects. Keep in mind that this technology is rapidly changing, but have fun experimenting with Houdini in the meantime!
Further resources
- Experiments by @iamvdo
- Chrome Labs Houdini Samples
- Is Houdini Ready Yet?
- Interactive Intro to Houdini by Sam Richard
- Chrome Dev Summit State of Houdini Talk
- Toolsday Podcast on Houdini * * * ### Plug: LogRocket, a DVR for web apps

LogRocket is a frontend logging tool that lets you replay problems as if they happened in your own browser. Instead of guessing why errors happen, or asking users for screenshots and log dumps, LogRocket lets you replay the session to quickly understand what went wrong. It works perfectly with any app, regardless of framework, and has plugins to log additional context from Redux, Vuex, and @ngrx/store.
In addition to logging Redux actions and state, LogRocket records console logs, JavaScript errors, stacktraces, network requests/responses with headers + bodies, browser metadata, and custom logs. It also instruments the DOM to record the HTML and CSS on the page, recreating pixel-perfect videos of even the most complex single page apps.
The post New horizons in CSS: Houdini and the Paint API appeared first on LogRocket Blog.

Top comments (0)