
In this guide, we are going to show you how to deploy the Bold Reports Report Server in Amazon Elastic Kubernetes Services with Istio to enable you to embed reporting tools into your application.
Containerization and Kubernetes are becoming increasingly popular. Amazon Elastic Kubernetes Service (EKS) is a managed Kubernetes service that can help organizations to set up and manage report servers easily.
Bold Reports Report Server is a reliable, scalable, and powerful reporting solution. It can be used on different platforms, including the Amazon Elastic Kubernetes Services. With the Bold Report Server, managing, styling, creating, and exporting reports becomes easy because there is no requirement for coding expertise to use it.
Let’s start this integration!
Prerequisites
When deploying the Bold Reports Report Server in Amazon Elastic Kubernetes Services with Istio, make sure you have the following hardware and software installed.
Hardware requirements
The following hardware is required:
- A CPU with a minimum of 2 cores.
- A minimum of 4GB of RAM.
Software requirements
The following software is required:
- A database such as Microsoft SQL Server, PostgreSQL, or MySQL. Ensure that the database you are using is accessible from outside the machine.
- Command line tools: Kubectl, AWS CLI, and IStioctl.
- Any web browser.
Deployment
In this part, we will take you through a step-by-step process of deploying the Bold Reports Report Server in Amazon Elastic Kubernetes Services with Istio.
Step 1: Prepare the environment.
a. Download the following deployment files from GitHub.

Let’s define each file:
- The deployment file contains the configuration to create and manage those pods using a replica set.
- The destination rule file contains the configuration for the destination rule, including the traffic policy for the associated Kubernetes service.
- The HPA file contains the configuration to increase or decrease the number of pods automatically in response to the workload’s CPU or memory consumption.
- Istio gateway has configuration for the Istio Gateway resource, including the port, protocols, and routing rules to use. The Istio Gateway allows incoming traffic into the cluster and can route the traffic to the appropriate Kubernetes services.
- The log4net_config file has configuration settings that are employed to view the application logs in your Kubernetes console or store the needed logs in a file.
- The namespace file contains configuration that will be helpful when different teams or projects share a Kubernetes cluster.
- The pvclaim_eks file has the configuration for where we will provide the information for the file system and file share.
- The service file lets us access pods through a single point of entry.
b. Create a Kubernetes cluster and node group to deploy Bold Reports.
Step 2: Connect with the EKS cluster.
a. Open the PowerShell folder and navigate to the area you downloaded the deployment files.
b. Run the following command to configure the AWS.
aws configure
c. Enter the AWS access key ID.
d. Enter the AWS secret access key.
e. Enter the AWS region code. You can get the AWS region code from the AWS website.

f. Enter the output format as. json

g. Update the Kubeconfig by running the following command.
aws eks --region “region-name” update-kubeconfig --name “cluster-name”
Region name indicates the region in which the cluster was created.
h. Run the following command to deploy the CSI driver. It creates all the CSI drivers required.
kubectl apply -k "github.com/kubernetes-sigs/aws-efs-csi-driver/deploy/kubernetes/overlays/stable/?ref=release-1.3"
Step 3: Deploy the NGNIX Ingress controller.
For deploying the NGNIX Ingress controller, run the following command.
kubectl apply -f https://raw.githubusercontent.com/kubernetes/ingress-nginx/controller-v1.2.0/deploy/static/provider/cloud/deploy.yaml
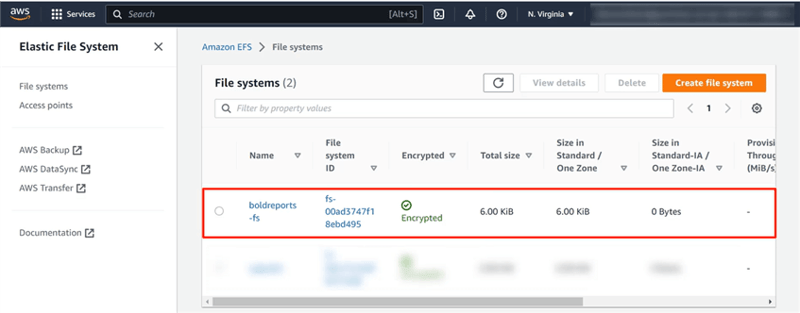
Step 4: Configure the storage pods.
You must then configure the file storage for pods. Create the EFS file system to store the shared folder for application usage.

Make a note of the file system ID, which you will use in the next step.
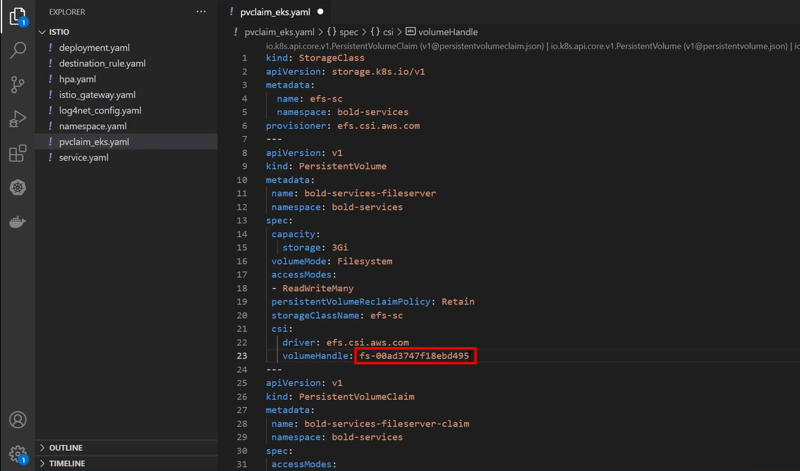
Step 5: Modify pvclaim_eks.yaml.
Open the pvclaim_eks.yaml file, then enter the volume handle ID value with the file system ID and save.
Step 6: Get the Ingress gateway external IP address.
Run the following command to get the Ingress gateway external IP address.
kubectl -n istio-system get service
We are going to use the IP address to deploy the Report Server.

Step 7: Set up SSL (optional).
To set up the Report Server with a domain name, you first need to map the domain name with the IP address of the Report Server. Once you have done that, you can add the domain name and the TLS secret name to the istio_gateway.yaml file.
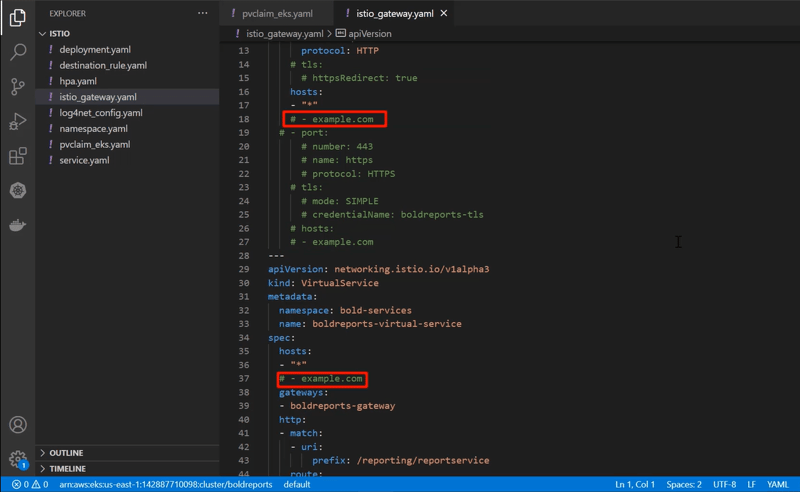
The application will be hosted in non-SSL mode by default. If you want to configure SSL, you need to add the domain and SSL configuration in the istio_gateway.yaml file:
a. Before you configure SSL, you need to create the TLS secret with the SSL certificate by running this command.
kubectl create secret tls boldreports-tls -n bold-services --key <key-path> --cert <certificate-path>
b. Remove the following lines.

c. Uncomment the following lines.

d. Replace example.com with your domain name.
e. Use the IP address that you obtained earlier to deploy the application.
Step 8: Modify deployment configuration.
Open the deployment.yaml file and replace the domain or Ingress gateway external IP address in the application base URL

Step 9: Configuring optional client libraries.
If you want to use third-party data sources like MySQL, Oracle, or PostgreSQL in your report, then you need to install them while deploying the Report Server. If you want to install more than one client library, separate them with commas as shown in the following.

Step 10: Apply the deployment file.
a. Run the following command to create a namespace for the Bold reports.
kubectl apply -f namespace.yaml
b. Create the config map by running the following command.
kubectl apply -f log4net_config.yaml
c. Run the following command to create a persistent volume (PV) and persistent volume claim (PVC) to apply the configuration from pvclaim_eks.
kubectl apply -f pvclaim_eks.yaml
d. Apply the configuration in the deployment file by running this command. It creates and manages pods with a specified number of replicas and the provided image.
kubectl apply -f deployment.yaml
e. Apply the configuration in hpa_gke by running this command. It sets up autoscaling for the Kubernetes Horizontal Pod Autoscaler (HPA).
kubectl apply -f hpa.yaml
f. To create the services, run the following command.
kubectl apply -f service.yaml
g. Apply the configuration in the istio_gateway by running the following command. It routes traffic to services running in the cluster based on their URL paths and host names.
kubectl apply -f istio_gateway.yaml
h. Run the following command to apply the configuration in destination_rule. This applies the traffic policies defined in the destination rule to the specified service.
kubectl apply -f destination_rule.yaml
i. After deploying all the deployment files, check the pod status by running this command. You should wait until all the pods are executed.
kubectl get pods -n bold-services -w
j. Run the command again until all the pods are running.

Configure Report Server
Once you have deployed the Report Server, you can then configure it by opening a web browser and navigating to the domain name or Ingress IP address provided in the application base URL.

To begin, activate your Bold Reports account. You will be required to provide your online credentials or upload your online unlock key. The online unlock key can be downloaded from your Bold Reports Account page.

For this demo, we will activate the account using online credentials:
- Click Log in to Activate Account and enter your Bold Report credentials.
- If you have more than one portal license, you will be required to select one.
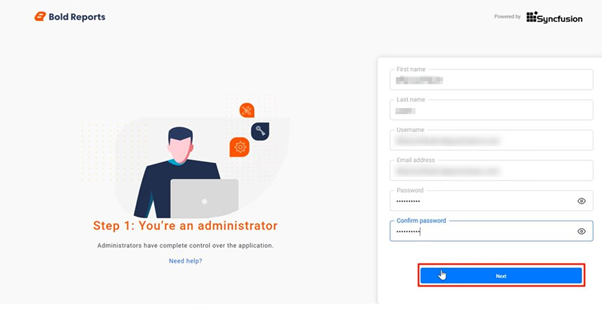
- Configure the Administrator user by entering the user information.
- Click Next.
Configure the database for storing Report Server data
- To configure the database, you can choose from the SQL Server, PostgreSQL, or MySQL databases. For this setup, choose PostgreSQL. The fields will be updated. You should then provide the required information in the required fields.

- You have the option to create a new database or use an existing database. Select New Database and enter the following name: boldserviceskubernetes.
- Enable the SSL option to make a safe connection using SSL.
- Click Next.
The report tenant deployment action has started and will run in the background.

Click Go to Reports, which will redirect you to the View all page.

In the View all page, you can add sample reports that are already available in the Report Server by clicking on Explore.

You can add those report samples in the Report Server by simply clicking Add Report. The sample report you selected will be added under the Sample Reports category.
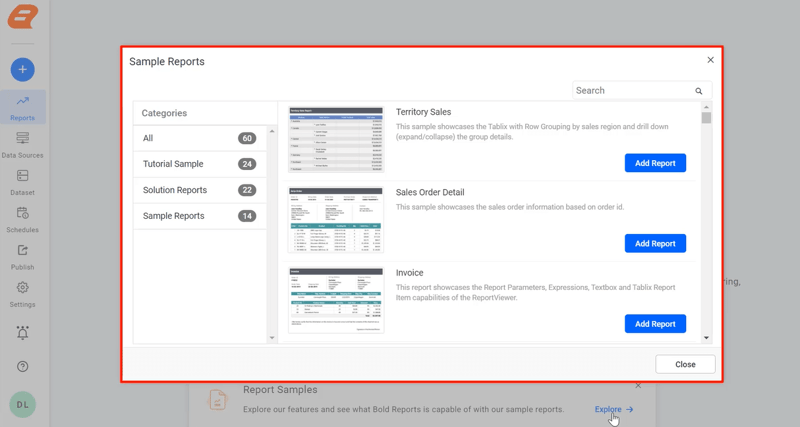
When you click on a report, it will open in the Report Server.

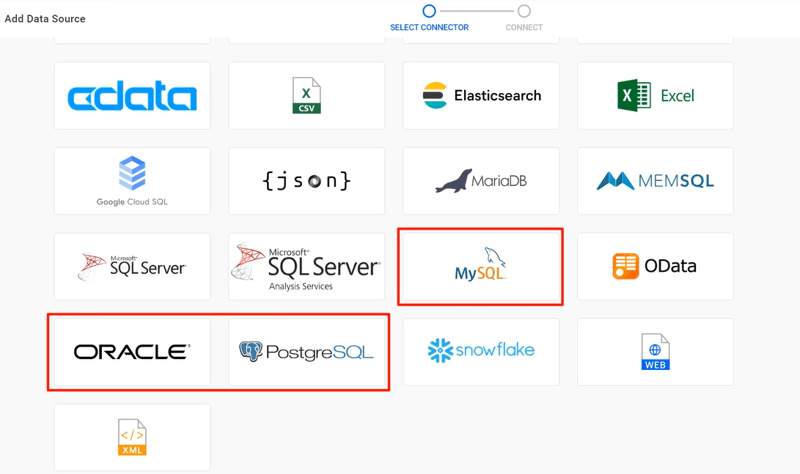
Now, if you open the shared data source data connector page, you will see third-party data sources like MySQL, Oracle, and PostgreSQL, as shown in the following.
Add client libraries
The Bold Reports Report Server’s visualization report items, such as charts and gauges, are not exportable. To export these items from scheduled reports, we need to install the PhantomJS client library on our Report Server:
1.First, you need to run bash on your pods. To do this, you will need to run the following command to get a list of all the pods that are currently running.
kubectl get pods -n bold-services -w
2.Run the following command, which will open a bash shell running inside the reports-web-deployment container.
kubectl exec -it <pod-name> -n <namespace> -- bash
indicates the name of pod and indicates the namespace used when deploying the Bold Report Server.
3.Change the current directory to /application/app_data/optional-libs by running the following command.
cd /application/app_data/optional-libs
4.After that, install the sudo and wget tools.
apt-get install sudo apt-get install wget
5.Before you can install PhantomJS, you need to install some of the required packages by running this command
sudo apt-get install build-essential chrpath libssl-dev libxft-dev libfreetype6-dev libfreetype6 libfontconfig1-dev libfontconfig1 -y
6.After that, run the following command to download the latest stable version of PhantomJS from the official website.
sudo wget https://bitbucket.org/ariya/phantomjs/downloads/phantomjs-2.1.1-linux-x86_64.tar.bz2
7.Once the file has finished downloading, extract the downloaded archive file to the desired system location by running this command.
sudo tar xvjf phantomjs-2.1.1-linux-x86_64.tar.bz2 -C /usr/local/share/
The downloaded file is extracted and moved to the /usr/local/share directory.
8.Run this command to create a symlink of the PhantomJS binary file in the system’s bin directory.
sudo ln -s /usr/local/share/phantomjs-2.1.1-linux-x86_64/bin/phantomjs /usr/local/bin/
9.To ensure PhantomJS is installed properly, run this command.
phantomjs --version
If the version number is shown, then the PhantomJS has been installed properly.
After reloading the browser, you can export a report that contains charts. When you open the exported file, you will see that the charts are included in the file, as well.

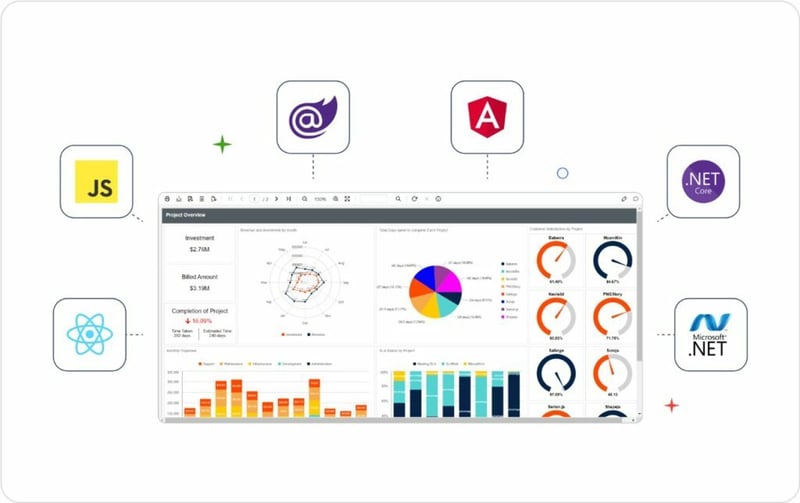
Report embedding
Bold Reports allows you to embed reporting functionalities directly within your applications. Our embeddable reporting tools can be seamlessly integrated with popular application platforms like ASP.NET Core, Blazor, Angular, and React. The way the embedded reporting tools are used varies depending on the deployment platform. You can find more detailed information about these differences in our documentation.
Conclusion
This blog post covered the step-by-step process of deploying the Bold Reports Report Server in Amazon Elastic Kubernetes Services with Istio, including adding optional client libraries and installing PhantomJS for exporting data visualization report items. We hope you found this guide helpful.
If you have any question or need further guidance, please feel free to add a comment in the comments section below. You can also contact us through our contact page. If you already have an account, you can log in to ask your support questions directly.
Bold Reports offers a 15-day free trial without the need for a credit card. We welcome you to start a free trial and experience Bold Reports for yourself. Let us know what you think!
Find us on Twitter, Facebook, and LinkedIn for news on our upcoming releases concerning Bold Reports.
Thank you for reading this blog post, and we are looking forward to providing you with more comprehensive content in the future.


Top comments (0)