
Introduction
Modern Android applications are becoming increasingly complex. As your codebase grows, maintaining a clean architecture and efficient build times becomes challenging. This is where multi-module architecture comes into play.
In this comprehensive guide, I'll walk you through everything you need to know about implementing a multi-module architecture in your Kotlin Android projects using Jetpack Compose.
What is Multi-Module Architecture?
Multi-module architecture divides an application into multiple, independent modules, each with well-defined responsibilities and boundaries. These modules can be developed, tested, and maintained independently.
For example, an e-commerce app might have separate modules for authentication, product catalog, shopping cart, and checkout functionality.
Multi-Module vs. Monolithic Architecture
Before diving deeper, let's understand the differences between multi-module and traditional monolithic architecture:
Monolithic Architecture
In a monolithic architecture:
All code resides in a single module (typically the app module)
The setup is simple initially
There's no need to manage module boundaries
While this approach works for small projects, it comes with significant limitations:
Build times increase dramatically as the project grows
It becomes harder to maintain clean architecture
Team development leads to more merge conflicts
Feature boundaries are difficult to enforce
Testing components in isolation becomes challenging
Multi-Module Architecture
On the other hand, multi-module architecture offers numerous benefits:
- Improved Build Speed: Only changed modules need recompilation
- Better Scalability: Easier to manage complex applications
- Enhanced Code Organization: Clear separation of concerns
- Parallel Development: Multiple teams can work simultaneously
- Reusability: Modules can be shared across different projects
- Testing: Easier unit testing of isolated modules Faster Deployment: Support for dynamic feature modules
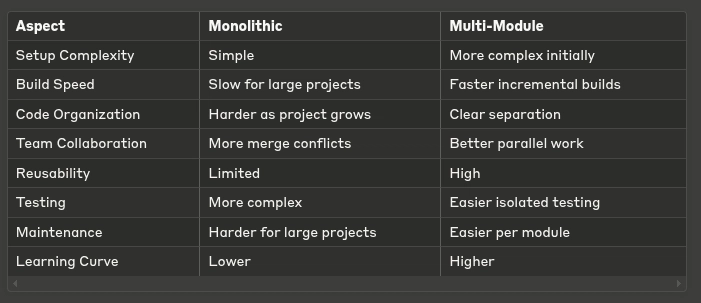
Quick Comparison
Multi-Module Structure Overview
A well-organized multi-module project typically follows this structure:
├── app                 # Main application module
├── core                # Core functionality modules
│   ├── network         # Networking components
│   ├── database        # Local data storage
│   ├── common          # Shared utilities
│   └── testing         # Testing utilities
├── common_ui           # Shared UI components
└── feature             # Feature modules
    ├── auth            # Authentication feature
    ├── profile         # User profile feature
    ├── home            # Home screen feature
    └── ...             # Other features
Let's break down each component:
App Module
The :app module serves as the main entry point for the application. It:
Contains the main activity and navigation logic
Has minimal business logic
Depends on all feature modules
Coordinates feature module integration
Core Modules
Core modules provide foundational functionality:
- :core:network: API clients, interceptors, network utilities
- :core:database: Room database, DAOs, entities
- :core:common: Shared utilities, extensions, base classes
Common UI Module
The :common_ui module contains:
- Custom composable components
- Theme definations
- Design system implementation
- UI utilities and extensions
Feature Modules
Feature modules represent the distinct functionalities of your app:
- :feature:auth: Authentication screens and logic
- :feature:profile: User profile functionality
- :feature:home: Home screen and related features Each feature module is self-contained with its own UI, business logic, and data handling.
Dependency Management Using buildSrc
Managing dependencies across multiple modules can quickly become complex. The buildSrc directory provides an elegant solution.
What is buildSrc?
buildSrc is a special Gradle module that:
- Is recognized automatically by Gradle
- Is used for custom build logic and dependency management
- Is compiled and added to the classpath of build scripts
- Provides type safety and IDE support
- Centralizes dependency versions and configurations
Setting Up buildSrc
- Create a buildSrc directory at your project root
- Add a build.gradle.kts file:
plugins {
    `kotlin-dsl`
}

repositories {
    google()
    mavenCentral()
}
- Create a src/main/kotlin directory structure for your Kotlin files
Creating Dependency Constants
Create a file called Dependencies.kt in the buildSrc/src/main/kotlin directory:
object Versions {
    const val kotlin = "1.8.10"
    const val compose = "1.4.3"
    const val hilt = "2.46"
}

object Dependencies {
    object Compose {
        const val ui = "androidx.compose.ui:ui:${Versions.compose}"
        const val material3 = "androidx.compose.material3:material3:${Versions.compose}"
        const val preview = "androidx.compose.ui:ui-tooling-preview:${Versions.compose}"
    }

    object Hilt {
        const val android = "com.google.dagger:hilt-android:${Versions.hilt}"
        const val compiler = "com.google.dagger:hilt-android-compiler:${Versions.hilt}"
    }
}
Using buildSrc Dependencies
Now you can use these centralized dependencies in your module build files:
// In module build.gradle.kts files
dependencies {
    implementation(Dependencies.Compose.ui)
    implementation(Dependencies.Compose.material3)
    implementation(Dependencies.Hilt.android)
    kapt(Dependencies.Hilt.compiler)
}

Top comments (0)