Flutter by Google enables the creation of native Android and iOS apps using a single codebase. One of its notable features is its vast selection of pre-built and customizable widgets, making the process of designing user interfaces a breeze.
To create a Flutter chatbot on Kommunicate and activate ChatGPT, start by following these steps:
Step 1: Log in to the Kommunicate dashboard.
Go to your Kommunicate dashboard and navigate to the Bot Integration section.
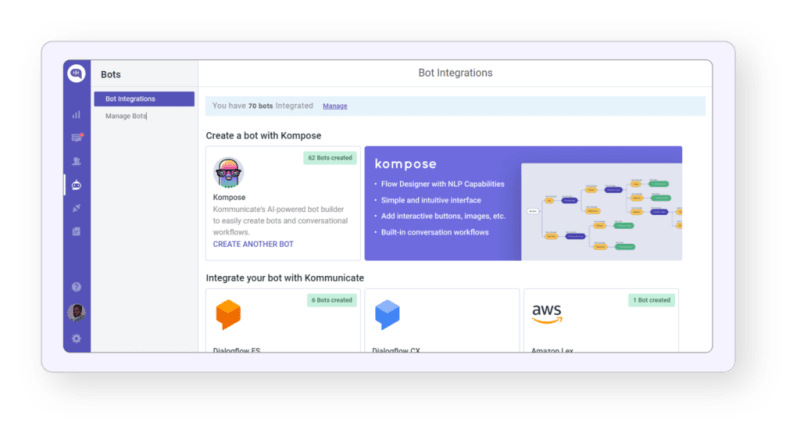
Look for the Kompose section and click on Integrate Bot.
Next, complete the setup of your bot by specifying its name, language, and human handoff setting. Once you configure these, proceed to finalize the bot setup.
Step 2: Create Welcome Message & Intents for your Flutter chatbot
Navigate to the ‘Manage Bots‘ section and choose the bot you have created.
Next, you need to set up the welcome message for your chatbot. The welcome message is the initial message that the chatbot sends to the user who starts a conversation.
Click on the “Welcome Message” section, then, type the message that your chatbot should show to the users when they open the chatbot and save the welcome intent.

After creating the welcome message, the next step in chatbot building is to create Intents (questions and answers). In the “Answer” section, you can add all the possible user’s questions and the chatbot’s corresponding responses.
To get started, click on the “+Add” button and provide an “Intent name”. Under “Step 1: User Says”, you need to specify the phrases/questions that will trigger the chatbot’s response. In the “Step 2: Bot Says” section, you need to specify the chatbot’s response to the user’s message. You can add multiple answers and follow-up responses to make the chatbot more interactive.


You can also refer to this document for Kompose chatbot integration with Kommunicate.
Step 3: Activate ChatGPT
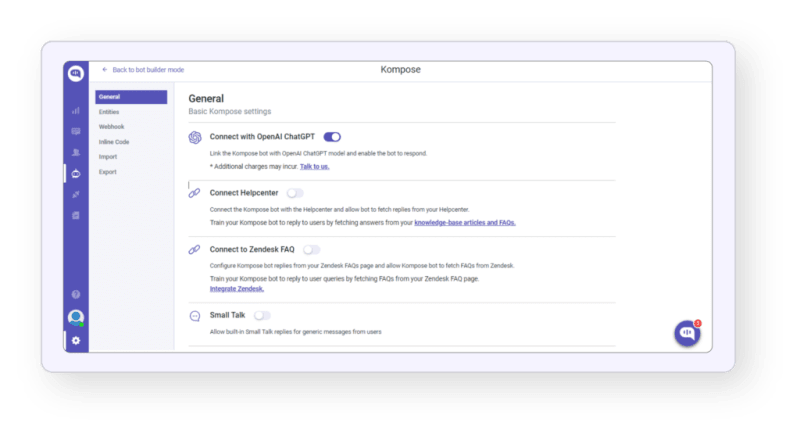
On the same page, you will find ⚙️Settings (top right corner of the page).
Click on Settings, the first option would be “Connect with OpenAI ChatGPT”, enable it.
And lastly, disable Small Talk (the last option on the same page).
Step 4: Activating the Chatbots
After creating a bot, you can activate it by setting it as the default bot in the conversation routing rules section.
Follow the steps below to do this:
Click on the Settings icon (below the profile picture) and select “Conversation and then Rules”
Next, look for “Routing rules for bots.”
Then, select the desired bot from the list and set it as the default bot.

rom now on, this bot will automatically respond to all of the conversations.
Step 4: Install Kompose Chatbot into Flutter App
With Kommunicate Flutter SDK, you can effortlessly incorporate personalized live chat in your applications. It has support for numerous hybrid platforms that are widely used at present. This SDK offers a quick and efficient method to develop native apps for both Android and IOS.
Before you begin using Kommunicate, ensure that your applications are compatible with Xcode 11 or higher and that AndroidX is installed.
Add Flutter SDK to your app
Add the below dependency in your pubspec.yaml file:

- Install the package as below:

- Import the kommunicate_flutter in your .dart file to use the methods from Kommunicate:

- For iOS, navigate to YourApp/iOS directory from the terminal and run the below command:

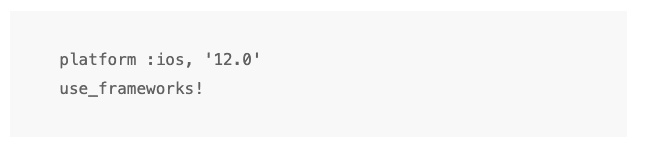
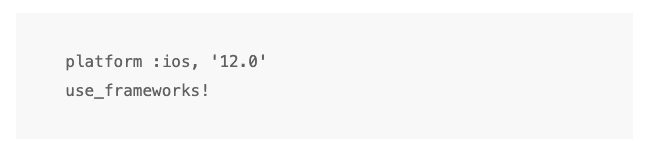
Note: Kommunicate iOS requires minimum iOS platform version 12 and uses dynamic frameworks. Make sure you have the below settings at the top of your iOS/Podfile:
Get your Application Id
Navigate to the Install section to get your APP_ID. This APP_ID is used to create/launch conversations.
Launch conversation
With Kommunicate’s build conversation function, you can create and launch conversations directly, without the need for authentication, initialization, and extra steps. You can customize the process by building the conversation object based on your specific requirements.
To launch a conversation, you need to create a conversation object, which ypu then need to pass to the build conversation function. Based on the parameters of the object, the conversation is created and launched.
Here’s an example of how to launch a conversation:

Now you are ready to chat with the ChatGPT bot on your Flutter app!


Kommunicate Sample application:
Download the sample app from here which includes ready-to-use Kommunicate Flutter SDK.
Go ahead and explore the Flutter integration with the Kompose chatbot.
Click here for original content

Top comments (0)