What are Soulbound tokens(SBT)?
Soulbound tokens are basically tokens that are attached to your account, as in they are non-transferrable tokens, the only thing that you can do is either burn the token or revoke the token meaning sending the token back to the sender.
The logic behind soulbound originates from the popular online game World of Warcraft. Players cannot sell or transfer soulbound items. Once picked up, soulbound items are forever “bound” to the player’s “soul.”
The purpose of soulbound token is to turn NFTs into something beyond just flipping jpegs, making money, showing status but to have a token that is both one-of-a-kind and also non-transferable.
Although there’s no actual monetary value of SBTs but it represents a person or it’s entity’s reputation.
🧪 What’s the need for Soulbound tokens(SBTs)?
There are plenty of use-cases for Soulbound tokens, some of the examples that can be implemented in every-day life can be:
Proof of work - You get certificates on completion of a course, degrees.
Proof of identification - Licenses or KYC stuff which is user specific
Exclusive membership
Credit verification
Proof of attendance - POAPs are the best example
I’ve just showed you the tip of the iceberg but the use-cases are endless, If you want to understand more about here’s an excellent blog by the king himself Vitalik Buterin
The only difference between our traditional NFTs and SBTs are that SBTs are non-transferrable as the whole purpose of SBTs are to create an individual’s digital identity so that they can be verified on-chain as data on-chain can’t be tampered and also that they don’t hold any monetary value because they are non-transferrable so you can’t trade.
What are we hacking today?🤔
Today we’ll be writing and deploying a NFT smart contract which is EIP4973 complaint i.e. Soulbound/Account bound token and we as the owner can mint and send the tokens to eligible people so that they can view it on Opensea, or any other marketplace.
For this we’ll first create an ERC721 NFT smart contract and then modify it along the way to make it EIP4973 compliant.
Let’s get started.
👀 Prerequisites
Basics of Solidity
Basic understanding of NFTs
Little curiosity
📝Writing a basic ERC721 contract
Before creating our Soulbound token, we’ll need a contract from which will act as our base contract and we’ll modify this to make this our Soulbound/Account bound NFT smart contract, don’t worry if you don’t know how to write smart contracts, we already have in-detail projects on NFT smart contracts like Getting started with NFT development and how to create an NFT contract with on-chain metadata these might be a good starting place if you’re looking to understand about NFT smart contracts also stay tuned cause we are going to drop a lot of projects soon👀
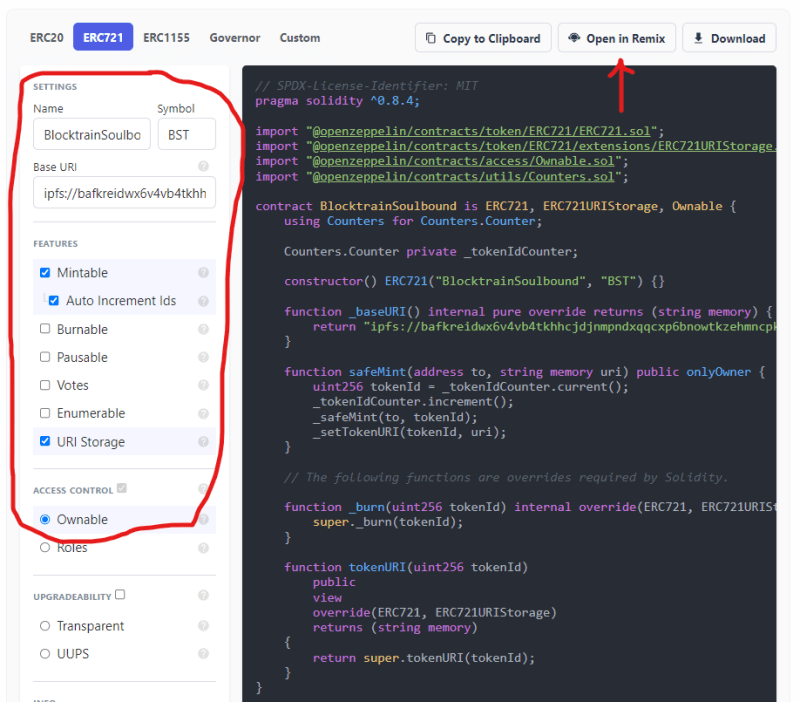
Let’s go over to Openzeppelin Wizard and get a contract boilerplate
Here we add the name and symbol of the contract first, this will be used as an identifier on etherscan and NFT marketplaces
-
Next is base URI, to understand how to upload files on ipfs and get their hash you can go to our Music NFT Tutorial where we have explained this in detail. For now you can use my hosted ipfs link:
ipfs://bafkreidwx6v4vb4tkhhcjdjnmpndxqqcxp6bnowtkzehmncpknx3x2rfhi/but just remember that this is a reference to our NFTs, this contains our NFT metadata and looks something like this when opened with an dedicated gateway - link Next are features and we’ll select Mintable which will allow users to mint, Auto-increment Ids which will be used to increment tokenIds of NFTs everytime a new one is minted.
Now let’s open this up in Remix, which is an online-ide to compile and deploy smart contracts.
We’ll just make a few changes in the contract, the final contract should look something like this:
// SPDX-License-Identifier: MIT
pragma solidity ^0.8.4;

import "@openzeppelin/contracts@4.7.3/token/ERC721/ERC721.sol";
import "@openzeppelin/contracts@4.7.3/token/ERC721/extensions/ERC721URIStorage.sol";
import "@openzeppelin/contracts@4.7.3/access/Ownable.sol";
import "@openzeppelin/contracts@4.7.3/utils/Counters.sol";

contract BlocktrainSoulbound is ERC721, ERC721URIStorage, Ownable {
    using Counters for Counters.Counter;

    Counters.Counter private _tokenIdCounter;

    constructor() ERC721("BlocktrainSoulbound", "BST") {}

    function _baseURI() internal pure override returns (string memory) {
        return "ipfs://bafkreidwx6v4vb4tkhhcjdjnmpndxqqcxp6bnowtkzehmncpknx3x2rfhi";
    }

    function safeMint(address to) public onlyOwner {
        uint256 tokenId = _tokenIdCounter.current();
        _tokenIdCounter.increment();
        _safeMint(to, tokenId);
    }

    // The following functions are overrides required by Solidity.

    function _burn(uint256 tokenId) internal override(ERC721, ERC721URIStorage) {
        super._burn(tokenId);
    }

    function tokenURI(uint256)
        public
        pure
        override(ERC721, ERC721URIStorage)
        returns (string memory)
    {
        return _baseURI();
    }
}
Here we’ve just changed the safeMint() and tokenURI() function
In
safeMintwe have removed the URI from functions args and removed the_setTokenURIIn
tokenURIwe instead of appending tokenId at the end of the URI we want the same NFT metadata for all NFTs in the collection, as this is just for demo purpose so I just return the_baseURI()which returns theURI.
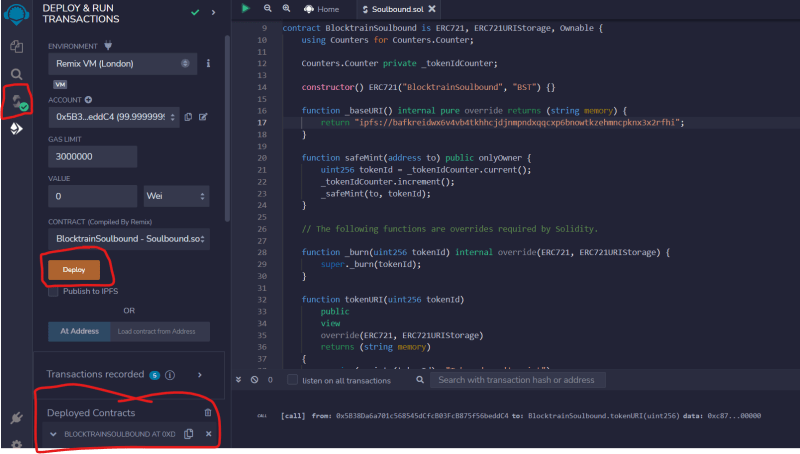
Now just compile your contract on Remix and deploy it over there itself and test if it works:
You need to press Ctrl+S to compile your contract
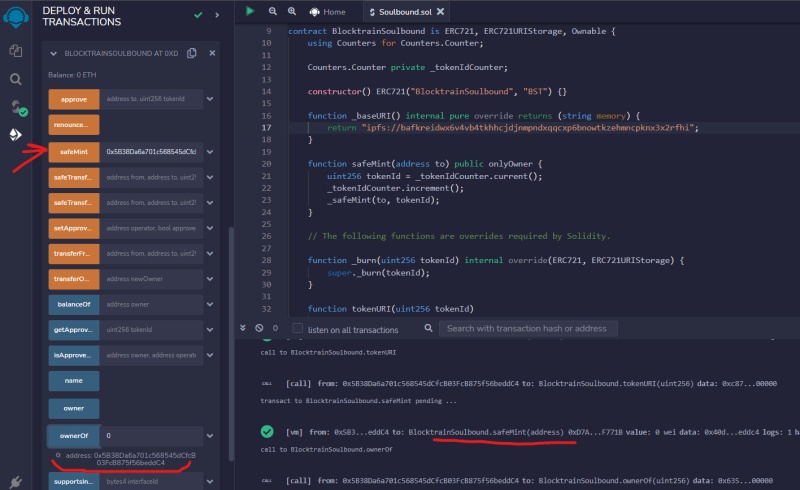
Once deployed test it using all the functions available:
🥷 Understanding EIP4973
According to ERC4973 Interface there are 5 things needed in order to create a Soulbound/Account bound token.
Event Attest - This event is emitted whenever a new token is issued and sent or bounded to an account.
Event Revoke - Revoke is emitted whenever a user sends the token back to the owner or burns it.
The
balanceOf,ownerOfandburnare already available in ERC721
For metadata standard we’ll follow ERC721 metadata as mentioned in the EIP.
You can read the EIP4973 official proposal, also remember that it is still in review purpose and might change in future but the main fundamental concepts won’t change.
⚒️ Modify contract to make it EIP4973 compatible
Now the first step that we need to do is to make our ERC721 base contract non-transferrable, for this what we just need to do is override 2 functions _beforeTokenTransfer and _afterTokenTransfer which are present in ERC721 contract and can be found on Openzepplin contracts
These functions act as hook, that runs before or after the transfer.
Just copy these two functions and paste it in our contract on Remix, something like this:
....

function _beforeTokenTransfer(
    address from,
    address to,
    uint256 tokenId
) internal override virtual {}

function _afterTokenTransfer(
    address from,
    address to,
    uint256 firstTokenId
) internal override virtual {}
Remember to add override so that it overrides the function present in base contract which is ERC721.
Now for _beforeTransferToken we need to check if the user is either receiving the token of burning the token then only we move ahead, and this can be done by checking the from address and to address, if from address is address(0) then it means the user is receiving the token and it to address is address(0) then the user is burning the token, we need to add a require statement for this:
function _beforeTokenTransfer(
    address from,
    address to,
    uint256 /* TokenId */
) internal override virtual {
    require(from == address(0) || to == address(0), "You cannot transfer this token");
}
Now _afterTokenTransfer will only be called when the token is either issued or burned so we need to call the two events mentioned in the EIP4973, Attest and Revoke according to the transfer.
function _afterTokenTransfer(
    address from,
    address to,
    uint256 firstTokenId
) internal override virtual {
    if(from == address(0)) {
        emit Attest(to, firstTokenId);
    } else if (to == address(0)) {
        emit Revoke(to, firstTokenId);
    }
}
Attest will be emitted when the from address is address(0) as it means that token is issued, while Revoke will be emitted when the to address is address(0) which means that token is burned.
We don’t have these two Event’s initialized or inherited so let’s pick them from the EIP and paste it in our code at the top above the constructor
event Attest(address indexed to, uint256 indexed tokenId);
event Revoke(address indexed to, uint256 indexed tokenId);
Now we have our non-transferrable NFT smart contract done, we have a few things more to modify.
First is the _burn function inherited from ERC721, it is an internal function, according to EIP4973 we need an external burn and only the owner of the tokenId can call the burn function:
function burn(uint256 tokenId) external {
    require(ownerOf(tokenId) == msg.sender, "You are not the owner of the tokenId");
    _burn(tokenId);
}
Last and final thing that’s left is to let the issuer or creator of the NFT to take back/burn the Soulbound token.
function revoke(uint256 tokenId) external onlyOwner {
    _burn(tokenId);
}
It is a onlyOwner function which let’s the creator of the contract to burn any token he wants.
Viola🎉🍾 we have our Soulbound token NFT contract done, which makes sure that tokens are non-transferrable, and user can only burn the token
Entire contract should look something like this:
// SPDX-License-Identifier: MIT
pragma solidity ^0.8.4;

import "@openzeppelin/contracts/token/ERC721/ERC721.sol";
import "@openzeppelin/contracts/token/ERC721/extensions/ERC721URIStorage.sol";
import "@openzeppelin/contracts/access/Ownable.sol";
import "@openzeppelin/contracts/utils/Counters.sol";

contract BlocktrainSoulbound is ERC721, ERC721URIStorage, Ownable {
    using Counters for Counters.Counter;

    Counters.Counter private _tokenIdCounter;

    event Attest(address indexed to, uint256 indexed tokenId);
    event Revoke(address indexed to, uint256 indexed tokenId);

    constructor() ERC721("BlocktrainSoulbound", "BST") {}

    function _baseURI() internal pure override returns (string memory) {
        return "ipfs://bafkreidwx6v4vb4tkhhcjdjnmpndxqqcxp6bnowtkzehmncpknx3x2rfhi";
    }

    function safeMint(address to) public onlyOwner {
        uint256 tokenId = _tokenIdCounter.current();
        _tokenIdCounter.increment();
        _safeMint(to, tokenId);
    }

    // The following functions are overrides required by Solidity.

    function _burn(uint256 tokenId) internal override(ERC721, ERC721URIStorage) {
        super._burn(tokenId);
    }

    function burn(uint256 tokenId) external {
        require(ownerOf(tokenId) == msg.sender, "You are not the owner of the tokenId");
        _burn(tokenId);
    }

    function revoke(uint256 tokenId) external onlyOwner {
        _burn(tokenId);
    }

    function tokenURI(uint256)
        public
        pure
        override(ERC721, ERC721URIStorage)
        returns (string memory)
    {
        return _baseURI();
    }

    function _beforeTokenTransfer(
        address from,
        address to,
        uint256 /* TokenId */
    ) internal override virtual {
        require(from == address(0) || to == address(0), "You cannot transfer this token");
    }

    function _afterTokenTransfer(
        address from,
        address to,
        uint256 firstTokenId
    ) internal override virtual {
        if(from == address(0)) {
            emit Attest(to, firstTokenId);
        } else if (to == address(0)) {
            emit Revoke(to, firstTokenId);
        }
    }
}
Now it’s time to deploy it on Goerli testnet and test it out ourselves.
⛽ Deploy our contract on Goerli Testnet
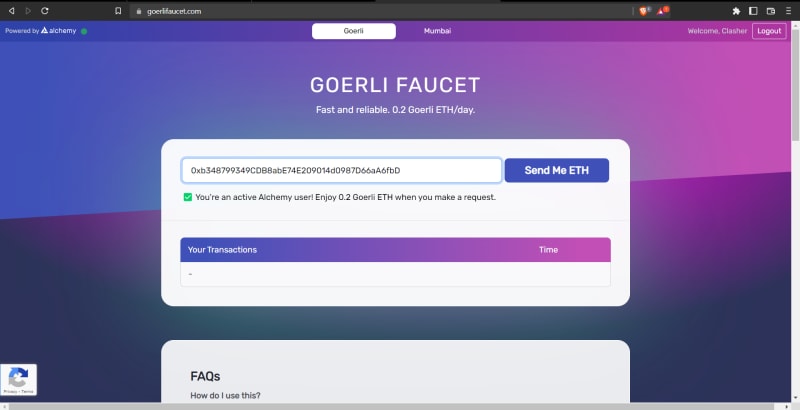
In order to deploy the contract on Goerli Testnet we’ll need some testnet ether first, let’s go and get some on goerlifaucet which is run by Alchemy
Just go to goerlifaucet.com and add your address over there and click on send me funds
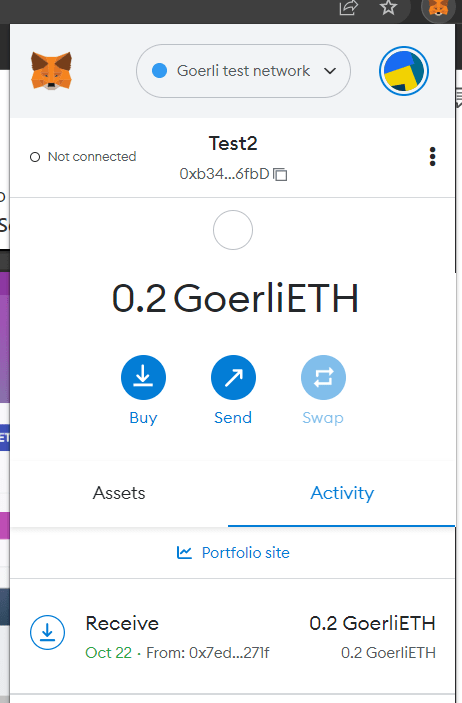
Once the transaction goes through you should be able to see some testnet ether in your metamask wallet when you switch the network to goerli, if you can't find goerli in your metamask a quick google search might help:)
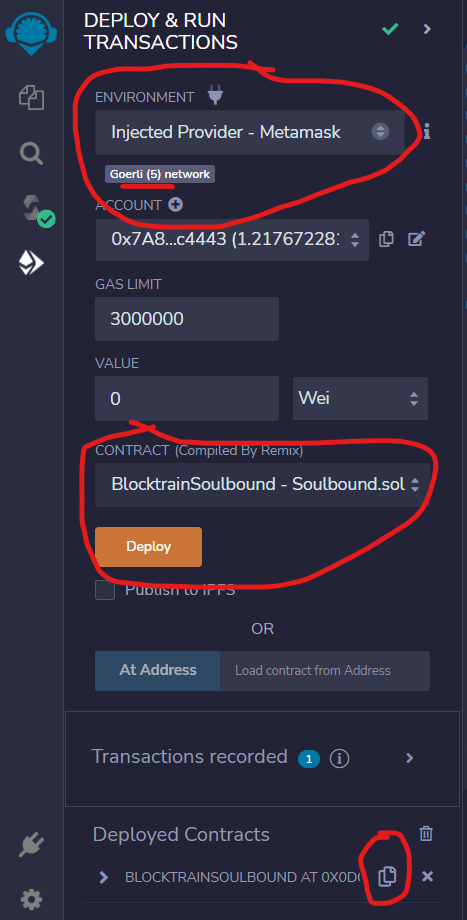
Once we have funds in our wallet, let’s go back to remix and deploy the contract, Click on the last tab on the left and change the network to Injected Provider - Metamask in the dropdown, a popup should open to connect your wallet, just click confirm and connect.
Once you have your wallet connected just make sure that you are on Goerli Testnet and then click deploy once the transaction goes through you should be able to see your contracts on the bottom left where it says deployed contracts.
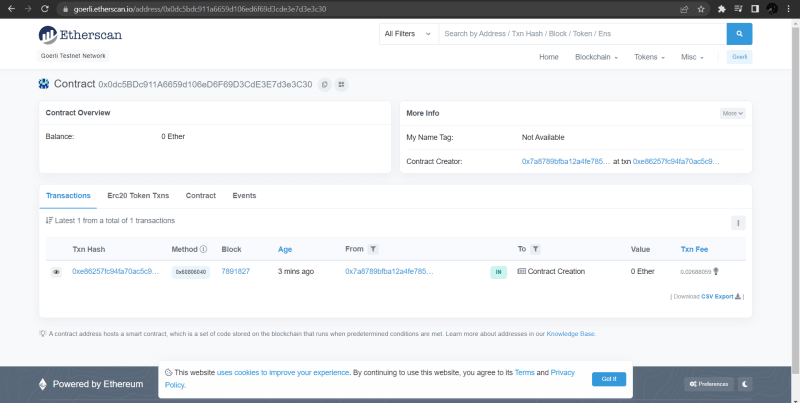
Just copy the address by clicking on the button beside the name of the contract and paste it on goerli.etherscan.io, you should be able to see something like this:
⛏️ Mint NFTs through Remix
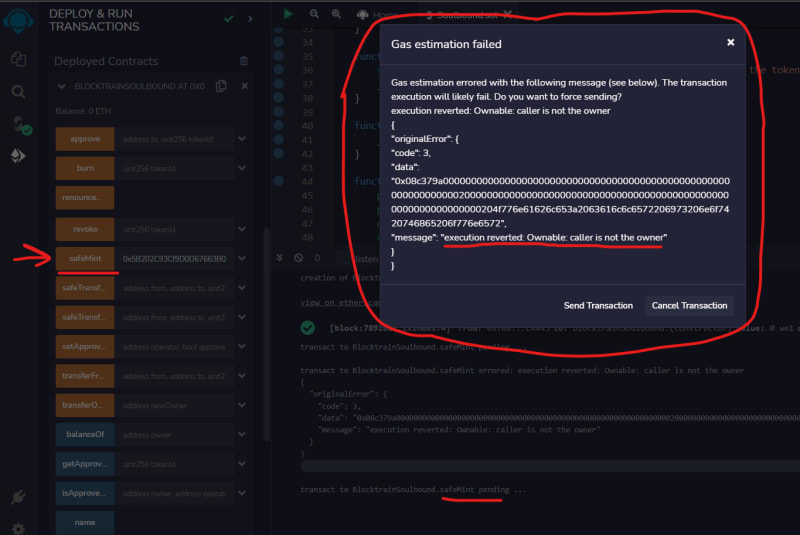
Now the first thing I’ll test is trying to mint the NFTs from a different metamask account for this just change the wallet in metamask and click on mint function
You’ll get this prompt from Remix, which says that caller is not the owner which means only the owner of the contract can mint the NFTs
Now let’s try minting one from original account to my secondary account, it will open up metamask for confirming the transaction as it will cost some gas to mint
Now that we have our NFT minted let’s take a look at it on Opensea
🤩 Checkout our tokens on Opensea
Now copy your contract address from Remix which we used earlier to lookup on Goerli Etherscan, and paste it on testnets.opensea.io.
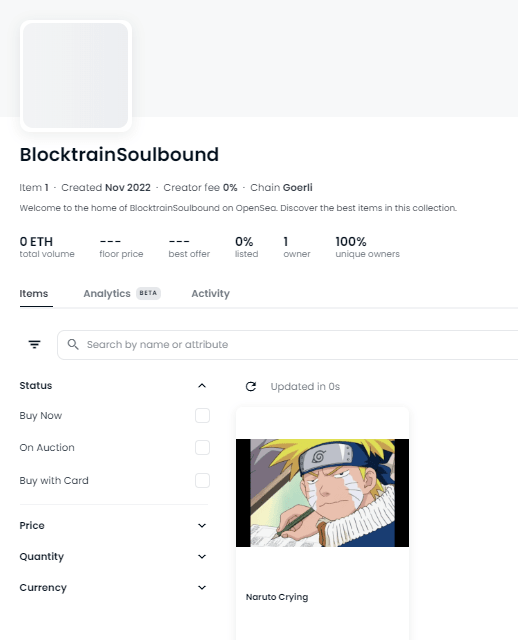
This is how my contract is looking
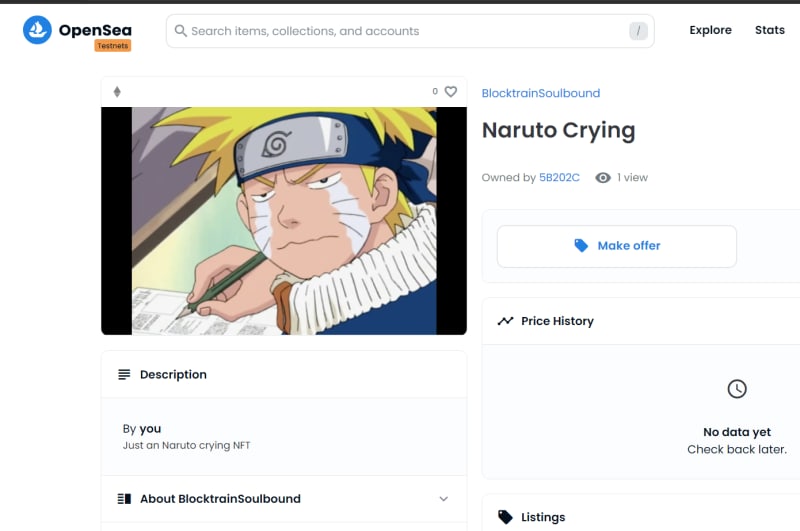
And this is how the individual NFT is looking
Now let’s test it, I’ll login on Opensea with the wallet that holds this NFT and try to transfer it to some wallet, let’s see what happens.
Click on the airplane icon on the right top once logged in through the wallet that holds the NFT
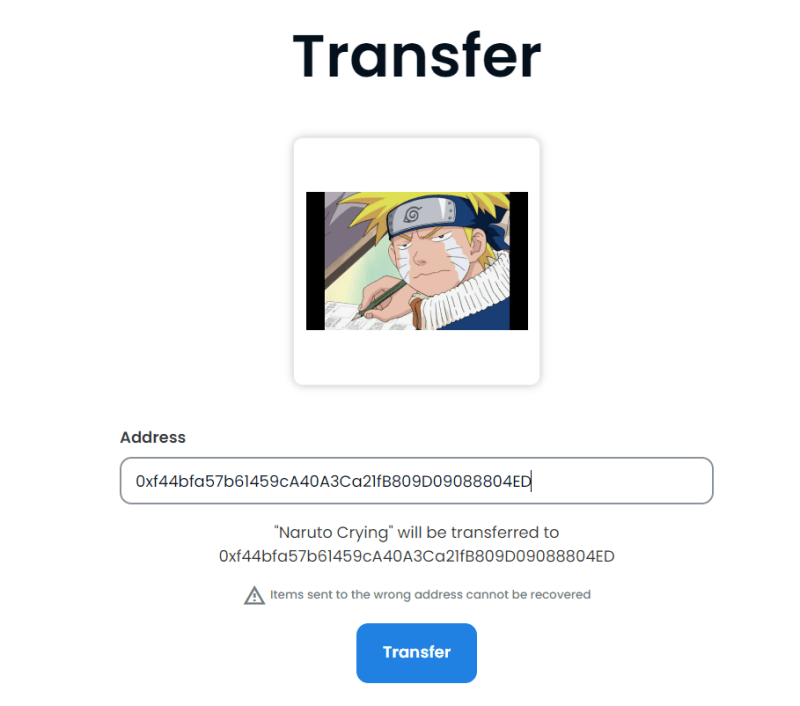
Once you click on it Opensea will take you to this page
Add a wallet address of one of your spare accounts or some random 40 character prefixing with 0x and click on the Transfer button.
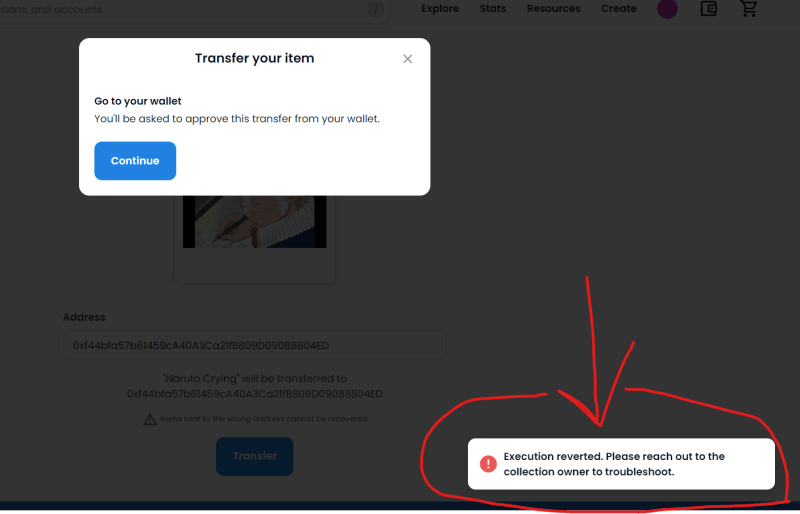
Haha the transaction get’s reverted, this means that you can’t transfer the NFT to that random address.
🔥 Burn the tokens
For allowing user to burn the token you can either send the token to address(0) or create a button on your minting website which has a button that triggers the burn function for the user
Let’s for now burn the tokens using Remix just change your wallet in metamask to the one holding the NFT and go to Remix, add the tokenId in the burn function argument and press burn, it will prompt you for an transaction which is small gas fees that you need to pay in order to burn the token.
Done you’ve successfully burned the token, i.e. it belongs to the address(0) now, you can verify this on opensea or etherscan. let’s take a look at opensea
If you scroll down a little bit on the individual NFT page, you’ll find Item Activity, you’ll see that the NFT has been sent from my address to address(0), check mine over here - Link
🍾 All done!
Oof this was a lot, give a pat to yourself on the back if you’ve reached this far.
I hope you’ve learned something new and interesting in this tutorial as it won’t be much time before Soulbound/Accountbound tokens become mainstream and people start using it in daily life, so make sure you get on the train before everyone else does and build cool sh*t.
Also stay tuned as we are going to drop more of such amazing tutorials with some intermediate and advance level🚀









Top comments (0)