
Welcome to Five Labs, a step-by-step guide to building applications using Five.
This lab will guide you through the process of creating Jobs in Five. Jobs in Five are utilized to automate functions, allowing you to schedule and execute them on a recurring basis. The objective of the tutorial is to:
- Download and import the Task Management Template in Five.
- Write and manage JavaScript functions.
- Adding a reminder feature in the Task Management Template.
- Creating Jobs in Five.
Lab Objectives
By the end of this lab, you will have learned how to write Jobs in Five that can run your Actions in Five on a recurring basis.
Typical use cases for jobs are, for example, scheduling an email report on a weekly basis, checking for new orders daily, or notifying users of incoming requests every minute. Five's Jobs feature lets us schedule functions at regular, time-based intervals.
To get started, here’s what we need:
- Have Five installed in your system or run Five on the cloud (with a paid subscription).
Don't Feel Like Reading?
Watch the YouTube video and learn how to use jobs to schedule tasks in Five.
https://www.youtube.com/watch?v=E25v9v7iyFM&t=2s
Step 1: Downloading And Importing The Task Management Template
First, let's import a template into Five so we can get a headstart and after that, we can jump right into our functions.
For this tutorial, we will be using the Task Management Template, and we will be adding a Reminder feature to this app such that we get a notification whenever a task is due.
Download the template from the link above and import it into Five.
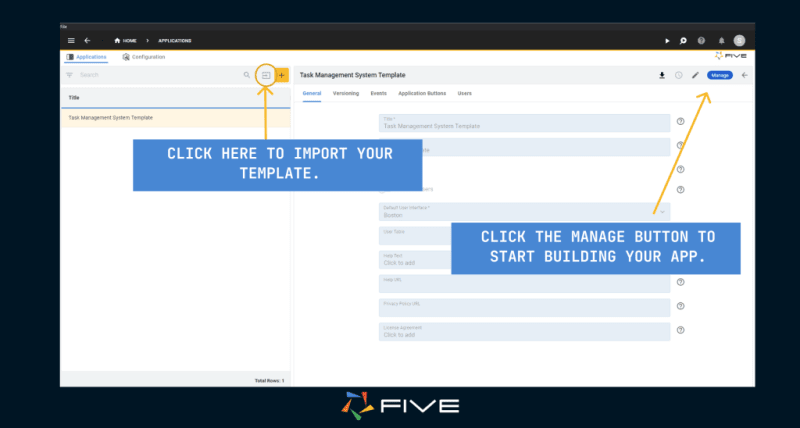
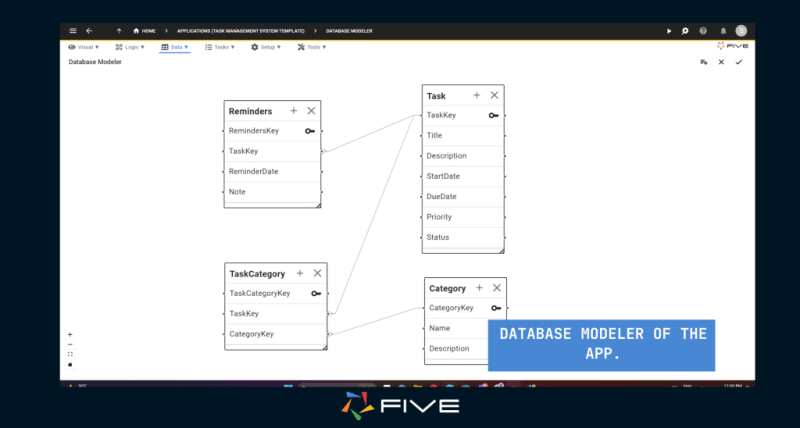
Click the 'Manage' button to enter the development environment, then select 'Database Modeler' from the 'Data' menu to view the app's database.
The Task Management application is straightforward and consists of four database tables: tasks, reminders, task categories and categories.
It also features some pre-constructed forms, charts, and queries for your perusal. We will use the 'Reminder' table to build a simple reminder feature for this app.
Step 2: Defining JavaScript Functions
Now that we have an understanding of our application, let's jump into writing some code.
Inside Five, navigate to the ‘Code Editor’, which you can find inside 'Logic'.
Click on the ‘+’ icon to initiate a new function. Assign it a meaningful name (we will call it sendReminder) and choose your preferred language, either TypeScript or JavaScript.

We will start by retrieving all the reminder dates from our table. We can do this by invoking a simple SQL statement through our function.
function sendReminder(five, context, result) {

  let sqlStatement = 'Select ReminderDate From Reminders'

  let queryResults = five.executeQuery(sqlStatement, 0);

  if (!queryResults.isOk()) {

          five.createError(queryResults);

  }

   return five.success(result);

}
We use five.executeQuery() and then we use.isOk() to check if the response resulted in any error. Since the response is a JSON object we can easily map through our results.
function sendReminder(five, context, result) {

  let sqlStatement = 'Select ReminderDate From Reminders'

  let queryResults = five.executeQuery(sqlStatement, 0);


  if (!queryResults.isOk()) {

          five.createError(queryResults);

  }


  queryResults.values.map(item => {

        five.log("Hello World")

        let currentDate = Date.now();

        let reminderDate = new Date(item.ReminderDate)

        if(currentDate >= reminderDate){

            five.showMessage("You have a task due")

        }

  })

   return five.success(result);

}
We simply iterate through each date and compare the set reminder date to the current date; if it's due, we display a message using five.showMessage(). We have also used five.log() to test if the function is working or not when we call it.
Now that our function is somewhat prepared, let’s test it first. We will start by attaching our function to a Test process.
Begin by navigating to Processes: click on ‘Tasks’, and then on ‘Processes’

Create a new process by clicking on the yellow ‘+’ button and giving it a name (we will call it ReminderProcess).
After that click on the ‘Events’ tab and since Five supports event-driven programming it will show you a list of events that the process goes through. We will attach our function to the ‘Do Complete’ event. Check out the screenshot below to see what this should look like inside Five. Save everything by clicking the tick mark.

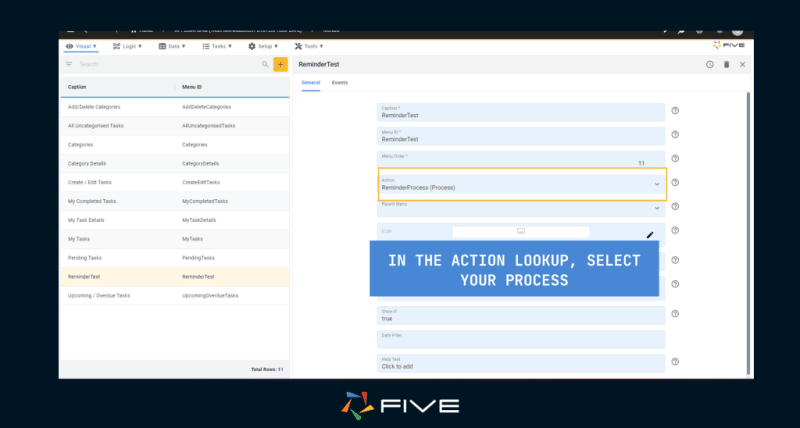
Next, let’s put our process into a menu so that we can access it in our end-user application.
Navigate to ‘Visual‘ and then click on ‘Menu‘, we will create a new menu item, and then in the ‘Action‘ field we will select our process.
Let’s run our application now. We will test our function in debug mode. This can be done by simply clicking on the ▶️ with the magnifying glass on the header.

Five will now run your application. But now you’ll also have access to the inspector, which you will be able to find minimized on the right. Maximize it by clicking on the 🔎 icon which will cause it to expand.
Now, select our ReminderProcess from the menus on the left, then click the check button in the top right to execute our process, which will trigger the ‘Do Run’ event.

When we run our process, we receive a message box, and the inspector also displays our logs, indicating our function is operating as intended.
Now let's go back to our function and add the final changes. In order for jobs to work in Five our code should have a connection with our database.
function sendReminder(five, context, result) {

    const db = five.getDatabaseConnectionByID('TaskMageDB')


    if (!db.isOk()) {


        return five.createError(db, 'Connect to database failed');


    }


    const tx = five.startTransaction(db);


    if (!tx.isOk()) {


        return five.createError(tx, 'Create transaction failed');


    }


    let sqlStatement = 'Select ReminderDate From Reminders'

    let queryResults = five.executeQuery(sqlStatement, 0);


    if (!queryResults.isOk()) {

        five.createError(queryResults);

    }


    queryResults.values.map(item => {

        five.log("It works");

        let currentDate = Date.now();

        let reminderDate = new Date(item.ReminderDate)

        if(currentDate >= reminderDate){

            five.showMessage("You have a task due")

        }

    })

    five.commit(tx)

    return five.success(result);

}
In the snippet above, we've appended several lines at the beginning of our existing function to establish a database connection. Initially, we utilize five.getDatabaseConnectionByID(), passing 'TaskMageDB' as the argument, which is the name of our database
To confirm the name of our database, we can click on the 'Data' menu, followed by 'Database', which should display a list of all available databases.
After that, we simply start a transaction using five.startTransaction(). Finally, just before executing our return statement, we use five.commit(), passing in the transaction variable, to commit our modifications. (Note: these steps are only required when we are working with Jobs in Five )
Before proceeding, we will make one last change and that is replacing the showMessage() function with sendNotification(). Currently, we are showing a dialogue box containing our message which is not an ideal way of getting reminders so instead we will be using Five's inbuild notifications. We simply replace five.showMessage() with this:
five.sendNotification("You have a task due")The sendNotification() function is designed with multiple users in mind, and thus, it expects a user key to identify the recipient of the notifications. Since we plan to use this function to send notifications to ourselves, we will need our user key.
One method to retrieve our key is by calling the five.currentUserKey() method. To do this, simply invoke this method within the inspector of your browser. If you're running the local version, access the inspector by selecting 'File' on the top left, followed by 'Debug' in your end-user application.
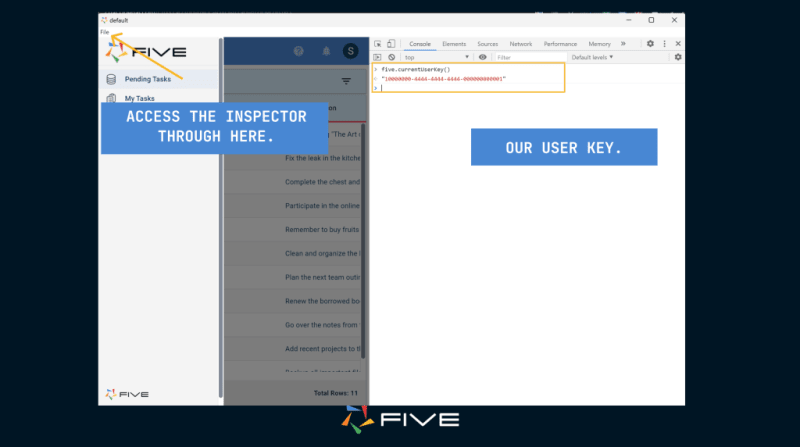
We will copy this key and paste it as an argument inside our code and now our function should look like this:
function sendReminder(five, context, result) {

    const db = five.getDatabaseConnectionByID('TaskMageDB')


    if (!db.isOk()) {


        return five.createError(db, 'Connect to database failed');


    }


    const tx = five.startTransaction(db);


    if (!tx.isOk()) {


        return five.createError(tx, 'Create transaction failed');


    }


    let sqlStatement = 'Select ReminderDate From Reminders'

    let queryResults = five.executeQuery(sqlStatement, 0);

    if (!queryResults.isOk()) {

        five.createError(queryResults);

    }


    queryResults.values.map(item => {

        let currentDate = Date.now();

        let reminderDate = new Date(item.ReminderDate)

        if(currentDate >= reminderDate){

            five.sendNotification("10000000-4444-4444-4444-000000000001","You have a task due")

        }

    })

    five.commit(tx)

    return five.success(result);

}
Step 3: Scheduling Our Job
Now let's finally set up our Job to make sure the functions runs on a regular schedule.
Start by clicking on 'Tasks' then 'Jobs'. Similar to creating our ReminderProcess, create a new job by clicking on the yellow ‘+’ button and giving it a name. Inside the Action lookup select 'ReminderProcess' or whatever name you assigned it.

For testing purposes, we are going to schedule our Job to execute every minute.
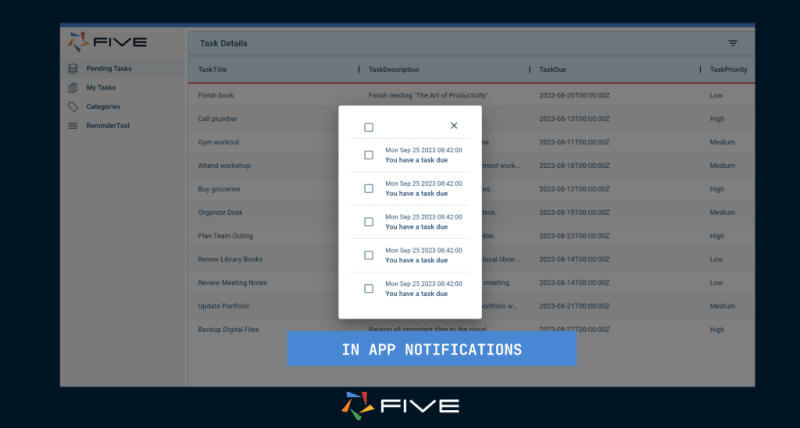
Now we run our application and after 1 minute we get an alert for our notifications in the 🔔icon on the header bar.

Clicking on the bell icon will open up our notifications. (Note: we receive 5 notifications as we have 5 tasks that are due from our Reminder Table).
Congratulations! We have successfully built a simple reminder feature for our Task Management application.
Conclusion
In this Five Lab, we've navigated through the process of automating functions using Jobs in Five. Jobs lets us schedule tasks, so that they run on a regular schedule, such as every minute, every day or every week.
We started by importing a Task Management Template to get a head start and then delved deeper into writing JavaScript functions, focusing on creating a reminder feature. We learned how to define, test, and refine our functions, ensuring they operate as intended, and how to connect them to our database, allowing for seamless interaction and data retrieval.
Moreover, we explored how to schedule our Jobs, allowing us to automate the execution of functions on a recurring basis, enhancing the efficiency and productivity of our application.

Top comments (0)