Github Actions — How to ship code to GCP Cloud Run

Deploying code to production is both time consuming and a delicate process. Getting things wrong might take your service down and eventually might hurt your users and cost you money.
The solution of course is automating as much as possible.
FYI: the blog post assumes basic knowledge in node.js/docker, a GCP account with permissions to deploy code and to create service accounts and a github account.
What is GCP Cloud run?
In the spirit of managed services, Google Cloud provides us with a service called Cloud Run.
Cloud Run is a fully managed compute platform that automatically scales your stateless containers
What can we understand from that sentence?
- Cloud run is a managed service
- Cloud run is for running containers
- It scales automagiclly
- It is designed for stateless services
So basically, anyone in need for running containers can benefit from using cloud run.
We want to run containers!
We can wrap our code in a container, docker for example, push it to GCP’s container registry (or another registry if we want) and use the gcloud cli tool to deploy it to cloud run or do some updates from the gcp console website.
But, that’s a repetitive process, it’s human error prone, and it consumes time. A wonderful oppourtonity for automatation.
There are many CI/CD tools on the market, in this post we’ll focus on the kind of newish Github Actions
What are Github Actions?
GitHub Actions makes it easy to automate all your software workflows, now with world-class CI/CD. Build, test, and deploy your code right from GitHub
Github Actions give us the capability to automate processes, so we can program what we want to do and know that it repeats itself exactly the same when we need it.
An action is basically a yaml file describing a series of instructions (called steps). Each step can be another action. I’m no going to go any deeper, documentation can be found here https://help.github.com/en/actions/getting-started-with-github-actions/core-concepts-for-github-actions
One key point is: Github provides an action’s marketplace, meaning we probably won’t have to invent the wheel unless we’re doing really bleeding edge stuff. The marketplace can be found here: https://github.com/marketplace?type=actions
Alright, What’s the plan?
We’re going to follow the next steps:
- Create a new Github repo
- Create a super simple node.js server
- Create the matching Dockerfile so we can containerize the server
- Create Github action yaml to actually build the container and deploy it to cloud run
- Create a service account
- Give the service account powers to act
- Update Github secrets
- Commit code and watch the magic happen
Full code can be found here: https://github.com/efiShtain/github-action-cloud-run
Create a new Github repo
If you already have a repo you’re working on, skip this step. Otherwise, go to Github.com, log in to your account a create a new repo, name it what ever you like and clone it to your drive
Create a super simple node.js server
Run the following commands in the repo directory:
// Initialize an npm package
npm init -y

// create source file directory
mkdir src

// create the application server entry point file
touch src/index.js

// vi to src/index.js or edit it how over you like and add the following code to it

const http = require('http');

function requestHandler(req, res) {
    res.write('ok');
    res.end();
}

const server = http.createServer(requestHandler);
const port = process.env.PORT || 8888;
server.listen(port, () => console.log(`listening on port ${port}`));
Create the matching Dockerfile
// create the docker file
touch Dockerfile

// Add the follwing lines to Dockerfile
FROM node:alpine
WORKDIR /usr/app/src
COPY package\*.json ./

RUN npm install --production

COPY src .

CMD ["node", "index.js"]
Create Github action yaml to actually build the container and deploy it to cloud run
Go to:
GoogleCloudPlatform/github-actions
This is the Google cloud platform official cloud run example for github actions. Create the exact same file in your local repo under .github/workflows/cloud-run.yml
We won’t deep dive to the file structure, let’s focus only on few points:
PROJECT\_ID: ${{ secrets.RUN\_PROJECT }}
That is the project id we’re going to use in gcp. To find your project id, go to https://console.cloud.google.com/. Log in if you need to, and open the projects list from the top left menu. In the modal window, you’ll see the list of your projects, their names and ids.
RUN\_REGION: us-central1
SERVICE\_NAME: helloworld-nodejs
You can control the service name and which region it is going to run.
service\_account\_email: ${{ secrets.SA\_EMAIL }} service\_account\_key: ${{ secrets.GOOGLE\_APPLICATION\_CREDENTIALS}}
We need to provide a service account and credentials so github can control our GCP project.
THIS IS VERY DANGEROUS AND IMPORTANT!!! RESTRICT AS MUCH ACCESS AS POSSIBLE FROM ANY SERVICE ACCOUNT
Go over the file if you want to see the rest of the stuff that’s going on, but it is fairly basic and does exactly what we described in the manual part.
Create a service account and update github secrets
Go to your GCP project console-> IAM & Admin-> Service account (https://console.cloud.google.com/iam-admin/serviceaccounts)
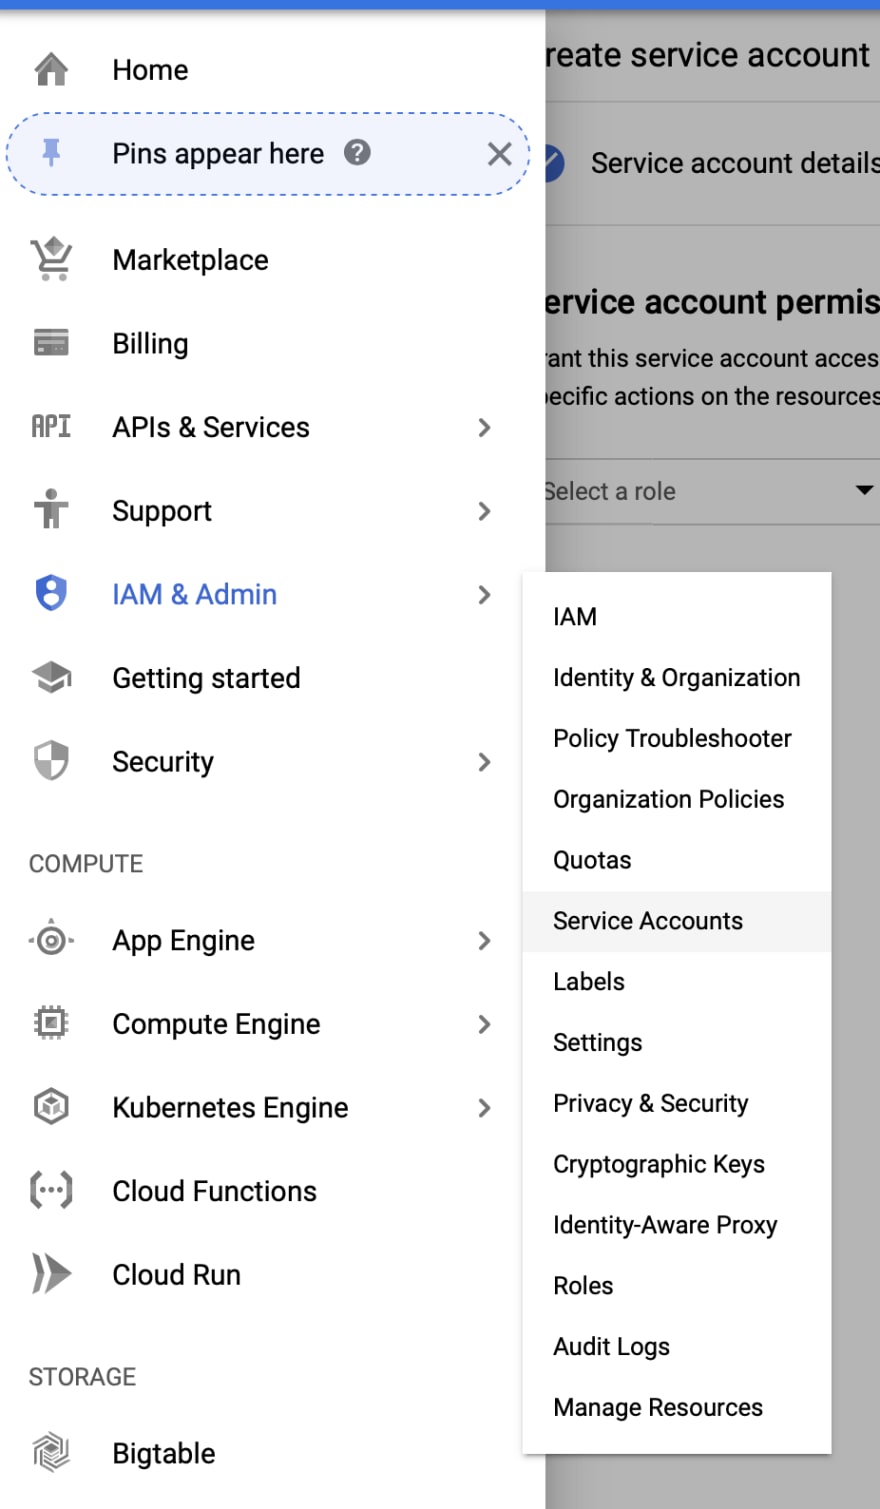
Click on Create Service Account

Fill in service account name, i.e. github-action, and a description

Click Create, and continue and done in the following two screens. You should now see your service account created successfully.

If you remember, we had three secrets in the cloud-run.yml file:
secrets.RUN\_PROJECET
secrets.GOOGLE\_APPLICATION\_CREDENTIALS
secrets.SA\_EMAIL
The SA_EMAIL is: github-action@…iam.gserviceaccount.com
To get the GOOGLE_APPLICATION_CREDENTIALS, click on the right menu and select create key
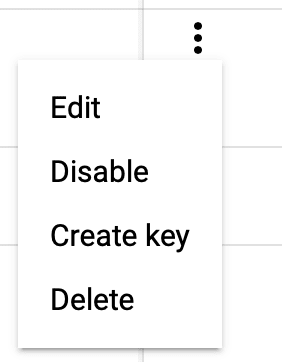
The following window will show:

Make sure you leave JSON selected and click create. A JSON file will be downloaded to you computer. Any one who has that file has the service account permissions to do what ever he wants. keep it safe, surely not as part of your repository.
The final step, it to base64 the content of the JSON file. On a mac you can use the following in terminal:
cat {PATH\_TO\_DOWNLOADED\_JSON\_FILE} | base64
Save the result, we will use it soon.
Make sure the service account can do what it needs to do
Our service account is worthless right now, it has no roles and it can’t do anything. Let’s give it some powers.
Go to the IAM pages, click Add and write the service account name we just created in the “new member” field — it should auto complete. Add the following roles to the service account:
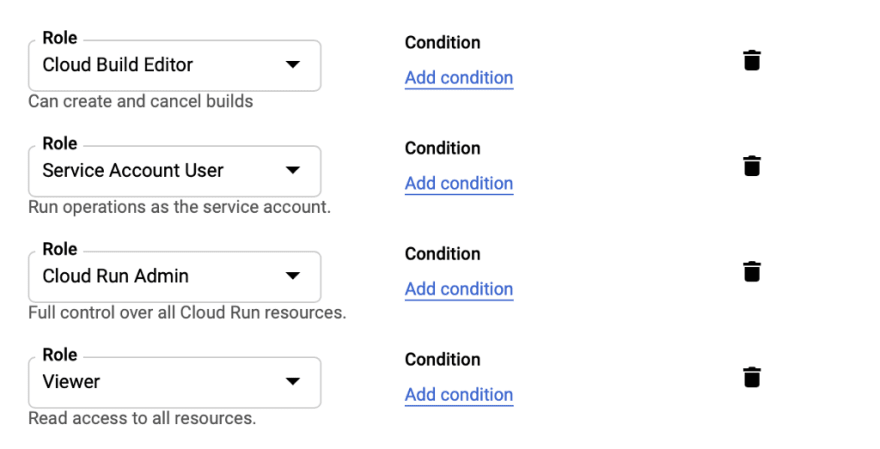
- Cloud builder — allow the service account to build and submit images
- Service account user — allow the service account to act as the service
- Cloud run admin — allow the service to deploy and start containers
- Viewer on the project — allow the service account to list storage objects and use them (this is where our container data is stored)
Update Github secrets
Alright, we’re done with GCP, Open your repo in Github’s website. Go to settings and select the secret tab

Add 3 secrets to the repo:
RUN\_PROJECT - project id
GOOGLE\_APPLICATION\_CREDENTIALS - service account credentials, in base64 format
SA\_EMAIL - the service account email
Commit code and watch the magic happen
That’s it! we’re fully set! you can commit your code and let github do the work. Go to the actions page, there you would see what is going on. Here is an example from some of my playground using github actions.

Conclusion
This was kind of a long process, But you only have to do it once, and i tried to describe the hard parts in details.
You now have a fully functioning Github Action which deploys a cloud run container and hides all the delicate repetitive tasks so you can focus on coding.
With that said, this is only touching the ice tip. This solution is not fully production ready as there are more things to consider like handling failures, rollbacks, canary testing, unit testing and so on.
Let me know if I have made any mistakes or if you can think of a better/easier way of doing the same

Top comments (0)