

Azure is a cloud computing service that lets developers and DevOps engineers effortlessly and efficiently deploy and maintain web servers or applications. It offers amazing advantages like scalability, reliability, and security on the deployed web apps or servers.
Django is the most popular Python backend framework for rapid web development. Django allows you to create backend servers, full-stack online apps, or websites, as well as perform AI or machine learning tasks.
This step-by-step guide will walk you through the process of Azure Django deployment, understanding the deployment workflow, and enabling continuous deployment for a seamless development workflow for you.
Let's delve into the details and unlock the potential of Azure for your Django projects!
Prerequisites
Now that you've understood the significance of Azure, here are certain prerequisites to ensure that you follow this instructional guide correctly.
- Have an account on Azure.
- You should have a Django app ready for deployment.
- You must have a GitHub account.
Configuring Azure for Django Deployment
This section will walk you through the steps of creating a web app on Azure to host your Django web app or web server.
- Login to your Azure portal and click App Services.
The app services are designed to host websites, web applications, API endpoints, and backend frameworks for web development.

- Click Create on the next screen to add an app service to your Azure account. To select which app service to deploy, a dropdown menu will appear.
Because you are deploying a web server that will require a database, select Web App + Database.

- Select subscriptions and resource groups, leave the region as it is, and define your web app details. If you don't already have a Resource group, click Create new.
Depending on the needs of your project, you can utilize Python 3.10 or 3.11. This guide uses Python 3.10.

- Define your database details.
- Use the suggested engine if this is your first time using Azure and it is a hobby project.
- The other details have been pre-defined based on your web app details.
- This guide will be focused on deploying a basic app therefore there will be no need to use the Azure Redis service.
- Choose a hosting package based on your demands, such as a hobby project or a production project.
- Select Review + Create to create the app service and database for your Django app.

- On the following screen, you should be able to review the details of your web app and database. After you've double-checked that all of the information is correct, click Create.
Scroll to Database(new) and save the credentials as you will be using these to set up a PostgreSQL database on your Django project.

- Your deployed app should look like this. With this, you can search and connect your Django project to the created app service.

Using Azure to Deploy Django App
This section will show you how to deploy your Django application from your local machine to your newly formed Azure hosting service.
You've now configured your Azure account for deployment. It's time to make your Django project public.
- Start by installing Psycopg, a PostgreSQL database adapter, first. This is used to link a PostgreSQL database server to a Django project, and install Whitenoise, it allows you to render static files on a server.
pip install psycopg2 whitenoise
- Make changes to settings.py before deployment. You would need to add the whitenoise middleware, your azure web app URL to the trusted CRSF and authorized host lists, make sure that static files have a storage location, and make use of the whitenoise middleware to render them.
# Define ALLOWED_HOST
ALLOWED_HOSTS = ['name-of-web-app.azurewebsites.net', '127.0.0.1']

# Modify Middleware
MIDDLEWARE = [
 'django.middleware.security.SecurityMiddleware',
 'whitenoise.middleware.WhiteNoiseMiddleware',
 # new
 'django.contrib.sessions.middleware.SessionMiddleware',
 'django.middleware.common.CommonMiddleware',
 'django.middleware.csrf.CsrfViewMiddleware',
 "corsheaders.middleware.CorsMiddleware",
 "django.middleware.common.CommonMiddleware",
 'django.contrib.auth.middleware.AuthenticationMiddleware',
 'django.contrib.messages.middleware.MessageMiddleware',
 'django.middleware.clickjacking.XFrameOptionsMiddleware',
]

# Update Staticfiles directory
STATIC_URL = 'static/'
STATIC_ROOT = os.path.join(BASE_DIR, 'static')
STATICFILES_STORAGE = 'whitenoise.storage.CompressedManifestStaticFilesStorage'

# Add azure web app as trusted CRSF
CRSF_TRUSTED_ORIGINS = ["fintech-app.azurewebsites.net"]
- Update your requirements.txt or create one if you don’t have one. The requirements.txt file tells Azure which packages must be installed on the cloud area for the app to execute.
pip freeze > requirements.txt
- Create a file, .production. Define a set of commands for Azure to Auto_build your Django app on its cloud.
[config]
SCM_DO_BUILD_DURING_DEPLOYMENT = true
- Create the .gitignore file. Specific files and folders won't be taken into account when pushing to your remote repository by GitHub. By doing this, you can prevent sharing private information or pushing unwanted data.
# Byte-compiled / optimized / DLL files
__pycache__/
*.py[cod]
*$py.class
.vscode/

# C extensions
*.so

# Distribution / packaging
.Python
build/
develop-eggs/
dist/
downloads/
eggs/
.eggs/
lib/
lib64/
parts/
sdist/
var/
wheels/
pip-wheel-metadata/
share/python-wheels/
*.egg-info/
.installed.cfg
*.egg
MANIFEST

# PyInstaller
#  Usually these files are written by a python script from a template
#  before PyInstaller builds the exe, so as to inject date/other infos into it.
*.manifest
*.spec

# Installer logs
pip-log.txt
pip-delete-this-directory.txt

# Unit test / coverage reports
htmlcov/
.tox/
.nox/
.coverage
.coverage.*
.cache
nosetests.xml
coverage.xml
*.cover
*.py,cover
.hypothesis/
.pytest_cache/

# Translations
*.mo
*.pot

# Django stuff:
*.log
local_settings.py
db.sqlite3
db.sqlite3-journal

# Flask stuff:
instance/
.webassets-cache

# Scrapy stuff:
.scrapy

# Sphinx documentation
docs/_build/

# PyBuilder
target/

# Jupyter Notebook
.ipynb_checkpoints

# IPython
profile_default/
ipython_config.py

# pyenv
.python-version

# pipenv
#   According to pypa/pipenv#598, it is recommended to include Pipfile.lock in version control.
#   However, in case of collaboration, if having platform-specific dependencies or dependencies
#   having no cross-platform support, pipenv may install dependencies that don't work, or not
#   install all needed dependencies.
#Pipfile.lock

# PEP 582; used by e.g. github.com/David-OConnor/pyflow
__pypackages__/

# Celery stuff
celerybeat-schedule
celerybeat.pid

# SageMath parsed files
*.sage.py

# Environments
myenv/
.env
.venv
env/
venv/
ENV/
env.bak/
venv.bak/

# Spyder project settings
.spyderproject
.spyproject

# Rope project settings
.ropeproject

# mkdocs documentation
/site

# mypy
.mypy_cache/
.dmypy.json
dmypy.json

# Pyre type checker
.pyre/
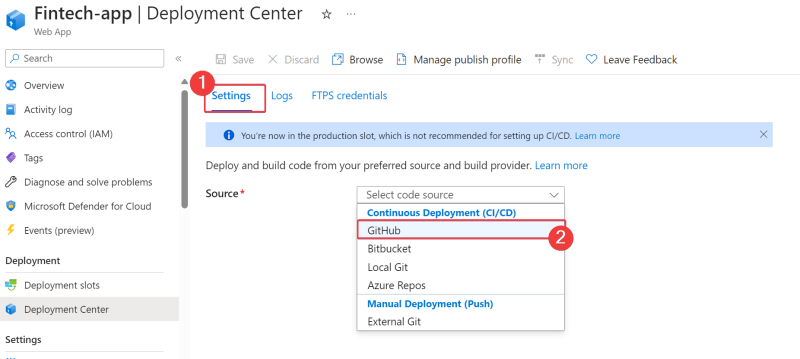
- Once you are done modifying your codebase, go to the Azure portal and choose the app service you just built. The Deployment Center should be located. Here, you can select a build source from options like GitHub, BitBucket or other source methods.

- Select Deployment Center and choose a source under Settings. For the sake of this guide, we’ll use GitHub.
- If this is your first time using Azure, you will be asked to sign in with your GitHub account. To login to your GitHub account, click Authorize.

- Once you authorize your GitHub account, you would need to select an organization, repository and branch that has the codebase you want to deploy.

- Azure would create a YML file that commands for deployment. The .yml file is used to configure CI/CD pipeline for automatic Django deployments and easy building of releases. This helps manage the applications better.
To preview it, click on Preview file under Workflow Configuration. Note: if you defined any workflow yml, it will be overwritten.

- Once you are satisfied with the deployment settings, click Save to set up the deployment on GitHub actions.

Once your GitHub Action has been setup, you would be notified.

You can see the yml file on your git remote repo that you set during the deployment process.

- Add an additional code on the yml file to collectstatic file and render them. Do this close to the install dependencies line.
- name: Install dependencies
        run: pip install -r requirements.txt

      - name: Run collectstatic
        run: python manage.py collectstatic
Once done, commit your changes and push to your git repo. The GitHub actions will auto-deploy the codebase to Azure.
- Update your database details and hostname on your Azure. Click on Configuration and select New application setting. Don’t forget to add secret information on your application settings. This is to create a more secure django app.

Define the name and the value and click Ok to set a secret info on your azure cloud.

Now, that’s it! Your Azure Django app is live!

Migrating Database
Once your Azure Django hosting is set up and your project is up and running, you must migrate and update the tables in your database to enable full functionality.
- Select SSH from the Azure portal's Development tool and click Go. With this, you can start a Linux terminal and run Python commands like creating a superuser or migrating a database.

- Run this command to migrate tables based on your existing models in the Django app.

- Use this command to create a superuser to access your django admin.

That’s all! You’ve managed to deploy a Django app on Azure.
Conclusion
This guide has explained how to use Azure for a swift deployment for your Django web apps or servers. Azure is an affordable hosting platform for your hobby project, startup, or even a large scale company with lots of traffic.
Azure app services can be used to deploy any web application; web servers, mobile backends, JSON API endpoints, etc., regardless of what continuous deployment source you are using; GitHub, Azure repos, BitBucket, or if you are using a manual deployment source.
Overall, the best way to deploy Django apps is with Azure because of its scalability, security and flexibility. Thanks to this article, your Azure Django deployment should be a smooth process.

Top comments (0)