In the last blog link we created a Flask application on an AWS EC2 instance and built custom data pipelines to interact with Data Engineering tools on AWS. This method of deployment has its own pitfalls, as the entire software development lifecycle which involves the maintenance of code, development of new features, collaboration and versioning is often difficult to handle.
Hence we need to shift to a DevOps approach which helps developers create end to end pipelines from development to testing to production which can deal with collaborative changes.
In this blog post we will be.
- Creating a Docker image of the Flask Application
- Publishing the image to AWS Container Registry and Running the code in AWS Container Service using AWS Fargate
- Add a Load Balancer for the ECS deployment
- Create an AWS Code Commit repository to push code
- Configure AWS Code Build to build new changes from the Code Commit Repository
- Configure Code Pipeline to automatically run steps 1 to 5 once the new commit is made to the Code Commit Repository
Creating a Docker image of the Flask Application:
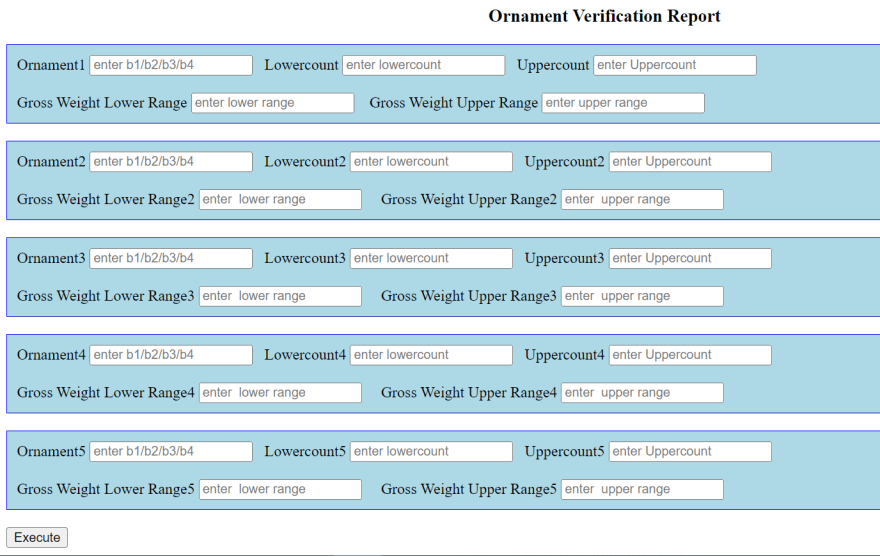
We can create a simple flask application which can interact with AWS as shown in the blog post below.
Using Flask to create custom data pipelines
Once we are successful with the creation of the Flask application on Ec2 instance we then need to add a Dockerfile which is used to create a Docker image from the existing Flask application.
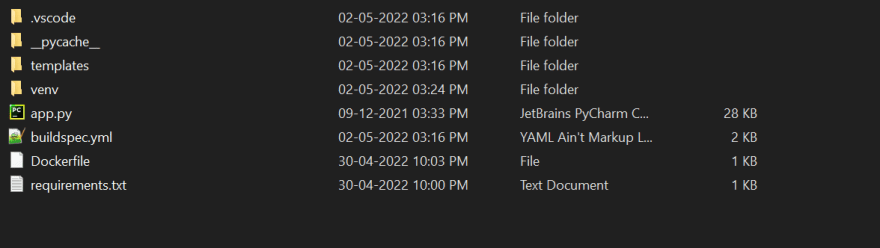
- Create two new files called Dockerfile and requirements.txt in the same parent directory as shown below

-
Create the requirements.txt file which has all the packages to be installed on the Docker Image.
$ cd CLOUDAUDIT_DATA_WRANGLER
$ nano requirements.txt
Then Add the two package inside the file
Flask
awswrangler
Here we don't a specify the version and this ensures that the latest version of the packages get installed.
-
Add the following lines into the Dockerfile.
# syntax=docker/dockerfile:1

FROM python:3.8-slim-buster

WORKDIR /python-docker

COPY requirements.txt requirements.txt

RUN pip3 install -r requirements.txt

COPY . .

CMD [ "python3", "-m" , "flask", "run", "--host=0.0.0.0"]
The first line (# syntax=docker/dockerfile:1) tells what is the syntax to be used while parsing the Dockerfile and the location of the Docker Syntax file
The second line (FROM python:3.8-slim-buster) allows us to use an already existing base image for Docker.
The third line (WORKDIR /python-docker) tells docker which directory to use.
The fourth and fifth lines tells Docker to copy the contents of requirements.txt into a container image's requirements.txt file and then run the pip install command for all the packages and dependencies.
The sixth line (COPY . .) tells Docker to copy the remainder of the folders to be copied into Dockers container.
The last line with (-m) indicates to run the Flask app as a module and to make the container accessible to the browser.
Building the Docker Image:
When we run the command as shown below, it builds a container with the name python-docker. This can then be pushed to our Container Registry on AWS.
$ docker build --tag python-docker .

$ docker run -d -p 5000:5000 python-docker
Here "-d" will run it in detached mode and "-p" will expose the specific port.
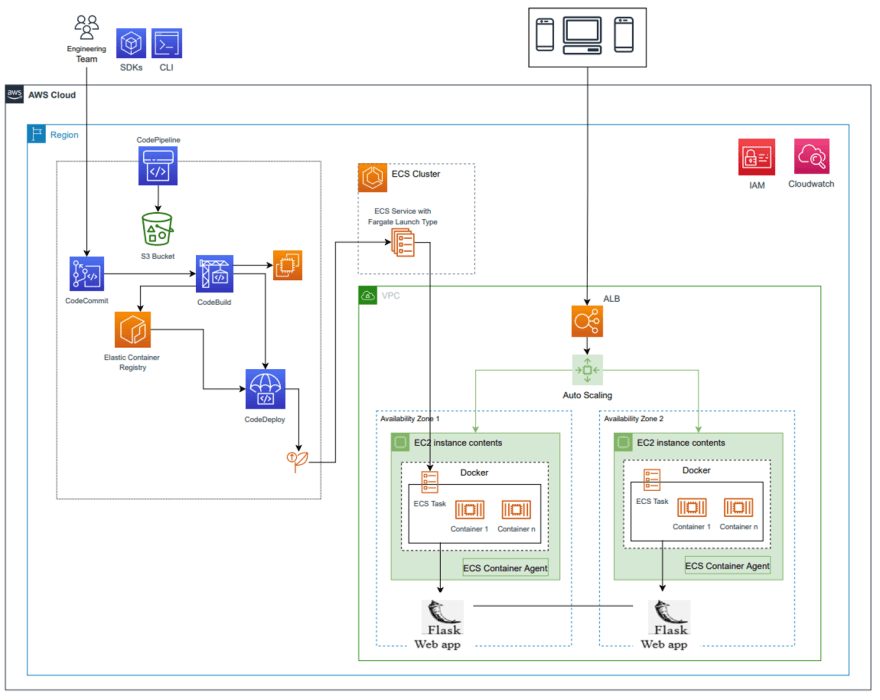
Publishing the image to AWS Container Registry and Running the code in AWS Container Service using AWS Fargate
We will be using AWS Fargate which is a serverless compute engine for Amazon ECS that runs containers without the headache of managing the infrastructure.
- Open the AWS console and then search for ECR
- Click on Get Started and then Create Repository


Here the repository name is flask-app
- Now click on push commands as shown in the screenshot shown below.
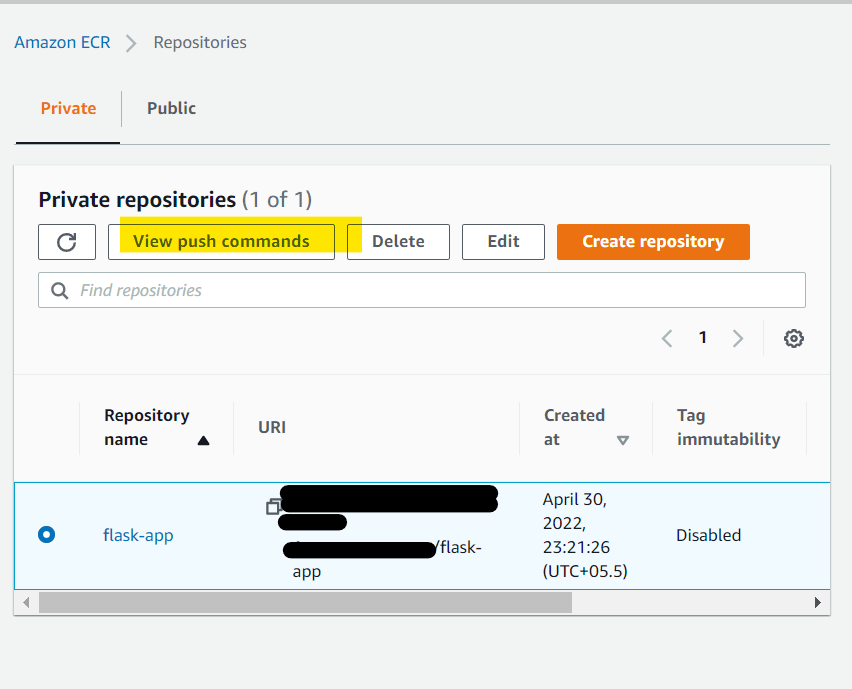
We have a list of commands that we need to run on our Ec2 instance which will push the docker image to ECR.
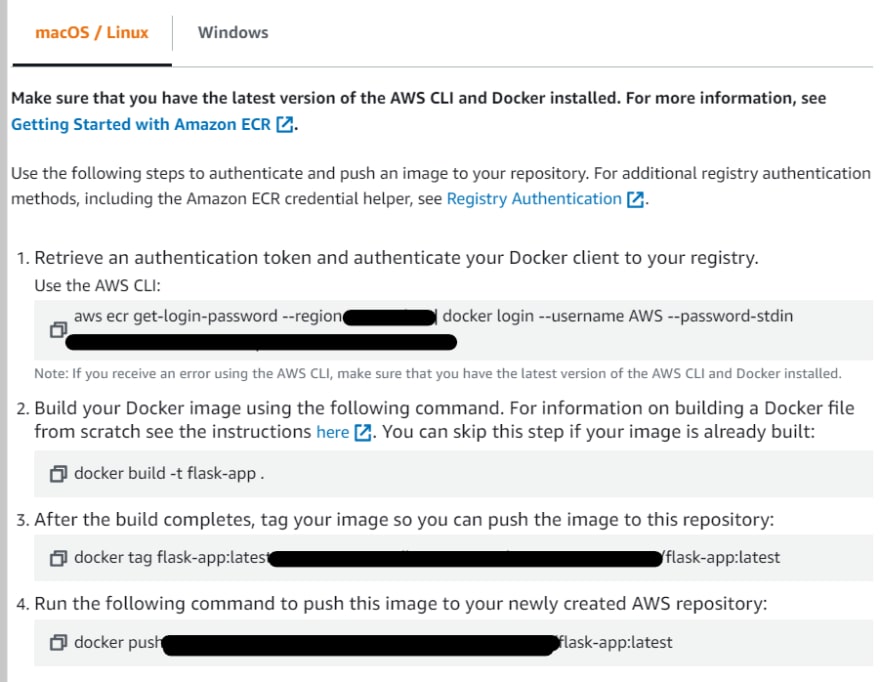
For Command 1 we need to attach a policy for the Ec2 instance to get the necessary permissions to authenticate with the ECR.
The links below show how we can attach a policy to the Ec2 machine.
After we add the permissions we need not run the second command as we have already created the docker image.
Now for command 3 and 4 we need to run :
$ docker tag python-docker:xxxxxxxxxx/flask-app:latest
REPLACE THE XXXXXXXX with the statements from your Console
$docker push xxxxxxxxx/flask-app:latest
REPLACE THE XXXXXXXX with the statements from your Console
Here we are tagging the image python-docker and then pushing the image to ECR with the name as flask-app.
-
Creating a cluster
- Search for ECS on the AWS Console, Click on create a new cluster, give a name and choose the default VPC and the subnets. Then choose AWS Fargate as shown in the image below.

- Then the left pane choose Task Definition

In this give a unique name, Enter flask-app for the name of the container and the URI which can be found in the ECR screenshot as seen below.

For the port mapping choose port 5000 and 80. Then click on next. For the Environment choose Fargate and leave the other defaults as shown below.

Finally Review and click next. This will add the Container in ECR to Fargate.
- Running the Task Definitions:
- As shown in the screenshot below click on on the created Task Definition and click on Run

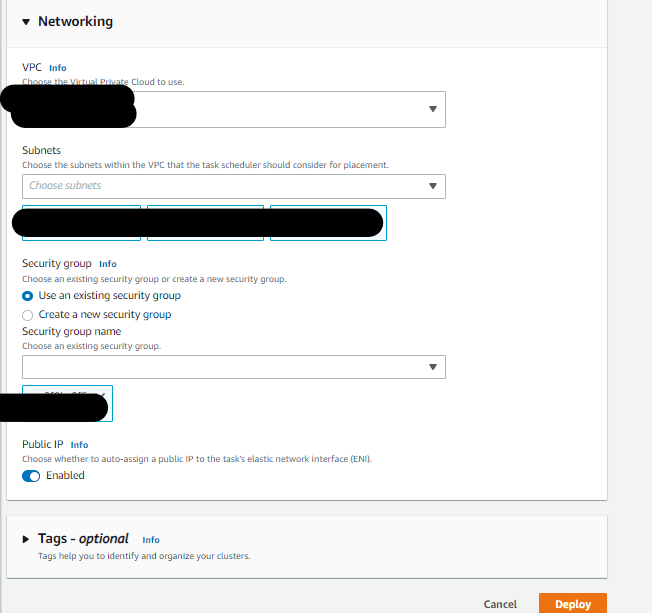
- Choose the Existing Cluster as shown below

- Choose the VPC and Subnet, create a new security group and click on deploy as shown below.
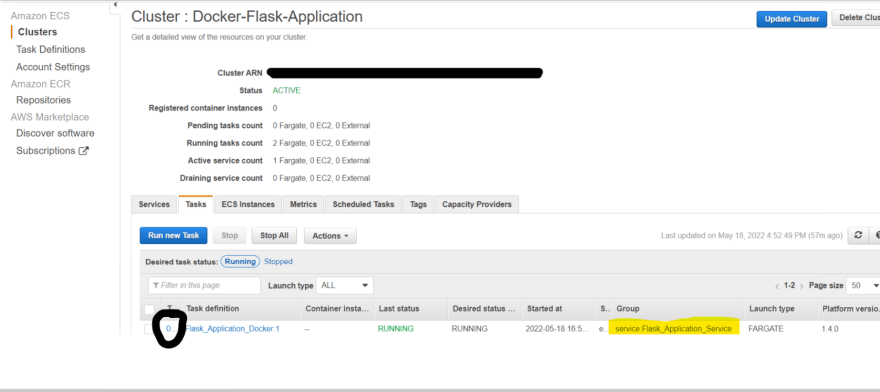
- Navigate back to Clusters on the left then click on the cluster which has been created. Then Click on Tasks to get the ENI which has been shown in Black in the image below.

- Click on ENI and also make note of the public IP address as shown below.

- Click on security Group and Edit the inbound port rules to allow traffic from Port 5000 and 80 as shown below.


- Once this is done Enter the PUBLIC IP from the ENI and the port 5000
Eg: http://publicIP:5000 in the URL and once this is entered YOU HAVE SUCCESFULLY LAUNCHED A DOCKER IMAGE ON THE ELASTIC CONTAINER SERVICE !!
Add a Load Balancer for the ECS deployment:
Open the EC2 Console and then choose the application load balancer as shown below.

Make sure to shift to the OLD AWS CONSOLE while doing this step as it will help to follow with the same steps as shown below.

Choose Application Load Balancer and click Create
Next, Configure it by giving a name and select the VPC and availability zones

Click Next, select Create a new security group and then click Next
Give a name to Target group, for Target type select IP and then click Next

Click Next, Review it and click Create
Once created note down the DNS name, which is the public address for the service
Creating a Fargate Service:
We will use the same task definition to create a Fargate Service
- Go to Task Definitions in Amazon ECS, tick the radio button corresponding to the existing Task definition and click Actions and Create Service.

- Choose Fargate as launch type, give it a name, do not change the Deployment type (Rolling update), and click Next.

Choose the subnets that we have configured in the load balancer

Choose Application load balancer for the load balancer type, and then click Add to load balancer

Select the Target group name that we have created in the Application load balancer and then click Next, Review it and then click Create Service.
Now we need to configure the Application load balancer security group that we have created earlier, go to the created Application load balancer and click on security groups and then click Edit inbound rules and add a Custom TCP rule with port 5000, as this is the internal port our application is configured in the flask application
Now, we can check our application is running by visiting the load balancer DNS name in a browser
It will most probably not run and there are very few guides to trouble shoot this issue. The Root cause for this is as follows:
Flow of the application before adding the load balancer:
Client -> URL -> Public IP of Fargate(port 5000 and 80 is opened to a specific IP) -> Response
Once we add the new load balancer and open the ports
Client -> URL -> Load Balancer -> Public IP of Fargate(Only port 5000 and 80 is opened to a specific IP) (PORT IS NOT OPENED TO THE LOAD BALANCER SECURITY GROUP)-> Response (As port 5000 is opened for the Security Grp)
Hence this can be seen in the documentation as shown below

To trouble shoot this issue, we need to OPEN PORT for the newly created Security Grp which is attached to the load balancer.
- Open ECS and select your cluster which contains the newly created service as shown below.
- Click on the Task and go to the ENI as shown below

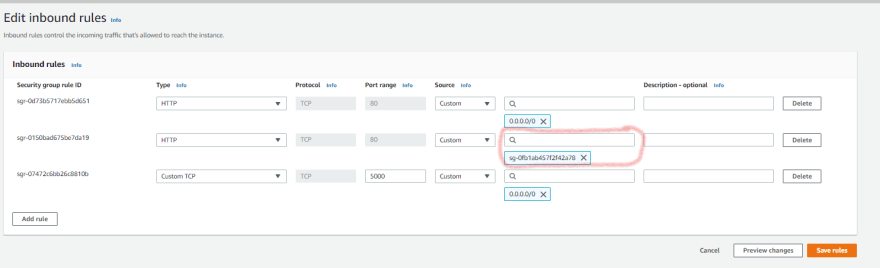
- Edit the Inbound rules and add the Security Grp which was given to the load-balancer as shown below and also open port 5000
Now if we open the open the load balancer page and check the DNS address in our browser we should be getting the FLASK APPLICATION.
Hurray we have successfully deployed the application on ECS and added a load balancer !!
Another way to know if the application is running successfully is to check the load balancer Target GROUP
Open the Ec2 console, navigate to load balancer and then check the TARGET GRP, if it is showing Unhealthy or Draining refer to the links below, it will most probably be the Inbound port rules which have not been opened !. In the screenshot shown below, we can see that it shows that the instance is healthy

- If we are still getting any 504, or 503 errors refer to the links below:
Create an AWS Code Commit repository to push code:
Open the AWS console and search for CodeCommit, click on create a new Repository and give it a name and a description as shown in the image below.

Add a new file called buildspec.yml in the parent directory.
- Now our application folder structure will look as per the screenshot shown below.
- This file contains the commands which can be used to compile, test and package code.
ADD A BUILD SPEC FILE and push this repo to git.

Download and change according to the image above
We can see that the "image.json" is an artifact file which contains the container name and the image URI of the container pushed to ECR. We then use these in CodePipeline.
artifacts are created from the container name which is created earlier in EC2 which is flask-app
Since this file is a Yaml file we need to check spacing and make sure we follow the right number of tabs and spaces.
Once the repository is created we need to add specific permission and create Git credentials to access the CodeCommit repository.
Go to the IAM console, choose Users and select which User you want to configure for CodeCommit, and attach AWSCodeCommitPowerUser policy from the policies list and Review and then click Add Permission.

- Configure Git using the blog post below:
- Follow the documentation below to Add Git Credentials for the AWS account. Once this is added, open the repository created in Code Commit and then run the following commands.
CD into your repository and run the commands as shown
- Add the files in your new local repository. This stages them for the first commit.
$ git init
- Commit the files that you've staged in your local repository.
$ git add .
$ git commit -m "First commit"
At the top of your GitHub repository's Quick Setup page, click to copy the remote repository URL.
In the Command prompt, add the URL for the remote repository where your local repository will be pushed.
- Sets the new remote
$ git remote add origin
Refer to the screenshot below to find the URL:

- Verifies the new remote URL
$ git remote -v
- Push the changes to the master branch
$ git push origin master
Configure Code Pipeline to automatically run steps 1 to 5 once the new commit is made to the Code Commit Repository:
We can then use Code Pipeline to configure builds from CodeCommit to the ECR which will inturn run the image on ECS.
1.Go to CodePipeline and click on GetStarted
Choose the Service, Repo and the Click on Next. Select the Repo name and Create a new service Role as shown below

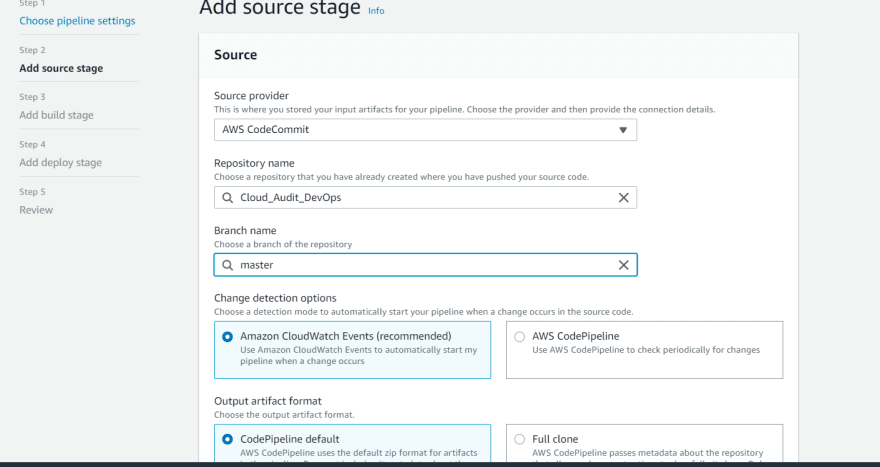
2.Choose the Source as AWS code Commit and Repo name from the dropdown. Then Choose the Master branch and click on Next
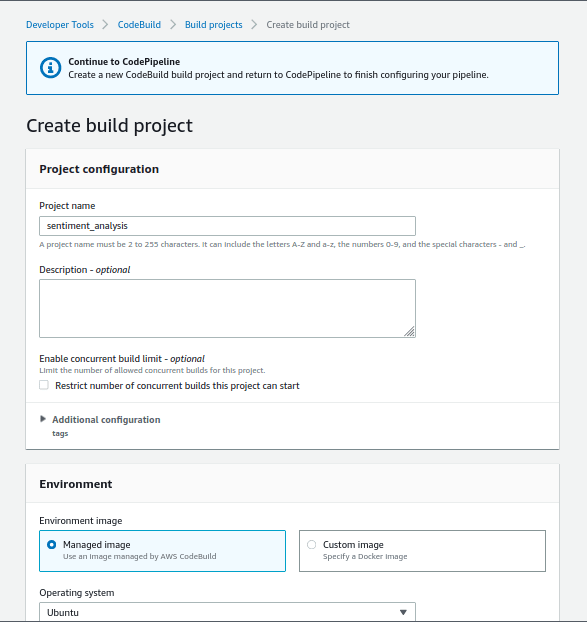
3.Next, for the build provider select CodeBuild and create a new build project, give it a name and configure it as follows
Make sure to Check the box: Privileged and make sure that the new service role is created and the Ec2 permission is added as shown below.

4.It will create a New service role, to which we have to add ECRContainerBuilds permission. For that, open the IAM console in a new tab, go to Roles and search and select the above-created role, and click Attach policies. Search for ECR and select the policy as below and click Attach policy

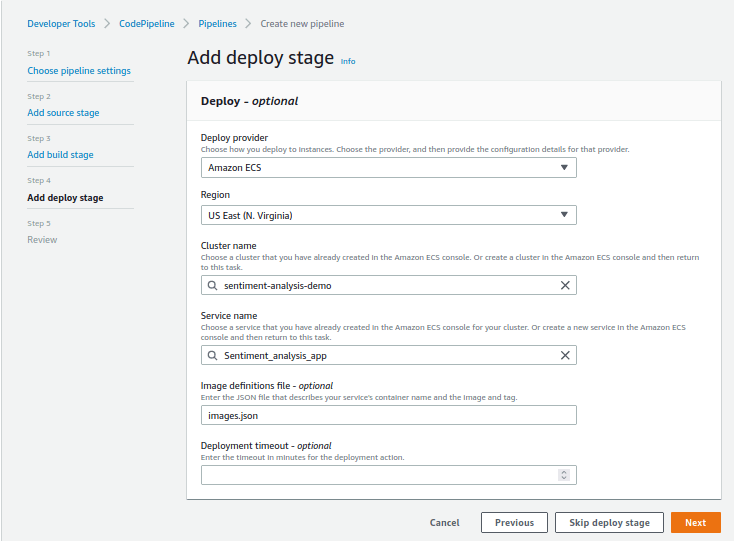
For Deploy provider, select Amazon ECS, cluster, and service name. Also, add the name of the image definitions file as ‘images.json’ that we will create during the build process
Here choose the name from the dropdown and ignore the names from the images below.
Once all the configurations are you should have something like this:

You can then make changes in the code push the commit to the repository and the pipeline will run and deploy the Latest changes to ECR via the DevOps Pipeline.
If you do, You yyess, You have implemented have implemented a cloud native DevOps scalable pipeline for Machine Learning and DataEngineering .
Don't forget to leave a Like, Share and Comment !!!!!
References:

Top comments (0)