
APIs are the backbone of modern applications, powering everything from user authentication to pulling in complex data. We understand that there’s no harm in making API calls individually, if you've got, say, 5 requests bundled in a collection. But if you have 10, 50, or more API endpoints to test, verify responses, and ensure everything works across environments, then, mate, the entire process becomes not only inefficient and insanely tedious but also prone to human error.
The Collection Runner takes that burden off your shoulders by automating API testing for entire collection, eliminating repetitive tasks, ensuring consistency, and saving you hours of debugging headaches. In this blog, we'll break down exactly how it works. We’ll walk you through the different variations of Hoppscotch’s Collection Runner, so you can easily figure out which one to choose based on your specific needs.
Meet Hoppscotch 👽
Hoppscotch is an open-source and self-hostable platform, that makes API development, testing, debugging, and documenting a walk in the park. It’s designed to work directly in your browser with no installations, no complex setups, and no account required. Just jump into hoppscotch.io, craft your requests, and you're good to go.
Collection Runner ▶️
At Hoppscotch, we’re obsessed with making API testing fast, easy, and, dare we say, ✨ fun ✨. The Collection Runner for it is your ultimate hack. Instead of slogging through individual requests, you just set it up once, hit run, and watch as your entire collection is executed in sequence, validated, and reported back to you in seconds. It’s like putting your API tests on autopilot.
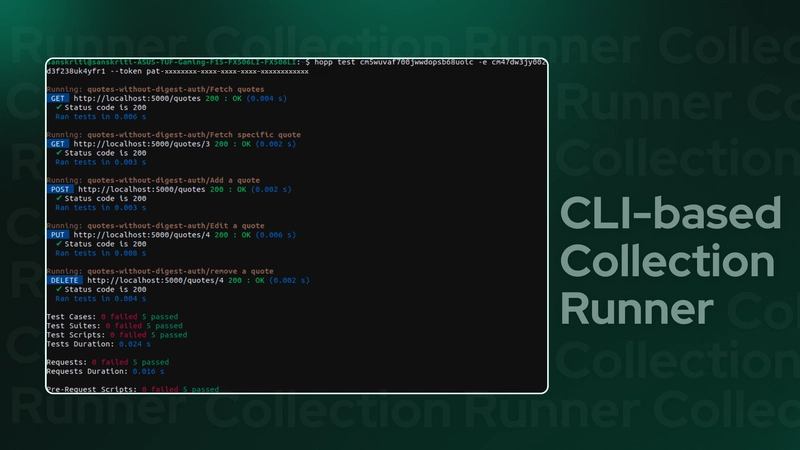
📟 Hoppscotch CLI-based Collection Runner
The CLI Edition of Hoppscotch works as a powerhouse for developers who prefer working in the terminal. If you’re the type who prefers working from the command line, this is your ticket to get started. All you need to do is check the prerequisites based on your system setup, verify your Node version ( v20+ ), and install the latest version of Hoppscotch CLI with this simple command:
npm i -g @hoppscotch/cli
Once you've got your app’s server up and running, head over to the REST API section of Hoppscotch, create a collection for your app’s APIs, and set up an environment if needed. Now, here’s where things get cool. You’ve got two ways to run your collection with the Hoppscotch CLI:
➡️ Using JSON Exports: Export your collection and associated environment in JSON format and pass it alongside the hopp test command to get the test summary:
hopp test [-e <environment file>] <hoppscotch collection file>
➡️ Using IDs: If you don't want to download any files locally, you can use this method. Every time you create a collection or environment, Hoppscotch assigns them unique IDs. You can run tests using these IDs through the CLI. To connect your instance account(Self-hosted or Cloud) with Hoppscotch CLI, you'll also need a personal access token. And if you're using a self-hosted instance of Hoppscotch, don’t forget to throw in the server URL as well:
hopp test [-e <environment id>] <hoppscotch collection id> [--token <access_token>] [--server <server url>]
Hoppscotch CLI-based Collection Runner fits right into your workflow if you are looking for:
✅ Automate API testing and integrate CLI with automated processes, ensuring that your APIs are tested as part of your build and deployment pipeline. (Checkout this blog to learn end-to-end about this).
✅ Generate JUnit reports of the test summary for structured test result tracking.
✅ Run large-scale test suites without the hassle of manually triggering each request.
✅ Run tests in different environments by simply referencing environment variables and configurations in your command line.
✅ Test against self-hosted instances of Hoppscotch, giving you full control over the testing process while keeping things secure.
✅ Scale your tests easily across multiple endpoints and use cases, enabling more comprehensive API validation in less time.
✅ Quickly debug APIs by running test collections with real-time results, assuring that your application runs smoothly after every update.
✅ Execute tests easily on remote servers, making it ideal for testing APIs across distributed systems or cloud environments.
✅ Trigger tests based on specific conditions, allowing you to run tests only when certain criteria are met (e.g., after new commits, or after a particular stage in your deployment process).
Refer to the documentation for a complete overview of Hoppscotch CLI and how it operates. Plus, watch the video attached below to know how to run a collection using Hoppsoctch CLI.
🌐 Hoppscotch Web-based Collection Runner
The GUI Edition of the Collection Runner is perfect for those moments when you want to visually manage your tests without the hassle of extra setup. It’s super convenient, especially when you want to generate a test summary side by side while working on your collection. All you need to do is pick your collection, set up your environment, and let the runner take care of the rest.
Once you hover over your collection, you’ll spot the Runner icon, which opens up a variety of configurations for you to tweak, including:
➡️ Delay: Set an interval delay (in milliseconds) between each request in your collection run.
➡️ Stop Run if Error Occurs: If any error pops up in a script or there’s an issue sending a request, the entire run stops, so no messy situations here.
➡️ Persist Responses: Log response headers and bodies for later review. (Keep in mind, this may slow things down if you’ve got a huge collection.)
➡️ Keep Variable Values: Save the variables used during the run. Any updates made to the variables will stick after the run finishes.
Once you're ready, click Run, a new tab opens showing the test results and execution details. You can dig deeper into any passed or failed test case to troubleshoot or just bask in the glory of a successful run.

The Web-based Collection Runner is just what you need when you want to:
✅ Quickly run tests without worrying about the setup or complex configurations.
✅ Track your tests visually with a real-time summary of each request and its results.
✅ Review and debug results with easy access to test case details in case something fails.
✅ Execute tests in an interactive environment, ideal for manual verification or smaller-scale testing.
To learn how to use the GUI edition of the Collection Runner, check out this video to understand the run settings and analyze the runner results.
That wraps up our blog for today! We hope this quick overview helped you figure out which Collection Runner is the right fit for your needs. Go ahead and give both editions a try, and let us know which one you prefer.
We're truly grateful for your continued support of Hoppscotch over the years. We're on a mission to make Hoppscotch the best suite for API development, testing, documentation, and more. Stay tuned to Hoppscotch X and LinkedIn for the latest updates. If you have any feedback or suggestions, drop us a line at hello@hoppscotch.io, or create an issue or discussion on our GitHub repository 💚.

Top comments (1)
Do we have an option to print the response data of the api in console in hopscotch CLI?