Here's your how to guide to set up, manage and monitor Spark on k8s
In this post we’d like to expand on that presentation and talk to you about:
- What is Kubernetes?
- Why run Spark on Kubernetes?
- Getting started with Spark on Kubernetes
- Optimizing performance and cost
- Monitoring your Spark applications on Kubernetes
- The future of Spark on Kubernetes
If you’re already familiar with k8s and why Spark on Kubernetes might be a fit for you, feel free to skip the first couple of sections and get straight to the meat of the post!
What is Kubernetes (k8s)?
Kubernetes (also known as Kube or k8s) is an open-source container orchestration system initially developed at Google, open-sourced in 2014 and maintained by the Cloud Native Computing Foundation. Kubernetes is used to automate deployment, scaling and management of containerized apps - most commonly Docker containers.
It offers many features critical to stability, security, performance, and scalability, like:
- Horizontal Scalability
- Automated Rollouts & Rollbacks
- Load Balancing
- Secrets & Config Management
- ...and many more
Kubernetes has become the standard for infrastructure management in the traditional software development world. But Kubernetes isn’t as popular in the big data scene which is too often stuck with older technologies like Hadoop YARN. Until Spark-on-Kubernetes joined the game!
Why Spark on Kubernetes?
When support for natively running Spark on Kubernetes was added in Apache Spark 2.3, many companies decided to switch to it. The main reasons for this popularity include:
- Native containerization and Docker support.
- The ability to run Spark applications in full isolation of each other (e.g. on different Spark versions) while enjoying the cost-efficiency of a shared infrastructure.
- Unifying your entire tech infrastructure under a single cloud agnostic tool (if you already use Kubernetes for your non-Spark workloads).
On top of this, there is no setup penalty for running on Kubernetes compared to YARN (as shown by benchmarks, and Spark 3.0 brought many additional improvements to Spark-on-Kubernetes like support for dynamic allocation.
Read our previous post on the Pros and Cons of Running Spark on Kubernetes for more details on this topic and comparison with main alternatives.
Getting Started with Spark on Kubernetes
Architecture: What happens when you submit a Spark app to Kubernetes
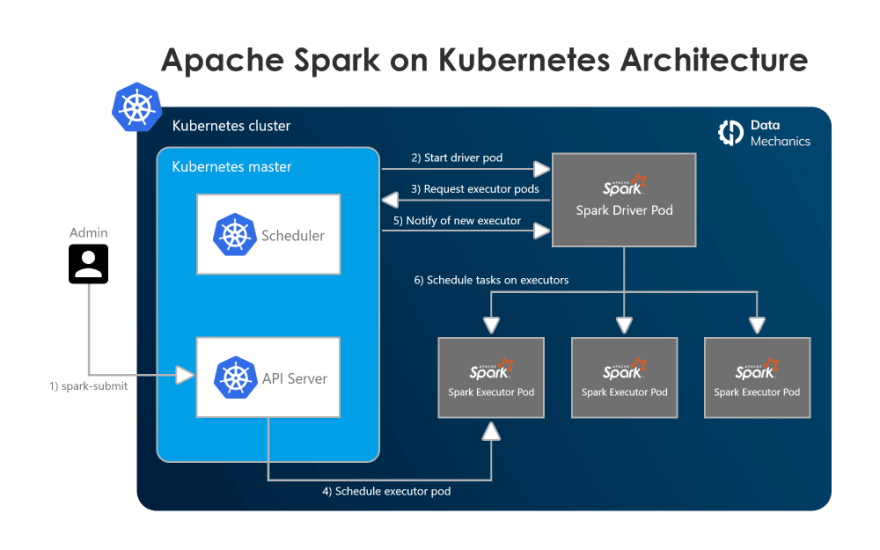
You submit a Spark application by talking directly to Kubernetes (precisely to the Kubernetes API server on the master node) which will then schedule a pod (simply put, a container) for the Spark driver. Once the Spark driver is up, it will communicate directly with Kubernetes to request Spark executors, which will also be scheduled on pods (one pod per executor). If dynamic allocation is enabled the number of Spark executors dynamically evolves based on load, otherwise it’s a static number.
How to submit applications: spark-submit vs spark-operator
This is a high-level choice you need to do early on. There are two ways to submit Spark applications to Kubernetes:
- Using the spark-submit method which is bundled with Spark. Further operations on the Spark app will need to interact directly with Kubernetes pod objects
- Using the spark-operator. This project was developed (and open-sourced) by GCP, but it works everywhere. It requires running a (single) pod on the cluster, but will turn Spark applications into custom Kubernetes resources which can be defined, configured and described like other Kubernetes objects. It adds other niceties like support for mounting ConfigMaps and Volumes directly from your Spark app configuration.
We recommend working with the spark-operator as it’s much more easy-to-use!
Setup Checklist
The steps below will vary depending on your current infrastructure and your cloud provider (or on-premise setup). But at the high-level, here are the main things you need to setup to get started with Spark on Kubernetes entirely by yourself:
- Create a Kubernetes cluster
- Define your desired node pools based on your workloads requirements
- Tighten security based on your networking requirements (we recommend making the Kubernetes cluster private)
- Create a docker registry to host your own Spark docker images (or use open-source ones)
- Install the Spark-operator
- Install the Kubernetes cluster autoscaler
- Setup the collection of Spark driver logs and Spark event logs to a persistent storage
- Install the Spark history server (to be able to replay the Spark UI after a Spark application has completed from the aforementioned Spark event logs)
- Setup the collection of node and Spark metrics (CPU, Memory, I/O, Disks)
As you see, this is a lot of work, and a lot of moving open-source projects to maintain if you do this in-house.
This is the reason why we built our managed Spark platform (Data Mechanics), to make Spark on Kubernetes as easy and accessible as it should be. Our platform takes care of this setup and offers additional integrations (e.g. Jupyter, Airflow, IDEs) as well as powerful optimizations on top to make your Spark apps faster and reduce your cloud costs.
Optimizing performance and cost
Use SSDs or large disks whenever possible to get the best shuffle performance for Spark-on-Kubernetes
Shuffles are the expensive all-to-all data exchanges steps that often occur with Spark. They can take up a large portion of your entire Spark job and therefore optimizing Spark shuffle performance matters. We’ve already covered this topic in our YARN vs Kubernetes performance benchmarks article, (read “How to optimize shuffle with Spark on Kubernetes”) so we’ll just give our high-level tips here:
- Use local SSD disks whenever possible
- When they’re not available, increase the size of your disks to boost their bandwidth
Optimize your Spark pod sizes to avoid wasting capacity
Let’s go through an example. Suppose:
- Your Kubernetes nodes have 4 CPUs
- You want to fit exactly one Spark executor pod per Kubernetes node
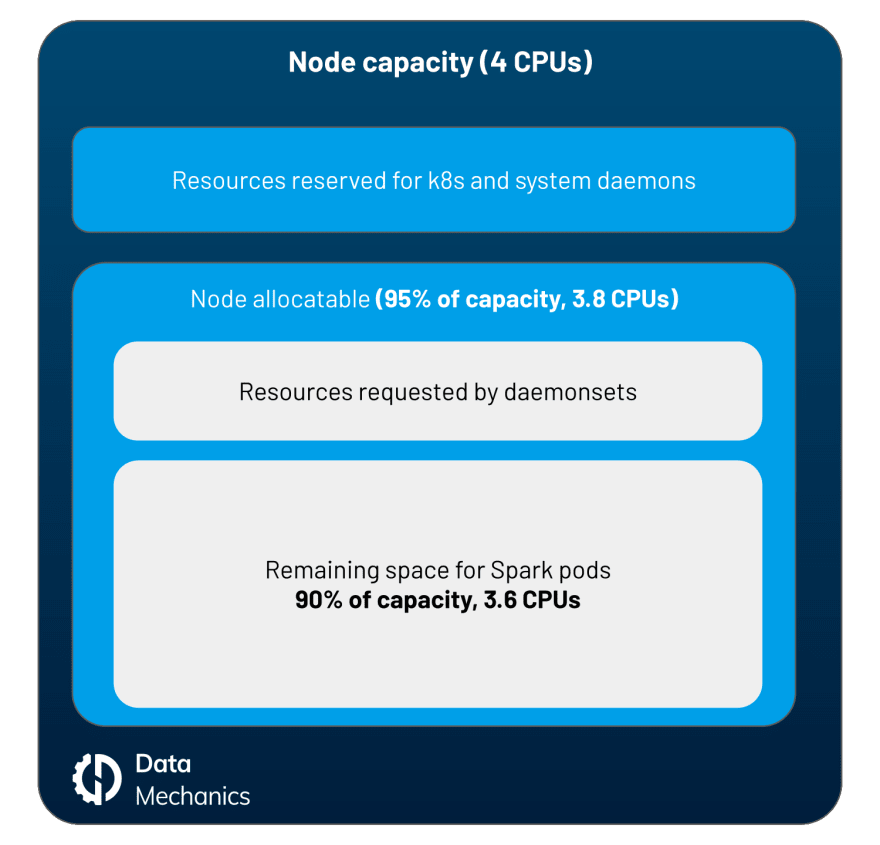
Then you would submit your Spark apps with the configuration spark.executor.cores=4 right? Wrong. Your Spark app will get stuck because executors cannot fit on your nodes. You should account for overheads described in the graph below.
Typically node allocatable represents 95% of the node capacity. The resources reserved to DaemonSets depends on your setup, but note that DaemonSets are popular for log and metrics collection, networking, and security. Let’s assume that this leaves you with 90% of node capacity available to your Spark executors, so 3.6 CPUs.
This means you could submit a Spark application with the configuration spark.executor.cores=3. But this will reserve only 3 CPUs and some capacity will be wasted. Therefore in this case we recommend the following configuration:
spark.executor.cores=4
spark.kubernetes.executor.request.cores=3600m
This means your Spark executors will request exactly the 3.6 CPUs available, and Spark will schedule up to 4 tasks in parallel on this executor.
Advanced tip:
Setting spark.executor.cores greater (typically 2x or 3x greater) than spark.kubernetes.executor.request.cores is called oversubscription and can yield a significant performance boost for workloads where CPU usage is low.
In this example we’ve shown you how to size your Spark executor pods so they fit tightly into your nodes (1 pod per node). Companies also commonly choose to use larger nodes and fit multiple pods per node. In this case you should still pay attention to your Spark CPU and memory requests to make sure the bin-packing of executors on nodes is efficient. This is one of the dynamic optimizations provided by the Data Mechanics platform.
Enable app-level dynamic allocation and cluster-level autoscaling
This is an absolute must-have if you’re running in the cloud and want to make your data infrastructure reactive and cost efficient. There are two level of dynamic scaling:
App-level dynamic allocation. This is the ability for each Spark application to request Spark executors at runtime (when there are pending tasks) and delete them (when they’re idle). Dynamic allocation is available on Kubernetes since Spark 3.0 by setting the following configurations:
--- spark.dynamicAllocation.enabled=true
--- spark.dynamicAllocation.shuffleTracking.enabled=trueCluster-level autoscaling. This means the Kubernetes cluster can request more nodes from the cloud provider when it needs more capacity to schedule pods, and vice-versa delete the nodes when they become unused.
Together, these two settings will make your entire data infrastructure dynamically scale when Spark apps can benefit from new resources and scale back down when these resources are unused. In practice, starting a Spark pod takes just a few seconds when there is capacity in the cluster. If a new node must first be acquired from the cloud provider, you typically have to wait 1-2 minutes (depending on the cloud provider, region, and type of instance).
If you want to guarantee that your applications always start in seconds, you can oversize your Kubernetes cluster by scheduling what is called “pause pods” on it. These are low-priority pods which basically do nothing. When a Spark app requires space to run, Kubernetes will delete these lower priority pods, and then reschedule them (causing the cluster to scale up in the background).
Use Spot nodes to reduce cloud costs
Spot (also known as preemptible) nodes typically cost around 75% less than on-demand machines, in exchange for lower availability (when you ask for Spot nodes there is no guarantee that you will get them) and unpredictable interruptions (these nodes can go away at any time).
Spark workloads work really well on spot nodes as long as you make sure that only Spark executors get placed on spot while the Spark driver runs on an on-demand machine. Indeed Spark can recover from losing an executor (a new executor will be placed on an on-demand node and rerun the lost computations) but not from losing its driver.
To enable spot nodes in Kubernetes you should create multiple node pools (some on-demand and some spot) and then use node-selectors and node affinities to put the driver on an on-demand node and executors preferably on spot nodes.
Monitoring your Spark applications on Kubernetes
Monitor pod resource usage using the Kubernetes Dashboard
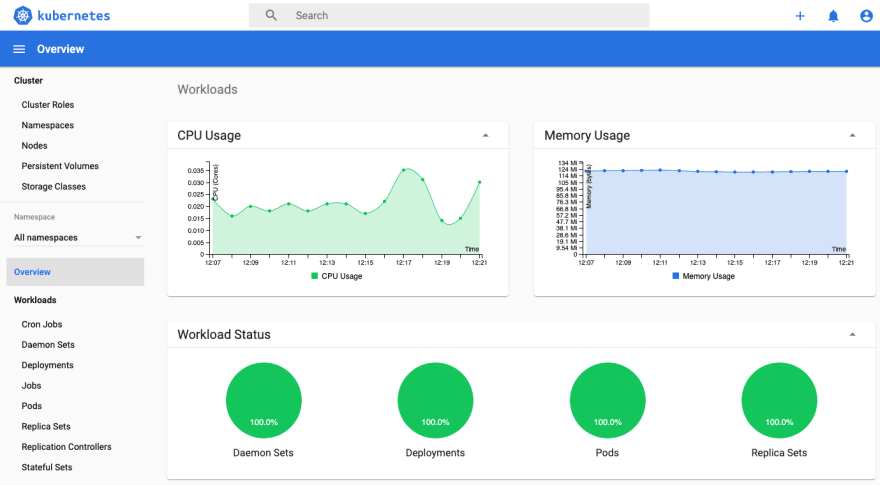
The Kubernetes Dashboard is an open-source general purpose web-based monitoring UI for Kubernetes. It will give you visibility over the apps running on your clusters with essential metrics to troubleshoot their performance like memory usage, CPU utilization, I/O, disks, etc.
The main issues with this project is that it’s cumbersome to reconcile these metrics with actual Spark jobs/stages, and that most of these metrics are lost when a Spark application finishes. Persisting these metrics is a bit challenging but possible for example using Prometheus (with a built-in servlet since Spark 3.0) or InfluxDB.
How to access the Spark UI
The Spark UI is the essential monitoring tool built-in with Spark. It’s a different way to access it whether the app is live or not:
- When the app is running, the Spark UI is served by the Spark driver directly on port 4040. To access it, you should port-forward by running the following command: --- $ kubectl port-forward 4040:4040 --- You can then open up the Spark UI at http://localhost:4040/
- When the app is completed, you can replay the Spark UI by running the Spark History Server and configuring it to read the Spark event logs from a persistent storage. You should first use the configuration spark.eventLog.dir to write these event logs to the storage backend of your choice. You should then follow this documentation to install the Spark History Server from a Helm Chart and point it to your storage backend. UPDATE: As of November 2020, we have released a free, hosted, cross-platform Spark History Server. This is a simpler alternative than hosting the Spark History Server yourself!
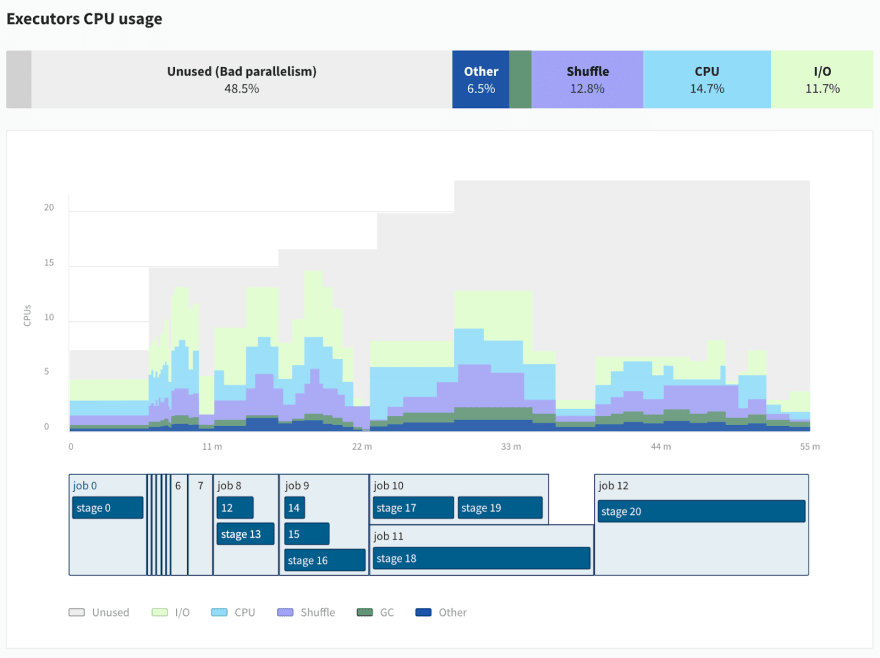
The main issue with the Spark UI is that it’s hard to find the information you’re looking for, and it lacks the system metrics (CPU, Memory, IO usage) from the previous tools.
For this reason, we’re developing Data Mechanics Delight, a new and improved Spark UI with new metrics and visualizations. This product will be free, partially open-source, and it will work on top of any Spark platform. We're targeting a release early 2021. Read more about it here.
The future of Spark on Kubernetes
In the upcoming Apache Spark 3.1 release (expected to December 2020), Spark on Kubernetes will be declared Generally Available -- while today the official documentation still marks it as experimental. This is due to a series of usability, stability, and performance improvements that came in Spark 2.4, 3.0, and continue to be worked on.
The most exciting features that are currently being worked on around Spark-on-Kubernetes include:
- [SPARK-20624] Better handling for node shutdown. This feature targeted for Spark 3.1 will let Kubernetes use the few seconds of notice it gets when a Spark executor is going down (due to dynamic allocation, or a Kubernetes node going down) to copy the shuffle and cache data files to other executors so that this work isn’t lost.
- [SPARK-25299] Use remote storage for persisting shuffle data. This feature will let Spark asynchronously copy shuffle files to remote storage (like S3), which will make the shuffle architecture more robust on Kubernetes (leading to an end-state where compute and storage resources are fully disaggregated). Another option which is evaluated is the possibility to implement an external shuffle service using Kubernetes sidecars (SPARK-32642).
At Data Mechanics, we firmly believe that the future of Spark on Kubernetes is simply the future of Apache Spark. As one the first commercial Spark platforms deployed on Kubernetes (alongside Google Dataproc which has beta support for Kubernetes), we are certainly biased, but the adoption trends in the community speak for themselves.
Conclusion
We hope this article has given you useful insights into Spark-on-Kubernetes and how to be successful with it. If you’d like to get started with Spark-on-Kubernetes the easy way, book a time with us, our team at Data Mechanics will be more than happy to help you deliver on your use case. Focus on your data, while we handle the mechanics.


Top comments (0)