
Beginner’s guide to JavaScript DOM
In this article, we will learn about the JavaScript DOM, nodes and elements, querying and traversing the DOM, evaluating and manipulating DOM nodes, and how we can add and remove an element.
The Document Object Model (DOM)
The Document Object Model (DOM) is the heart of any web manipulation, created by the browser when an HTML document loads inside it.
The Document Object Model (DOM) is a built-in object with many properties and methods for manipulating content, styles, and structures. is one of the unique and useful tools in JavaScript. Interacting with the browser, reacting to user events, changing CSS styles, making cool popups, and many other things can be achieved through the DOM.
DOM and how it’s created.
The DOM describes an HTML page as a hierarchy of nodes; it parses the HTML codes and creates an object representation of it, where the HTML tag/element is translated to an element node and text/whitespace are translated to text node, because the browser doesn’t work with text behind the scenes.
JavaScript Vs Browser.
JavaScript and the browser are always in communication, with the browser being in charge of parsing, rendering, and loading HTML/JavaScript scripts when they are downloaded. As we all know, JavaScript is a hosted language where the browser provides the environment for effective running of JavaScript. The browser provides a bunch of APIs and functionality to enable JavaScript to work with the parsed documents.
DOM API
The majority of web APIs (DOM API Included) are written in JavaScript with the sole aim of manipulating the DOM of web documents.
The API is generally known as “Application Programming Interfaces,” which serves as the path between the rendered HTML documents and the JavaScript. It has collections of interfaces, properties, and methods, and is made up of code structures for manipulating the functionality of an application by developers.
The Difference between Nodes and Elements
Everything in the DOM is simply a node. Nodes are generally the objects that make up the DOM. Elements/Element nodes are HTML tags in the DOM, text nodes are text and whitespace in the DOM, while attributes create attribute nodes.
Nodes and elements are somehow used interchangeably in the DOM, but there is a difference between them.
**Elements **are simply one type of node available in the DOM, created from an HTML tag rendered without the text. It consists of some special properties and methods to interact with elements by either changing the style, content or by creating or removing the element. Node is both an element and a text node.
Our Sample Code

Selecting/Querying of Nodes.
There are many methods of selecting and querying nodes in your rendered HTML page in the DOM.
They are as follows.
querySelector().
querySelectorAll().
getElementById().
getElementsByTagName().
getElementByClassName().
- querySelector(). With querySelector(), you can have access to a single element in the DOM. This method gives you more flexibility and power as it can take CSS selectors and pseudo selectors as you can use it in a CSS file.

Using document.querySelector() to access the first elements in the DOM is recommended.
This method can also be used to uniquely select the first instances, i.e., it takes any CSS selectors and will return the first element if there are selectors that match multiple elements. Despite the fact that all the li tags in our code have a class of listItem, it will return the first li alone.
- querySelectorAll () This method is used if your wish is to access a collection of elements, an array like object, which is typically a node list, not a real array, but an array like object that supports certain behaviors of an array. You also have different ways of querying the documents by CSS selectors and pseudo selectors, which will return a non-live nodelist.

- getElementById(). This method is the easiest way to find an element inside a DOM tree and will return a single element as Id is a unique way of assigning an attribute to an element.
The below code snippet shows the result of a unique way of selecting an Id of vp from our code.

- getElementsByTagName() this method is used to access elements with similar tag names. It returns an HTML collection instead of a Nodelist like querySelectorAll(), and it will return a live Nodelist.

- getElementsByClassName(). This method will retrieve elements with similar class names into an HTML collection.

The below code shows the result of selecting the className of all the li in our code sample.
DOM element evaluation and manipulation
There are many ways to manipulate and evaluate elements in the DOM, provide a good user experience for the users, change and modify the text of an element in the rendered user interface without the need to reload the page. The following are some of the methods of manipulating and evaluating elements in the DOM.
innerText
innerHTML
textContent
innerText; This is one of the methods of accessing and modifying text in the DOM. It displays the invisible text contained inside the node. Code below for more illustrations.

The above code shows the result for the innerText of the first li with an Id of fab. Note that I added span to the first li from our sample code.
InnerHTML; with this method, the text content and element spacing are returned, and the entire HTML element can be added into your DOM. The example below shows where the h2 element was added/appended to our sample code with the help of innerHTML.

textContent; this method gets the inner text as it was in the source code. It won’t return the tags but will return all spacing and hidden CSS text.

The above code replaces the text content, otherwise known as a text node, with the new text.
The Difference between Attributes and Properties
Although not always, attributes are strategically mapped to properties, which enables live synchronization. An attribute is anything written within HTML code that allows the browser to create a DOM object based on the tag name.
Properties are the value stored in the object that is created based on the HTML code automatically. Objects in JavaScript have properties.
How to set/remove/get an attribute
To change/modify/remove/get an attribute while in the DOM, there are many methods, which are listed below.
- setAttribute() this method is used to set attributes to our specified element. This method takes two values, which are the name of the attributes you want to set (must be a string) and the value you want to give your set attribute.

- removeAttribute() with this method, attributes can be removed from our HTML element. This method takes only a single value, unlike setAttribute() that takes two values.

- getAttribute() this method as the name implies, allows for an attribute to be get/retrieve from the HTML code. It takes a single value just like removeAttribute().

Traversing the DOM.
This section is dedicated to traversing the DOM, where we will discuss some of the properties and methods needed for DOM traversal.
Traversing the DOM is using one selected node to access either its childrenElement, parentElement, siblingElement or the rest. You can move to any direction in the DOM with the help of traversing. Before we move ahead with traversing the DOM, let’s get hindsight on some of the terms we will encounter.
Child/Children
This simply means a direct child node or element node.

In the above code, h1 is the child of div.
Descendant/Descendants
Descendants are both direct and indirect nodes of an element in the DOM.

The above code shows that both the h1 and the sub tag are descendants of the div.
Parent.
Just like the child/children, a parent node is a direct parent node or an element.

The div is the parent of the h1 but not of the sub tag as shown above.
Ancestor
Ancestor is both direct and indirect parent node of an element.

Div is the ancestor of both the h1 and the sub tag.
Back to our DOM traversal, we can dive into any surrounding elements or nodes in the DOM once we have selected a node.
Some of the important properties are as follows.
parentElement/parentNode
childNode/children
firstChild/firstElementChild
lastChild/lastElementChild
nextSibling/nextElementSibling
previousSibling/previousElementSibling
parentElement/parentNode; the difference between parentElement and parentNode is that while parentElement is used to select an element’s parent node, parentNode is used to select any node in the DOM.
When there is a need to ascertain the parent element of a particular element that is nested in another, the parentElement property is used.

The code returns the above answer when you use parentElement on the li from our sample code.
childNode/children; the main difference between childNode and children is that while childNode returns all the child nodes in the DOM (text included), children is used to select only the element child node.
“children” is used to pull out all the nested elements inside the parent element.

All the children were pulled out when children’s property was used on their parent.
firstChild/firstElementChild; the difference between firstChild/firstElementChild is while firstElementChild returns the first element child alone, firstChild returns the first child node.
If you have many children nested within a parent and you need to select the first element child, you can use a querySelector to get the first child, but you can as well use the famous firstElementchild to get the result.

lastChild/lastElementChild; the difference between lastChild/lastElementChild is while lastChild returns the last node, the lasElementChild returns the last element child node.
If there are many children nested within a parent, and there is a need to select the lastelement child, lastElementchild will get you the result.

nextSibling/nextElementSibling; the difference between nextSibling/nextElementSibling is while nextSibling returns the next sibling node, the nextElementSibling returns the next element sibling node.
If you wish to select the next sibling element of an already selected element, the property to use is nextElementSibling.

The result from our sample code gives ul as the nextElementSibling to h1.
previousSibling/nextElementSibling; the difference between previousSibling/previousElementSibling is while previousSibling returns the previous sibling node, the previousElementSibling returns the previous element sibling node.
If you wish to select the previous sibling element of an already selected element, the property to use is previousElementSibling.

The output of the code that selects the previousElementSibling on the button with a class of .btn from our sample code is the ul.
Query Method vs. DOM Traversal
It is super important to be aware of all the DOM traversal techniques, where you can select any element in the DOM. This is powerful, but care must be taken in handling them. Query methods will always work fine in accessing elements in the DOM and you shouldn’t be shy about making use of them.
DOM Elements Styling
specific ways of manipulating elements in the DOM, providing a good user experience to the users, changing and modifying the style of an element is by changing their style.
Style Property
style; if you are familiar with CSS properties, we can access the properties in JavaScript and manipulate the styles and change them around using any CSS properties. You can directly target individual CSS styles using an inline method, and this has higher specificity that will override any style properties assigned to the element. From our code sample, I changed the background color of the h1 to blue. example below.

Note: When changing styles in JavaScript, instead of using snake case as we use in CSS, the convention is to use a camel case like I did in the above code, which changed from background-color in CSS to backgroundColor in JavaScript. This kind of styling, known as inline, will only work on a single element. If we want to change the background color of all our li tags, as we already gave them the class of listItem, it will not work until we loop through each and apply the style. code below for proper illustration.

Via className
With className, you can manipulate the CSS classes attached to an element by dynamically changing, removing, or adding new CSS classes to an element. With className, it takes a single string that contains all the classes to be added. All classes are set and controlled once and other properties like id can be controlled.

Via classList
classList is a JavaScript object with a couple of built-in methods that make it convenient to add/remove/toggle and check if an element contains a CSS class. It gives you control over the added classes and can also be used in conjunction with className.
Creating/Inserting new Element
This section will be dedicated to how a brand new element can be created and inserted into the DOM.
There are two major ways this can be done; they are as follows:
1 HTML String
- creatElement()
HTML string can be used to create a new element in the DOM and can be added with innerHTML and insertAdjacentHTML.
innerHTML
innerHTML property which you will find on an element node that adds or renders an HTML code in the place you added it. It is useful whenever you plan on changing all the HTML content of an element.

insertAdjacentHTML.
Alternatively, insertAdjacaentHTML which is a method that can be use to add an HTML code next to an existing code instead of replacing the code. it has four positions, beforbegin, afterbegin, beforeend and afterend.

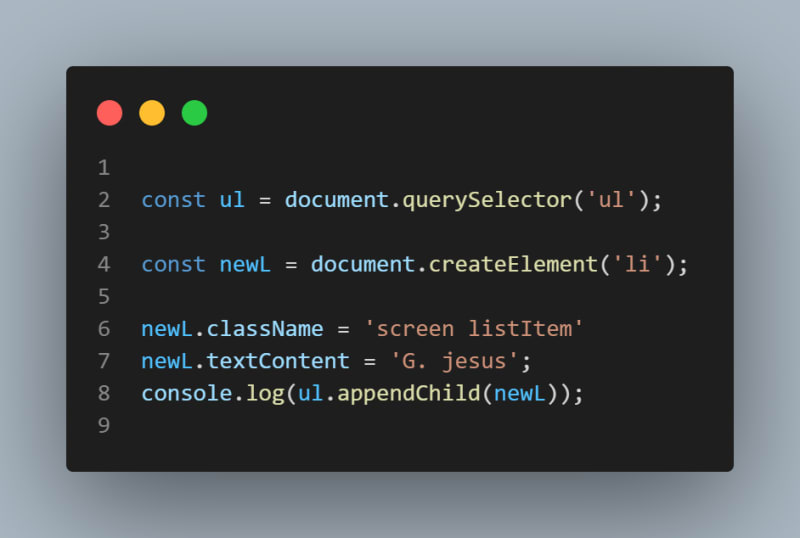
**createElement(); **Method use to create single DOM element node instead of a bunch of HTML at once. createElement() is always called on a document object and takes at least one argument, i.e. the tag name of the element without the angle bracket you want to create.

The above code shows a new element li created using the createElement method.
createElement() object can be added to the DOM with following methods.
appendChild()/append()
prepend(),before(),after(),insertBefore().
replaceChild()/replaceWith().
**appendChild/append(); **is used to append newly created elements into the DOM. While append() insert both text and element node, appendChild() is used to insert element node only.
**prepend(),before(),after(),insertBefore(); **used to insert an element/node in a specific position. Prepend() is used to insert newly craeted element as the fist element, before() is used to insert before a selected element, after() is for inserting of elemnt to a specific position after a selected element, while insertbefore is used to insert a child node before an existing child.
*replaceChild () or replaceWith () replaceWith *() is used to replace an entire element in the DOM.

DOM Node Cloning
Inserting of element will only move and not copy the element, if you want to copy the element the method available on every node element is the cloneNode(), which takes one optionally argument that is a boolean which determines whether the cloning is a deep when you input true or notify the input is false.
Removing Elements
It is nice to have an element inserted into the DOM, but it will be bad if we can’t remove unwanted elements from our DOM. Yes, with replaceWith() we can remove the element but to only replace it with another element. To get rid of an element entirely, there are remove() and removeChild() methods.

The above code will remove the ul in our sample code.

The above code shows how to use removeChild() .
Conclussion
That is a wrap.
We have covered so much in this article, we have touched on virtually all the important DOM manipulation properties and methods. We talked about the selection methods, traversing the DOM, creation, insertion, and deletion of elements, and many more.
I hope this article will help you to get a clear picture of the JavaScript DOM.
Enjoy your day.
Read this post and more on my Typeshare Social Blog

Top comments (0)