Setting up a storage node is a pivotal step towards decentralized storage solutions, contributing to networks like IPFS or Storj. Begin by selecting appropriate hardware and ensuring reliable internet connectivity. Opt for a machine with sufficient storage capacity and processing power to handle data efficiently. SSDs or HDDs with ample space are recommended, along with a stable internet connection for seamless data transfer.
Integrate your storage node with the chosen network. This typically involves generating a unique node ID and linking it to your hardware. Joining a network often requires creating an account and following specific protocols to ensure seamless integration. Regular maintenance and monitoring are essential to keep your storage node running smoothly, ensuring optimal performance and contributing effectively to the decentralized storage ecosystem.
By hosting a storage node, participants become integral components of decentralized storage networks, enabling data to be stored securely and accessed reliably from various locations worldwide. This decentralized approach not only enhances data resilience and availability but also fosters a community-driven ecosystem where individuals actively participate in shaping the future of data storage and accessibility.
Critical System Prerequisites for Node Hosting:
- Minimum of 100GB Available Storage Required
- 5,000 $STOR collateral/100GB Hosted Node
- 4X/m Bandwidth of Available Storage
DedicatedCore:
- Known for prioritizing performance, DedicatedCore likely offers VPS solutions with powerful hardware specifications.
- Including high-speed SSD storage, ample RAM, and efficient CPU resources.
- DedicatedCore may offer a wide range of customization options for VPS instances.
- Enabling users to customize their virtual servers based on particular specifications.
RackNerd:
- Their VPS plans may have slightly lower hardware specifications compared to DedicatedCore.
- RackNerd's VPS offerings may also provide some level of customization, but it's possible that the range of options could be more limited compared to DedicatedCore.
Pricing Comparison Best for Storage Chain:

Note: As per eligibility criteria for storagechain to host a Node you require high storage so better go for DedicateCore as they provide highest storage in affordable cost.
Steps to Buy DedicatedCore Virtual Machine for storagechain.io:
Step 1:Dedicated Core VM Purchase

Select Storage VPS, click Buy Now
We use storage VPS cause it gives ok computer specs with a lot of storage.
In the next screen select the configuration of your choice and click Buy Now as shown below

For this example, we’ll be choosing the 10TB sized node, but the configuration steps are the same no matter which size of Virtual Machine you choose for your Storagechain Node.
You’ll be presented with a screen similar to this to finish your order:

There are several data points we need to enter to have the server properly configured. Let's examine each of them separately.
- Choose Billing Cycle - Choose how you’d like to pay (ie. Monthly, Quarterly, Yearly)
- Host Name - The name of your server. It needs to be an FQDN, for example: Servername.domain.com What you choose for the .domain.com doesn’t matter…It just has to have some data there in that format
- Root Password - This is the password you will use to access your server via SSH.
- NS1 - No use, but must be filled in. I use server1 and server2
- NS2 - See Above
- Operating System - In this case we will choose Debian 11
Click Continue and you’ll be taken to the payment screen. It should look similar to this:

Once you have input your payment info click “Complete Order”
You will be taken to the Services screen. It will look similar to this:

It may take a few minutes for DedicatedCore.com to put together your system, once it’s active you will notice the Status “Active” as highlighted in the above image.
Once the host is Active, it will be ready to be configured.
Make note of the IP address (masked in black in the above image).
You will need this IP address for our next step.
Step 2: StorageChain Node Setup
Log into the storage chain website at https://storagechain.io/
On the left side of the screen expand “My Storage Nodes” and click on “Host Storage Node”

You’ll be presented with this screen:

Let’s look at each field individually:
- Choose the amount of storage for your node.
- Name your node. I recommend using Host-Location Capacity, but it’s up to you.
- Enter your node IP from DiedicatedCore.com “My Services” screen:

- Make sure the storage node type says Virtual Machine
- Next, connect your wallet that has STOR in it for collateral for your storage node
- If you approve of the terms of service, Click the check box.
- Add collateral. Once, your collateral has been added you will get your storage node ID. We will need this for the config file on the VM.
Step 3: VM Software Download and Install
Depending on your platform, there are various ways to access your VM to complete the install:
Option 1- my weapon of choice is an SSH client called Putty:
Step 1: Download the Installer
Get the most recent version of PuTTY from the official website.
https://www.chiark.greenend.org.uk/~sgtatham/putty/latest.html
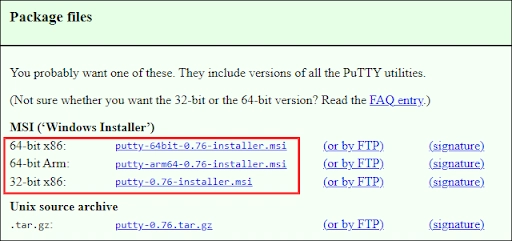
Select the MSI installer version that is right for your system. Get the 64-bit edition for 64-bit operating systems or opt for the 32-bit variant of PuTTY if your system runs on 32-bit architecture. Save the file to the desired folder.
Step 2: Configuration and Installation
- Launch the downloaded MSI file by double-clicking to initiate the installation process.
- On the welcome page, select Next to carry out the installation.

3.If there's no need to modify the installation path, proceed by clicking Next. Click Change... to specify another path.

- Select which product features you want to install. Click Install.

- When the installation is finished, the software displays a screen that reads "Setup complete." If you would want to view the developer's notes, click or uncheck the View README file option. Click Finish to exit the installer.

Step 3: Run Putty
After installation, launch PuTTY to ensure good functionality.
To launch, either double-click the Desktop icon or utilize the search bar by typing 'putty' and pressing Enter.

The PuTTY configuration window appears if the installation went smoothly.

The configuration options allow you to set up the connection type, and port, and connect to a server. Choose between SSH and enter a server hostname or IP address.
Option 2 - Start by opening a Windows PowerShell Prompt. Tip: Use the Windows search submit box located in the system tray to look up Windows PowerShell.
The format for the command is ssh root@your virtual machine IP address
![]()
Option 3 - If you are using a Mac you can use Terminal to SSH
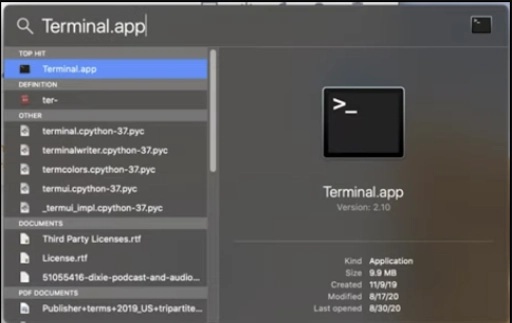

The format for the command is ssh root@your virtual machine IP address
You’ll be prompted to accept the keep. Enter Y

Enter your password

Having established connection to your VM.
Copy/Paste (as one line) and Run the following command:
echo "nameserver 8.8.8.8" >> /etc/resolv.conf;curl -L https://file-view-prod.storagechain.io/api/file/download/uqpR52G8mFYW4q78viQ4yrRhLUH43kSq > install.sh > install.sh && chmod +x install.sh ;./install.sh
You should see a screen like this:

You will be requested to furnish the subsequent information:
Cluster Name = The name of your virtual machine on the storagechain node
Email = your registered email with Storage Chain
Password = Your Storage chain password
Node ID - Comes from setting up the node on the Storage Chain. You can retrieve in the “My Storage Nodes” screen on the Storagechain website.
The download will take up to 30 min to download/update the code. You will see screens similar to this…Just be patient and let it have time to do its thing.

Once the install/config is complete (5-10 min), if it has successfully initialized, you should see a screen like this:

Let’s check the Storage Chain website to verify the node is active. Something like this ought to appear.

If it’s green, you are good to go!
Congrats on your new node!
If not, kindly contact us and we will assist you.
Conclusion
In summary, the Node Setup Guide available on storagechain.in serves as a comprehensive blueprint for establishing a resilient node infrastructure within the StorageChain ecosystem. By meticulously outlining each step, from initial setup to ongoing maintenance, the guide empowers users to actively engage in the network's operations and guides them through setting up a node with DedicatedCore, should they choose to pursue it.
Moreover, the guide prioritizes security measures and best practices, ensuring the ongoing integrity and resilience of the evolving network. With this guide as their companion, users can confidently navigate the complexities of node deployment, contributing to the precise and proficient growth and sustainability of StorageChain.

Top comments (0)