
Written by Eze Sunday✏️
Web clients often need to request data to update part of a website. Before single-page applications (SPAs) came about, this type of request would require the entire website to reload in order to display the updated content or — if the request failed — an error.
Full-page reloads can slow performance and negatively impact UX. SPAs solved that problem by allowing websites to update a specific part of a page without reloading the entire page.
This concept has become part of the foundation of many frontend JavaScript frameworks, like React, AngularJS, SolidJS, and Svelte. There are also a few different libraries offering this functionality for Rust apps, including a React-inspired library called Dioxus.
The Rust programming language community has been growing rapidly, driving the demand for frontend frameworks like Perseus that leverage Rust's speed and safety to build scalable web applications. In this article, we'll take a look at how to use Dioxus to build and deploy a Rust SPA.
To follow along with this tutorial, you'll need Rust installed. If you don't have it yet, you can install it with Rustup. You can check out the full code on GitHub for the demo app we’ll build in this tutorial. Otherwise, let’s jump right in.
Jump ahead:
- Understanding how Dioxus works
- Setting up Dioxus
- Designing the app components
- Deploying a Dioxus and Rust application
- Other tools like Dioxus for Rust
Understanding how Dioxus works
Dioxus is a Rust library that allows you to build cross-platform UI components. As of this writing, it supports web and desktop applications. Dioxus works like React, but without its quirks — you can think of it as a hybrid of React with the safety and speed of Rust.
Essentially, Dioxus works by creating and managing a virtual representation of the DOM, making updates to the virtual DOM efficiently, and then applying those updates to the actual DOM as illustrated in the diagram below: 
Since Dioxus is a cross-platform development framework, we can use it to build applications for mobile (in-view), web, and desktop platforms. However, we’ll be focused on the mobile part of it in this article. The completed app will look like so: 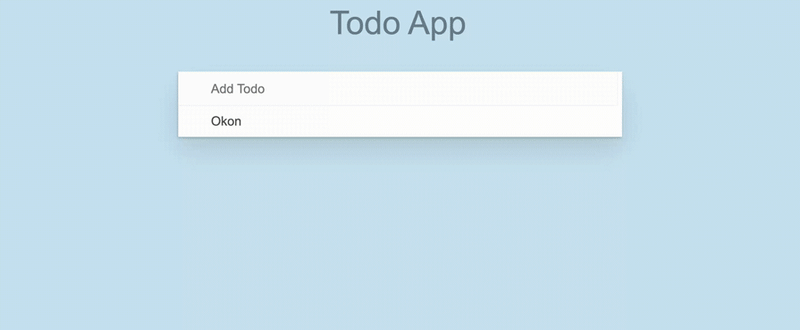 Let's roll up our sleeves and build a simple to-do SPA to learn the basics of Dioxus!
Setting up Dioxus
To fully explore Dioxus, we’ll start by installing it. Run the following commands in your terminal:
cargo new --bin todoapp
cd todoapp

cargo add dioxus dioxus-web wasm-bindgen im
The commands above will:
- Create a new Rust application with the name
todo - Navigate into the
tododirectory - Install the
dioxusframework and thedioxus-webweb renderer. Dioxus has different renderers for different platforms, but we'll be focusing on the web renderer in this example - Install
wasm-bindgen, a library that provides a bridge between Rust and JavaScript, allowing Rust code to be compiled to WebAssembly and then called from JavaScript - Install
im, which provides a variety of immutable data structures, including vectors, hash maps and sets, ordered maps and sets, and more
In our case, we only need the hash data structure from im to create a performant to-do list. It’s also possible to use the Rc<T> smart pointer to achieve similar behavior, but because im creates an immutable shared value that is efficient for iteration and cloning, we’ll use it instead.
Now that we’re all set up, let’s start writing some code.
Designing the app components
As you can see in the to-do app’s preview image we saw earlier, our application will have four components:
- The
appcomponent - The input component
- The entry component
- The to-do list component
Let’s start with the app component and go through each of the other sub-components.
Setting up the app component
In Dioxus, the app component is the main component responsible for aggregating and rendering the entire single-page application’s user interface. A component in Dioxus must have a Scope and return an Element. Here is an example:
fn app(cx: Scope) -> Element {
    let result: &mut u32 = cx.use_hook(|| 0);

    cx.render(rsx!(
        div { "Hello World" }
    ))
}
While the Scope is an object that passes down state and event handlers to child components, every component has a return type of Element, which indicates that the component will render HTML. This allows you to create modular and reusable components you can use to build complex user interfaces. You’ll see how it’s used in our to-do app example.
Now, in your app directory create a lib.rs file in the src sub-directory. In this file, we’ll define the Todos type and the TodoItem data structure, which will set the stage for how we’ll create our to-do list and add items to it. Here’s the code:
use dioxus::{html::input_data::keyboard_types::Key, prelude::*};

/// Define a type for Todos, which is an immutable HashMap of u32 keys to TodoItem values.
pub type Todos = im::HashMap<u32, TodoItem>;
/// Define the structure for a TodoItem, which has an id and contents.
#[derive(Debug, PartialEq, Clone)]
pub struct TodoItem {
    pub id: u32,
    pub contents: String,
}
Based on our Todos type definition, we’ll have an id with a type of u32 and the TodoItem, a struct that contains the specific to-do id and the content in the hash map or state.
Next, in the same file, we’ll create our app component, which we’ll pass to the main function to be rendered. In the initial part of the app component, we’ll create the references we’ll need for the todos, the new todo_item, and the todo_id:
/// This function initializes the main application and manages todos, new todo input, and todo IDs.
pub fn app(cx: Scope<()>) -> Element {
    // Create references for todos, new_todo_item, and todo_id.
    let todos: &UseRef<im::HashMap<u32, TodoItem>> =
        use_ref(cx, || {
            let default_todos = im::HashMap::<u32, TodoItem>::default();
            default_todos
        });

    let new_todo_item: &UseRef<String> = use_ref(cx, String::new);
    let todo_id: &UseState<u32> = use_state(cx, || 0);
These references ensure that we can access and modify the todos, the new_todo_item, and the todo_id throughout the component. Notice that we’re using use_ref and use_state hooks to create the references. This is similar to the useRef and useState Hooks in React, but in Dioxus:
-
use_stateis used to manage an immutable state in a component. It allows you to store and update the state between component renders. Whenever the state is updated, the component will re-render -
use_refis used to manage mutable state in a component. It takes an initial value as an argument and returns a mutable reference to that value
With use_state, the only way to update the state is to replace the existing state with a new state. For situations where that is expensive and you don’t want to replace the state but rather modify it, you’ll use use_ref.
Finally, in the app component, we need to render and return the HTML:
    // Render the app using rsx! macro.
    cx.render(rsx! {
        section { class: "todo-app",
            style { include_str!("./style.css") }
            div {
                header { class: "header",
                    h1 {"Todo App"}
                    todo_input { todos: todos.clone(), new_todo_item: new_todo_item, todo_id: todo_id }
                }
                todo_list { todos: todos.clone() }
            }
        }
    })
The render method takes in the rsx! macro as an argument. The rsx! macro is a declarative way to define the UI of a Dioxus component. It takes a block of code as input and returns a Node value, which represents the UI tree of the component. It's very similar to JSX in React.
The code inside the rsx! macro block is written in a way that is similar to HTML. For example, the following code renders a div element with the CSS class name todo-app:
rsx! {
    div { class: "todo-app" }
}
The rsx! macro also supports embedding Rust expressions in the code block. For example, the following code renders a todo_list component and passes the todos reference to it as props:
rsx! {
    todo_list { todos: todos.clone() }
}
By adding the style { include_str!("./style.css") } line, we are able to include our external CSS styles in this component.
You’ll also notice the div, header, and section elements in the rsx! macro. These are all provided by the Dioxus framework and loaded from prelude::*, which brings into scope every module in a crate — in this case, the dioxus crate.
Inside the app component, we need to render the todo_input and todo_list components, let’s create them in the next sections.
Creating the todo_input component
The todo_input component will allow users to type their to-do task and save it to the list. We’ll continue to work in the lib.rs file to create this component.
First, we’ll create a struct to capture the TodoInputProps, which will ensure we are able to reference and modify the to-do items we create:
/// Define the properties structure for TodoInput.
#[derive(Props, PartialEq)]
pub struct TodoInputProps<'a> {
    todos: UseRef<im::HashMap<u32, TodoItem>>,
    new_todo_item: &'a UseRef<String>,
    todo_id: &'a UseState<u32>,
}
Now, let’s create the actual todo_input component. Add the following code in the same file after the code above:
/// Define the todo_input function that returns an Element.
/// This function renders the input field for adding new todos and handles user input.
pub fn todo_input<'a>(cx: Scope<'a, TodoInputProps>) -> Element<'a> {

    // Render the input element with properties.
    cx.render(rsx! {
        input {
            class: "new-todo",
            placeholder: "Add Todo",
            value: "{cx.props.new_todo_item.read()}",
            autofocus: true,
            oninput: move |event| cx.props.new_todo_item.set(event.value.clone()),
            onkeydown: move |event| {
                if event.key() == Key::Enter && !cx.props.new_todo_item.read().is_empty() {
                    cx.props.todos.write().insert(
                        *cx.props.todo_id.get(),
                        TodoItem {
                            id: *cx.props.todo_id.get(),
                            contents: cx.props.new_todo_item.read().clone(),
                        },
                    );
                    cx.props.todo_id.set(cx.props.todo_id + 1);
                    cx.props.new_todo_item.set("".to_string());
                }
            }
        }
    })
}
We have two key event handlers in this component that control its major functionality: onkeydown and oninput. We’re using these event handlers to listen for user input in the to-do input field.
The oninput event handler is fired whenever the user changes the value of the input field. It clones the value of the event and sets it as the new value of the new_todo_item prop, ensuring that the to-do input field gets updated with the user's input. This behavior is similar to the onChange event in JavaScript.
Meanwhile, the onkeydown event handler checks if the user pressed the Enter key and if the todo input field is not empty. If both of these conditions are met, the event handler inserts a new to-do item into the todos prop.
The new to-do item's ID is equal to the current value of the todo_id prop. Likewise, its contents are equal to the current value of the new_todo_item prop. Notice the .set method used in the last part of this code? That is Dioxus’s way of updating the state. Once that is called and the state is updated, the component will re-render.
Now, we have the todo_input component ready. Next, we’ll set up the todo_list component.
Creating the todo_list component
Our goal with the todo_list component is to display all the to-do items that the user adds to the list. Append the following code to the existing code in your lib.rs file:
/// Define the properties structure for TodoList.
#[derive(Props, PartialEq)]
pub struct TodoListProps {
    todos: UseRef<im::HashMap<u32, TodoItem>>,
}

/// Define the todo_list function that returns an Element.
/// This function renders the list of todos.
pub fn todo_list<'a>(cx: Scope<'a, TodoListProps>) -> Element {
    // Render an unordered list with todo entries.
    cx.render(rsx! {ul { class: "todo-list",
    cx.props.todos.read().iter().map(|(id, _todo)| {
        rsx! { todo_entry { key: "{id}", id: *id, set_todos: &cx.props.todos } }
    })
    }
    })
}
In the code above, we first created a TodoListProps struct and passed it to the todo_list component. Then, we looped through the entire to-do list and rendered each to-do entry with the rsx! macro.
We also need to create a separate component responsible for composing each new to-do entry. That way, we can easily update the individual components separately. Below is the TodoEntry component:
/// Define the properties structure for TodoEntry.
#[derive(Props)]
pub struct TodoEntryProps<'a> {
    set_todos: &'a UseRef<Todos>,
    id: u32,
}
/// Define the todo_entry function that returns an Element.
/// This function renders a single todo entry.
pub fn todo_entry<'a>(cx: Scope<'a, TodoEntryProps<'a>>) -> Element {
    // Retrieve the todos and the current todo using the provided id.
    let todos: std::cell::Ref<'_, im::HashMap<u32, TodoItem>> = cx.props.set_todos.read();
    let todo: &TodoItem = &todos[&cx.props.id];
    // Render a list item with the todo's contents and a delete button.
    render!(li {
        div { class: "view",
            label { "{todo.contents}" }
            button {
                class: "remove",
                onclick: move |_| {
                    cx.props.set_todos.write().remove(&cx.props.id);
                }
            }
        }
    })
}
We also want users to be able to remove their to-do items from the list when they are done with the task. To accomplish this, we’ll add a button and a click event to handle removal for each entry:
button {
    class: "remove",
    onclick: move |_| {
        cx.props.set_todos.write().remove(&cx.props.id);
    }
}
Now that we’ve covered all the components, let’s fire up the server in the main.rs file. Replace the content of the main.rs file with the following code:
use todoapp::*;
pub fn main() {
    dioxus_web::launch(app);
}
The todoapp is the root component in the lib.rs file. In case you named yours something else, remember to use the same name here.
Next, we‘ll create a Dioxus.toml file at the root of the project directory and add the following content:
<head>
  <title>Todo App</title>
</head>
This configuration file will allow you to set the title of the app, which you would usually set in the head of an HTML document.
There are a lot of other configurations you can add in this file. For example, you can set the name of the application, the platform — since Dioxus is a cross-platform development tool — and whether or not you want the app to reload when you update your code during development.
You can check everything available to configure in the Dioxus docs. Here is an example configuration for our to-do app:
[application]
name = "todo_app"
default_platform = "web"

[web.app]
title = "Todo App"

[web.watcher]
reload_html = true

[web.resource]
[web.resource.dev]
Lastly, you can go ahead and run the app by executing the following command:
dx serve
Let’s see how to deploy our app next.
Deploying a Dioxus and Rust application
Deploying a Dioxus application is straightforward. It requires only two steps.
The first step is to set the directory to deploy the application in the Dioxus.toml file:
[application]
...
out_dir = "build"
base_path = "/"
The second step is to run the release build command:
dx build --release
This will generate the static files you need to deploy to your server, as shown below: 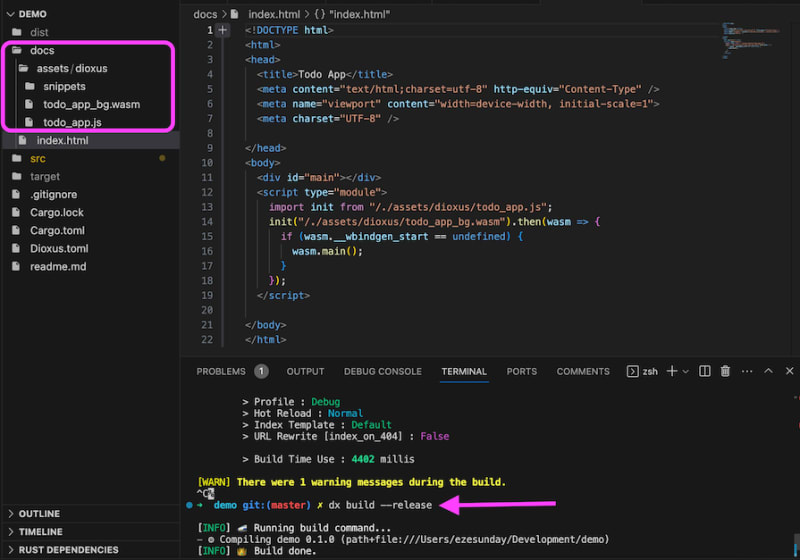 If you’ve made it to this point, congratulations! You’ve successfully built and deployed an application with Dioxus and Rust. You can double-check what we’ve built so far with the sample code on GitHub.
Other tools like Dioxus for Rust
As mentioned briefly in the introduction, there are several frameworks and libraries for developing SPAs in Rust. Dioxus is a relatively new kid in the block, but has developed and gained popularity quickly. Here is a comparison table of some frontend frameworks like Dioxus for Rust:
| Framework | GitHub stars | Virtual DOM | Server-side rendering (SSR) | Rendering method | Architecture |
|---|---|---|---|---|---|
| Dioxus | 14.5K | ✅ | ✅ | HTML | React/Redux |
| Dominator | 886 | ❌ | ❌ | HTML | FRP |
| Egui | 17.1K | ❌ | ❌ | Canvas | ImGUI |
| Iced | 21K | ❌ | ❌ | Canvas | TEA |
| Kobold | 369 | ❌ | ✅ | HTML | React/Redux |
| Leptos | 12.6K | ❌ | ✅ | HTML | FRP |
| Mogwai | 415 | ❌ | ✅ | HTML | Mogwai |
| MoonZoon | 1.6K | ❌ | ❌ | HTML | FRP |
| Sauron | 1.8K | ❌ | ✅ | HTML | FRP |
| Perseus | 2K | ❌ | ✅ | HTML | FRP |
A potential shortcoming for Dioxus is that it uses a virtual DOM like React, which most frameworks are pulling away from. Since Dioxus trying to be “React for Rust developers,” it retains some of React’s design patterns while taking advantage of Rust’s benefits to optimize projects.
Conclusion
Dioxus is an amazing framework that gives Rust developers superpowers to build more scalable web applications. We explored some of its capabilities by building a demo to-do app. You can check out the full code on GitHub.
While we took an in-depth look at Dioxus in this tutorial, there is still so much to learn. Luckily, Dioxus provides detailed documentation with references and cookbooks to guide developers. Make sure you check it out, and feel free to comment below with any questions.
LogRocket: Full visibility into web frontends for Rust apps
Debugging Rust applications can be difficult, especially when users experience issues that are difficult to reproduce. If you’re interested in monitoring and tracking performance of your Rust apps, automatically surfacing errors, and tracking slow network requests and load time, try LogRocket.

LogRocket is like a DVR for web apps, recording literally everything that happens on your Rust app. Instead of guessing why problems happen, you can aggregate and report on what state your application was in when an issue occurred. LogRocket also monitors your app’s performance, reporting metrics like client CPU load, client memory usage, and more.
Modernize how you debug your Rust apps — start monitoring for free.

Top comments (0)