In this tutorial I will let you know one of the possible way to deploy the R (data science model) and node.js application on the same window server in production environment.
Let’s first discuss the over all project scope in order to understands that what we want to achieve.
Requirement: We have one node.js application (NodeApp). That NodeApp responsible to realize any required custom logic like dealing data I/O operation through the defined APIs. For instance, one of the NodeApp API-1 get the data from the third party API. One of the microservice process this data and store it in database. API-2 of NodeApp get the request from user to predict the value, like todays's or tommorow's maximum daytime temperature. The prediction task is done by the R data science model (RApp). So, we have running two application one is NodeApp, second one is RApp. We have to deploy these two applications on personal window server (IIS).
There is a number of ways to achieve this task. But I found the following way more suitable if we consider the scalability and manageability perspective of project.
Phase 1: Program installation
I assume that you have installed node, npm, and R; and able to run NodeApp from code-studio and RApp from r-studio.
Step 1: Installation of R: Download and install R. It is necessary that you should be able to run the r script from command prompt. In order to verify that, you have to run the ‘Rscript’ command on terminal and you will get response as given in below picture.

If you get an error like : “'Rscript' is not recognized as an internal or external command, operable program or batch file” then following solution will fix this error.
Step 2: Installation of pm2
Setting up pm2 on window (IIS) is lil bit tricky comparatively to Linux or Mac. Pm2, which is install using npm doesn’t work on window as it works on Linux or Mac. So you have to follow the following steps in order to setup and run pm2
First download the “pm2-installer” from git. The official guide can be found here.
Run these three commands one by one from downloaded folder (I am assuming that you already have installed and running node and npm). It is recommended that you run the command with administrative privileged for that run CMD as administrative by clicking the right button of mouse.
npm run configure
npm run configure-policy
npm run setup
After running these three commands successfully, go to services and find pm2 -> right click
-> properties

Then you have to select ‘Local System Account’ instead of ‘This account’. Then click on Apply and then Ok.

Now we are good to go to introduces process to pm2, which we want to manage.
Phase 2: Prepare RApp for the given scenario.
Step 1. Produce ‘.rds’ file:
I am assuming that you have already developed your R application or simply R script and have produced file(s) into ‘.rds’ format.
Or you can follow the official document from here
Step 2: Transform R script into RestAPI: Definitely transforming simple R code into web service using plumber have enormous benefits. It will help to keep the code separate from the other app logic (which is NodeApp in our case) and allow to follow the microservice architecture style. In that sense the application will have the scalability feature.
It is very simple to create RestAPI for R script using plumber, as given in below picture.
Or simple you can follow the official document (which is always recommended) from here.
Example of APIs creation using plumber is given below.

If you have installed plumber, you can use the pr() function to instantiate a new Plumber router programmatically ( or generate plumber APIs). Bring the API to life using the pr-run() command and pass the port number as an argument:
library(plumber)
# 'anything.R' is the location of the file shown above
pr("anything.R") %>%
pr_run(port=8000)
Copy whole command and paste into R-studio console and you will see your application live and accessible via APIs:

You will get a message that API is running on some port like ‘8000’ and you can make request in following ways for the defined APIs:
http://localhost :8000/connection-status or http://localhost :8000/predict
Step 3: Before we process with step 3, I am assuming that your NodeApp is ready with you. Put the .rds file and plumber API script file into R_app folder at root of you NodeApp folder as give below; however, it is not compulsory and you can keep R_app anywhere, wherever you want. But accordingly you have to provide the path that we have discussed in further steps. Major required file to run RApp using pm2 are highlighted. We will see why and how to create "r-mp2-start-script.R" file in subsequent steps.

Step 4: Initially, pm2 designed to deal node project but we can wrap the r code (which is responsible for running plumber) in a way that it can understood by the pm2. So that pm2 can manage RApp as well in term of restarting whenever server get restarted.
In order to introduce R script to mp2, we have to create one more file with the following script (you can give any name to this file) I preferred r-mp2-start-script.R:

(It is recommended to provide full path instead of relative path)
Step 4: In order to insure that PM2 can manage your R app, you can manually test it by running the “Rscript run-RiskPlumberAPI.R” command in terminal from the file location.
After running this command your application should up and running. You can test it by calling the above-mentioned API, or APIs which you have defined in you R script. In our case:
http://localhost :8000/connection-status or http://localhost :8000/predict
You can close the terminal it will shut down R application,
Phase 3: In this phase we will start both the app via pm2 as forever.
Step1: Start RApp
Using the following command, you can run the RApp via pm2:
pm2 start --interpreter="Rscript" /your-file-location/r-mp2-start-script.R
(Run the command prompt as administrator and execute the command from directory where r-mp2-start-script.R is reside)
Now your RApp should up and running, you can test it by calling the above given (in step 4) APIs.
Step2: Start NodeApp
To run the NodeApp, you can create a file which will start the NodeApp. This file is also known as pm2 ecosystem file. You can generate is by running “pm2 init simple” it will generate the ecosystem file, which is basically a java script file. In this post I have created an ecosystem file as a .json. For that you simple create a file with any name. I named it “pm2 -start-config.json”.

pm2-start-config.json will contain the configuration of our NodeApp that we want to manage.
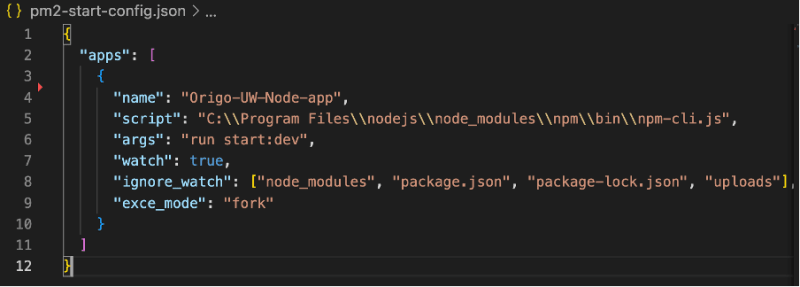
You have to modify the script path of pm2 and npm-cli if needed, so check path on your server. Additionally, you have to modify the args field in pm2-start-config.json file according to your npm run script which defined in the package.json file.
Now we are set to launch NodeApp by running the following command:
pm2 start pm2-start-config.json
(Run the command prompt as administrator and execute the command from directory where pm2-start-config.json is reside)
You will see the following output

Now we run the “pm2 save” command to run the applications in background forever.
And we are done!

Top comments (0)