
Hi, in today's article, we will be walking through the steps involved in setting up an Ubuntu virtual machine, creating users and groups, and assigning specific permissions to the different groups.
Users and groups are created to control access to the system's files, directories etc.
We assume you have provisioned a Virtual machine, if not, you can follow this guide to creating a VM (Virtual Machine) in Azure .
Let's get started:
Connecting to our VM
We connect to our VM using SSH. I advise to download your keys file (VMname.pem file) to your desktop for easy access.
-
On your VM homepage, select
and then

```SSH```

*You have to
 your VM if you already have one created, before you can

 ```Connect```

 to it*

*   If you are on a Windows machine, you have to download

 ```Putty```

 or any other client. In this tutorial, we assume your machine is linux based. In your terminal, cd to your desktop (wherever your keys file is) and run the following commands:
chmod 400 azurekeyfile.pm
ssh -i azureuser@40.75.89.163
*The first command gives us write permission to the specified file and the second logs us in securely to the VM we've created on an Azure server.
If successful, the username on our terminal changes to 'azureuser@VMname'*

### Creating Groups

For this artcle's sake, we limit ourselves to two groups namely,

 ```group_a```

 and

 ```group_b```

.

We create our groups by running:
sudo addgroup groupname
Example:
sudo addgroup group_a
sudo addgroup group_b
We run the following command to confirm if our groups are created:
tail /etc/group
To delete a group, run the following command:
sudo delgroup groupname
### Creating Users

For this artcle's sake, we limit ourselves to four users namely,

 ```May```

,

 ```Paul```

,

 ```Abel```

 and

 ```Solomon```

.

We create our users by running:
sudo adduser username
Example:
sudo adduser may
sudo adduser paul
sudo adduser abel
sudo adduser solomon
*You will be asked to enter a new password for the user*

We run the following command to confirm if our users are created:
cut -d: -f1 /etc/passwd
To delete a user, run the following command:
sudo deluser username
### Adding Users to our Groups

Run the following command:
sudo adduser username groupname
Example:
sudo adduser may group_a
sudo adduser paul group_b
sudo adduser abel group_a
sudo adduser solomon group_b
### Granting permissions to users

We first create three files, and specify the permissions they will have.
Permissions are:
execute(x): this gives a user or group of users the permission to execute a script(file).

read(r): this gives a user or group of users the permission to read a file.

write(w): this gives a user or group of users the permission to write (or edit) a file.

We run the following command to create our files:
touch filename
Example:
touch file_a
touch file_b
*To edit a file in the terminal, we use the nano text editor by running:*
nano filename
Example:
nano file_a
nano file_b
We save our files by pressing

 ```Ctrl + O```

,

 ```Enter```

 and then exit the editor with

 ```Ctrl + X```


We give group_a users the permission to execute, write and read file_a while they can only read file_b and vice-versa.

We assign file permissions to the groups:
chmod g+wrx file_a
chmod g+wrx file_b
We give read permission to 'other' users:
chmod o+r file_a
chmod o+r file_b
We assign file_a to group_a and file_b to group_b:
chgrp group_name file_name
Example:
chgrp group_a file_a
chgrp group_b file_b
We check our files and the permissions they have:
ls -l
Expected output:

The above image shows us the permissions granted to our files
```-```
means we are dealing with files.
```rw-```
means the owner (azureuser) has read and write permissions to the file.
```rwx```
means the group has read, write and execute permissions to the file.
```r--```
means others have only read access to the file.
The column which contains
```1```
, indicates the number of files in the directory(in our case, we are dealing with only one file)
The column which contains
```azureuser```
shows the users while
```group_a```
shows the name of the group name that owns the file.
The next columns contain the size of the file, date and time the file was last modified and the name of the available files.
Tada!! our job here is done.
To end our connection with our VM, run
exit
Remember to stop and then delete your VM from the azure portal!

## Test time!!
We login as one of the users we created and try to access the files we created.

To login as May, we run:
su -p may
We would be asked to provide our user password.
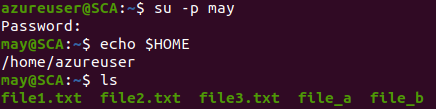
*All we did in the picture above, is to login as May, print out the location of our home directory and then see the files in our home directory.*
May is a member of
```group_a```
which means she should not be able to write to the file
```file_b```
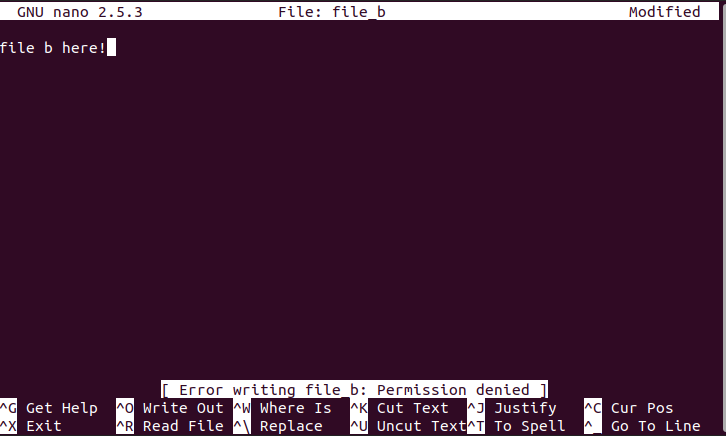
We run:
nano file_b
*This command opens up the file in the nano editor*.
We write some texts on the file, but are unable to save the new changes to the file because as a member of
```group_a```
, we have no access to write to the file labeled
```file_b```
There you have it folks!
We have successfully assigned permissions to our group members.

Oldest comments (0)