This tutorial was written by David Bekker, author of the database driver for Drupal on MongoDB. David is also Drupal’s subsystem maintainer for the Database API and the database driver modules for MySQL, MariaDB, PostgreSQL, and SQLite.
This is a tutorial for setting up a demonstration Drupal site on MongoDB Atlas. We are using the MongoDB Atlas M10 for the database and we are using AWS EC2 medium for the PHP webserver. You can try to use the AWS EC2 micro free tier for minimizing costs. While the MongoDB Atlas free tier could technically support a Drupal site, it may not offer the level of performance needed for a satisfactory experience.
Create a MongoDB Atlas account
To register using the Atlas UI, start at the MongoDB Atlas registration page.
Create a MongoDB Atlas M10 cluster
Once you have created a MongoDB account, use it to log in to MongoDB Atlas.
Follow the official MongoDB instructions on creating a new MongoDB Atlas cluster.
There are three main steps to take:
- Create a new organisation.
- Create a new project within the organisation.
- Create a new M10 cluster within the project.
On the overview page, click on the button Build a cluster.
To deploy your cluster, select the M10 option and change the name to DrupalOnMongoDB. Make sure that AWS is the provider. In this tutorial, we will be using the AWS us-east-1 datacenter that is located in North Virginia in the USA. You can change the used datacenter to your preferred datacenter. Make sure to create your EC2 instance, which we will be using to run the PHP webserver, located in the SAME datacenter. If this is not the case, the performance of the Drupal site on the MongoDB Atlas will be very slow. Next, click on Create Deployment.
The cluster deployment will take a couple of minutes.
When the deployment is complete, you can create a database user account on the Security Quickstart page. Make sure that Username and Password is selected. Then, fill in the username and password and click on Create User. You need to remember the username and password as they are needed during the Drupal install process.
Click on Finish and Close.
Then, click on Go to Clusters and go to the overview page.
You should now have a MongoDB Atlas M10 cluster running. The available sample dataset is not used.
Create a database on your MongoDB Atlas cluster
Click on Clusters in the menu on the left side. Then, click on Browse Collections.
Now, click on + Create Database or Add your first database and set the database name to aws and the collection name to deleteme. Every database in MongoDB needs to have at least a single collection. The collection name deleteme is not used in the Drupal install process. Leave additional settings empty.
In the resulting overview page, the new database aws should be visible.
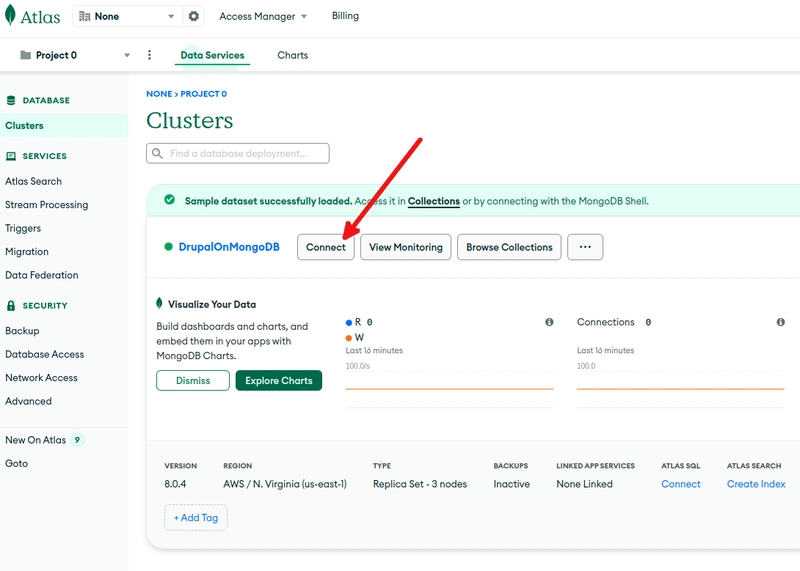
Now, we need to get the server name of the MongoDB Atlas instance as we will need it during the Drupal install process. Click on Clusters in the menu on the left side, then on Connect.
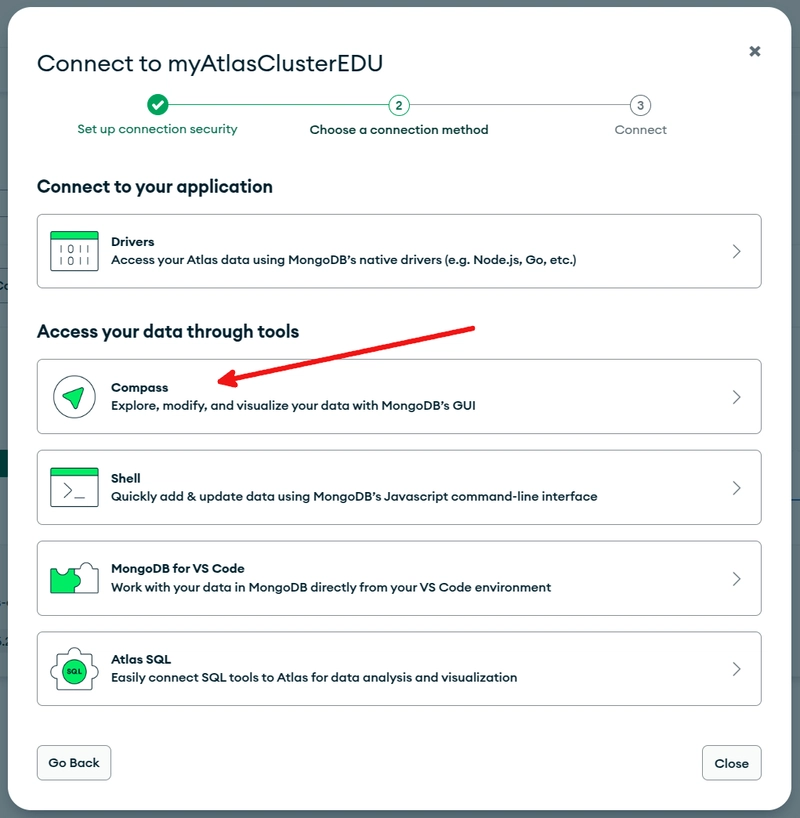
In the connect to cluster popup, click on Compass.
In the center of the popup, you can copy the connection string for connecting with the MongoDB Compass tool—something like:
mongodb+srv://:@myatlasclusteredu.drd0q.mongodb.net/
In my connection string, the server name is myatlasclusteredu.drd0q.mongodb.net. Again, please save your server name, because we will need it during the Drupal install process.
The MongoDB Compass is a great interactive tool for querying, optimizing, and analyzing your MongoDB data.
Giving the MongoDB database user the admin role
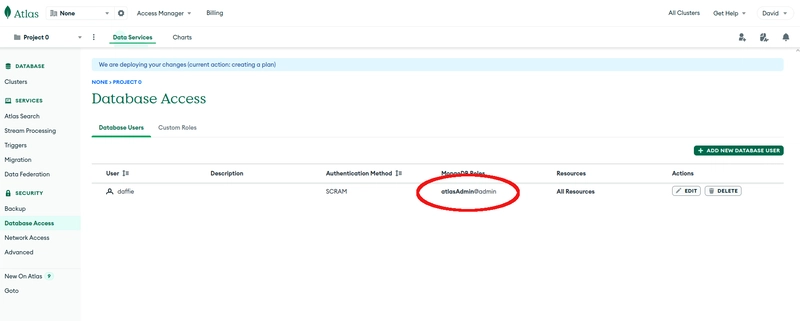
Now, click on Database access. You should see the database user you just created.
The database user has the role readWriteAnyDatabase@admin. However, this is not enough for Drupal. For Drupal, the database user needs the built-in role Atlas admin. Click on Edit to change the setting for the database user.
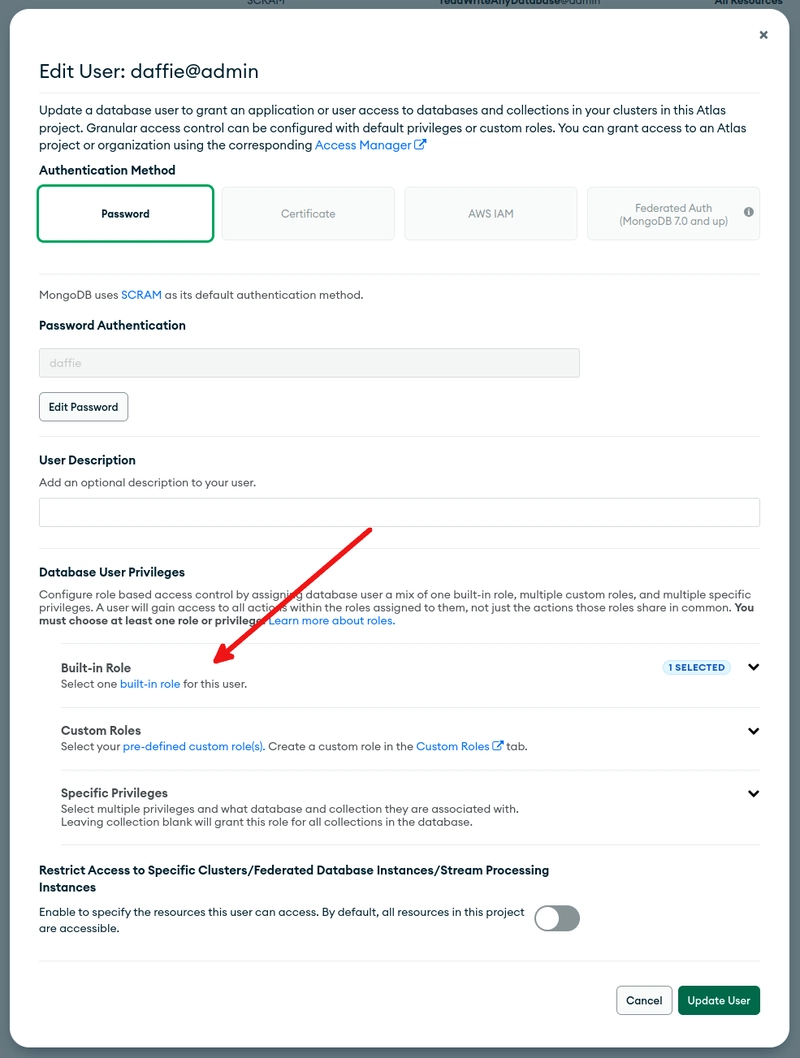
Change the built-in role to Atlas admin.
Now, the MongoDB database user should have the built-in role Atlas admin.
Create an AWS account
Use a personal AWS account or create a new AWS account for this lab instead of using an organization’s account. This ensures you have full access to all required services and prevents leaving behind any unintended resources.
Once your AWS account is set up, proceed to the next chapter to launch a database instance with Amazon RDS.
Create and configure a security group
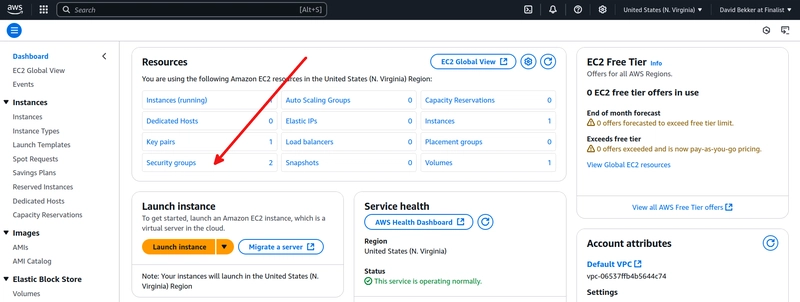
Go to the EC2 dashboard page and click on Security groups.
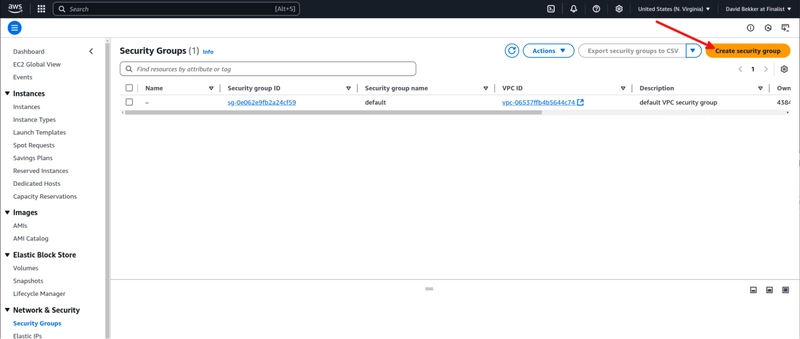
Then, click on Create security group.
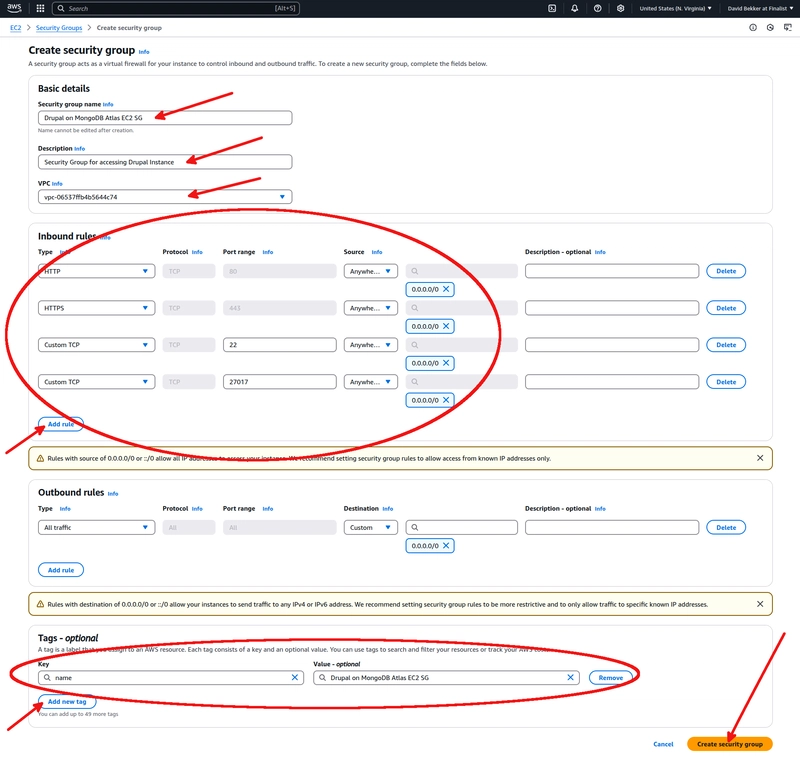
Create a new security group with the following configuration:
- Security group name:
Drupal on MongoDB Atlas EC2 SG - Description:
Security Group for accessing Drupal Instance - VPC: Default VPC
- Inbound Rules:
- Type:
HTTP| Source:Anywhere-IPv4 - Type:
HTTPS| Source:Anywhere-IPv4 - Type:
Custom TCP| Port range:22| Source:Anywhere-IPv4 - Type:
Custom TCP| Port range:27017| Source:Anywhere-IPv4
- Type:
- Tags:
Key:
name| Value:Drupal on MongoDB Atlas EC2 SG
After providing all the necessary details, click on the Create security group button. This action will create a security group that can be utilized as part of the EC2 instance provisioning process.
The first and second inbound rules will allow web requests to your Drupal on MongoDB Atlas site. The third inbound rule will allow you to connect to the EC2 instance to configure your PHP webserver. The fourth inbound rule will allow the PHP server to connect to your MongoDB Atlas database. When setting up a Drupal on MongoDB Atlas for production, please use a private endpoint—this is much more secure.
Getting an AWS EC2 medium instance
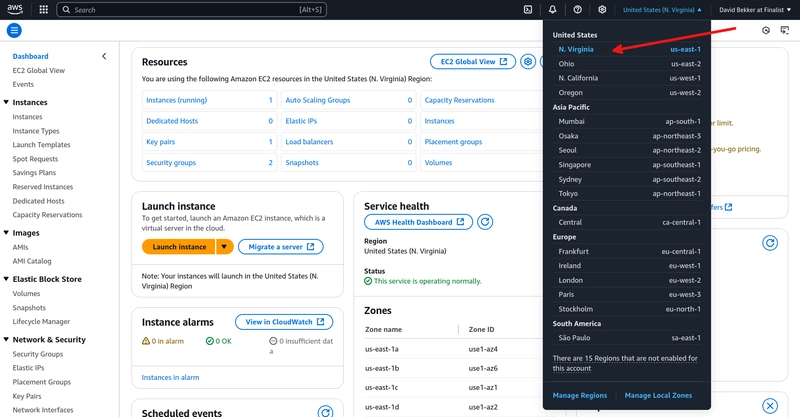
For a Drupal site on MongoDB Atlas to perform well, it is very important that the MongoDB Atlas database and the PHP webserver are located in the SAME datacenter!
If the selected datacenter is not the same as the one you selected for your MongoDB Atlas, please change it now to the same datacenter.
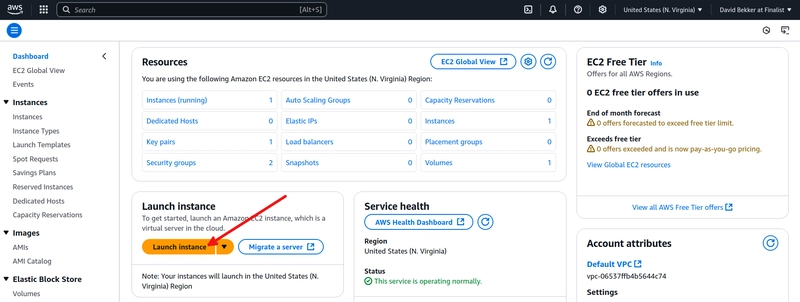
Now, click on Launch instance to configure an EC2 instance to use as the PHP web server.
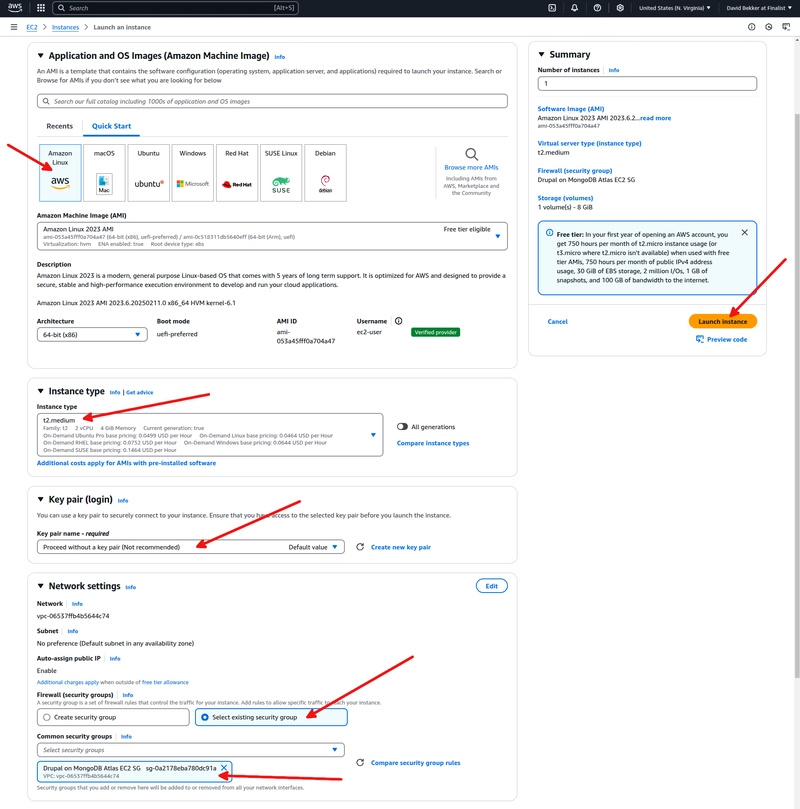
Set the name of the EC2 instance to Drupal on MongoDB Atlas. Make sure that Amazon Linux is selected as the used OS image. For the instance type, select t2.medium. Change the key pair setting to Proceed without a key pair (Not recommended). Using a key pair is much more secure. However, we are creating a demonstration site. In network settings, change the setting Select existing security group and select the security group you created before. Then, click on Launch instance.
Allow your EC2 instance to connect to your MongoDB Atlas instance
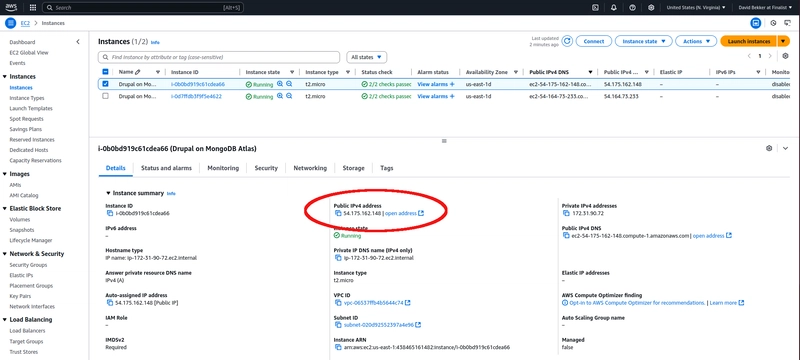
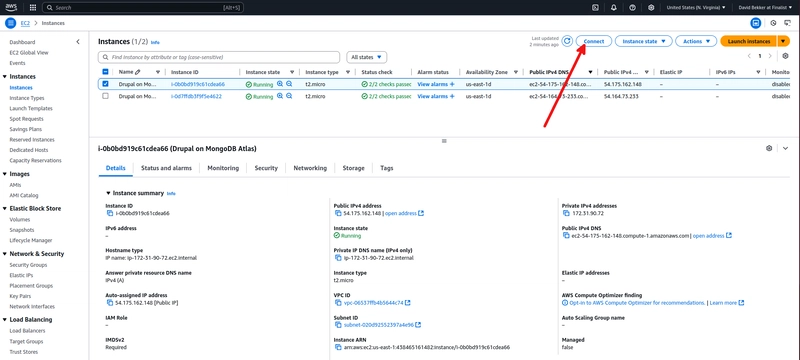
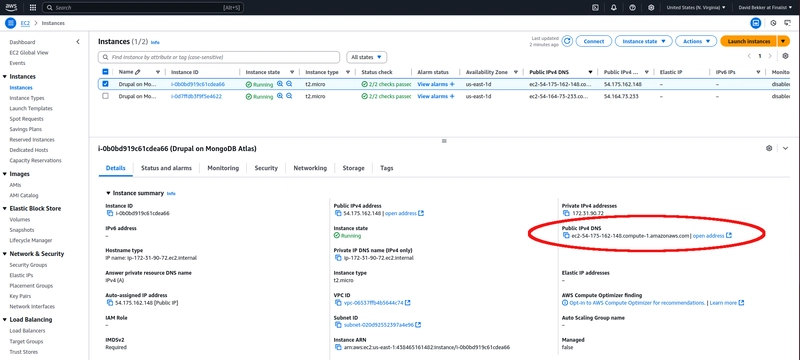
Go to the EC2 instances page in the AWS console. You should see the EC2 instance you created for the Drupal installation. Select the instance and the EC2 instance details should be visible. In the EC2 instance, copy the value for the Public IPv4-address.
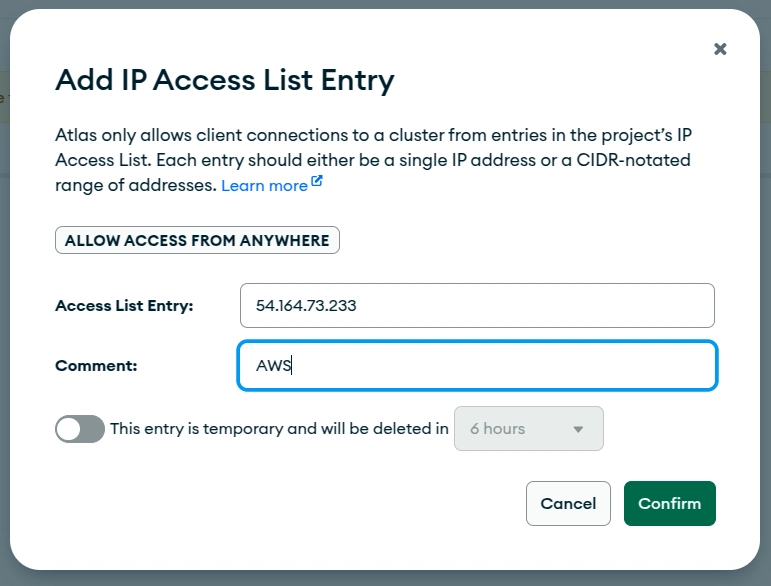
You will need to allow MongoDB Atlas to be accessed by your AWS EC2 instance. Go to the MongoDB Atlas cluster and click on Network access.
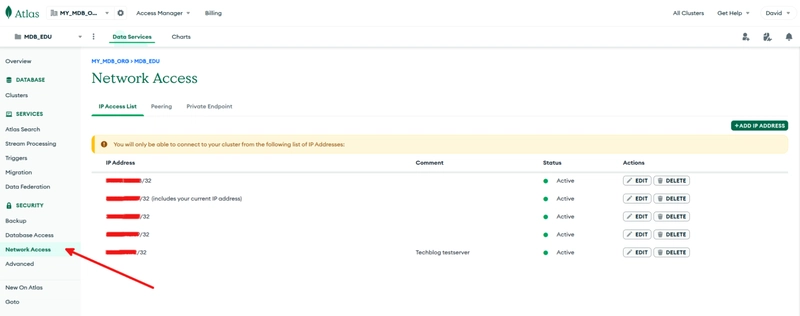
Then, click on + ADD IP ADDRESS and fill in your public IPv4-address from your AWS EC2 instance and set the comment value to AWS. Click on Confirm. Now, your IPv4-address from your AWS EC2 instance should be added to the list.
Connect to your EC2 instance
Go to the EC2 instances page in the AWS console. You should see the EC2 instance you created for the Drupal installation. Select the instance and click on Connect.
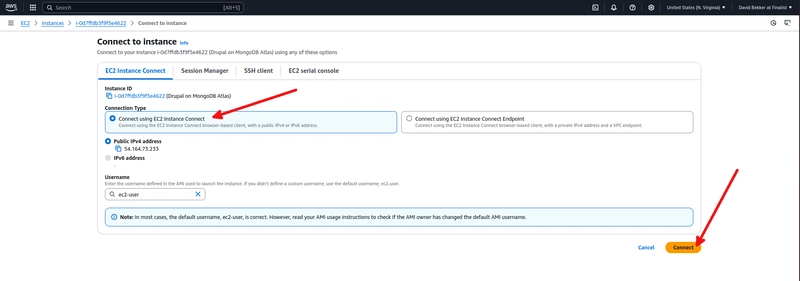
Make sure Connect using EC2 instance Connect is selected and click on Connect.
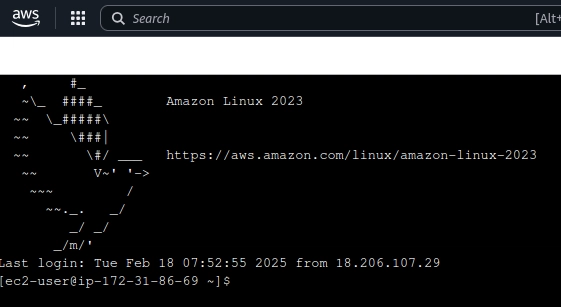
Now, you should be redirected to the AWS EC2 instance terminal window. We can now start building the PHP webserver.
Installing the Apache web server
We will start by installing the Apache webserver with the following commands:
sudo dnf install -y httpd
After the Apache webserver has been installed, we have to edit the apache configuration file with the command:
sudo nano /etc/httpd/conf/httpd.conf
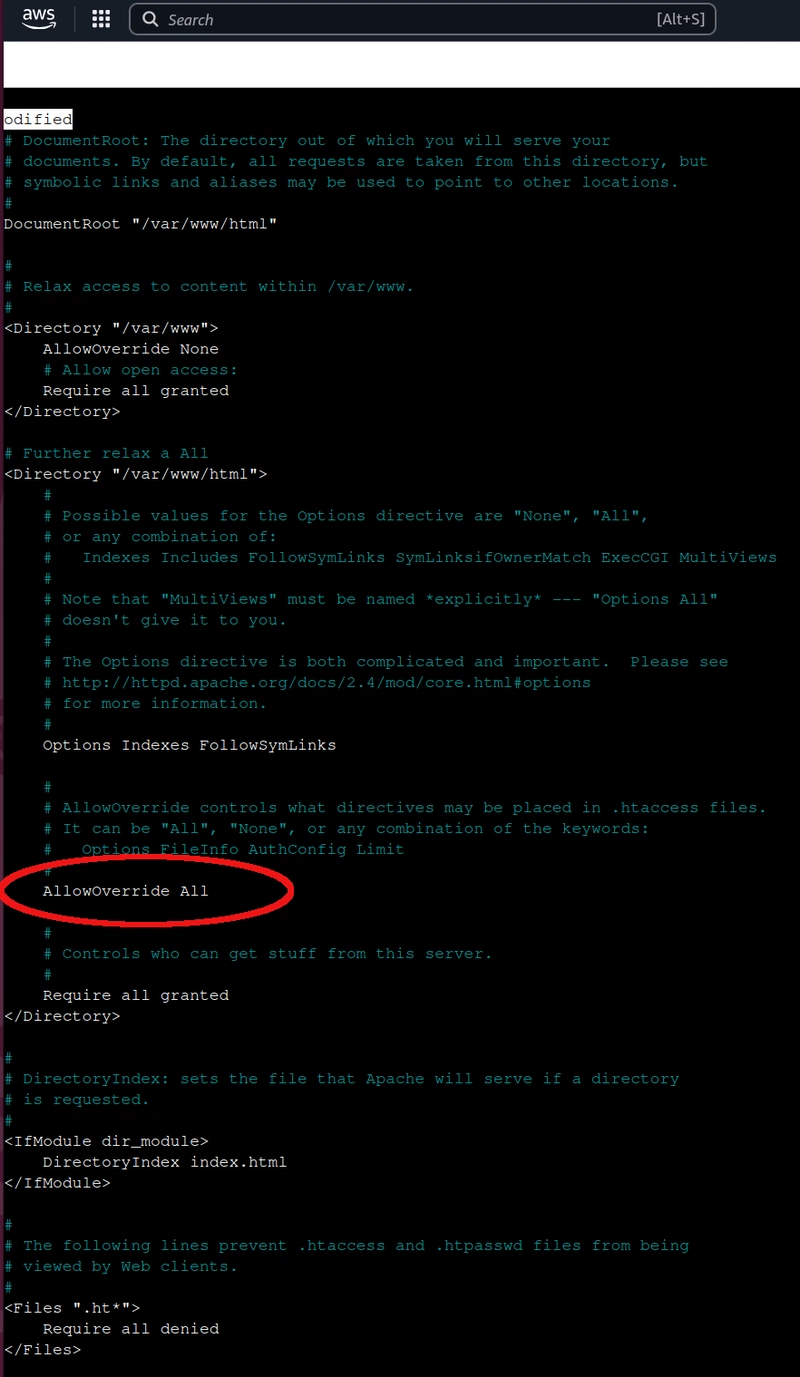
In the configuration file, change the setting AllowOverride None to AllowOverride All in the directory "/var/www/html". Be careful—there are multiple AllowOverride None. The following image clarifies which setting to change.
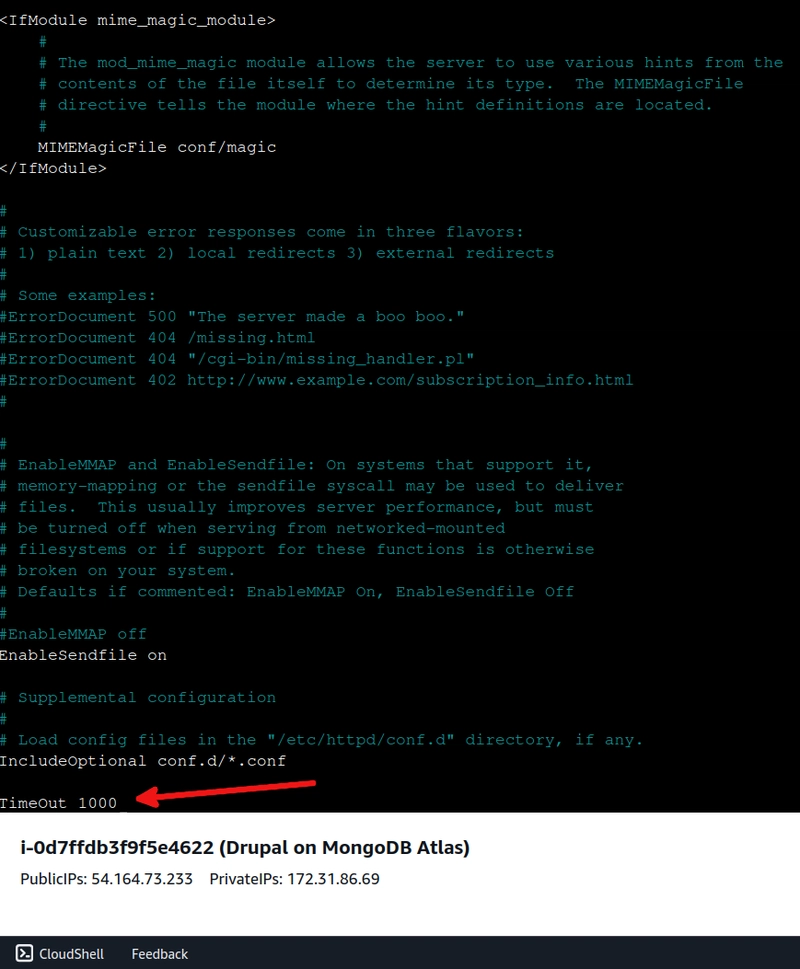
Then, at the end of the configuration file, add the setting TimeOut 1000. The install process might take some time and this setting will prevent the process from ending prematurely.
You can save and exit from nano by entering CTRL + O followed by CTRL + X.
Now, run the following command to restart the Apache webserver with the new configuration.
sudo service httpd restart
To make sure the Apache web server was installed correctly, open the AWS EC2 instances and select the EC2 instance that will be used as your PHP webserver. Copy the Public IPv4 DNS name and open it in a new browser tab. Use the regular http instead of the more secure https.

Installing PHP
Install PHP by executing the following line in the AWS terminal window:
sudo dnf install -y php8.3 php-dom php-simplexml php8.3-cli php8.3-common php-curl php8.3-gd php8.3-mbstring php8.3-opcache php-readline php-sqlite3 php8.3-xml php8.3-zip
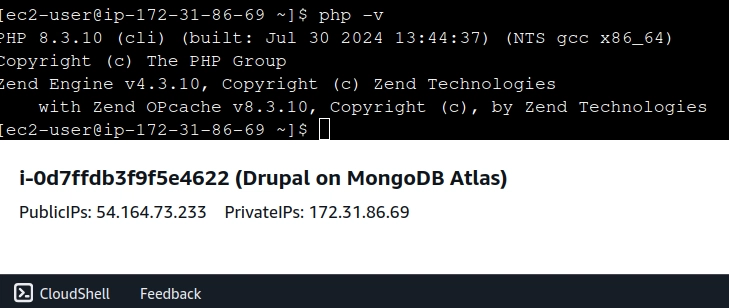
To check to see if PHP was installed correctly, run the command:
php -v
Installing the MongoDB PHP extension
The PHP extension for MongoDB needs to be installed as a PECL repository. Run the following command to install PHP PECL:
sudo dnf install -y php-pear php-devel
Run the following command to install the PHP extension for MongoDB. For all options, select the default option.
sudo pecl install mongodb

Now, we need to enable the PHP extension for MongoDB by adding the PHP configuration file and adding the line "extension=mongodb.so" at the end of the PHP configuration file:
sudo nano /etc/php.ini
extension=mongodb.so
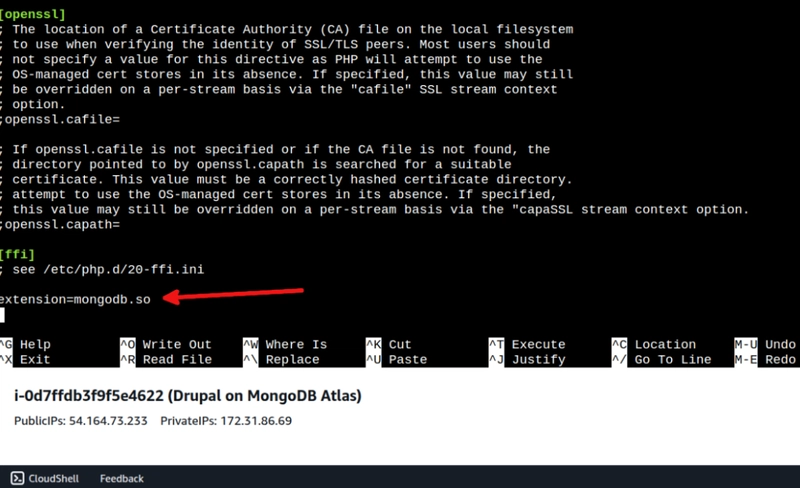
As before, you can save and exit from nano by entering CTRL + O followed by CTRL + X.
The PHP web server needs to be restarted for the configuration changes to take effect.
sudo service httpd restart
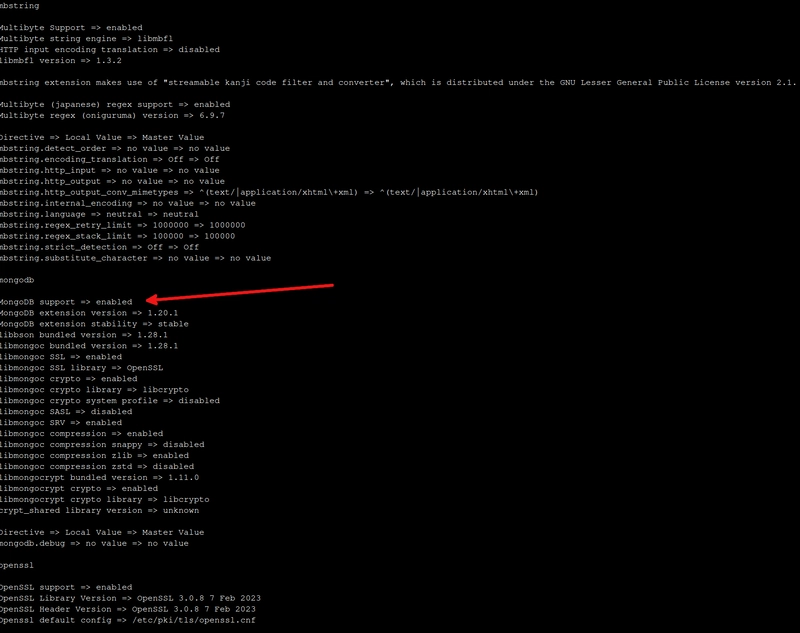
You can run php -i and check if the extension for MongoDB is enabled. Look for the line "MongoDB support => enabled".
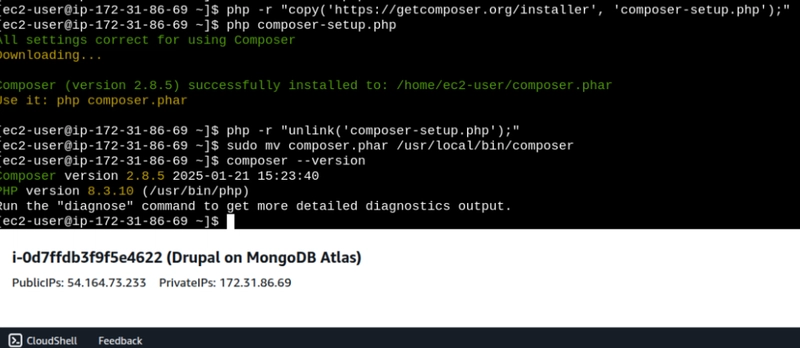
Installing PHP Composer
Run the following commands to download Composer.
php -r "copy('https://getcomposer.org/installer', 'composer-setup.php');"
php composer-setup.php
php -r "unlink('composer-setup.php');"
sudo mv composer.phar /usr/local/bin/composer
To check if the Composer tool is correctly installed:
composer --version
The expected result should be something like:
Installing the Drupal code
We are now going to install the PHP files for the Drupal web server. Run the following commands in the AWS terminal. Answer the question Continue as root/super user [yes]? with yes.
cd /var/www/html/
sudo composer create-project drupal/recommended-project:11.1.5 drupal
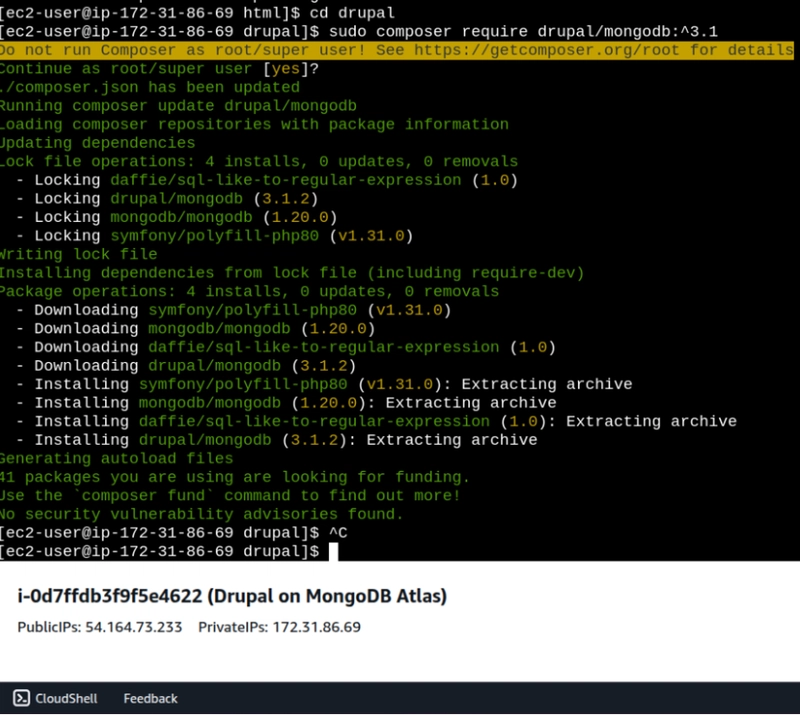
cd /var/www/html/drupal/
sudo composer require drupal/mongodb:^3.1
Install git and apply the Drupal core patch
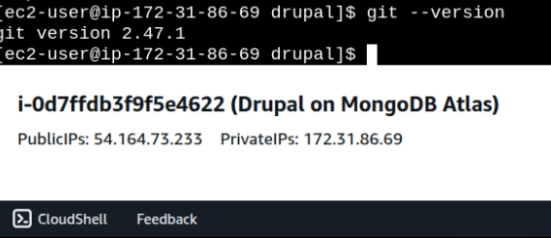
The Drupal core PHP files need to be patched to make it work with a MongoDB database. For that, git needs to be installed.
sudo dnf install git -y
git --version
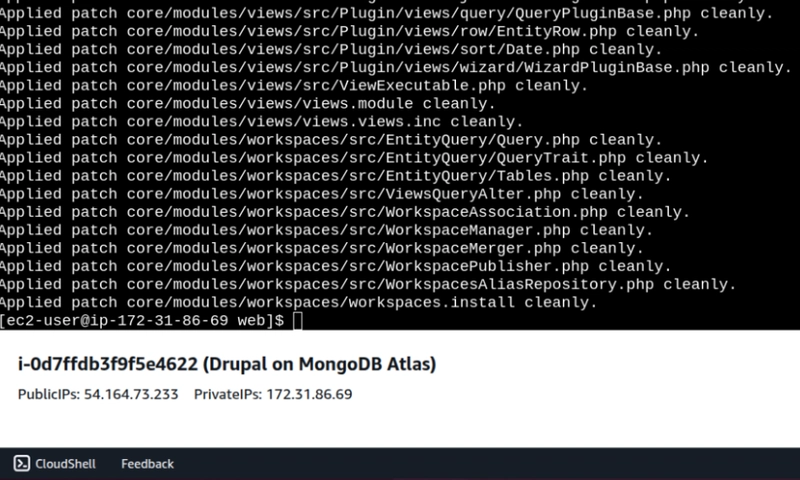
Now is the time to apply the Drupal core patch for MongoDB.
cd /var/www/html/drupal/web/
sudo git apply -v modules/contrib/mongodb/patches/drupal-core-11.1.5.patch
Creating the settings.php file
Create a settings file by copying the default settings file. The settings file has to be writable to allow the Drupal install process to save the new settings.
cd /var/www/html/drupal/web/sites/default/
sudo cp default.settings.php settings.php
sudo chmod 777 settings.php
sudo nano /var/www/html/drupal/web/sites/default/settings.php
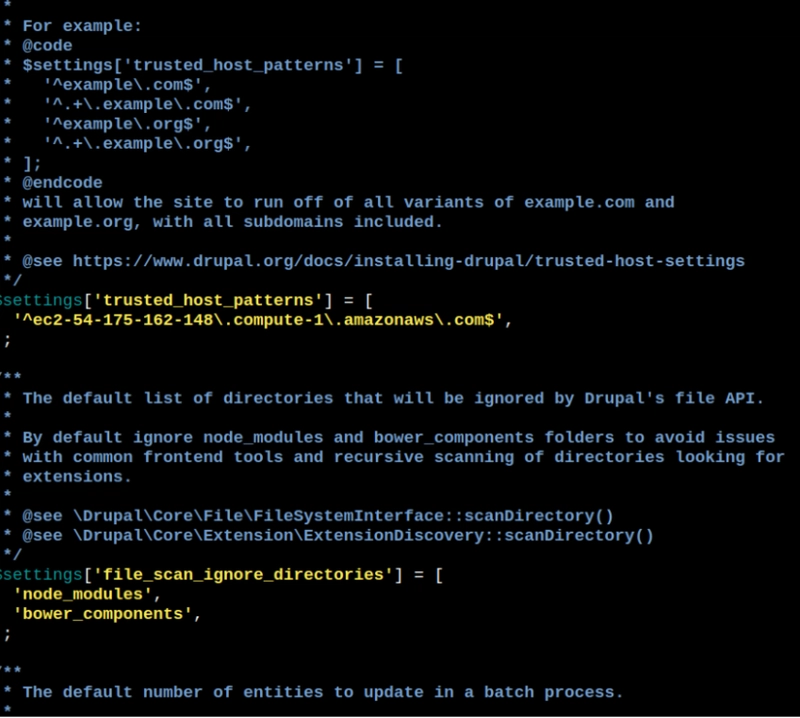
Look for:
# $settings['trusted_host_patterns'] = [];
And replace it with something like:
$settings['trusted_host_patterns'] = [
  '^ec2-54-175-162-148\.compute-1\.amazonaws\.com$',
];
The used domain name is the same as the one from step #9 (Public IPv4 DNS). Do not copy the hostname from this document. Copy it from your used EC2 instance.
You can save and exit from nano by entering CTRL + O followed by CTRL + X.
Create the default file directory for Drupal
Create the default files directory for Drupal by executing the following commands:
sudo mkdir /var/www/html/drupal/web/sites/default/files
sudo chmod 777 /var/www/html/drupal/web/sites/default/files
Install Drupal on MongoDB Atlas
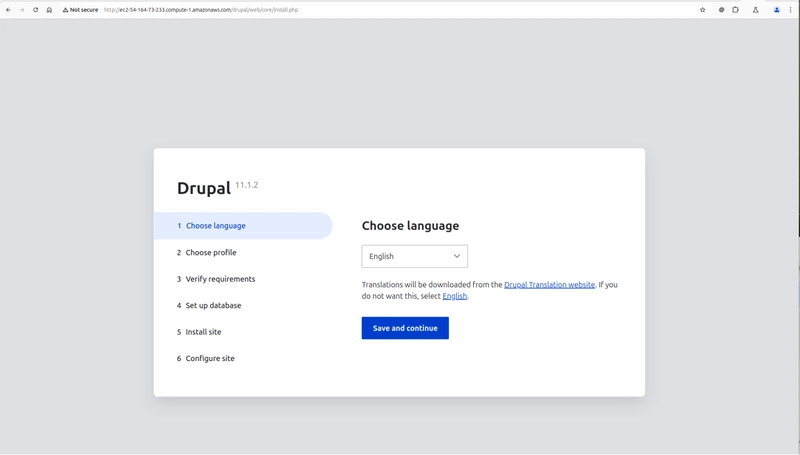
In the browser, open the domain name from step #9 (Public IPv4 DNS) and change to the directory /drupal/web. The resulting web address should be something like: http://ec2-54-164-73-233.compute-1.amazonaws.com/drupal/web. You will be redirected to: http://ec2-54-175-162-148.compute-1.amazonaws.com/drupal/web/core/install.php. Now, the Drupal install process can be started. For this demonstration site, go for the default English language. Click on Save and continue.
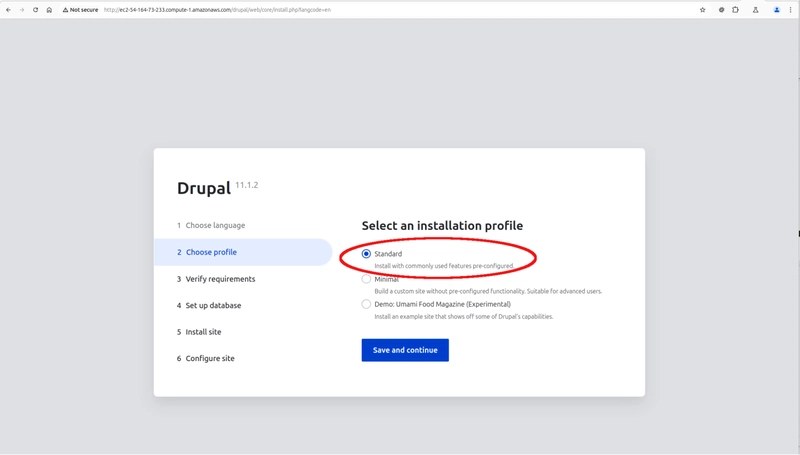
Keep the default profile Standard selected and click on Save and continue.
When all the previous steps have been executed correctly, you will be redirected to the next step: the database settings. If something goes wrong, you will end up on the Verify requirements page. This page will list the requirement problems that need to be fixed.
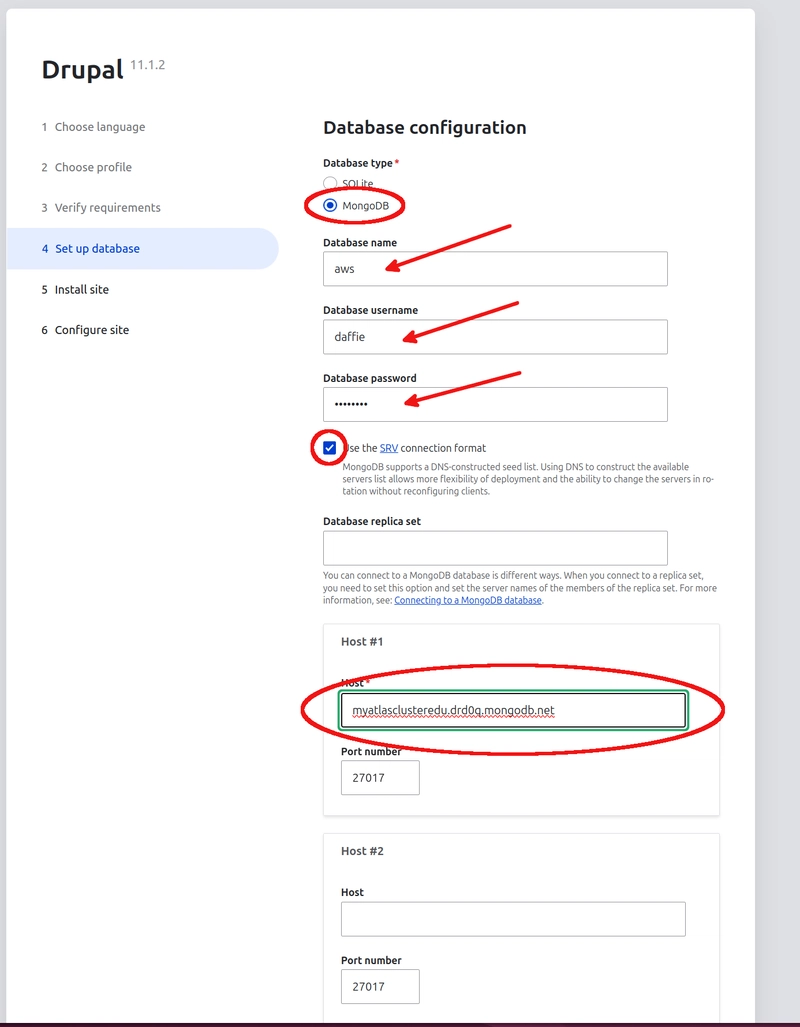
On the Set up database page, select MongoDB as the database type. The database name should be: aws. The database username and password should be the ones that you created for the database user in MongoDB Atlas. The option for the SRV connection format should be set for MongoDB Atlas. Always use this type of connection format for MongoDB Atlas. The last setting is for host and it should be the server name you saved from the MongoDB Compass connection string. When this is done, click on Save and continue.
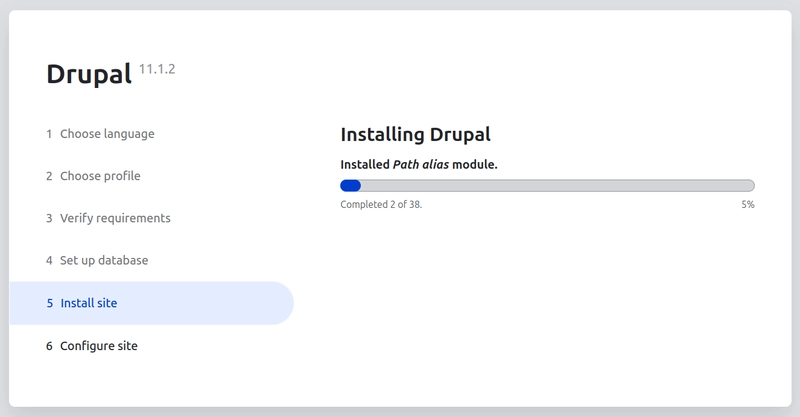
The Drupal install process will now start installing the Drupal modules. This might take a couple of minutes.
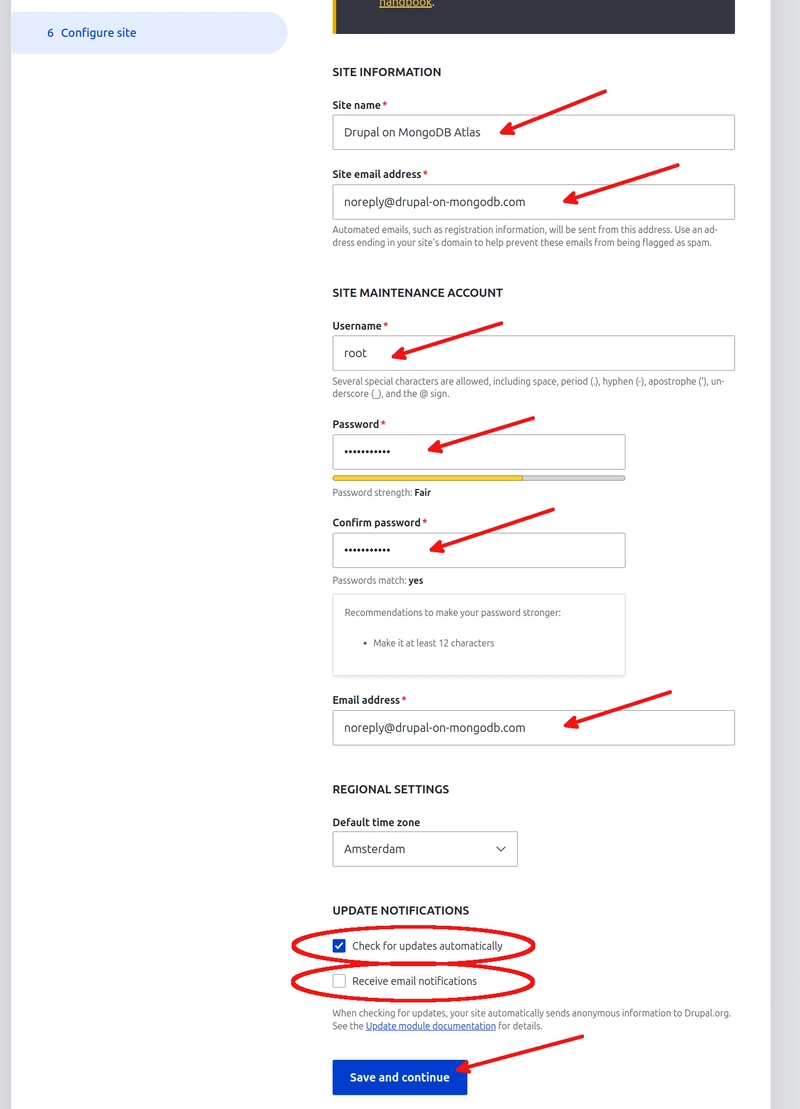
On the Configure site page, you will add the main settings for your Drupal on MongoDB Atlas site. Set the site name to Drupal on MongoDB Atlas, and set the site email address to noreply@drupal-on-mongodb.com or any non-existing email address. The username and password are for the Drupal site administrator account. As we have just added a non-existing email address, it is useful to uncheck Receive email notifications. Then, click on Save and continue. This can take a couple of minutes.
When the Drupal install process is finished, you will be redirected to the main page.
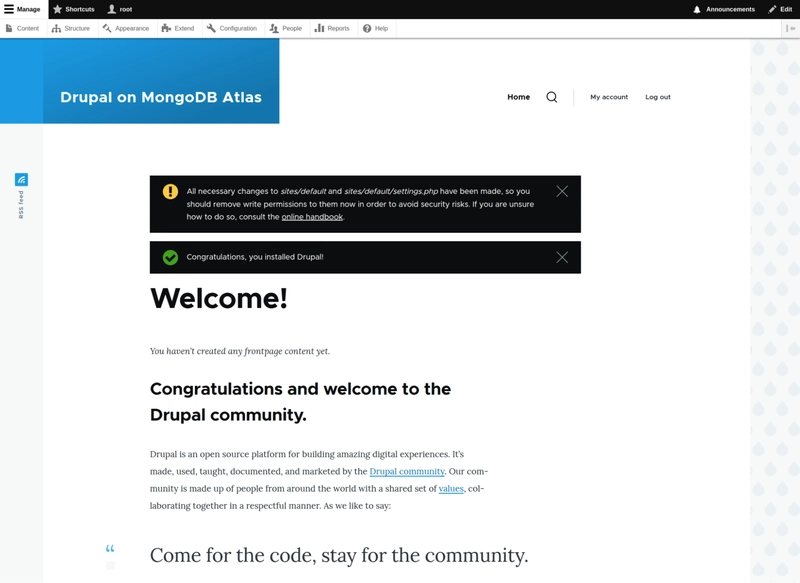
After installing Drupal
The settings directory and the settings.php need to be secured. Run the following commands to do this:
sudo chmod 555 /var/www/html/drupal/web/sites/default
sudo chmod 444 /var/www/html/drupal/web/sites/default/settings.php
On the Drupal main page, click on Reports and then click on Status report. You should be redirected to the Drupal status page and it should look something like:
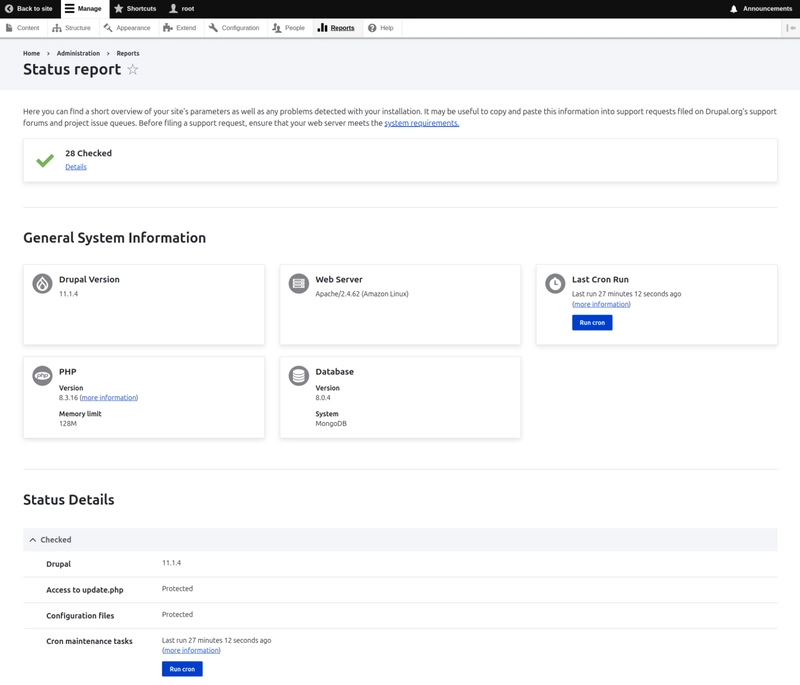
Congratulations! You have now finished installing your Drupal site on MongoDB Atlas.
You can now start building your Drupal site.
Please do not use search, content_moderation, workflow, and workspace modules, since currently, they are not fully supported.
Add content to Drupal and view how it is stored in MongoDB Atlas
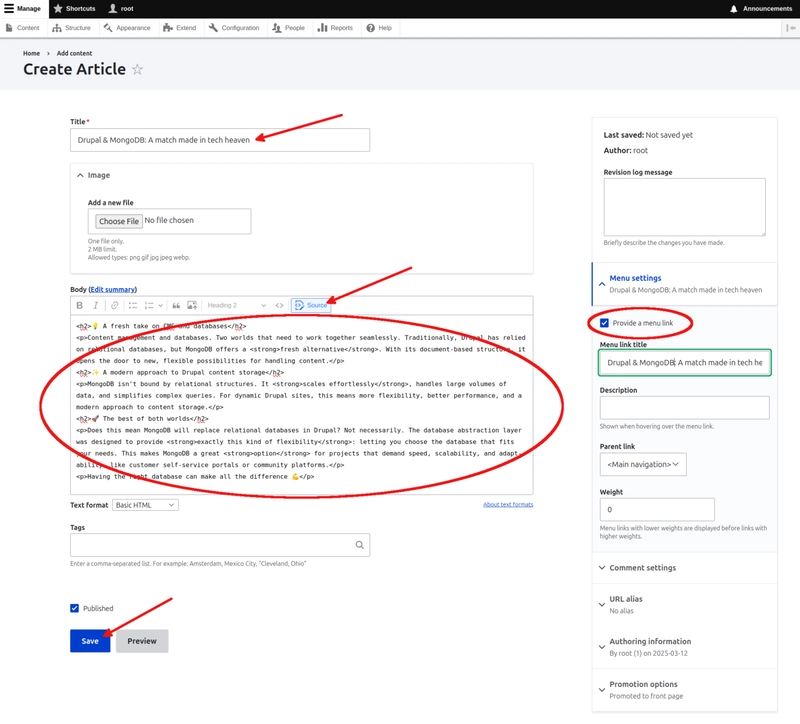
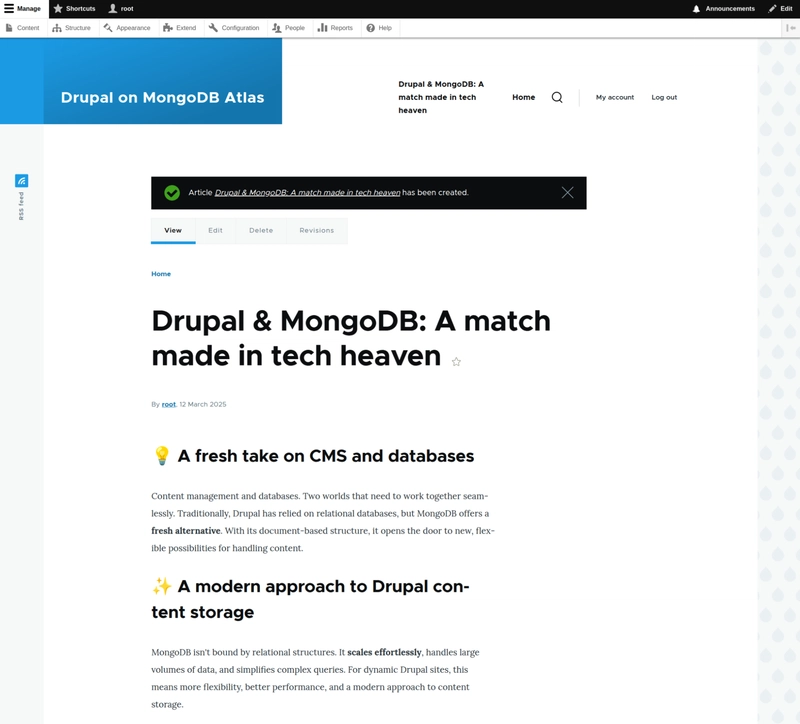
For this, we are creating an Article in our Drupal site named How Drupal and MongoDB are a match made in heaven.
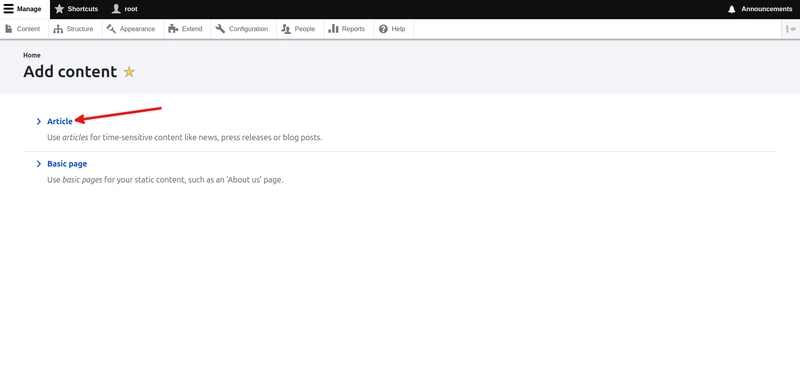
To create a new article on your Drupal site, click on content in the menu on the left side of the page.
The content that you are going to create is an article. Therefore, click on > Article.
We are now on the Create Article page. First, add the title to the new article. Second, click on Source and then copy and paste the article’s body. After that, we can create a menu link to our new article. Click on Menu settings and check the box for Provide a menu link. The menu link title gets auto filled and can be changed. Lastly, click on Save to save the new article.
The title of the article:
Drupal & MongoDB: A match made in tech heaven
The body of the article:
<h2>💡 A fresh take on CMS and databases</h2>
<p>Content management and databases. Two worlds that need to work together seamlessly. Traditionally, Drupal has relied on relational databases, but MongoDB offers a <strong>fresh alternative</strong>. With its document-based structure, it opens the door to new, flexible possibilities for handling content.</p>
<h2>✨ A modern approach to Drupal content storage</h2>
<p>MongoDB isn't bound by relational structures. It <strong>scales effortlessly</strong>, handles large volumes of data, and simplifies complex queries. For dynamic Drupal sites, this means more flexibility, better performance, and a modern approach to content storage.</p>
<h2>🚀 The best of both worlds</h2>
<p>Does this mean MongoDB will replace relational databases in Drupal? Not necessarily. The database abstraction layer was designed to provide <strong>exactly this kind of flexibility</strong>: letting you choose the database that fits your needs. This makes MongoDB a great <strong>option</strong> for projects that demand speed, scalability, and adaptability, like customer self-service portals or community platforms.</p>
<p>Having the right database can make all the difference 💪</p>
After clicking on Save, we are redirected to the page with the new article.
On the MongoDB Atlas cluster overview page, click on Browse Collections.
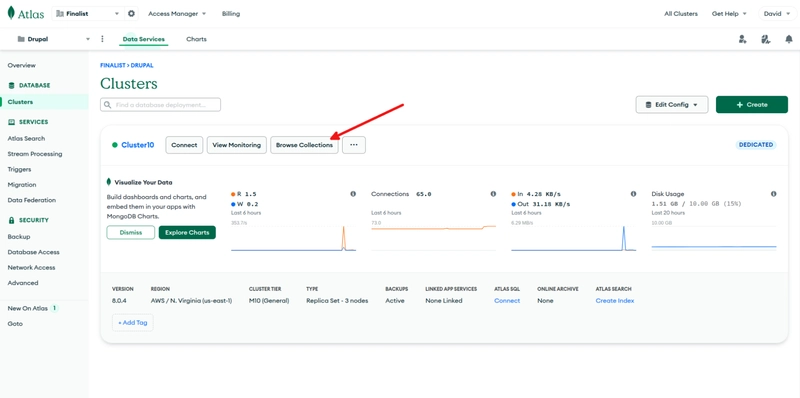
Click on aws to view all collections in the database. Then, click on the collection node to view the just created article. To view the title of the article, click on node_current_revision and then click on the single object in the array. The body of the article is in the array node_current_revision__body.

When you are done
Do not forget to stop the AWS EC2 instance with the PHP web server on AWS and the MongoDB Atlas database instance.
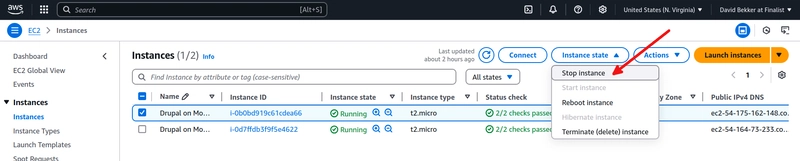
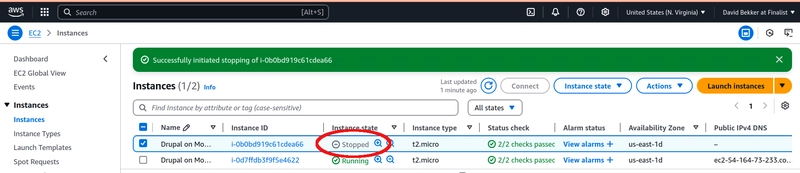
On the AWS EC2 instances page, select the instance for your PHP webserver. Then, in the top menu, click Instance state and then Stop instance to stop the EC2 instance.
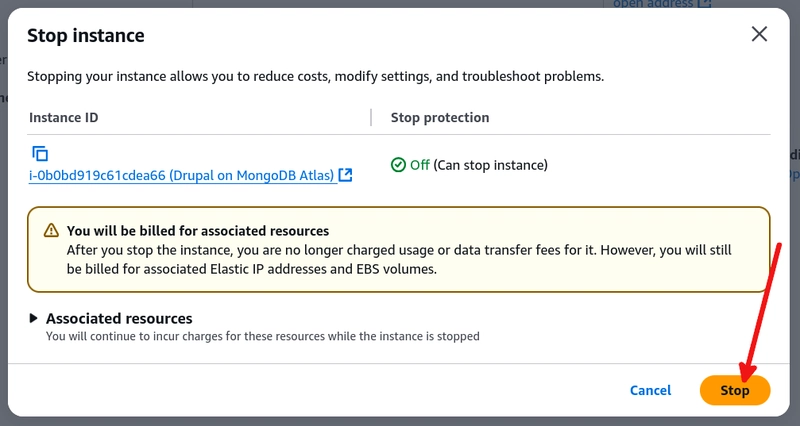
Click Stop to confirm you want to stop the instance.
Now, the EC2 instance should have the instance state of Stopped.
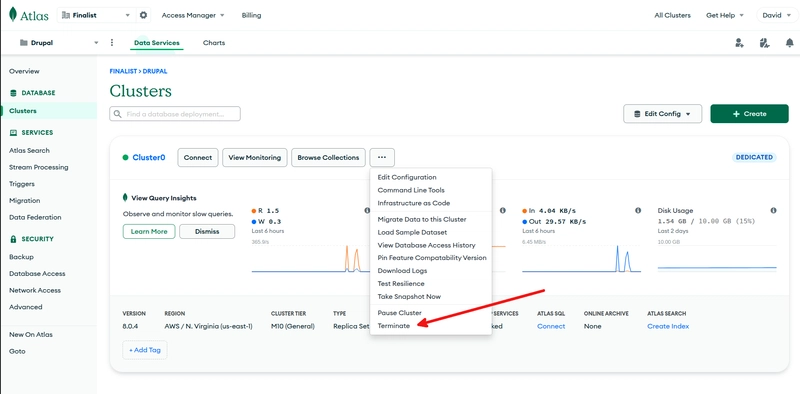
Lastly, to stop your MongoDB Atlas M10 cluster, go to the cluster overview page and click on Terminate.
Conclusion
By following this guide, we have successfully set up a Drupal site on MongoDB Atlas, using AWS EC2 as the PHP web server. This setup provides a scalable and flexible CMS solution, utilizing MongoDB’s document-based storage for optimal performance. We can now start building your Drupal site, adding content, and exploring how MongoDB handles your data.
Remember to secure your settings and avoid unsupported modules like search, content moderation, workflow, and workspace. With this foundation in place, you’re ready to leverage the power of Drupal and MongoDB Atlas for your projects!

Top comments (0)