This tutorial was written by Vishal Turi.
This tutorial walks through integrating the WhatsApp Business API—specifically, Cloud API—and webhook setup using the MongoDB Node Driver. We'll create a Node.js application that handles WhatsApp webhook events and message sending capabilities while storing all communication data in MongoDB.
The WhatsApp Business Cloud API is intended for people developing for themselves or their organization and is also similar for business solution providers (BSPs). Webhook will trigger whenever a business phone number receives a message, updates the current state of the sent message, and more.
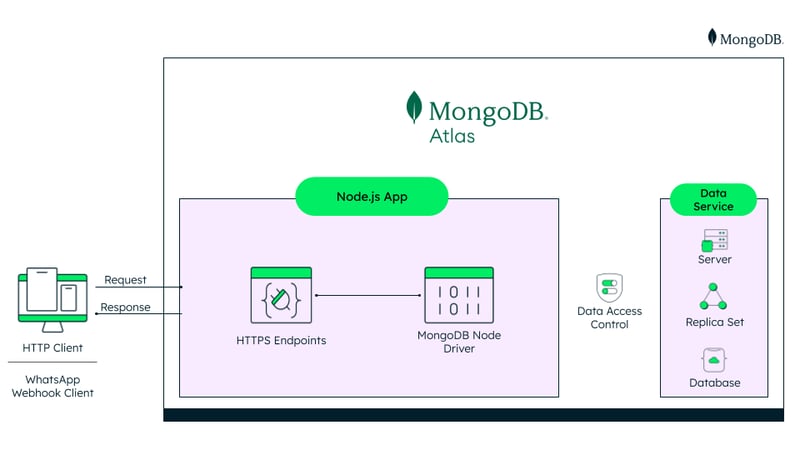
We will examine a way to set up webhooks to connect with WhatsApp, create a Node.js server to handle these webhooks, and implement endpoints that send/receive messages while storing them in MongoDB.
Prerequisites
The core requirement is a Meta Business account. If you don’t have a business account, then you can also use the Test Business account that is provided by Meta. Refer to the article Create a WhatsApp Business Platform Account for more information.
WhatsApp Business Cloud API is a part of Meta’s Graph API, so you need to set up a Meta Developer account and a Meta developer app. You can follow the instructions from the Get Started with Cloud API, hosted by Meta guide and complete all the steps explained in the docs to set everything up. When you create your application, make sure that you create an “Enterprise” application and that you add WhatsApp as a service. Once your application is created, find the following and store them somewhere.
- Access token: You can use a temporary access token from your developer app > WhatsApp > Getting Started page, or you can generate a permanent access token.
- Phone number ID: You can find it from your developer app > WhatsApp > Getting Started page. It has the label “Phone number ID” and can be found under the “From” section.
Next, you’ll need to set up a MongoDB Atlas account, which you can learn how to do using the MongoDB Getting Started with Atlas article. Ensure that Node.js is installed on your system, and then let's proceed with setting up the project.
Project setup
Let's create a basic Express.js server that will handle our webhook endpoints and connect to MongoDB using the MongoDB Node Driver for storing our WhatsApp messages.
To begin, you'll need to install the necessary dependencies for the project. You can do so by running the following command:
npm install express mongodb dotenv
Next, create a .env file in the root of your project and configure it with the following values:
# MongoDB Configuration
MONGODB_URI=your-mongodb-connection-string
DB_NAME=WhatsApp
COLLECTION_NAME=messages
# Server Configuration
PORT=3000
# WhatsApp Configuration
VERIFY_TOKEN=your-custom-verify-token
WHATSAPP_API_VERSION=v15.0
Now that your environment is set up, let's create a basic Express.js server that will handle the webhook endpoints and connect to MongoDB using the MongoDB Node Driver to store incoming WhatsApp messages.
// Import required dependencies
const express = require('express');
const { MongoClient } = require('mongodb');
require('dotenv').config();

// Initialize express application
const app = express();
const port = process.env.PORT || 3000;

// Environment variables configuration with default values for development
const mongoUri = process.env.MONGODB_URI || "mongodb://localhost:27017/";
const dbName = process.env.DB_NAME || "WhatsApp";
const collectionName = process.env.COLLECTION_NAME || "messages";
/**
 * UPDATE YOUR VERIFY TOKEN
 * This will be the Verify Token value when you set up the webhook
**/
const whatsappApiVersion = process.env.WHATSAPP_API_VERSION || "v15.0";

// Initialize MongoDB client
const client = new MongoClient(mongoUri);

// Middleware to parse JSON bodies
app.use(express.json());

// MongoDB connection function with error handling
async function connectToMongo() {
  try {
    await client.connect();
    console.log("Connected to MongoDB successfully!");
  } catch (error) {
    console.error("MongoDB connection error:", error);
    process.exit(1); // Exit if we can't connect to database
  }
}

// Helper function to get MongoDB collection
function getCollection() {
  return client.db(dbName).collection(collectionName);
}

## TODO: Webhook endpoint

## TODO: Send Message endpoint

// Start server and connect to MongoDB
async function startServer() {
  await connectToMongo();
  app.listen(port, () => {
    console.log(`Server running at http://localhost:${port}`);
  });
}

startServer().catch(console.error);
Now that our project is set up, let's deep-dive into how to create a verification requests endpoint for the WhatsApp webhook.
Verification requests endpoint for webhook
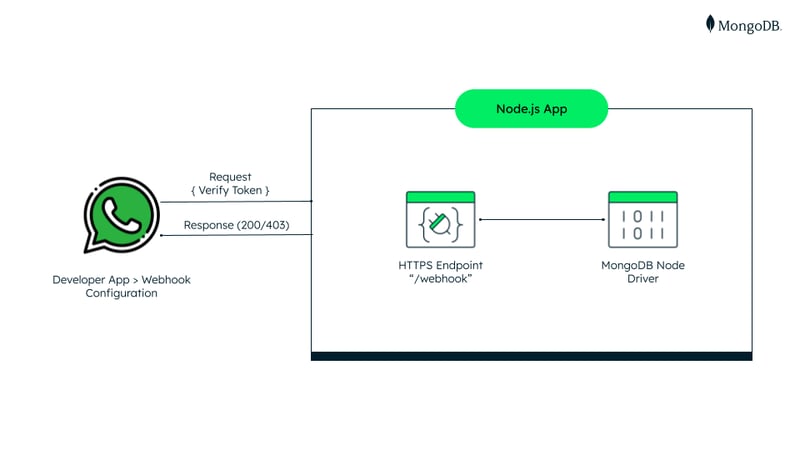
The first thing you need to configure in the WhatsApp application is a verification request endpoint. This endpoint will validate the key and provides security to your application so that not everyone can use your endpoints to send messages.
When you configure a webhook in the WhatsApp Developer App Dashboard, it will send a GET request to the Verification Requests endpoint. Let’s write the logic for this endpoint.
You need to set a secret value for VERIFY_TOKEN. You can pick any random value for this field, and you will need to add it to your WhatsApp webhook configuration later on.
The request receives three query parameters: hub.mode, hub.verify_token, and hub.challenge.
We need to check if hub.mode is subscribe and that the hub.verify_token value matches the verifyToken. If so, we return the hub.challenge value as a response. Otherwise, the response is forbidden.
/**
 * Webhook verification endpoint (GET)
 * This endpoint accepts GET requests at the /webhook endpoint. You need this URL to set up the webhook initially, refer to the guide https://developers.facebook.com/docs/graph-api/webhooks/getting-started#verification-requests
**/
app.get('/webhook', (req, res) => {
  // Parse params from the webhook verification request
  let mode = req.query['hub.mode'];
  let token = req.query['hub.verify_token'];
  let challenge = req.query['hub.challenge'];

  // Check the mode and token sent are correct
  if (mode === 'subscribe' && token === verifyToken) {
    // Respond with 200 OK and challenge token from the request
    res.status(200).send(challenge);
  } else {
    // Responds with '403 Forbidden' if verify tokens do not match
    res.sendStatus(403);
  }
});
Wow, that was quick! Now, you can go to WhatsApp > Configuration under Meta Developer App and set up the Callback URL that we have generated in the above code. The URL will be in this format: https://<your host url>/webhook. Click Verify Token, and enter the value that you have specified in the VERIFY_TOKEN environment variable.
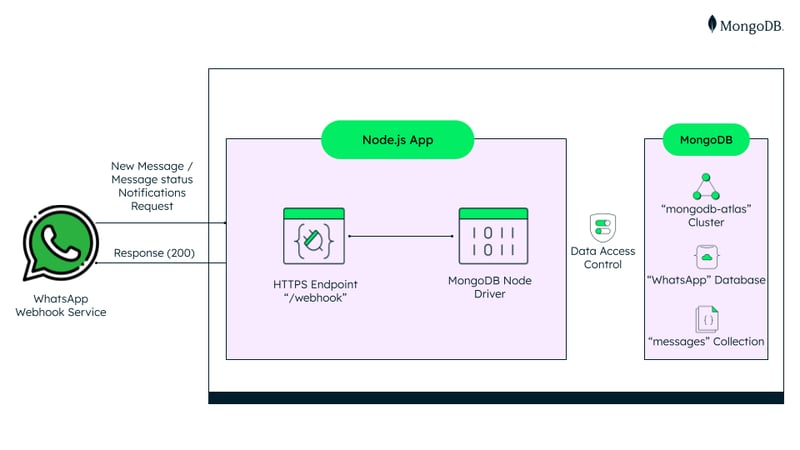
Event Notifications webhook endpoint
The Event Notifications endpoint is a POST request. Whenever new events occur, it will send a notification to the callback URL. We will cover two types of notifications: received messages and message status notifications if you have subscribed to the messages object under the WhatsApp Business Account product. First, we will design the schema and write the logic for this endpoint.
Let’s design our sample database schema and see how we will store the sent/received messages in our MongoDB collection for future use. You can reply to the received messages and see whether the user has read the sent message.
Sent message document:
{
    type: "sent", // this is we sent a message from our WhatsApp business account to the user
    messageId: "", // message id that is from sent message object
    contact: "", // user's phone number included country code
    businessPhoneId: “”, // WhatsApp Business Phone ID
    message: {
        // message content whatever we sent
    },
    status: "initiated | sent | received | delivered | read | failed", // message read status by user
    createdAt: ISODate(), // created date
    updatedAt: ISODate() // updated date - whenever message status changes
}
Received message document:
{
    type: "received", // this is we received a message from the user
    messageId: "", // message id that is from the received message object
    contact: "", // user's phone number included country code
    businessPhoneId: “”, // WhatsApp Business Phone ID
    message: {
        // message content whatever we received from the user
    },
    status: "ok | failed", // is the message ok or has an error
    createdAt: ISODate() // created date
}
In short, this webhook endpoint will do either an update operation if the notification is for a message status update, or an insert operation if a new message is received.
/**
 * Webhook events endpoint (POST)
 * Accepts POST requests at the /webhook endpoint, and this will trigger when a new message is received or message status changes, refer to the guide https://developers.facebook.com/docs/graph-api/webhooks/getting-started#event-notifications
*/
app.post('/webhook', async (req, res) => {
  try {
    const collection = getCollection();

    if (req.body.object && req.body.entry) {
      for (const entry of req.body.entry) {
        for (const change of entry.changes) {
          // Handle message status updates
          if (change.field === "messages" && change.value.statuses) {
            for (const status of change.value.statuses) {
              // Update the status of a message
              await collection.updateOne(
                { messageId: status.id },
                {
                  $set: {
                    status: status.status,
                    updatedAt: new Date(parseInt(status.timestamp) * 1000)
                  }
                }
              );
            }
          }
          // Received message notification
          else if (change.field === "messages" && change.value.messages) {
            for (const message of change.value.messages) {
              const status = message.errors ? "failed" : "ok";

              // Insert the received message
              await collection.insertOne({
                type: "received", // this is we received a message from the user
                messageId: message.id, // message id that is from the received message object
                contact: message.from, // user's phone number included country code
                businessPhoneId: change.value.metadata.phone_number_id, // WhatsApp Business Phone ID
                message: message, // message content whatever we received from the user
                status: status, // is the message ok or has an error
                createdAt: new Date(parseInt(message.timestamp) * 1000) // created date
              });
            }
          }
        }
      }
    }
    res.sendStatus(200);
  } catch (error) {
    console.error("Error processing webhook:", error);
    res.sendStatus(500);
  }
});
Excellent! We have just developed a webhook for sending and receiving messages and updating in the database, as well. So, you can list the conversation, see who replied to your message, and follow up.
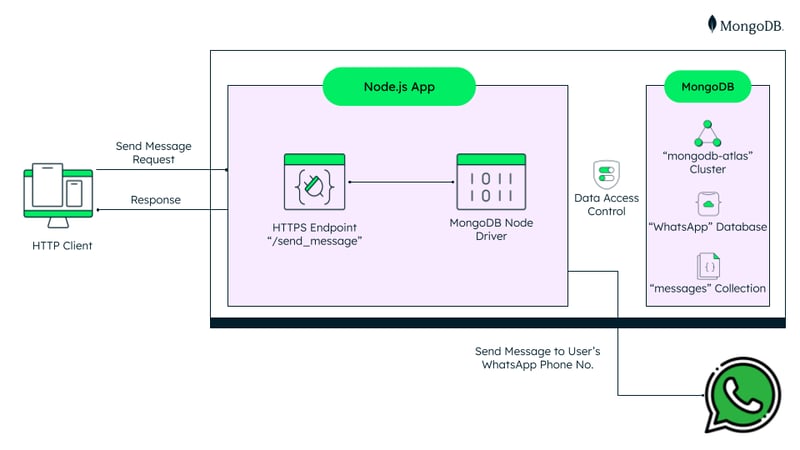
Send message endpoint
Send Message Endpoint is a POST request, almost similar to the Send Messages of the WhatsApp Business API. The purpose of this endpoint is to send and store the message with messageId in the collection so the Event Notifications webhook endpoint can update the status of the message in the same document that we already developed in the previous point. We will write the logic for this endpoint.
Before moving forward, let’s understand the request params:
- Body: The request body should be the same as the WhatsApp Send Message API.
- Headers: Pass Authorization Bearer token. You can use a temporary or permanent token. For more details, read the prerequisites section.
- Query: Pass the business phone ID in the
businessPhoneIdproperty. For how to access it, read the prerequisites section.
This endpoint uses the fetch module to call the send message API of WhatsApp business. If the message is sent successfully, then insert a document in the collection with the messageId.
/**
 * Send message endpoint (POST)
 * Accepts POST requests at the /send_message endpoint, and this will allow you to send messages the same as documentation https://developers.facebook.com/docs/whatsapp/cloud-api/guides/send-messages
*/
app.post('/send_message', async (req, res) => {
  try {
    // Business phone ID is required
    const businessPhoneId = req.query.businessPhoneId;
    if (!businessPhoneId) {
      return res.status(400).json({
        message: "businessPhoneId is required in query params!"
      });
    }

    const collection = getCollection();

    // Prepare WhatsApp API URL
    const whatsappUrl = `https://graph.facebook.com/${whatsappApiVersion}/${businessPhoneId}/messages`;

    // Send message to WhatsApp using fetch
    const response = await fetch(whatsappUrl, {
      method: 'POST',
      headers: {
        'Content-Type': 'application/json',
        'Authorization': req.headers.authorization
      },
      body: JSON.stringify(req.body)
    });

    const responseData = await response.json();

    if (response.ok) {
      // Store message in MongoDB if WhatsApp API call was successful
      await collection.insertOne({
        type: "sent", // this is we sent a message from our WhatsApp business account to the user
        messageId: responseData.messages[0].id,  // message id that is from the received message object
        contact: req.body.to, // user's phone number included country code
        businessPhoneId: businessPhoneId, // WhatsApp Business Phone ID
        message: req.body, // message content whatever we received from the user
        status: "initiated", // default status
        createdAt: new Date() // created date
      });
    }

    // Return the WhatsApp API response to the client
    res.status(response.status).json(responseData);

  } catch (error) {
    console.error("Error in send_message endpoint:", error);
    res.status(500).json({
      error: "Failed to send message",
      details: error.message
    });
  }
});
Now, we are all ready with the endpoint. Refer to the below curl request example. This will send a default welcome template message to the users. You just need to replace your value inside the <> brackets.
curl --location '<ENDPOINT URL>?businessPhoneId=<BUSINESS PHONE ID>' \
--header 'Authorization: Bearer <ACCESS TOKEN>' \
--header 'Content-Type: application/json' \
--data '{
    "messaging_product": "whatsapp",
    "to": "<RECEIVER PHONE NO.>",
    "type": "template",
    "template": {
        "name": "hello_world",
        "language": { "code": "en_US" }
    }
}'
Great! We have just developed an endpoint that sends messages to the user’s WhatsApp account from your business phone number.
Conclusion
In this tutorial, we developed three endpoints using Node.js and MongoDB. One is Verification Requests, which verifies the request from WhatsApp > Developer App’s webhook configuration using Verify Token. The second is Event Notifications, which can read sent messages and status updates, receive messages, and store them in MongoDB’s collection. The third is Send Message, which can send messages from your WhatsApp business phone number to the user’s WhatsApp account.
Apart from these things, we have built a collection for messages. You can use it for many use cases, like designing a chat conversation page where you can see the conversation and reply back to the user. You can also build your own chatbot to reply to users.
To dive into the complete implementation using Node.js that we have performed above, visit the GitHub repository. Feel free to clone the repository and experiment with different use cases in your projects.
If you have any questions or feedback, check out the MongoDB Community Forums and let us know what you think.

Top comments (2)
Some comments may only be visible to logged-in visitors. Sign in to view all comments.