
Init container can be converted to sidecar container using
restartpolicy: always
Example of a Sidecar Container
# This is the identity the Pods will run as.
apiVersion: v1
kind: ServiceAccount
metadata:
  name: demo-kubectl-sidecar
  namespace: default
---
# This defines the namespace-scope permissions granted.
apiVersion: rbac.authorization.k8s.io/v1
kind: Role
metadata:
  name: demo-kubectl-sidecar
  namespace: default
rules:
- apiGroups:
  - ''
  resources:
  - pods
  verbs:
  - get
  - watch
---
# This joins the ServiceAccount to the Role above.
apiVersion: rbac.authorization.k8s.io/v1
kind: RoleBinding
metadata:
  name: demo-kubectl-sidecar
  namespace: default
roleRef:
  apiGroup: rbac.authorization.k8s.io
  kind: Role
  name: demo-kubectl-sidecar
subjects:
- kind: ServiceAccount
  name: demo-kubectl-sidecar
---
# This defines the cluster-scope permissions granted.
apiVersion: rbac.authorization.k8s.io/v1
kind: ClusterRole
metadata:
  name: demo-kubectl-sidecar
rules:
- apiGroups:
  - ''
  resources:
  - nodes
  verbs:
  - get
  - watch
---
# This joins the ServiceAccount to the ClusterRole above.
apiVersion: rbac.authorization.k8s.io/v1
kind: ClusterRoleBinding
metadata:
  name: demo-kubectl-sidecar
roleRef:
  apiGroup: rbac.authorization.k8s.io
  kind: ClusterRole
  name: demo-kubectl-sidecar
subjects:
- kind: ServiceAccount
  name: demo-kubectl-sidecar
  namespace: default
---
# This is the actual workload.
apiVersion: apps/v1
kind: Deployment
metadata:
  name: demo-kubectl-sidecar
  namespace: default
spec:
  replicas: 1
  selector:
    matchLabels:
      app: demo-kubectl-sidecar
  template:
    metadata:
      labels:
        app: demo-kubectl-sidecar
    spec:
      serviceAccountName: demo-kubectl-sidecar
      securityContext:
        # Set this to any valid GID, and two things happen:
        #   1) The volume "content" is group-owned by this GID.
        #   2) This GID is added to each container.
        fsGroup: 9376
      containers:
      - name: server
        image: nginx
        volumeMounts:
        - mountPath: /usr/share/nginx/html
          name: content
          readOnly: true
      initContainers:
      - name: sidecar
        image: thockin/kubectl-sidecar:v1.30.0-1
        restartPolicy: Always
        env:
          - name: MYPOD
            valueFrom:
              fieldRef:
                fieldPath: metadata.name
          - name: MYNS
            valueFrom:
              fieldRef:
                fieldPath: metadata.namespace
          - name: MYNODE
            valueFrom:
              fieldRef:
                fieldPath: spec.nodeName
        args:
          - bash
          - -c
          - |
            while true; do
              kubectl -n $MYNS get pod $MYPOD -o json | jq '.status' > /data/this-pod-status.json
              kubectl get node $MYNODE -o json | jq '.status' > /data/this-node-status.json
              sleep 30
            done
        volumeMounts:
        - name: content
          mountPath: /data
        securityContext:
          # This doesn't need to run as root.
          runAsUser: 9376
          runAsGroup: 9376
      volumes:
      - name: content
        emptyDir: {}
      terminationGracePeriodSeconds: 5
kubectl apply -f <yaml-file-name>
kubectl port-forward deployment/demo-kubectl-sidecar 8080:80
curl http://localhost:8080/this-pod-status.json
curl http://localhost:8080/this-node-status.json
Understanding the Role of the Pause Container in Kubernetes
When we try to restart a container then its IP changes. But if a container inside a pod restart then the IP of the pod remains same, this is due to pause container present in kubernetes.
It holds the network namespace and IP address for the Pod, allowing the other containers within the Pod to communicate and share networking resources.
The pause container is automatically created by containerd when you start a Pod. It is not visible to kubectl, but you can see it using the ctr command.
How to View Pause Containers and Pod IPs
-
To see all
pause containerson the node
ctr --namespace k8s.io containers list | grep pause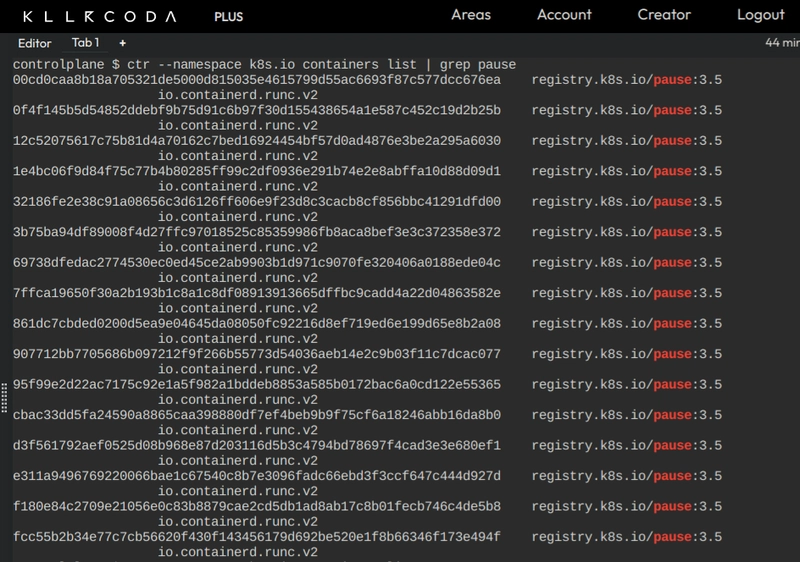
-
To check the
IPof the specific pod
kubectl get pod <pod-name> -owide
Kubernetes User Namespaces
User namespaces enhance security by isolating user IDs (UIDs) and group IDs (GIDs) inside containers from the host system. This means that a root user inside a container doesn't have root privileges on the host, reducing the risk if a container is compromised.
This feature helps limit the damage from attacks by keeping container permissions separate from host permissions. User namespaces are now more stable and widely available, supporting both stateless and stateful pods.
Pod Disruptions
Pods do not disappear until someone (a person or a controller) destroys them, or there is an unavoidable hardware or system software error.
Types: *Voluntary and involuntary disruptions*
- Voluntary disruption
* Deleting the deployment

* Updating a deployment's pod template

* Directly deleting a pod

* Draining a node

* Removing a pod from a node to allow something else to fit on that node
- Non-voluntary disruption
* Hardware failure

* Cluster administrator deletes a VM (instance) by mistake

* Cloud provider or hypervisor failure makes a VM disappear

* Kernel panic

* Node disappears from the cluster due to network partition

* Eviction of a pod due to the node running out of resources
Here are some ways to reduce involuntary disruptions:
Ensure your pod requests the resources it needs.
Replicate your application if you need higher availability.
For even higher availability with replicated applications, spread them across racks (using anti-affinity) or across zones (if using a multi-zone cluster).
Pod disruption budgets (PDB)
It helps to keep your application running smoothly by limiting how many pods can be disrupted at once. They ensure that a minimum number of pods remain available during maintenance or updates. You set up a PDB to specify how many pods need to stay up and running, and Kubernetes follows these rules during planned disruptions but not during unexpected ones like crashes.
We use PDB only for high availability
Here is an example of a PDB configuration:
-
Create a deployment
apiVersion: apps/v1
kind: Deployment
metadata:
  name: nginx-deployment
  labels:
    app: nginx
spec:
  replicas: 3
  selector:
    matchLabels:
      app: nginx
  template:
    metadata:
      labels:
        app: nginx
    spec:
      containers:
      - name: nginx
        image: nginx:1.14.2
        ports:
        - containerPort: 80
-
Create PDB
apiVersion: policy/v1
kind: PodDisruptionBudget
metadata:
  name: nginx-pdb
spec:
  minAvailable: 2
  selector:
    matchLabels:
      app: nginx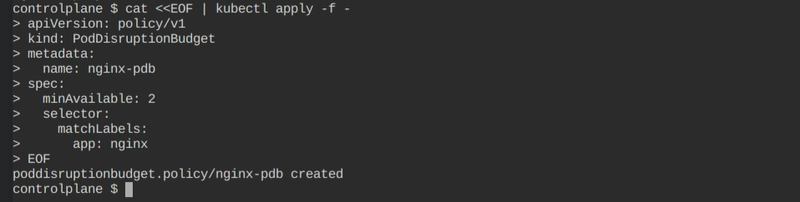
-
Check available PDB
kubectl get pdb
-
Do rolling updates (update nginx image)
kubectl set image deployment/nginx-deployment nginx=nginx:1.16.1 -
Watch the pods now
kubectl get pods -w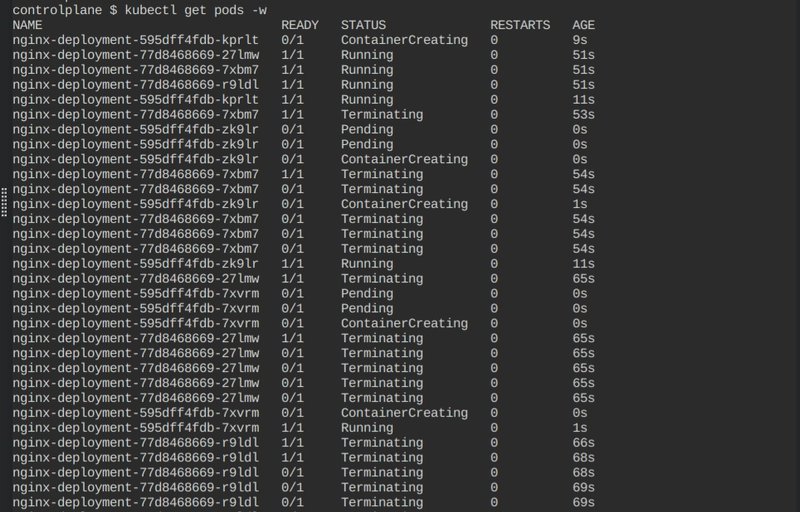
Setting Resource Requests and Limits for Efficient Resource Management
In Kubernetes, applications run as pods inside nodes. A node is a physical or virtual machine with specific configurations like CPU and memory. Each application consumes a certain amount of these resources.
Kubernetes uses the concepts of resource requests and limits to manage CPU and memory usage:
Resource Requests: The minimum amount of CPU and memory that a pod needs to run.
Resource Limits: The maximum amount of CPU and memory a pod is allowed to use.
These settings are crucial for scheduling because they help the scheduler find the best node to deploy a pod. For example, if a pod requires at least 2 CPUs and 1 GB of RAM, you set these values in the resource requests and limits. The scheduler then finds a suitable node that can accommodate these requirements.
When creating a highly available Kubernetes cluster, it's important to properly configure resource requests and limits to ensure efficient resource utilization and stability.
Understanding CPU Throttling in Kubernetes
CPU throttling means limiting a pod's CPU usage when it tries to use more than its allowed amount. This prevents one pod from using too much CPU and affecting other pods on the same node. If a pod reaches its CPU limit, Kubernetes slows it down to stay within the limit, which can make the pod run slower. This helps ensure that resources are shared fairly and the cluster stays stable.
Overutilization and Underutilization of Resources
Overutilization happens when a resource is used too much, exceeding its capacity. For example, if a CPU is consistently running at 100%, it can cause performance issues, slow down processes, or even crash the system because there's not enough capacity left for other tasks.
Underutilization occurs when a resource is used too little, meaning it's not being fully used even though it's available. For instance, if a server has a lot of memory but is only using a small portion of it, the rest of the memory is underutilized, leading to inefficient use of resources and potentially higher costs without any benefit.
we can specify the LimitRange of a namespace
apiVersion: v1
kind: LimitRange
metadata:
  name: example-limitrange
  namespace: default
spec:
  limits:
  - type: Pod
    max:
      cpu: "2"
      memory: "1Gi"
    min:
      cpu: "200m"
      memory: "100Mi"
  - type: Container
    max:
      cpu: "1"
      memory: "500Mi"
    min:
      cpu: "100m"
      memory: "50Mi"
    default:
      cpu: "300m"
      memory: "200Mi"
    defaultRequest:
      cpu: "200m"
      memory: "100Mi"
Now you can directly create pods without specifying limit and ranges it will automatically assigned to the pod
Quality of Service (QoS)
Quality of Service (QoS) in Kubernetes is a way to prioritize and manage resources for Pods to ensure they get the resources they need based on their importance and requirements. Kubernetes classifies Pods into different QoS tiers based on their resource requests and limits.
-
Pods that have both CPU and memory requests and limits set, and the requests are equal to the limits. These Pods get the highest priority for resources and known as
guaranteedQOS.Guaranteed QoS Example:
apiVersion: v1
kind: Pod
metadata:
  name: nginx-guaranteed
spec:
  containers:
  - name: nginx
    image: nginx
    resources:
      requests:
        memory: "256Mi"
        cpu: "500m"
      limits:
        memory: "256Mi"
        cpu: "500m"
-
Pods that have CPU and memory requests and limits set, but the requests and limits are not equal. These Pods get some level of resource assurance but can use more resources if available and known as
burstableQOS.Burstable QoS Example:
apiVersion: v1
kind: Pod
metadata:
  name: nginx-burstable
spec:
  containers:
  - name: nginx
    image: nginx
    resources:
      requests:
        memory: "256Mi"
      limits:
        memory: "512Mi"
-
Pods that do not specify any CPU or memory requests or limits. These Pods get the lowest priority for resources and can be easily evicted if the node is under resource pressure and known as
besteffortQOS.BestEffort QoS Example:
apiVersion: v1
kind: Pod
metadata:
  name: nginx-besteffort
spec:
  containers:
  - name: nginx
    image: nginx
When k8s runs out of resource then on the basis of QOS class, first evict the
BestEffortthenBurstableand at lastGuaranteedevicted
Understanding Kubernetes Downward API
Downward API is a useful feature that allows Pods to access information about themselves and the cluster environment. It helps applications running inside Pods to get metadata and resource details, which they might need to operate correctly or adjust their behavior.
The Downward API provides a way for Pods to obtain information about themselves, such as:
Pod Name: The name assigned to the Pod.
Namespace: The namespace in which the Pod is running.
Pod Labels and Annotations: Metadata attached to the Pod.
Resource Limits and Requests: Information about how much CPU and memory the Pod has been allocated.
How to Use the Downward API
The Downward API provides this information through environment variables or files within the Pod. Here’s a simple example of how to use it:
-
Using Environment Variables:
You can define environment variables in your Pod spec to expose metadata from the Downward API:
apiVersion: v1
kind: Pod
metadata:
  name: my-pod
spec:
  containers:
  - name: my-container
    image: my-image
    env:
    - name: POD_NAME
      valueFrom:
        fieldRef:
          fieldPath: metadata.name
    - name: POD_NAMESPACE
      valueFrom:
        fieldRef:
          fieldPath: metadata.namespace
In this example:
* The `POD_NAME` environment variable will be set to the Pod's name.

* The `POD_NAMESPACE` environment variable will be set to the Pod's namespace.
-
Using Volumes:
You can also expose metadata through files in a volume:
apiVersion: v1
kind: Pod
metadata:
  name: my-pod
spec:
  containers:
  - name: my-container
    image: my-image
    volumeMounts:
    - name: pod-info
      mountPath: /etc/podinfo
  volumes:
  - name: pod-info
    downwardAPI:
      items:
      - path: "name"
        fieldRef:
          fieldPath: metadata.name
      - path: "namespace"
        fieldRef:
          fieldPath: metadata.namespace
In this example:
* The Pod’s name and namespace will be available as files in /etc/podinfo within the container.
Conclusion
In conclusion, this article delves into essential Kubernetes concepts, including the transformation of init containers to sidecar containers, the critical role of the pause container in maintaining network namespaces, and the security benefits of user namespaces. It also covers the different types of pod disruptions and how to manage them using Pod Disruption Budgets (PDB). Additionally, the article explains the importance of setting resource requests and limits for efficient resource utilization and stability, and it categorizes the different Quality of Service (QoS) classes in Kubernetes. Practical examples and YAML configurations are provided to help illustrate these concepts, making it a comprehensive guide for managing Kubernetes environments effectively.

Top comments (0)