
Gm folks ✨
The Graph is certainly one of the coolest innovations in Web3 space. With its unique infrastructure, Graph Protocol adds Indexing functionality to the Blockchain ecosystem. It has ridiculously simplified the process of querying data from blockchain networks like Ethereum.
A Subgraph defines which data The Graph will index from a blockchain, and how it will store it. Once deployed, it becomes part of a global graph of blockchain data which you can retrieve using GraphQL.
In this tutorial, I will show you how to use the EPNS Helper Function to integrate your channel with a Subgraph.
EPNS only supports subgraphs deployed on The Graph Protocol's Hosted Service. The next update would include support for Subgraph Studio.
Subgraph support is currently available at Staging and will be available on Prod following the Protocol v2 audit.
Why use Subgraphs?
Subgraphs are used to retrieve and store data from the blockchain for a specific smart contract. This data can be used to investigate a range of smart contract-related events.
The Uniswap Subgraph, for example, keeps data on total volume across all trading pairs, volume data per trading pair, and even data for a specific token.
How about intelligently retrieving data from a Subgraph and generating helpful alerts?
This can be incredibly beneficial to your dApp's end-users and entities connected to your smart contract, improving the overall user experience.
Sending Notifications using EPNS
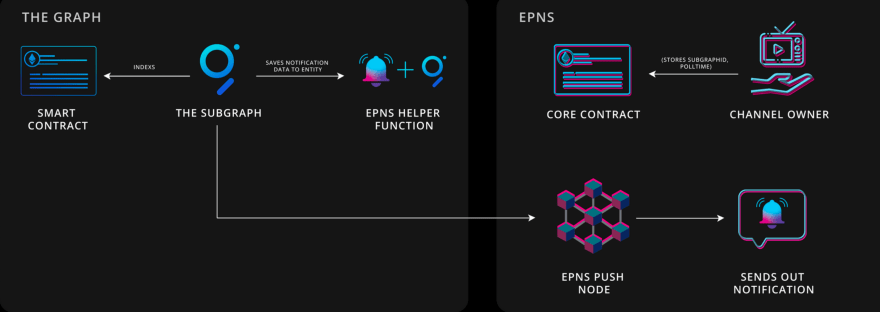
EPNS has developed an in-house Helper Function specifically for The Graph Protocol that allows you to read events from the Subgraph and define notifications accordingly. Once defined, they are stored on the Subgraph in a Long String format.
Later on, EPNS Push Nodes fetch the notifications defined on the Subgraph and push them accordingly to subscribers of the channel.
In order to integrate EPNS with your Subgraph, you will need:
- Your Subgraph ID
- A channel deployed on EPNS
In case you don’t have the Subgraph ID, feel free to create your own Subgraph by following the step-by-step guide available here at Create a Subgraph.
Once you have published your Subgraph, you can start sending notifications based on events generated from the Smart Contract to the users.
Enough talking, let’s get into Building stuff right away!!
Setup EPNS with Subgraph
In order to integrate EPNS with your Subgraph, follow the below steps carefully;
1. Initialize Subgraph with EPNS
- Navigate to the Subgraph directory and you’ll find
schema.graphqlfile. Open in an editor of your choice and include the following EPNS Schema;
type EpnsNotificationCounter @entity {
  id: ID!
  totalCount: BigInt!
}

type EpnsPushNotification @entity {
  id: ID!
  notificationNumber: BigInt!
  recipient: String!
  notification: String!
}
- In
mapping.tsfile undersrc/directory, export the Subgraph ID;
//Note: EPNS only supports The Graph Hosted Service at present
export const subgraphID = "GithubID/subgraph-slug"
Note: Make sure the above step is complete, as Subgraph ID will be imported in the next step!
- Create a file named
EPNSNotification.tsin thesrc/folder. I’ll call it our Helper File. Now, copy the below-provided TypeScript code and paste it into the newly created Helper file;
import { BigInt, log } from "@graphprotocol/graph-ts"
import { EpnsNotificationCounter, EpnsPushNotification } from '../generated/schema'
import { subgraphID } from "./mapping"

export function sendEPNSNotification(recipient: string, notification: string): void
{
  let id1 = **subgraphID**
  log.info('New id of EpnsNotificationCounter is: {}', [id1])

  let epnsNotificationCounter = EpnsNotificationCounter.load(id1)
  if (epnsNotificationCounter == null) {
    epnsNotificationCounter = new EpnsNotificationCounter(id1)
    epnsNotificationCounter.totalCount = BigInt.fromI32(0)
  }
  epnsNotificationCounter.totalCount = (epnsNotificationCounter.totalCount).plus(BigInt.fromI32(1))

  let count = epnsNotificationCounter.totalCount.toHexString()
  let id2 = `${subgraphID}+${count}`
  log.info('New id of EpnsPushNotification is: {}', [id2])

  let epnsPushNotification = EpnsPushNotification.load(id2)
  if (epnsPushNotification == null) {
    epnsPushNotification = new EpnsPushNotification(id2)
  }

  epnsPushNotification.recipient = recipient
  epnsPushNotification.notification = notification
  epnsPushNotification.notificationNumber = epnsNotificationCounter.totalCount

  epnsPushNotification.save()
  epnsNotificationCounter.save()
}
- In
mapping.tspresent insrc/, import the Helper File;
import { sendEPNSNotification } from "./EPNSNotification"
The example mapping.ts file is written in TypeScript. It’s the main script that defines your notification payload and its recipients.
2. Define Payload Items
In the event handler method of mapping.ts file, define your notification payload items such as the recipient of the notification, type, title, message, etc. These variables will be used to define our notification variable.
mapping.ts is present in the epns-graph-integration/src folder.
let recipient = "0xD8634C39BBFd4033c0d3289C4515275102423681",
      type = "3",
      title = "Number changed",
      body = `Number changed from ${event.params.from} to ${event.params.to}`,
      subject = "Number changed",
      message = `Number changed from ${event.params.from} to ${event.params.to}`,
      image = "null",
      secret = "null",
      cta = "https://epns.io/"
It’s highly recommended to take a look at this documentation to understand more about payload items and their definitions.
3. Define Notification
The notification variable is defined in the below format 👇🏼
Format : {"field" : "value"}
notification = `{\"type\": \"${type}\", \"title\": \"${title}\", \"body\": \"${body}\", \"subject\": \"${subject}\", \"message\": \"${message}\", \"image\": \"${image}\", \"secret\": \"${secret}\", \"cta\": \"${cta}\"}`
4. Call the EPNS Helper Function
Once the above steps are complete, you need to invoke the EPNS helper function and send the response. To call the EPNS Notification helper function, use the below script;
sendEPNSNotification (recipient, notification)
Connect Subgraph With EPNS Channel
Once you have set up EPNS integration into your subgraph, you must add the subgraph to its channel in order to deliver notifications. You will require a Subgraph ID, which is usually present at the end of the subgraph URL.
I hope you already created a channel. If you haven’t created one yet, check out this guide to create a channel on EPNS.
- Go to EPNS dApp → Channel Dashboard → Settings Button → Add Subgraph Details
- Enter your
Subgraph IDandPoll Interval
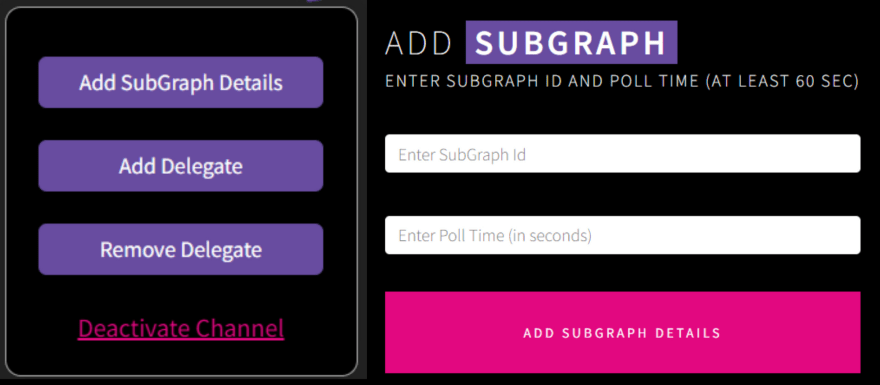
One important thing to note is the Poll Interval. It’s the time (in seconds), which defines the time interval at which Push Nodes shall ping the subgraph for fetching the latest notifications.
Note: This is an on-chain transaction that stores the above data to EPNS Core Contract. So it requires $ETH for gas fees
Once you complete the transaction, you have successfully integrated EPNS into your Subgraph. Push Nodes will start polling the respective subgraph for notifications at regular Poll Intervals.
Please share this tutorial with your developer community if you found it useful. Also, if you are someone who is building using The Graph Protocol, this could be a great addition to track subgraph events.
I’ll be back with another awesome blog very soon. Till then, keep building and keep growing 🚀
Sayonara!!

Top comments (0)