In the past two posts, we built a Rails app in Docker and deployed it in Amazon ECS. In this post, we use AWS CodePipeline to automate building Docker images and deploy our application to our ECS service.
- Build Rails + Sidekiq web apps in Docker
- Deploy Rails in Amazon ECS
- Automate Deploys with AWS CodePipeline - we are here
- Advanced ECS Concepts:
- Service Discovery and Auto Scaling - coming soon
- Fargate - coming soon
If you want to follow along without having to create the Rails application from the first post, you can clone the latest version of the repository in my GitHub page.
1 | Concepts
Why even bother with CI/CD Pipelines? 🤷🏻
As a project gets bigger, more and more time is eaten away by a manual deployment process. Imagine having your developers having to SSH to 5-10 EC2 instances running your app to run git pull origin develop and restart the application. This process can take 5-20 minutes of your developer per deploy. If he/she makes mistakes, the developer would have to repeat the process all over again.
Having a CI/CD pipeline allows you to have a reliable and consistent deployment process. Your developers no longer have to worry about making mistakes in deployment because they no longer have to do it manually. They just push to master and go. 🟢
CI is Continuous Integration
CI is a coding philosophy that encourages teams to merge small changes frequently. Every time these changes are merged, an automated build and a suite of tests run to prove this change is compatible with the existing code.
CD is Continuous Delivery
CD is an extension to CI that allows new changes to be deployed rapidly. Every time you merge to master, the CI runs. The app is then deployed to a staging environment for testing. A manual approval process stands in the way of this change being deployed straight to production.
CD is also Continuous Deployment 🚚
Once your team reaches a level of confidence in your test suite, you can have changes deployed straight to production.
What we will do in this post
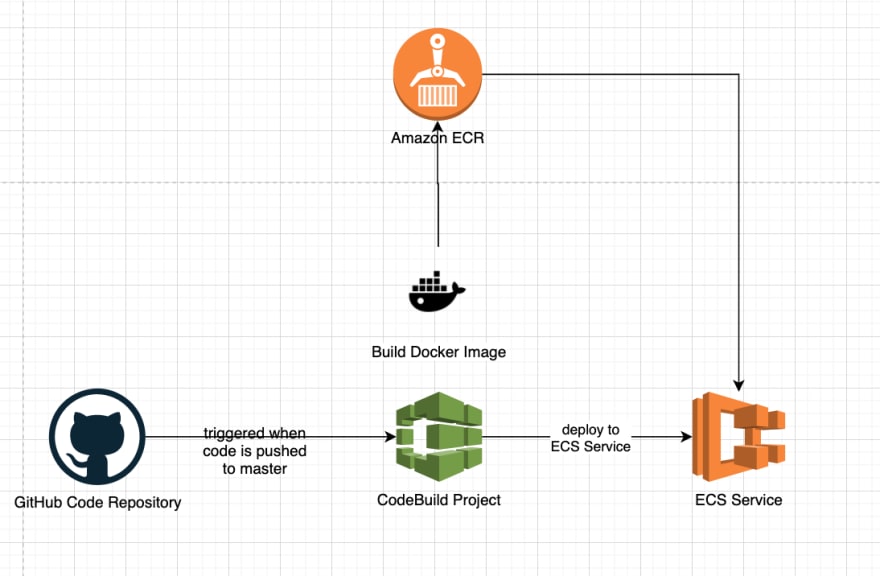
For this post, we will create a 3-stage pipeline:
- Source: Our code will be stored in GitHub. When developers push to master, the rest of the CI/CD pipeline is triggered.
- Build: In this stage, we simply build our Docker image and push that image to ECR.
- Deploy: We will deploy to the "web" ECS service. To keep things simple, we won't try to deploy to the "sidekiq" ECS service that we made in the previous post.
2 | buildspec.yml changes
To create a CI/CD pipeline, we have to create a buildspec.yml file in the root directory of our project. This file serves as a set of instructions for CodeBuild on which commands to use for the build process. We can summarize what our buildspec.yml does in the simple steps below:
- Authenticate with AWS ECR
- Create shared folders
- Build and tag the Docker image
- Push the Docker image to ECR
- Create an artifact named "imagedefinitions.json" that specifies the name of the container to update inside the ECS Service. If you've been following this blog series, it should be named "web" . If you want to look for the name of the container in your own ECS service, the image below should look familiar:
If you want to learn more about CodeBuild, you may visit my earlier post on how CodeBuild works.
version: 0.2

phases:
  install:
    runtime-versions:
        docker: 18
    commands:
      - nohup /usr/local/bin/dockerd --host=unix:///var/run/docker.sock --host=tcp://127.0.0.1:2375 --storage-driver=overlay2&
      - timeout 15 sh -c "until docker info; do echo .; sleep 1; done"
  pre_build:
    commands:
      - echo Logging in to Amazon ECR....
      - aws --version
      - $(aws ecr get-login --no-include-email --region $CI_REGION)

      - COMMIT_HASH=$(echo $CODEBUILD_RESOLVED_SOURCE_VERSION | cut -c 1-7)
      - echo "The commit hash is $COMMIT_HASH"
      - IMAGE_TAG=${COMMIT_HASH:=latest}

      - echo "Creating folders for pid files"
      - mkdir shared
      - mkdir shared/pids
      - mkdir shared/sockets

  build:
    commands:
      - echo Build started on `date`
      - echo Building the Docker image...
      - docker build -t $REPO_URL:latest .
      - docker tag $REPO_URL:latest $REPO_URL:$IMAGE_TAG
  post_build:
    commands:
      - echo Build completed on `date`
      - echo Pushing the Docker images...
      - docker push $REPO_URL:latest
      - docker push $REPO_URL:$IMAGE_TAG
      - echo Writing image definitions file...
      - printf '[{"name":"web","imageUri":"%s"}]' $REPO_URL:$IMAGE_TAG > imagedefinitions.json
artifacts:
    files: imagedefinitions.json
3 | CodePipeline Setup
In the blog post series, we created two ECS services: one for web, and another one for Sidekiq. In this post, we create a CI/CD pipeline for the web service only. In the next post, I will modify this CI/CD pipeline to also update the Sidekiq service
(3.1) In the service menu, search for CodePipeline. We must create the pipeline in the same region as the ECS cluster.
(3.2) Then, click "Create Pipeline."
(3.3) Name the pipeline "ruby-docker-app-pipeline". Here, CodePipeline defaults to creating a new service role.
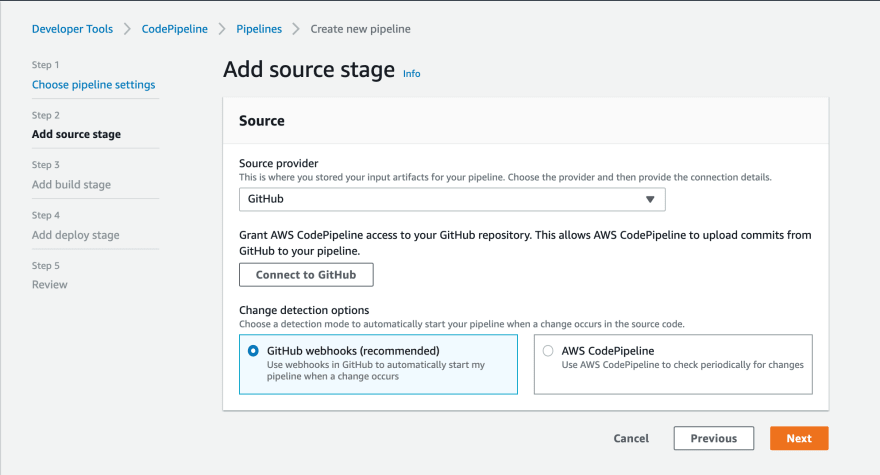
(3.4) For the source stage, choose the source provider where your code is stored. For me (and for you as well, if you've been following the series), I chose GitHub. Then, click "Connect to GitHub."
I think CodeCommit offers the best integration with CodePipeline and other AWS services. But it hasn't quite caught up with GitHub / Bitbucket in terms of ease of use.
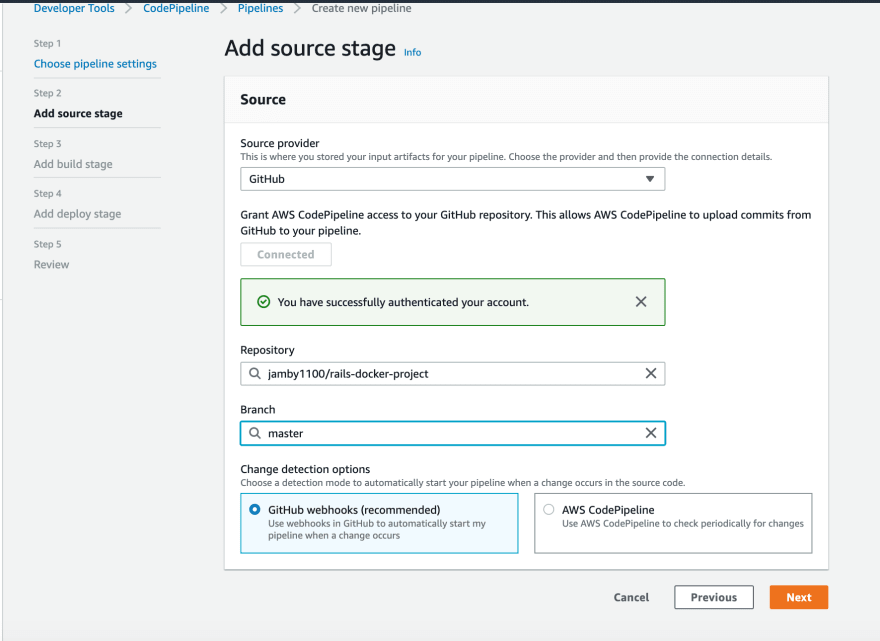
(3.5) A pop-up screen then appears, asking you to authorize access to your GitHub account.
(3.6) Then, specify a branch. A push to this branch triggers CodePipeline (via GitHub webhooks) to start the CI/CD process. We usually delegate the master branch for the CI/CD process because we want to deploy the code in the master branch to our production environment. But there are also times when we create CI/CD pipelines for other branches.
Then, click Next.
(3.7) In the build stage, we use CodeBuild to build and push our Docker image. To do this, we create a new build project by clicking "Create Project."
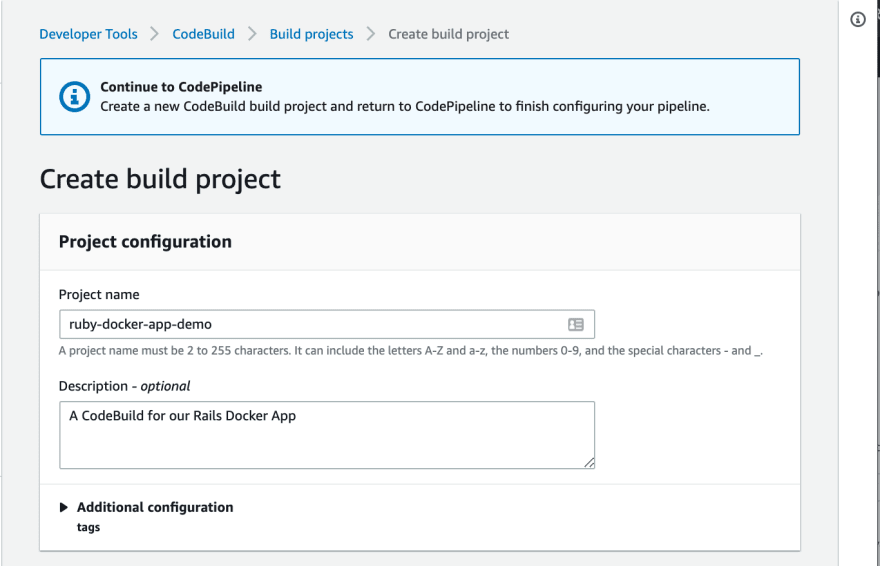
(3.8) Name the project as "ruby-docker-app-demo," and add any description you like to.
For the environment, choose Ubuntu as the OS and the latest aws/codebuild/standard:4.0 image. Make sure to enable the privileged flag so we can build Docker images.
We aren't very particular about our environment because we don't have any Ruby-based code to run. But in real-world CI/CD pipelines, they usually run unit tests in the build stage. With that, you would have to pick the environment that contains the version of the programming language you want to run the tests on. You can find it here.
We also create a new service role that CodeBuild uses when it runs our build process.
Then click, "Next."
Then, we are redirected back to the CodePipeline page. Here you see that a CodeBuild project has been added. After that, click Next.
(3.9) Now, we are on the deploy stage. We specify the cluster name and the service name of the ECS Service we want to deploy to.
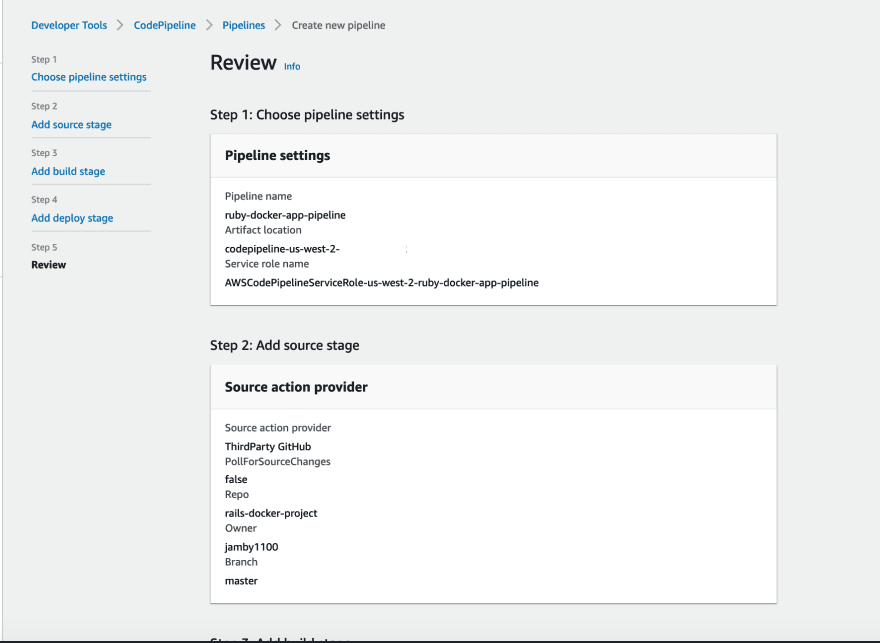
(3.10) Then, review the configurations. Once you are satisfied, hit "Create."
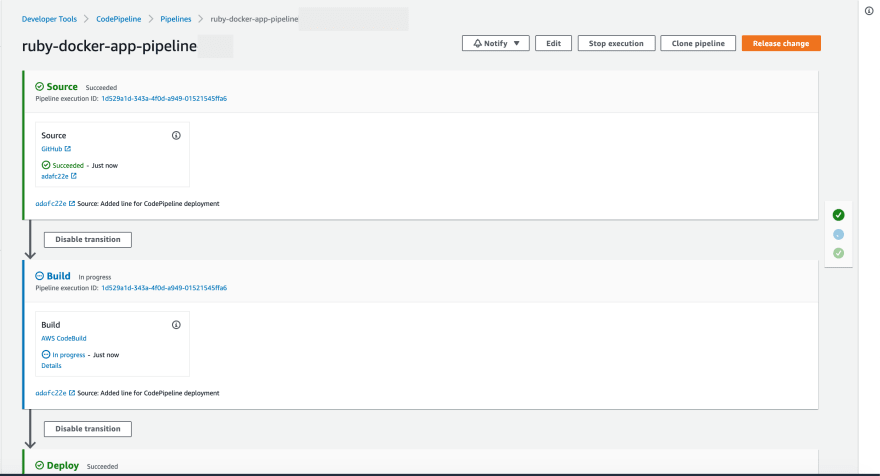
(3.10) Once a pipeline has been created, it automatically tries to run your CI/CD process. It shows you its progress in the visual representation of your pipeline.
(3.11) After a few minutes, the build stage fails because we haven't added our environment variables, and we haven't updated our CodeBuild service role.
To solve this, go to your CodeBuild project, and click on the service role under Build details.
Then, we attach the AmazonEC2ContainerRegistryFullAccess policy to this role. This policy allows CodeBuild to push images to ECR so we can use it in the deploy stage later on.
(3.12) Another thing we have to do is to add environment variables. Looking closely at our buildspec.yml in Section 2, the build process needs two variables: $REPO_URL and $CI_REGION.
To do this, go to CodeBuild and find the build project that we created in step 3.8. If you followed the naming, it should be named "ruby-docker-app-demo." Then, under the "Edit" dropdown on the upper right, click "Environment."
On the next page, expand the "Additional Configuration" dropdown. There, find the environment variables section. Add the two environment variables REPO_URL and CI_REGION.
-
CI_REGION- For this variable, just place the AWS region you are currently in -
REPO_URL- Add the simple URL of your ECR repository. The format of the URL looks like the example below. If you followed this blog series, you would have had created an ECR repository in section 3 of this post.<<ACCOUNT-NUMBER>>.dkr.ecr.us-west-2.amazonaws.com/sample-docker-rails-app
(3.13) With the environment variable and the CodeBuild role fixed, we can run the pipeline properly. Go to CodePipeline and find the pipeline we just created. In the build stage, hit "Retry."
After a few minutes, you should see the pipeline fully deployed.
4 | Testing the CI/CD Pipeline
To truly demonstrate that our CI/CD pipeline works, we create and push a change in our master branch. We should then be able to see it on our website a few minutes later.
(4.1) To demonstrate that something has changed, we show the site before adding a change. Get your ALB's URL and paste it in your browser. If you aren't sure where to find the URL, step 12.1 of this post demonstrates how to look for it.
You should be able to see this site:
(4.2) Let's go back to the application code. In the app/views/home/index.html.erb file, let's add a new line at the bottom.
Home Page:

<%= @message %>

<% @posts.each do |post| %>
  <h1> <%= post.title %> </h1>
  <h2> <%= post.author.name %> </h2>
  <p> <%= post.body %>

  <br>

  <p>
    <%= link_to "Like", increment_async_path(post_id: post.id), method: :post %>

    Likes:
    <%= post.likes_count %>
  </p>
<% end %>

<h1> Updated via CodeBuild! </h1>
<!-- THIS IS THE NEW LINE  -->
<h1> Update just now via CodePipeline!! </h1>
And then, let's commit and push this code:
git add -p
git commit -m "Added line for CodePipeline deployment."
git push origin master
(4.3) After pushing your update, you should see that our CI/CD pipeline is once again busy at work:
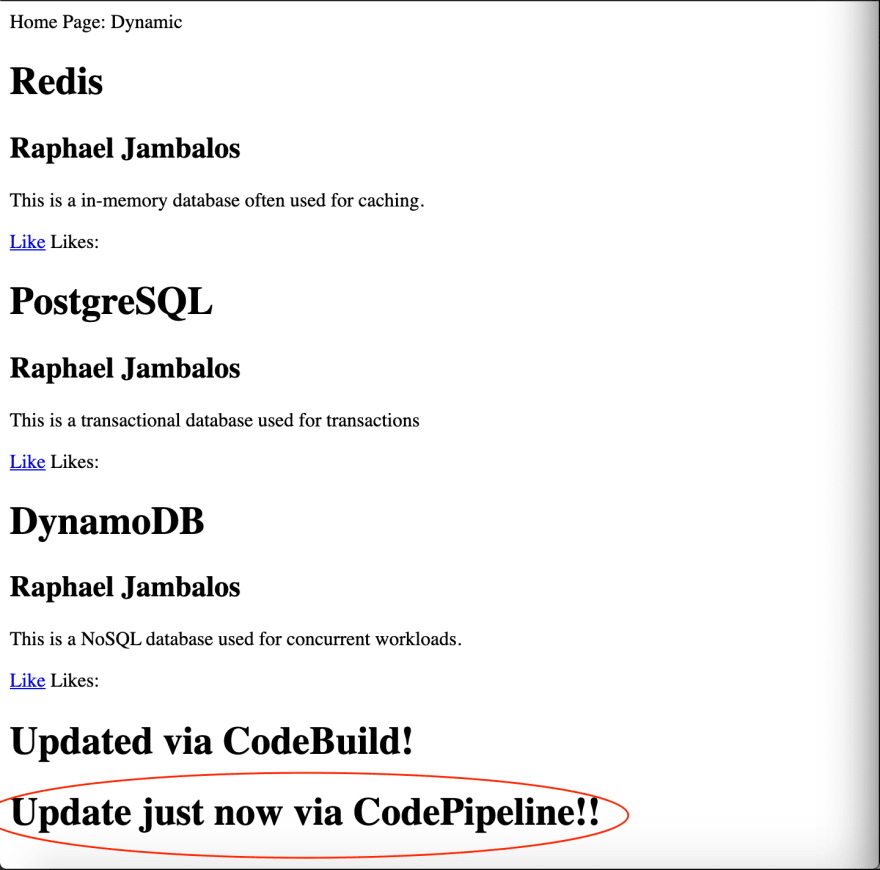
(4.4) After a few minutes, you should see our code update live on our website.
5 | Congratulations 🥇🥇🥇
You built your own Rails app in Docker and created a full CI/CD pipeline for it! You are now ready to take full advantage of CI/CD for your team.
Getting to this stage is no small feat. If you need any help implementing the walkthrough above, just let me know. Feel free to leave a comment below, or message me! I'd love to hear from you!
Special thanks to my editor, Allen, for making my posts more coherent.











Oldest comments (16)
Saving this for later 🚀
Thanks man! Let me know what you think :D
This post is worth the wait! 💯This will be very helpful to us, clicking through each of the services is a hassle. 😅
I know you didn't touch on deploying to the "sidekiq" ECS service to make things simple, but just curious, if we need to do that, will we create a separate pipeline for it?
Hi Jaye, no need to create a separate pipeline. Just add a new deploy stage in the pipeline to deploy to those ECS service. You may have to change the container name of your sidekiq container from "sidekiq" to "web".
Ahh got it, thanks!! 🙏🏻
By renaming to web, wouldnt it be pointing into other Task Definition?
Thanks for this post!
How would you suggest handling one-off tasks. For example, database migrations that would need to be run before the Deploy phase in CodePipeline? Another example would be running tasks like rails console at any point of time.
Hi Tejas, sorry late reply, been swamped with work lately.
For database migrations, you can include it in your build process but you must have a process in doing so. Like forbidding "destructive" migrations (delete table / delete column) from being run inside the CI/CD. We just implemented this but only "additive" migrations is allowed (add column / add table).
Also, best to run a point-in-time snapshot of the RDS database every time you run this.
For rails console tasks, we just enter the container via
docker exec. We have fargate containers for prod, but we left out 1 ECS container running on EC2 for this exact purpose.No worries and I appreciate you taking out time to reply. Here's what I ended up doing:
For the database migrations - I did include it in the build process but I separated the migrations into another stage in the pipeline and implemented something similar to what the aws-rails-provisioner gem does (Basically uses another buildspec for the release stage).
For one-off tasks - I ended up writing a shell script which runs a task, waits for it to be placed in a container, runs
docker exec -tito open the console and kills the task when the console is closed. The script could be run by something like:bash rails-console.sh --cluster "cluster_name" --task-definition "task_def_name" --profile "cli_profile_name"Hey Raphael, Thanks for this!
I have two questions:
1) Im not being able to find what to use instead. of "web" in. the buildspec. Where do you find your container name? Is it related to the task definitions? If that's so, how would we handle the sidekiq and web different build commands?
2) How would you configure two have a production and a staging environment?
Hi Nico, addressing your concerns below:
" Im not being able to find what to use instead. of "web" in. the buildspec."
"how would we handle the sidekiq and web different build commands?"
"How would you configure two have a production and a staging environment?"
Thank you!! I could run the deployments!!
One more thing maybe you know how to do it. Before I did it manually but its the same thing, when I update a ECS service with a new task definition, it takes forever to update the task definition of the service and now with CodePipeline its the same thing, the Deploy stage its not ending because the deployment is not being done.
In the past I solved this by stopping the task but its not good for production environment of course.
Is there some configuration that I may be missing or is just how it is?
Thanks again!
Hi Nico,
Ahh yes, it does take awhile. This is because you are using ECS deployment controller. Essentially, during deployment it creates new tasks with the new version while the old version is running. The way I understood it is traffic is only redirected when the container reaches a healthy status and it passes the load balancer target group health check. To quote AWS documentation:
"If a task has an essential container with a health check defined, the service scheduler will wait for both the task to reach a healthy status and the load balancer target group health check to return a healthy status before counting the task towards the minimum healthy percent total."
Now, the default for "load balancer target group health check to return a healthy status" is 5 consecutive periods of 30seconds. So that's at least 2.5minutes after your containers are marked as healthy that traffic starts to get to your instances.
I'd totally recommend going for AWS Code Deploy's blue/green deployment so your traffic (or at least part of it) will be shifted to the new version right away (or in parts, over a period of time). Rollbacks are also so much easier with this design.
Perfect! Yes, that's the type of deployment Im looking for. I will try to configure it.
I figured out that my problem is that the container has 1024 MB of CPU units available and with both my tasks (each with 512), it reaches this limit so when trying to do a new deployment, I guess it tries to create the new task first and then stop the old one, but there's no CPU to have the "third" task running simultaneosly. Do you know where I can configure how much CPU does the container have?
Or should I use different containers for web and sidekiq? Maybe add to the buildspec to create two artifacts and configure each deployment to look at a different json file? What do you think?
Hi Nico,
" I guess it tries to create the new task first and then stop the old one, but there's no CPU to have the "third" task running simultaneosly. "
Do you know where I can configure how much CPU does the container have?
Or should I use different containers for web and sidekiq?
Maybe add to the buildspec to create two artifacts and configure each deployment to look at a different json file? What do you think?